vsmStudio - Installation and Update
Introduction
Before installation of VSM software components please refer to the Data and IT Specifications to assure to meet the specified system requirements.
You can buy servers specified as listed in the Specification directly from Lawo, or buy them through your local Dell supplier.
After installation of Windows Server OS and applying the VSM software, the steps described as in the following, must be executed per Server of a VSM System/ Cluster.
Installation of a physical vsmStudio Server under Windows Server 2025
Following, manual settings are mandatory before running your vsmStudio system on a Windows Server 2025 OS.
BIOS Settings
- Update time and date if necessary.
- Set the power management to the highest available performance.
- Activate “Power up” after power loss.
UAC
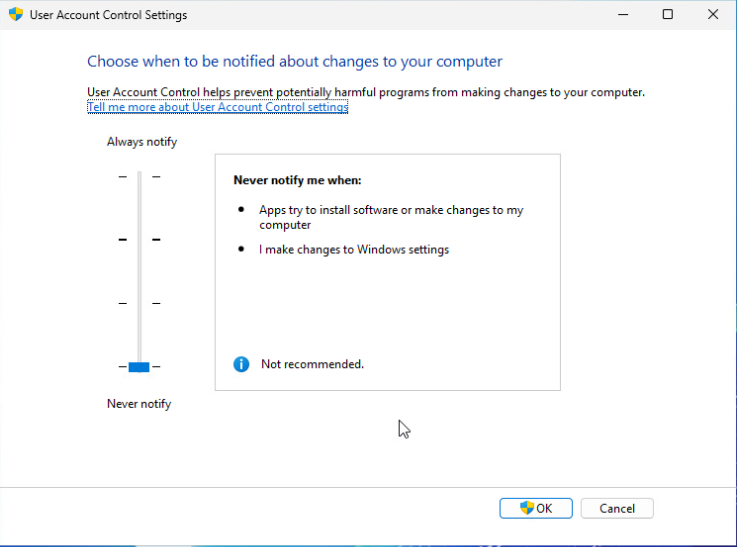
To allow vsmStudio to autostart in case of a Server failure, autologon is required and should not require a confirmation and manual intervention from the User. Therefore the UAC (User Account Control) must be set to "Never notify me when".
Group Policies
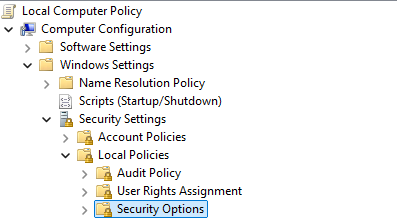
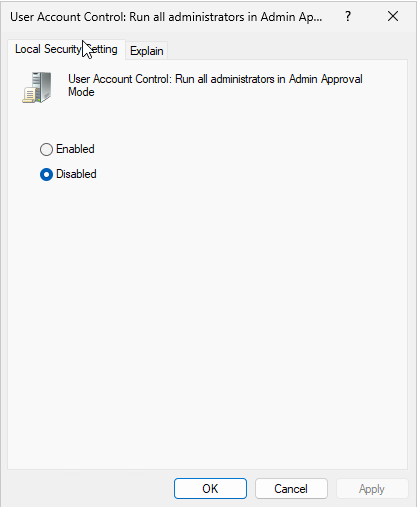
Open Group Policies via gpedit.msc and navigate to Windows Settings>Security Settings>Local Policies>Security Options, on tab Local Security Setting, set "User Account Control: Run all administrators in Admin Approval Mode" to Disabled.

If you skip the step above, vsmStudio won't start if placed in the Startup Folder
Explorer Structure
Create a VSM folder on C: or any other local drive.
- Create subfolders for each respective VSM application (vsmStudio, vsmDiscover, ...)
- In each of these subfolders, it is recommended to create a folder "Versions" to keep track of previous and current software versions
Due to a known issue, we currently do not recommend to place vsmStudio into "C:\Program Files\vsm\", since the space character in "Program Files" prevents the NATS server from starting. Therefore, for now, please put it e.g. here "C:\vsm\vsmStudio". The mentioned issue has already been addressed and will be fixed in the upcoming release.
vsmStudio Properties
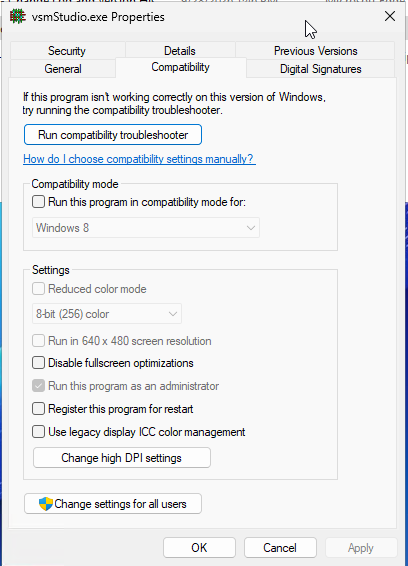
In the properties view of the vsmStudio as well as the vsmPanel application, navigate to the Compatibility tab and set the tick-mark "Run this program as an administrator".
Windows Firewall
Navigate to the "Windows Defender Firewall with Advanced Security" window. Create Firewall Inbound- and Outbound Rules for all programs placed in the VSM directory.
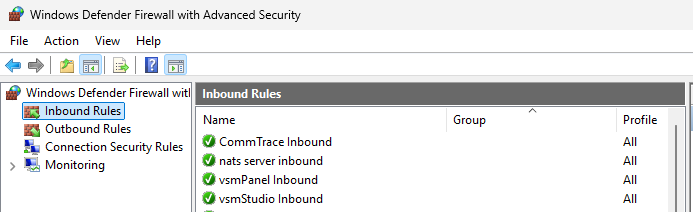
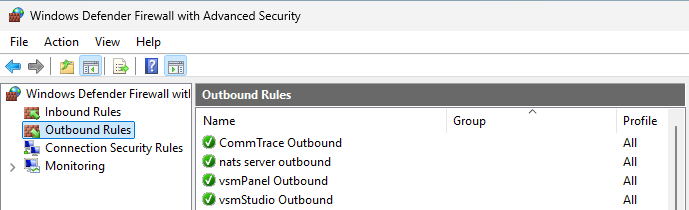
We recommend to chose "Program" as Rule Type for Inbound- and Outbound Firewall rules.
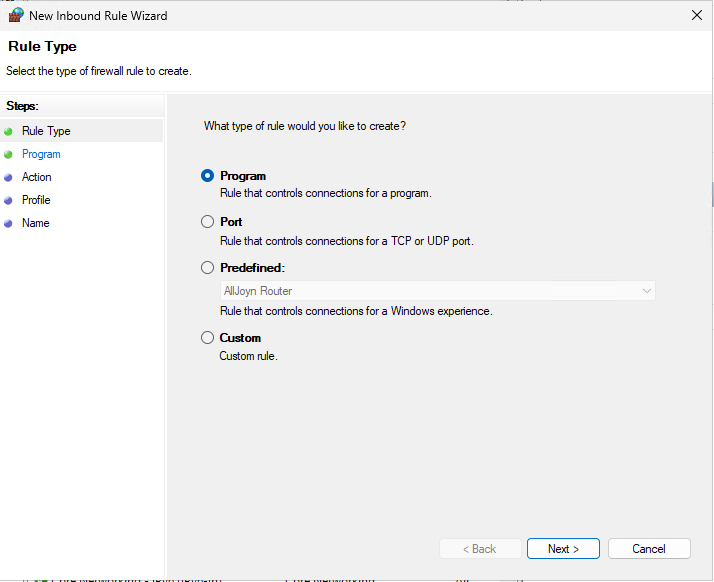
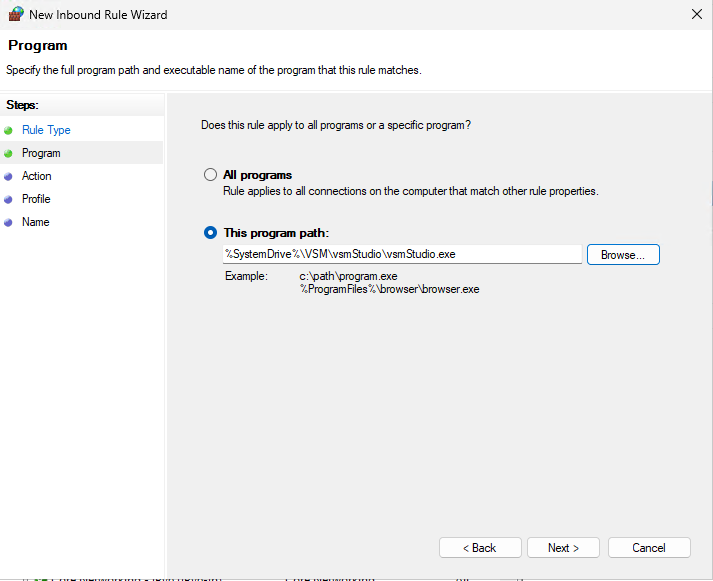
Enter the respective program path.
Allow the connection.
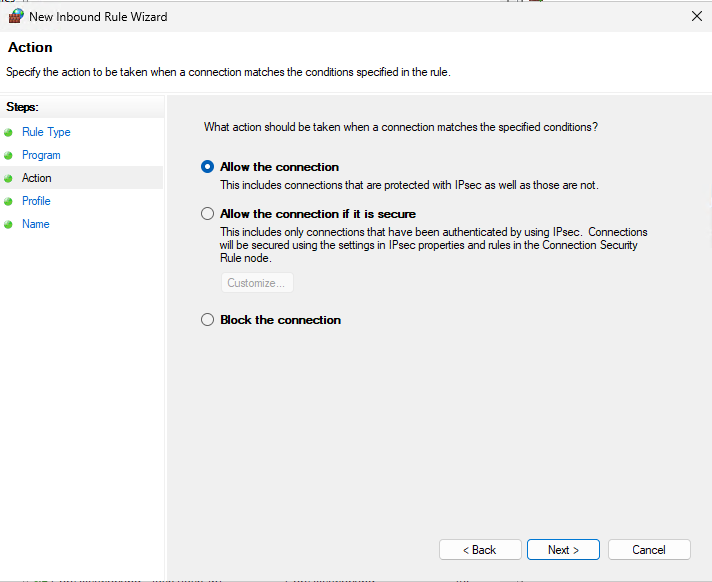
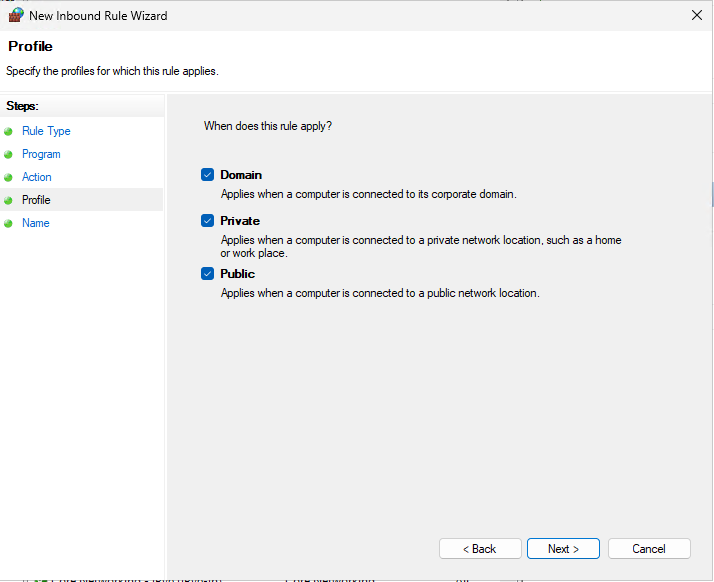
Under Profile, select all applications for the new rule.
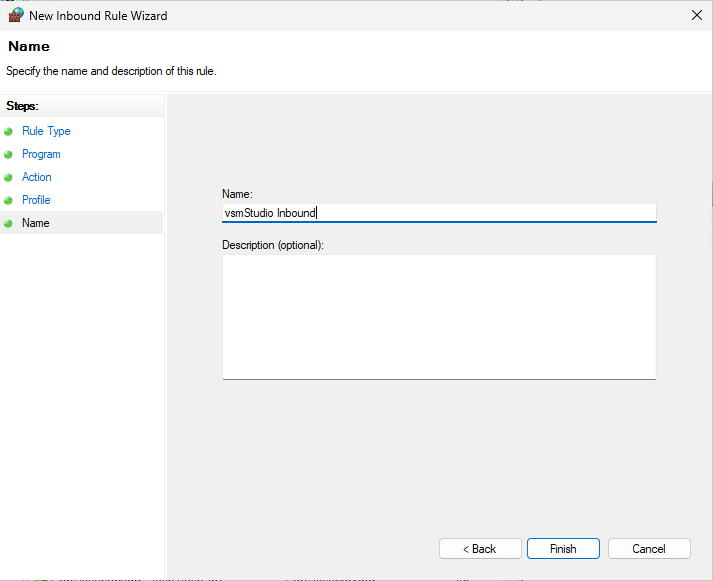
Finalise this step by setting a descriptive name.
Windows Updates
We strongly recommend to set the Windows update service to manual and stop the service, so that no mandatory update, which may restarts the machine automatically, can affect your production.
Windows Auto Logon
Allow your default user to login automatically after a server restart or power loss. There are two ways to achieve this:
A: Set Windows Auto Logon via regedit
Select Start, and select Run.
In the Open box, type Regedit.exe, and press Enter.
Locate the
HKEY_LOCAL_MACHINE\SOFTWARE\Microsoft\Windows NT\CurrentVersion\Winlogonsubkey in the registry.In the Edit menu, select New, and then point to String Value.
Type AutoAdminLogon and press Enter.
Double-click AutoAdminLogon.
In the Edit String dialog box, type in 1 and select OK.
Double-click the DefaultUserName entry, type your user name and select OK.
Double-click the DefaultPassword entry, type your password, and select OK.
If the DefaultPassword value doesn't exist, it must be added manually. To add the value, follow these steps:
On the Edit menu, select New, and point to String Value.
- Type DefaultPassword, and press Enter.
- Double-click on DefaultPassword.
- In the Edit String dialog, type your password and select OK.

If no DefaultPassword string is specified, Windows will automatically change the value of the AutoAdminLogon key from 1 (true) to 0 (false), disabling the AutoAdminLogon feature.
- If you have joined the computer to a domain, you should add the DefaultDomainName value, and the data for the value should be set as the fully qualified domain name (FQDN) of the domain.
- Exit the Registry Editor.
- Restart your computer. You can now log on automatically.
B: Set Windows Auto Logon via Autologon-Sysinternals tool
- Download the Autologon tool from https://learn.microsoft.com/en-us/sysinternals/downloads/autologon
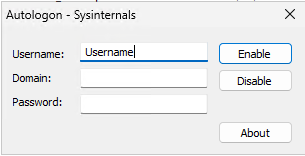
- Execute the Autologon64.exe
- In the opening window enter the respective username and password to be logged on automatically and click enable
Autostart vsmStudio
To automatically start vsmStudio after a server restart we recommend to place a Shortcut of vsmStudio.exe under the following path C:\Users\<Username>\AppData\Roaming\Microsoft\Windows\Start Menu\Programs\Startup.
Make sure to exclude vsmStudio.exe from Anti-Virus scans (Windows internal Anti-Virus or any other Anti-Virus program) to prevent potential system issues during production.
vsmStudio Monitoring instance
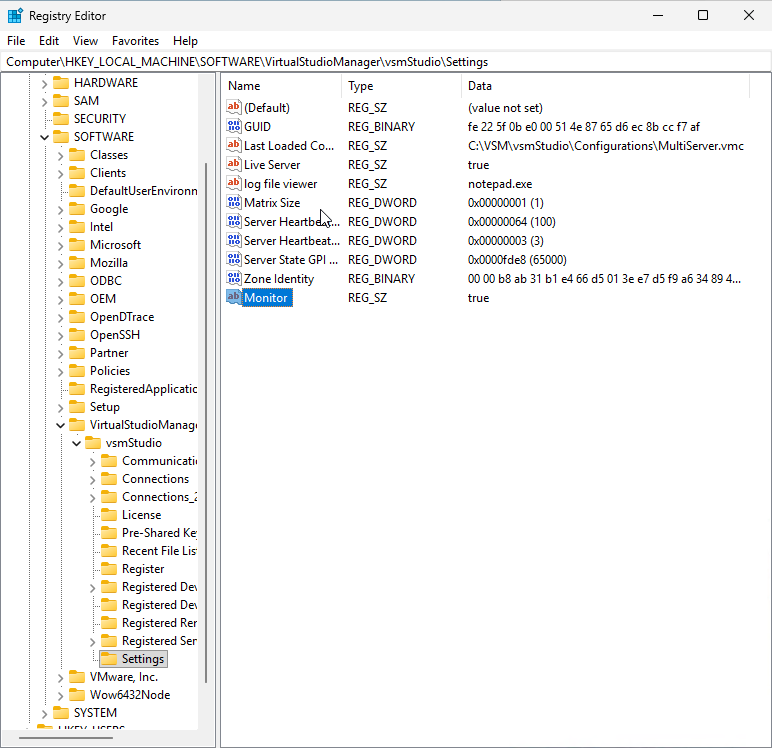
An application monitoring instance allows vsmStudio to restart automatically in case of a software crash. To enable the application monitoring, create a registry key “Monitor” and set its value to “True”. See pic below.
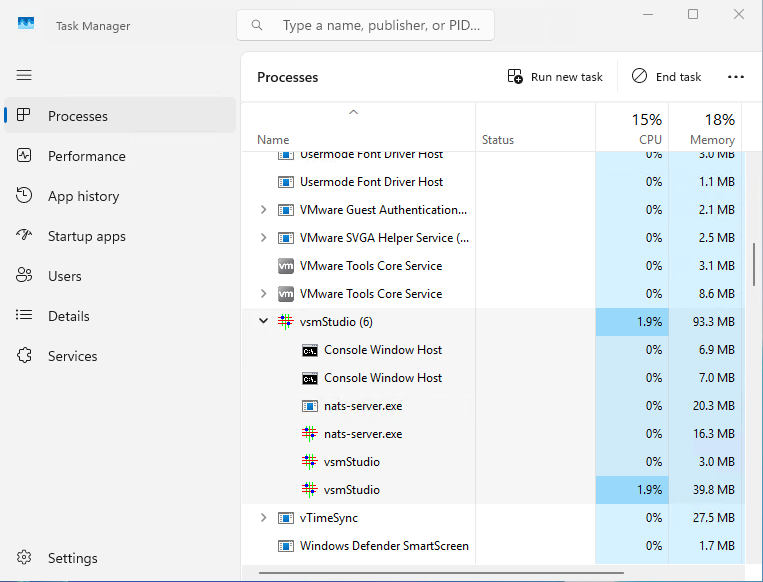
In Task Manager, while Monitoring is active, two vsmStudio instances will show running. One is the Monitoring process, which is the vsmStudio instance that uses the smaller amount of handles. Performing an “End Process Tree” on the Monitoring process will end both instances.
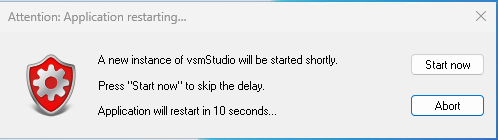
If monitoring is enabled, the vsmStudio system will detect unexpected application terminations, in which case the following dialog will pop up and be displayed:
Optional Display and Energy settings
- Disable screen saver
- Disable all power saving options and set Windows to "High performance" Power Plan
vTimeSync
To keep all servers in your vsmStudio cluster time-synced, it is necessary to install another VSM component, the vTimeSync Service. Latest released vTimeSync software is available for registered users via the LAWO Downloadcenter.
Installation
- Run the setup file under a local administrator account.
- Make sure the service "vTimeSync" is running by checking under "Computer Managemen/Services".
- Make sure you allow UDP connections to port 8031 and TCP connections to port 8033 and 8039 through the Firewall.
Configuration
- Open a webBrowser window and navigate to https://localhost:8033.
Please note that browsing to this page from another machine only allows read-only access.
- Choose a synchronization source and wether you want other computers to synchronize to this computer
- Press "Save"
- Check the messages section for errors or info
Please note that all times in the message area are UTC, not local times. All client stats (like "Mean Difference") are reset every 6 hours.
If the Firewall is turned on, make sure to configure Rules, as described above, for vTimeSync (Inbound and Outbound rules) as well.
File Backup
It is strongly recommended to complete a backup of the running version before starting a software update. This ensures the availability of the current version in case of any possible issue in or after the update process.
Before updating vsmStudio in an existing install, some critical files must be saved to a backup location to allow a safe return to the previous version of vsmStudio. These files are located in the respective vsmStudio installation folder (1).

To create a backup of a current vsmStudio version, configuration and other related files, copy all existing folders and files from the installation folder to a backup drive:

- the folder Configurations (contains vsmStudio configuration files. Existing .bak and .vmcc files do not need to be stored but should be deleted from time to time due to the fact that they are created on a regular basis)
- the folder Firmware (contains panel and vsmGear firmware)
- the folder Mapping (contains protocol and configuration specific mapping tables)
- the folder nats (since Release 26.1.1, contains NATS Leafnode Server specific files)
- the folder Resources (contains configuration related images)
- the folder Storage (contains system data)
- the file vsmStudio.exe (optional Change Log for reference) or
- the Release package/.zip
- A Backup of LogFiles is optional
In addition, the backup of some local registry entries is required. For full backup, export and copy the respective vsmStudio registry folder including all subfolders from the Registry Editor. It is recommended to copy all folders and files to a dedicated folder on the backup partition and name it with the date of the day.
In a 64-bit OS environment, running vsmStudio 64-bit (available since release 2022-1) the path to the files is: "Computer\HKEY_LOCAL_MACHINE\SOFTWARE\VirtualStudioManager\vsmStudio" (1). On older Systems with 64-bit OS environment but running vsmStudio 32-bit (prior to release 2022-1) the path to the files was: "Computer\HKEY_LOCAL_MACHINE\WOW6432Node\VirtualStudioManager\vsmStudio" (2).

Installation and Update
Before running an update, close the vsmStudio application.
Latest released vsmStudio software is available for registered users via the LAWO Downloadcenter.
Copy the downloaded .zip (1) to the desired vsmv\vsmStudio folder on the respective Server drive. Default path is D:\vsm\vsmStudio (2).

The vsmStudio software package/ .zip (1) contains the vsmStudio.exe (2) with respective Change Log document (3). With Release 26.1.1 we introduced a new way to interface with a Lawo HOME system, via a local NATS Leafnode Server. Required files are part of the "nats" folder (4). Please also refer to the respective documentation here.

Extract the files from .zip (1) into the same folder. If previous versions of the same files already exist in the folder (2,3,4), the system will prompt to verify whether these files should be replaced. Confirm to replace the respective files. All other folders, shown below, are created automatically by the system, once the application is started the first time.


vsmStudio releases prior to version B2351-release contained a separate .pdb file, which is no longer required with latest releases. Therefore "old" .pdb files in the respecting installation folder can and should be deleted when updating.
vsmStudio does not require an installation but is delivered as executable. To start the application, just execute the vsmStudio.exe (1) by double click.

Since release 2022-1, vsmStudio comes as 64-bit application.
When updating from an older 32-bit to a 64-bit vsmStudio version, vsmStudio will detect that the 64-bit Registry node is not existing and a once-only pop-up window will appear after executing the vsmStudio.exe. Please read the text within this window carefully and confirm. Existing 32-bit Registry settings are automatically migrated to the new 64-bit node, if the pop-up is confirmed with OK. The original 32-Bit node in the Registry is not changed and therefore still available in case there should be any need to run a 32-bit vsmStudio version at any time again. A Backup of the Configuration and Storage data is not made automatically, which is also mentioned in the pop-up window.

After startup of vsmStudio, verify the success of the update by checking the running version within the start-up screen or via the respective icon on the toolbar.


If the system is a redundant Server Cluster, the same procedure must be repeated on each Server in the Cluster.
Software Registration
After the initial start of vsmStudio, the following prompt will provide further information to register the software license:

To register your software, select the option registration under the menu tab.

The following registration window will open, copy the System-Identification-Number (1) via the Copy button (2).
Please create a license request via our Service Portal and provide the copied System-Identification-Number. Further information on this process can be found here.
Once the registration key was provided, enter it accordingly in the blank section of the registration window (3). Confirm with OK. The software is now licensed and can be used within the limits of the enabled features and resources. Follow the same process if an extension of the license is required and a respective new key is provided.

VSM Folder Details
The folders automatically created by the vsmStudio system include:

Folder "Configurations" (1)
The folder Configurations contains the following file types for every configuration.

- .vmc Files
For every configuration, a .vmc file is created with an individual ID. It serves the synchronisation of servers in the Multi-Server Cluster and contains the protocol assignment and configuration of the virtual master matrix.
.vmcc Files
.vmcc files are generated automatically during software updates.
- .bak Files
.bak files are backup files that are created automatically if system-critical changes are made to the configuration.
Folder "Firmware" (2)
The folder Firmware initially contains no files. It is used to update vsmGear. Paste one or multiple new .pFL file into the folder to update the firmware on VSM hardware automatically. The hardware can be downgraded or flashed using a Firmware.Patch.ini file.


The process of updating VSM panels and hardware does require incremental CPU, network and memory consumption of the vsmStudio application. Depending on the number of panels, the automatic update procedure can affect the overall system performance. Before starting to use a vsmStudio Server in a live production system please make sure to delete all firmware files within the firmware folders!
Firmware updates in a running system should be planned carefully and executed during dedicated service windows only. Alternatively panels may also be updated by connecting to any offline Server running vsmStudio with the respective firmware files in its local Firmware folder.
Folder "LogFiles" (3)
The folder LogFiles initially contains no files. LogFiles are created once the vsmStudio application is started. Dump and Trace files are created depending on respective event triggers.

- .log Files
The software creates daily log files and saves them in this folder. This happens, for example, every time vsmStudio is started. If the software runs for 24 hours, a log file is created at 3:00am (local time) by default. Its size (in gigabytes) as well as length of time it will be saved can be defined at the start of every configuration. Log files are sorted by date and saved in a text format. Manual deleting of log files on a regular basis is recommended.
- Subfolder Dumps
In the event of a crash, dump files (.dmp) are saved in the folder LogFiles. These contain a snapshot of the memory with time and date of the crash. This allows the identification of the problem that led to the crash.
- Subfolder Trace
.txt files showing the CommTrace are saved in the subfolder Trace. Trace files contain information pertaining to the logging start of the computer, the version of vsmStudio used, running events, and crosspoints with pseudo devices. Go to the System Debug Flags rider under matrix settings to create a trace file.
Folder "Mapping" (4)
The folder Mapping initially contains no files. E.g., if a Lawo Nova73 router is configured to the system, the folder Mapping saves an .ini file with the corresponding interfaces.

This file should always be read-only.
Folder "nats" (5)
Since Release 26.1.1, the folder nats is provided together with the vsmStudio version. This folder contains the process nats-server.exe as well a template configuration file, which is mandatory for the system to create configuration related files later. With every running HOME connection, a new leafnode process will be started and a respective file will be listed in here temporarily.

Folder "Resources" (6)
The folder Resources contains two sub folders. Both related to graphical content used in vsmStudio configurations.

- Subfolder Pictures
The folder Pictures allows the saving of different backgrounds for different panel IDs. If it contains the file background.default.bmp, this picture is used as background for the panel editor.
- Subfolder vsmPanel
The folder vsmPanel contains pictures that are assigned to buttons or image page-items in the panel editor. These are saved into this folder automatically upon use within any configuration of the system.
Folder "Storage" (7)
The folder Storage may contain various folders with different .dat files. These .dat files contain configuration-specific information for each configuration that was loaded on the system. For instance, label changes or change of storage groups are marked by the system with time stamp and are subsequently saved. The time stamp is not applied to all labels and storage groups, but only to those that were changed. The following .dat files are saved here:

- Labels.dat
Stores transfer of labels to other servers with time stamp and changes.
- ScheduledEvents.dat
Stores events for the transfer to other servers set up in the scheduler.
- SignalLocks.dat
Stores locked signals to be transferred to other servers.
- StorageGroups.dat
Stores contents of storage groups to be transferred to other servers.
- VirtualStates.dat
Stores crosspoint information related to virtual signals.
- Tombstones.dat
An administrative file that saves changes and synchronizes the server (for a maximum of 90 days).
- DeviceState.dat
Stores crosspoint information of the VSM Dummy X-Switches.