HOME Apps - Getting Started
Before configuring a new app, it is useful to understand how HOME Apps are controlled and where their settings are stored.
Installation and Setup
It is expected that customers will have a HOME (management) system plus one or more app server(s). Or, in a HOME Apps 'converged' system, a single server that is correctly configured to run both HOME and HOME Apps.
During the installation of HOME Apps, there are a number of configuration decisions to be made. This means that, at the current time, each new HOME Apps release must be installed by the Lawo engineering team.
- To schedule a new installation or upgrade, please contact Lawo Support. You can find information about the latest release here.
- For an overview of the installation process, including guidance on server, network and licensing requirements, please see HOME Apps - Installation Overview.
Once an App Server is added to a HOME system, certain parameters must be configured (by the user) to determine how that particular server will operate. For example, whether the following options are enabled or not: automatic deployment of apps; preferred server groups; stream redundancy; single SRD mode; redundancy for app failover; etc. In addition, the PTP Configuration is where you can set and adjust mandatory Precision Time Protocol (PTP) parameters, including domain, announce and sync intervals, delay request intervals, and unicast mode. Options like TAI offset and hybrid mode can also be enabled or adjusted, ensuring precise synchronization for your system. For more information, please see HOME Apps - App Server Configuration.
Once the software installation process is complete and the App Server(s) are configured, users can create and manage their apps (using the HOME UI).
Configuration and Control
All apps are created and managed by HOME using its web-based user interface (UI).
Once an app is configured, its parameters can be accessed (over NATs) via the HOME API. This supports integration with external control systems such as Lawo's VSM.

The Device ID is displayed in the app's general settings page.
Opening a Connection to HOME
The computer must be connected to the same network and subnet as the HOME management system server(s).
The HOME UI is accessed by entering the IP address, or domain name, of the HOME server into a web browser and then signing in.
- Open your web browser application and type in either
http://HOME-IP-address:5000/or the domain name of the HOME server followed by port:5000. Press Enter. - At the "Sign in" screen, enter the following credentials: Username = lawo; Password = lawo.
- Following a successful sign in, the HOME 'Devices' page appears.
For more information and troubleshooting, please see Opening a Connection to HOME (in the HOME User Manual).
HOME UI Operation
The image below explains the basic operation of the 'Devices' page (when viewed on a reduced-width screen).
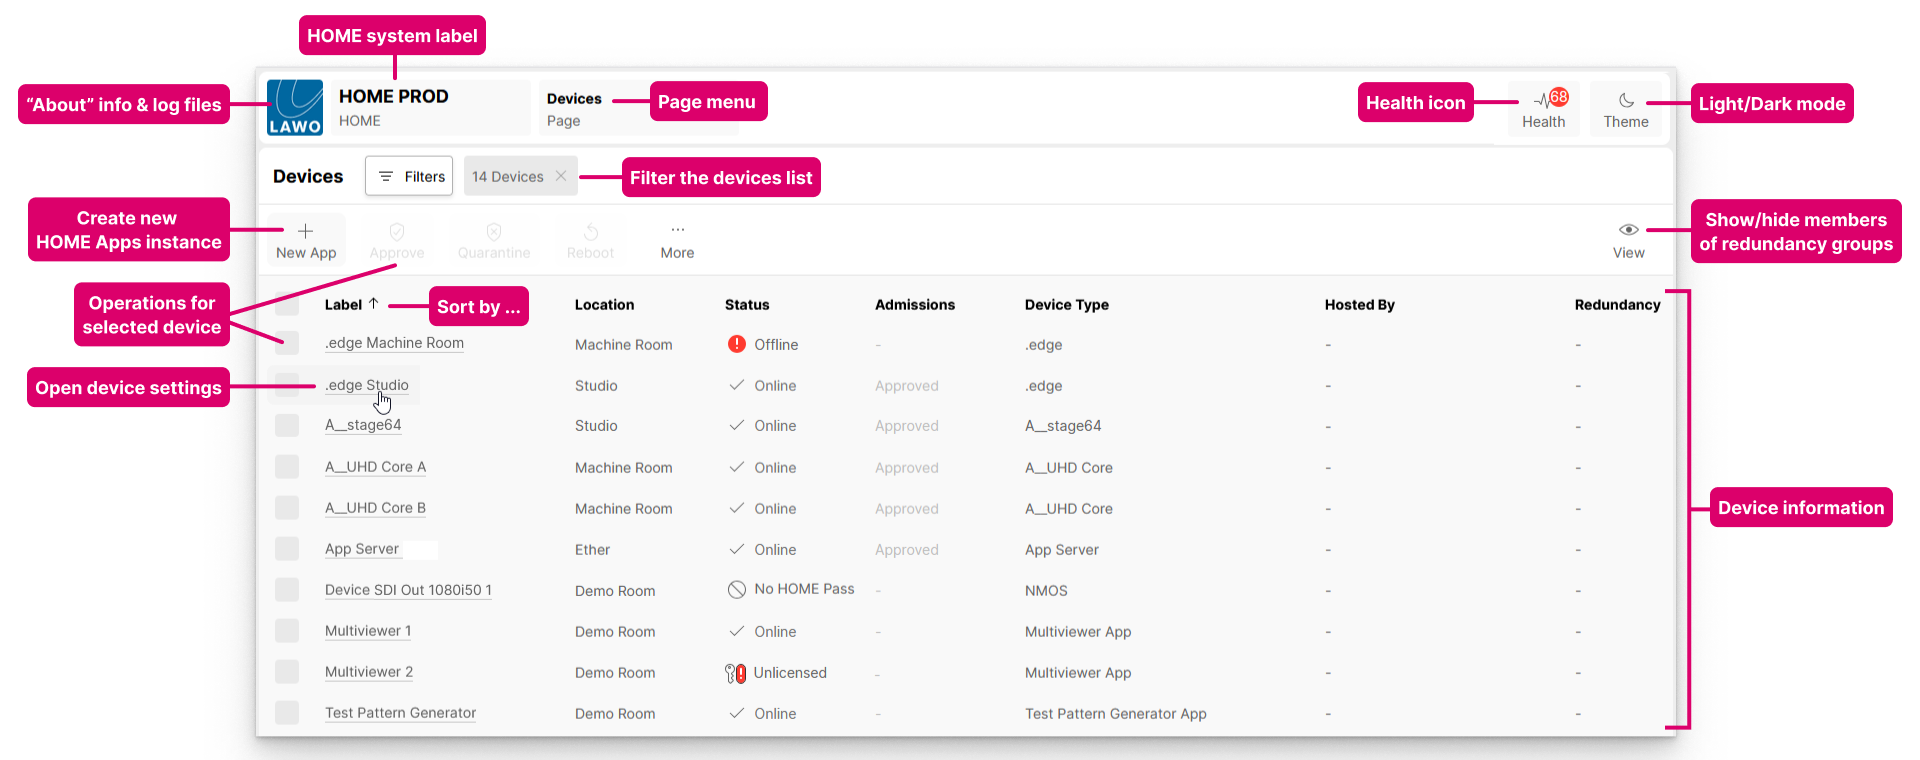

The HOME user interface can operate in either light or dark mode. Click on the Theme icon (top right) to toggle between the modes.
The Filters button can be used to filter the contents of the list. For example, to view only the devices in a particular location.
For more information about these, and other features of HOME, please see HOME - User Interface Operation.
Identifying the Apps (and App Servers)
In HOME's 'Devices' list, each individual app (and app server) appears as a separate "device". If there are existing apps (and app servers), then these can be identified by looking at the Device Type column.
The other columns show information about each app and device. For HOME Apps, the main points to note are:
- Label - each app (and app server) must have a unique label. For the individual apps, this is done as part of the New App or Duplicate App procedure.
- Location - adding a location is optional but can be useful to filter or sort the 'Devices' list or 'Stream Routing' page.
- The label and location can be edited from the 'Edit Device Info' dialog (in the app's general settings page).
- Status - shows the status of each app (as described below).
For more information about the other columns in the 'Devices' list, please see HOME - Devices page (in the HOME User Manual).
App Status
The Status column shows the current status of each app and device. For the individual apps, there are four possible statuses: Online, Inactive, Unlicensed or No HOME Pass.

If an app is Inactive, then it is configured but not running. Once an app is started, its status changes to Online.
If an app is Unlicensed, then its current usage exceeds the available perpetual licenses and credits. This can occur if an app has been started and the allocated perpetual license(s) or credits are missing, or the credit validity has expired.
Important: An unlicensed app will continue to run in its current state until the next restart. This allows the production to be completed. The unlicensed status becomes important if you need to stop the app for any reason, or shutdown the entire system / app server. In this instance, the app cannot be started again until the licensing issue is resolved.
If No HOME Pass is displayed, then the app cannot be configured or controlled by HOME. This status is unlikely to appear for the individual apps as, usually, enough HOME Passes are included with the system. This status may occur for an app server if the user has removed the HOME Pass assignment.
For more information about the app (and app server) statuses, please see HOME - Device Status and Admissions (in the HOME User Manual).
App Health
To confirm that the app is running and "healthy", click on the app label (to open the 'Device → General' settings) and check the Lifecycle area.
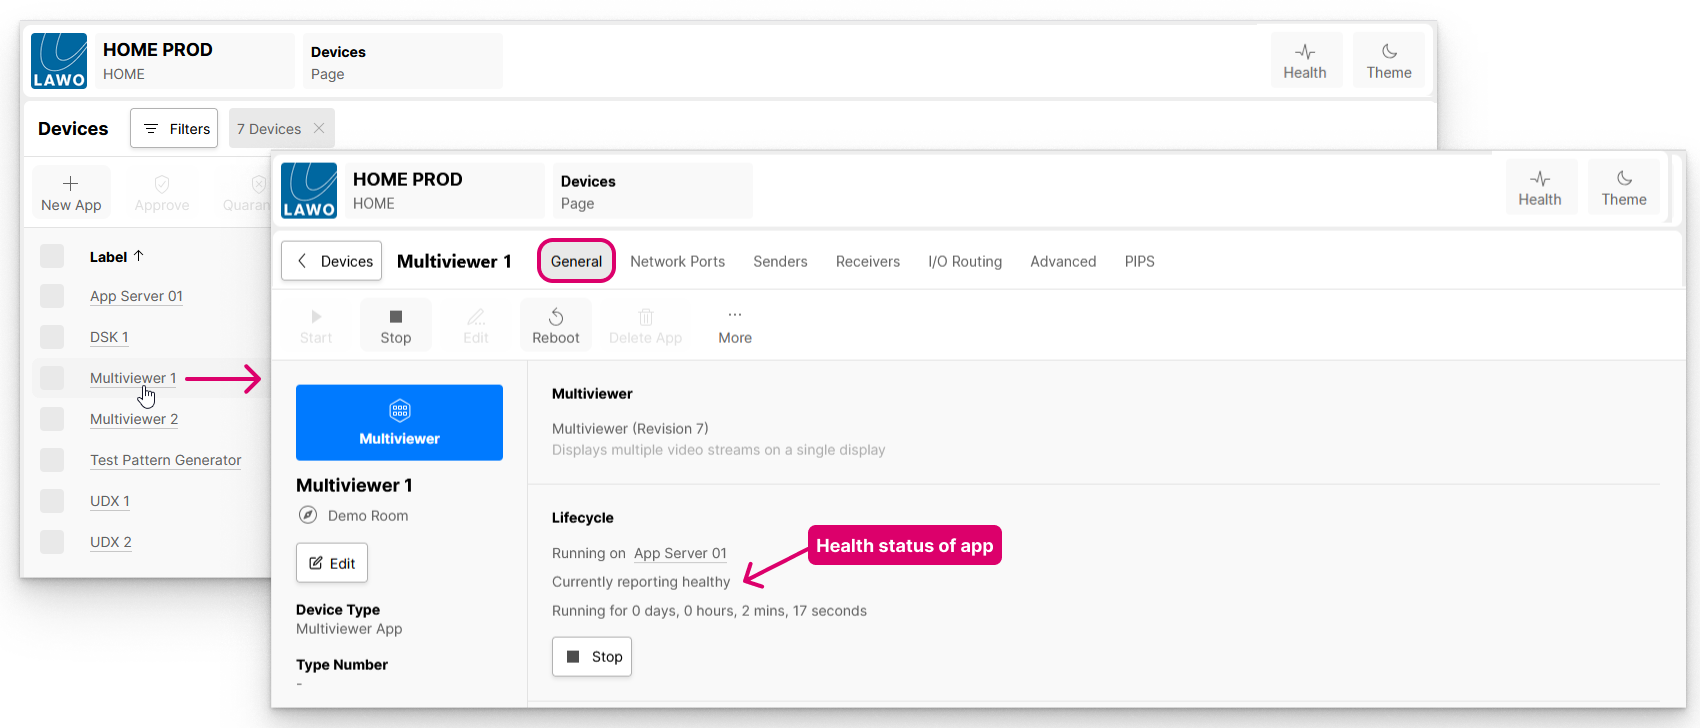
Here you will see which server the app is using, the health status (reported from the server) and how long the app has been running.
When you start an app, it is normal for the app to be "unhealthy" for a few seconds. Once the app is initialized, the status should update.
Once the status shows as "Currently reporting healthy", the app is ready to use.
Checking the App Server(s)
As part of the HOME Apps installation, each app server is added to HOME and assigned a default label.
The Status (and Admissions) should show as Online (and Approved). If HOME's admissions service is disabled, then the Admissions column can be ignored.
- If the status shows as Offline, then check that the app server is powered and connected to the HOME network.
- If the status is showing as Quarantined, then the admissions service is enabled and the app server must be approved before it can be used.
To learn more about the admissions service, please see Approve or Quarantine a Device (in the HOME User Manual).

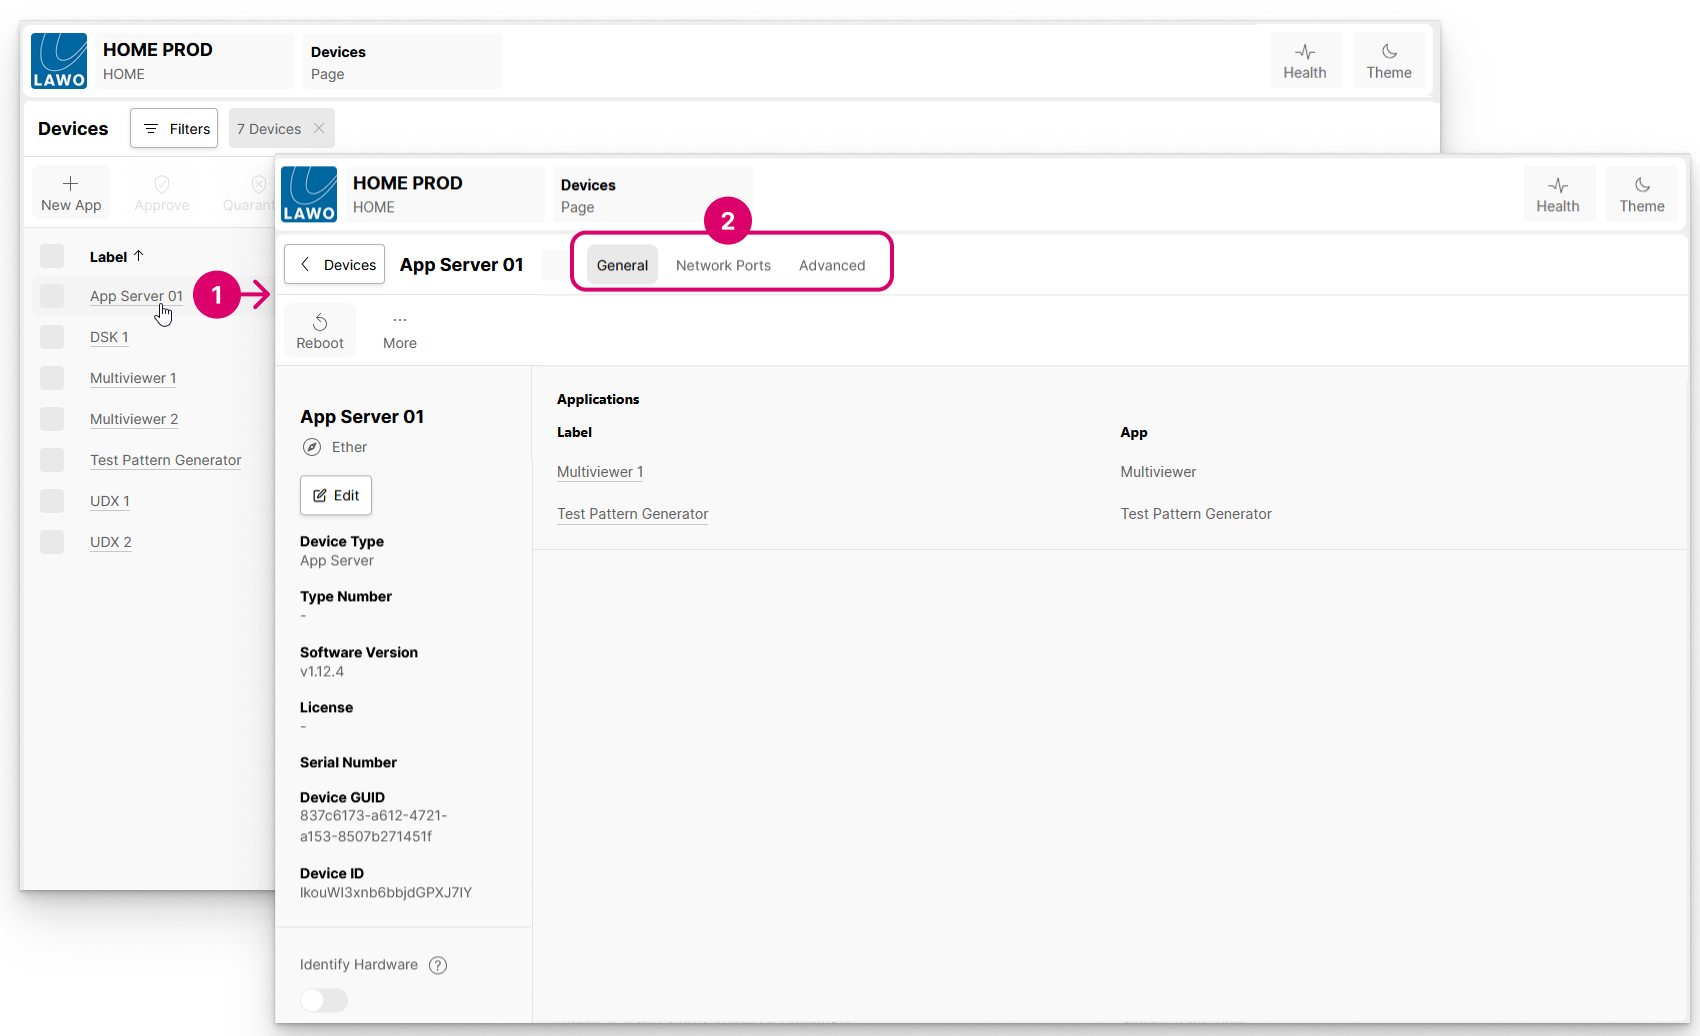
You can check which apps are running on a server by clicking through to the device's general settings page:
- Click on the app server label (1) and choose the General menu tab (2).
- The Applications area lists all of the apps running on the server. Note that, if you click on the label of an app (e.g. Multiviewer 1), then this navigates to the app's general settings page.
Preparing Apps
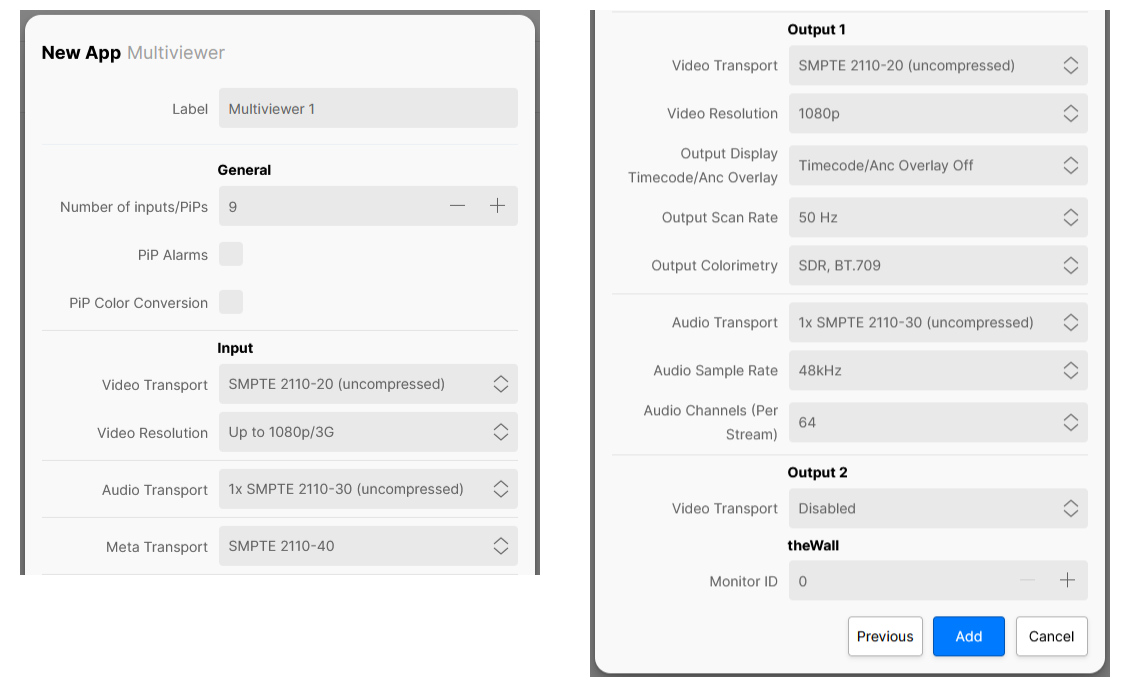
Apps are created and configured using HOME's New App function. This can be done at any time, with or without an app server. This step labels and configures the app, and adds it to HOME's 'Devices' list.
During the app creation process, the user is presented with a range of options that define the fundamental functionality and streaming capability of the app. The choices made here will determine the resources required to run the app: I/O bandwidth, CPU resources, etc. This allows the IP senders and receivers to be tailored to the application and network (to help manage the bandwidth of the switches and NICs). Note that the initial configuration options can be edited later but this is only possible once the app is stopped.
Once an app exists it can be started either from HOME (as shown below) or remotely (via the HOME API). This step deploys the app's processing to one of the available app servers. To start an app successfully, there must be sufficient capacity (on a HOME Apps server) and enough available licenses or credits (on the HOME system). The resources can be checked by looking at the Target App Server and Licensing information (in the 'Start App' dialog).

Once an app is started, you should check the app's health. This step confirms that the processing is correctly deployed. Click on the app's label (to open the 'Device → General' settings) and check the Lifecycle area. If the status shows as "Running on <name of app server>" and "Currently reporting healthy", then the app is ready to use.
Connecting Signals
The I/O signals for all HOME Apps are streamed via the media network and so, once an app is configured and running, its streaming connections can be managed from HOME's 'Stream Routing' page.
From here, you can connect a sender to a receiver, interrogate and lock existing connections, disable the sending streams and view/edit the stream configuration parameters.
The image below explains the basic operation of the page:
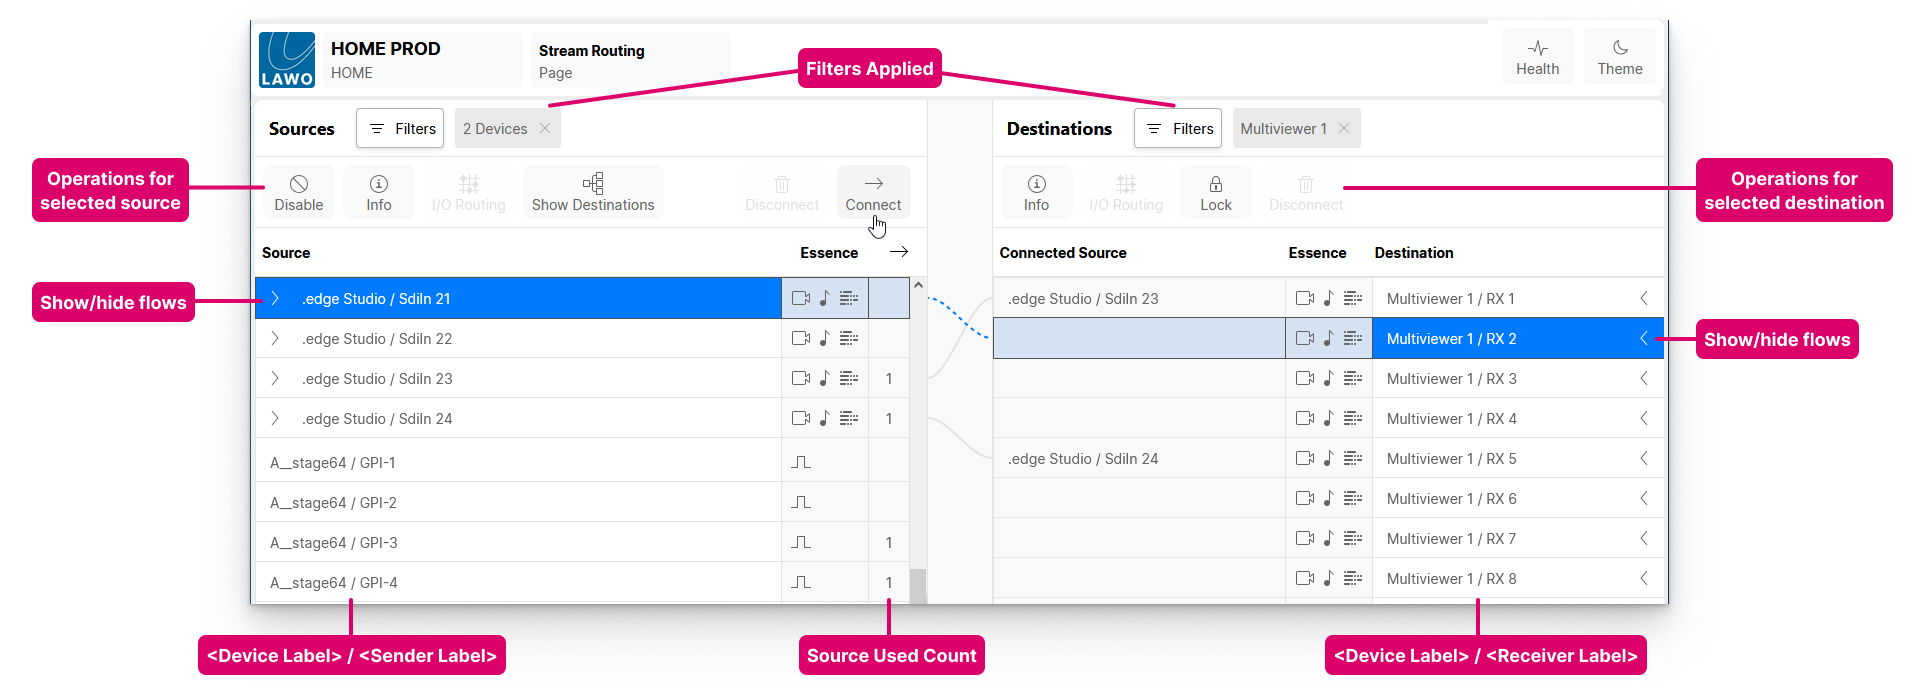
For most HOME Apps, the IP senders and receivers are pre-defined according to the configuration of the app. i.e. the number and type of I/O. You can check the current configuration from the 'Device → Senders' or 'Device → Receivers' page (as described here). As part of the app configuration, users can choose the stream transport type, video resolution, number of audio channels, etc. This allows the IP senders and receivers to be tailored to the application and network (to help manage the bandwidth of the switches and NICs).
Connections can be made by selecting a source and a destination, and then pressing Connect. This sets up a streaming connection that will be automatically re-instated if, for example, the sending device restarts.
Once a connection is made, signals are streamed via the media Network Interface Cards (NICs) of the current app server. To achieve dual-redundant streaming, compatible with SMPTE ST2022-7, the NICs must be configured in pairs to support the primary and secondary streams. This is achieved by switching on the Stream Redundancy option in the app server configuration. Note that this option is configured at an app server level, meaning that the senders and receivers of all apps running on that server are either all dual-redundant OR all non-redundant. It is not possible to configure Stream Redundancy per app or per stream.
If audio streams are configured, then the 'I/O Routing' maps the audio channels being received by the app's receivers to the audio channels transmitted by the app's senders. By default, the audio channels are mapped on a 1:1 basis. The I/O Routing can be edited if you wish to change the default assignments.
Adjusting App Settings
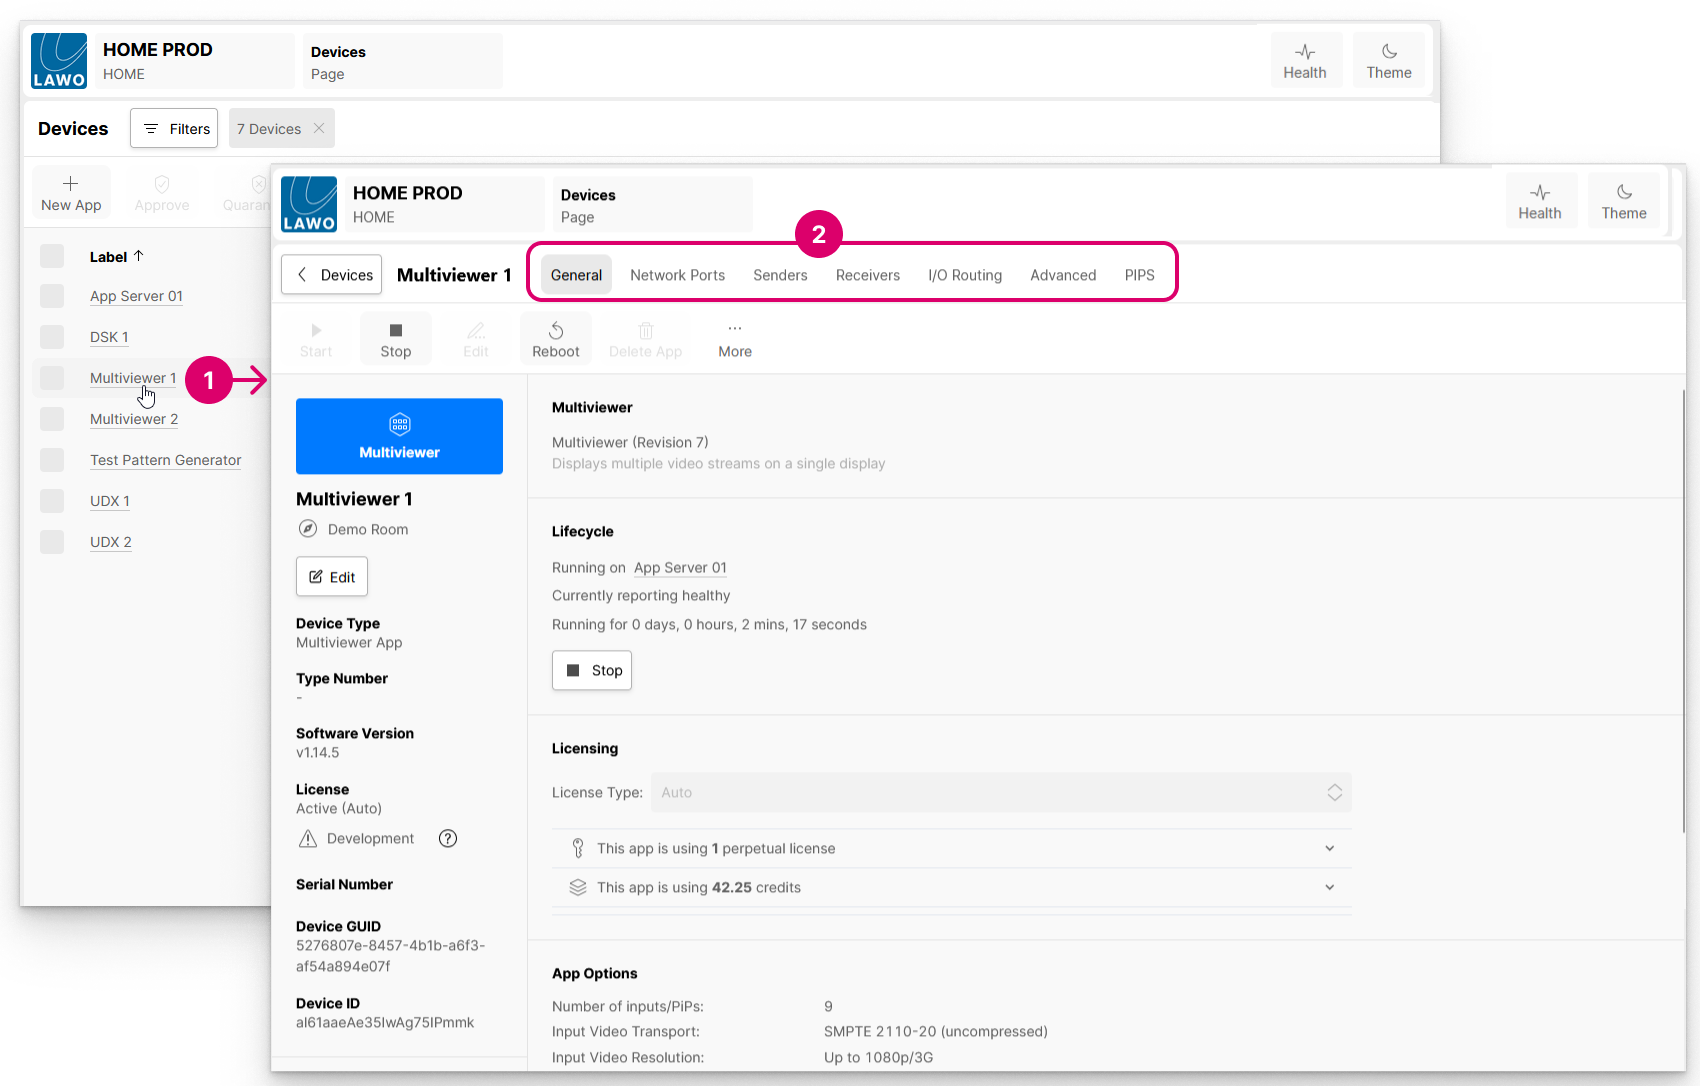
The menu tabs provide access to a variety of app-specific parameters such as the label and location, license type, initial configuration, senders and receivers, and so on.
If an app has No HOME Pass, then a page with minimal content opens. In this instance, you will need to check that the app has a valid HOME Pass (license).
All HOME Apps systems are delivered with enough HOME Pass perpetual licenses to run the individual app instances and app server(s). This means that the HOME Pass for an app is usually fulfilled by one of the included perpetual licenses. A HOME Pass can also be achieved using credits if, for example, the HOME Pass perpetual licenses are assigned elsewhere or the app's License Type is set to credits.
For more information about the licensing, please see HOME Apps - Licensing Introduction and HOME Passes (in the "HOME User Manual").
To return to the main 'Devices' list, click on the < Devices button (to the left of the app label). From here, you can repeat the steps above to access another device or app.
Where are the settings saved?
The latest settings for each app are saved (by HOME) whenever a change is made.
Note that the settings are stored on the HOME management system and not on the app server. This means that an app can be started with its latest settings on any available app server (with sufficient resources).
What can be controlled?
There are several pages of settings that are handled in a similar way for each app.
In the example shown above, the HOME Multiviewer has seven pages. The first six (General, Network Ports, Senders, Receivers, I/O Routing and Advanced) are available for most HOME Apps. The PIPS page is specific to the HOME Multiviewer app.
The descriptions that follow summarize the function of each page.
The General settings is the first landing page that appears whenever you click through to an individual app. It is divided into three main sections with app management operations (at the top), general information (on the left) and other settings (on the right).
The informational fields (on the left) include the app label and location, plus the Software Version (important for compatibility with HOME), and the Device ID which identifies the app within HOME and to external controllers.
The areas (on the right) provide further information about the app including:
- the Lifecycle information: current status (started, stopped, etc.) and health. When the app is running without problems, the app will report as "healthy". If the app reports as "unhealthy", then corrective action should be taken as the app is not operating correctly.
- the Licensing information: the number and type of licenses in use.
- a summary of the app's initial configuration (under App Options).
When an app is stopped (not running), it is possible to edit the app label, location, initial configuration and license type.
The Network Ports page provides information about the network interfaces of the app server which is currently running the app.
From here you can check the status of the app server's network ports and view their network settings.
Please note: The network settings of an app server cannot be edited from the Network Ports page, as this is done (by the Lawo engineering team) during the HOME Apps system configuration.
The Senders and Receivers pages appear for all apps that support signal streaming. They list all of the app's IP senders and receivers (that can be connected using HOME's 'Stream Routing' page).
For HOME Apps, the senders and receivers are pre-defined according to the configuration of the app. i.e. the number and type of I/O.
From the Senders (or Receivers) page you can check information about a sender (or receiver), and access its more advanced options. These include the I/O Routing (for the audio flows), stream configuration parameters, SDP data and Disable/Enable controls (for the senders).
The I/O Routing page appears for all apps that handle audio inputs and audio outputs. It provides the ability to route audio channels being received by the app's receivers to the audio channels transmitted by the app's senders.
By default, the audio channels are mapped on a 1:1 basis. The I/O Routing can be edited if you wish to change the default assignments.
The Advanced tab provides access to all available configuration controls, presented in a simple tree structure. This, and any other pages, are specific to the app.
The same parameters can be accessed (over NATs) via the HOME API. This supports integration with external broadcast control systems such as Lawo's VSM.
Initial Configuration vs Runtime Controls
Before editing an app, it is important to understand the difference between editing the initial configuration and using the runtime controls.
These initial configuration parameters appear in the 'New App' dialog. To streamline the process, a set of default values are entered and so, in most cases, all you need to provide is a label for the app.
When an app is started for the first time, the initial configuration values are loaded and saved (elsewhere). From here on, there are some parameters that can only be changed when the app is stopped (by editing the initial configuration), and others that can be modified while the app is running (using the 'runtime' controls). If parameters can be edited in both the initial configuration and during runtime, then the initial configuration is overwritten by the runtime controls as the latest (runtime) value always wins.
An example of how this works in practice is provided here. For now, it is useful to know that:
- If a parameter can only be edited in the initial configuration, then the user must first stop the app, edit the initial configuration (via 'Edit App' or 'Edit Apps'), and then restart the app. Any changes are applied on the next start up of the app. If there is a change to the resource usage, then this is displayed in the 'Start App' dialog.
- The 'runtime' controls appear, once the app is running, in the other 'Device' settings pages: Senders, Receivers, Advanced, etc. The latest values are saved (by HOME) whenever a change is made and loaded on the next start up of the app. Note that the runtime controls have no impact on the resource usage. If a parameter has a runtime control then, after the first start-up of the app, any changes must be made using the runtime control (and not the initial configuration), as the initial configuration will be overwritten by the runtime value on the next start up of the app.
Editing Multiple Apps
If you wish to apply changes to more than one app at a time, then this is possible using the Edit App function (selected from the More... menu in the main 'Devices' list).
In this instance, it is possible to apply changes to multiple apps of the same type (in bulk). For example, to update the app revision or change the streaming format for several apps.
For more information, please see HOME Apps - Edit App(s).