HOME - Devices page
The ‘Devices’ page is the first landing page that appears when you open a connection to home. It can also be opened from the main page menu.
Overview
The 'Devices' page lists all of the devices, apps and services that are known to HOME. A device must appear here before it can be configured.
The image below explains the basic operation of the page.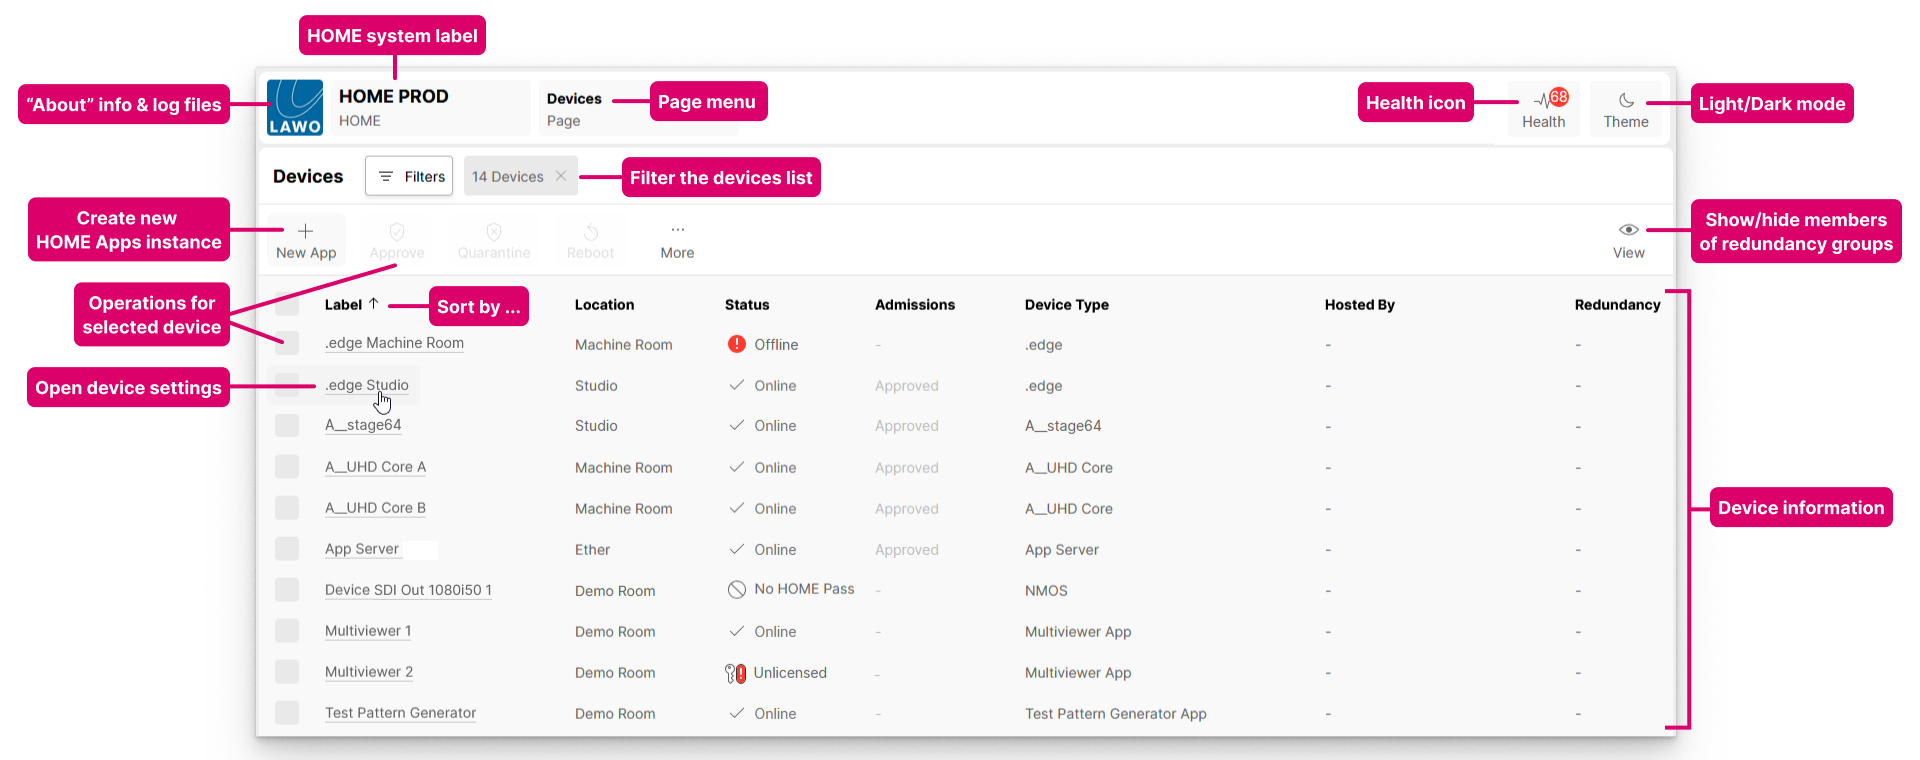
The 'Devices' list includes all of HOME's inventory items, where the type of device, app or service is clearly identified in the Device Type column. While we usually refer to "devices" in this documentation, the same principles apply to all inventory items (unless otherwise stated).
How are devices discovered?
Whether automatic discovery is possible depends on the device type as follows:
- HOME-native devices. All Lawo IP nodes and devices which "live@HOME" are discovered automatically when they are connected to the network.
- NMOS-compatible devices. Devices that are compatible with NMOS IS-04/IS-05 can also be discovered automatically, if HOME is running a valid NMOS license.
- Third-party devices. Devices that are not detected automatically can be added manually by configuring a proxy. An example is included here.
- HOME Apps. In a HOME Apps system, each app server is discovered automatically (as a HOME-native device). The individual apps must be created manually (using either New App or Duplicate App).
What can be controlled?
From the 'Devices' page, you can:
- Check the status of the network's devices.
- Create a New App (for deployment on a HOME Apps server).
- Approve or quarantine a physical device (if the network admissions service is enabled).
- Reboot a device.
- Access additional operations via the ... More menu.
Device Information
The main working area provides basic information about each device including its label, location and status.
The Label identifies the device (in HOME) and to other network users:
- Each label must be unique (within the HOME system), and a label must be entered. This field cannot be left blank.
- A default label is assigned to all devices that are automatically detected by HOME.
- For HOME Apps, a unique label must be entered (when you create a new app).
- Labels can be edited later without affecting the rest of the configuration. This is done from the 'Edit Device Info' dialog (in the device's general settings page).
The Location is displayed in HOME and can be used to filter or sort a list:
- Entering a location is optional. This field can be left blank.
- Locations can be edited without affecting the rest of the configuration. This is also done from the 'Edit Device Info' dialog (in the device's general settings page).
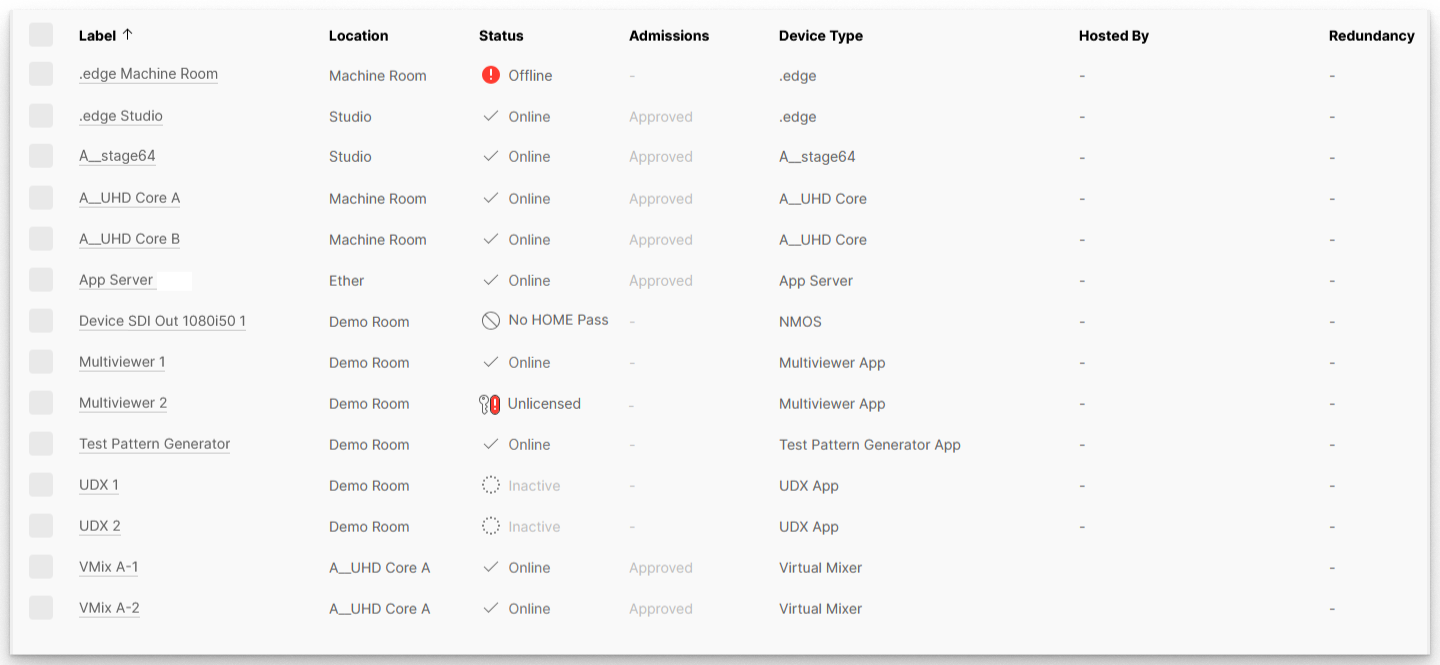
The Status column shows the status of the network's devices:
- Physical devices can be online, offline, quarantined, unlicensed or have No HOME Pass.
- HOME Apps can be online, inactive, unlicensed or have No HOME Pass.
- How to interpret the status (and admissions) is described later.
The Admissions column is relevant for physical devices, and shows whether the device is fully approved (and part of the operational network) or in some other state (e.g. partially approved or in quarantine). The admissions service is optional and so, if it is disabled, then the admissions show as "-" for all devices. When the admissions service is enabled, the Approve and Quarantine buttons can be used to manage which devices are part of the operational network. This is described in more detail here.
The Device Type describes the inventory item and can be used for identification purposes. This field is fixed and cannot be edited. If the text description is preceded by a group icon. then the 'Devices' list entry is a redundancy group.
The Hosted By and Redundancy columns apply if redundancy groups are configured:
- Hosted By shows where the redundant group or member is hosted.
- Redundancy shows the members of the redundancy group.
The View button can be used to change the view, to show (or hide) the redundancy group members. For more information, please see Redundancy Groups and Views.
Note that the device labels act as navigational links to the device settings pages. So, if you click on a label in the Label, Hosted By or Redundancy columns, then this opens the general settings page for the device.
Devices List Operations
The following operations are possible from the 'Devices' page:
- Click on the Filters button to apply a filter.
This can be used to restrict the view to say a particular set of devices. See Using Filters. Click on a column header to sort the list alphabetically. For example, to sort by Label.
Each click toggles the sort mode between ascending (A -> Z) and descending (Z -> A). An up or down arrow appears beside the header to indicate the current sort mode.- Use the Status (and Admissions) columns to check the status of a device.
How to interpret the status (and admissions) is described later in Device Status and Admissions. - Click on a device label to access the settings for an individual device.
From here, you can check and edit a variety of device-specific parameters such as the label and location, initial configuration, IP settings, senders and receivers, and so on. - Click on New App to create a new HOME Apps instance.
Apps can be created by any HOME (management) system. However, to start an app successfully, the system must be correctly configured for HOME Apps by the Lawo engineering team. For more information about creating apps, please see New App (in the "HOME Apps User Manual"). - Select one or more devices (using the tick boxes in the first column) and choose one of the following operations.
Note that not all devices support all operations. If an option is not supported (by the selected device), then it is greyed out.- Approve - add physical device(s) to the operational network. See Approve or Quarantine a Device.
- Quarantine - remove physical device(s) from the operational network. See Approve or Quarantine a Device.
- Reboot - remotely reboot a device or app from HOME. See Reboot a Device.
- More - reveals a number of additional operations via the ... More drop-down menu. See Devices ...More Menu.