Waves for mc² - Host PC Setup
This topic describes how to prepare the Waves Axis Scope PC.
Introduction
The Waves Axis Scope PC is configured using a series of command lines. The commands must executed using the Windows PowerShell terminal (as described below). There are two possible scenarios:
- either, create a text file (with the commands) and transfer this to the Waves Axis Scope PC (via a USB memory device). You can then copy and paste the commands from the text file.
- or, copy and paste the commands directly from this web page.
The rest of this topic describes the method followed by the commands.
Device Connections (for initial setup)
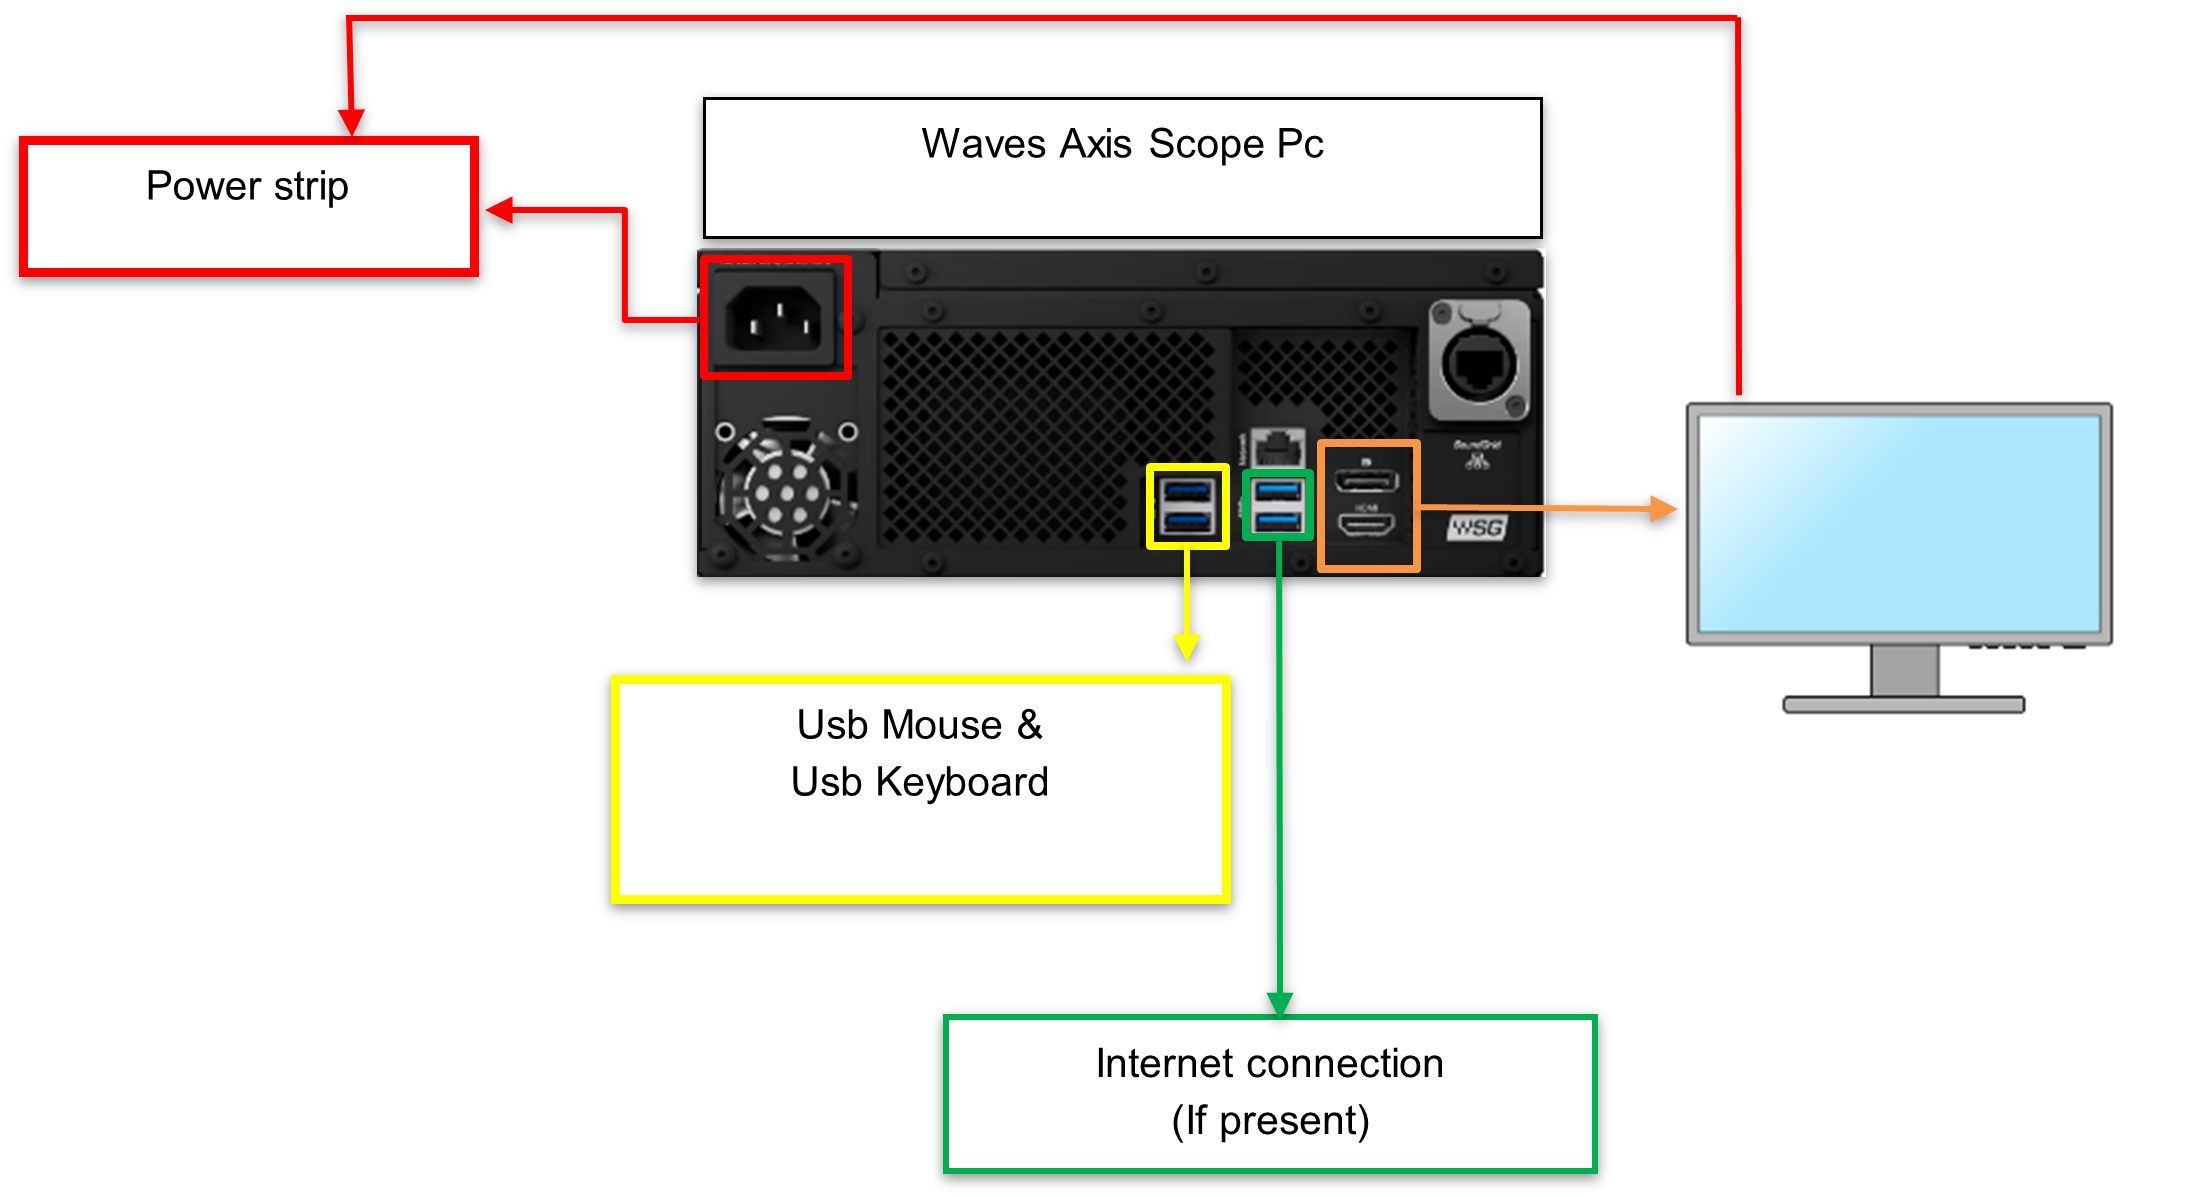
The diagram below shows the connections required for the initial setup.
Power, Video, Keyboard and Mouse are mandatory. The internet connection is recommended (to allow the commands to be copied from this web page, and/or remote configuration of the Waves Axis Scope PC).
Power On
- Before applying power to the PC, check the internet connection and apply power to the video monitor.
- Power up the Axis Scope PC (with the internet Ethernet cable connected).
- The image below shows the desktop (at the first start up).

Executing the Commands
The Waves Axis Scope PC has only an administrator user with the name "AXIS" without any password.
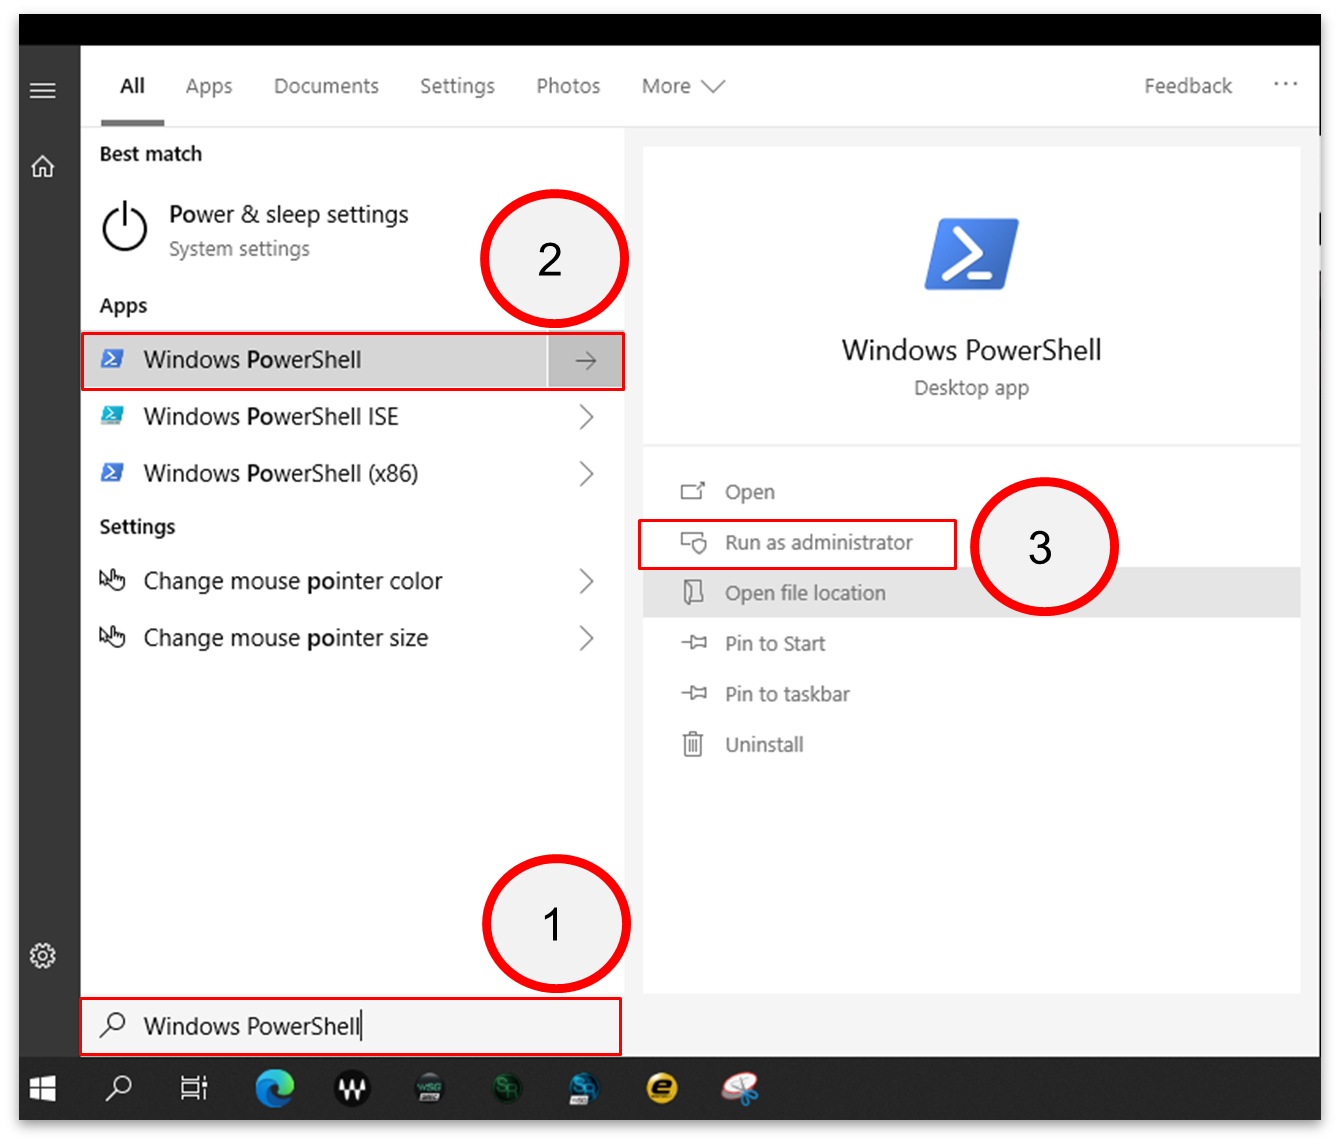
To execute the commands:
- Go to Windows start menu.
- Using the search bar, enter "Windows PowerShell".
- Select "Run as administrator".
- Copy and paste the command lines into the Windows PowerShell terminal. This can be done globally or individually, line by line. It is important to enter the full syntax for each line.
- The Waves Axis Scope PC restarts automatically (after the
restartcommand).
Command Lines (required)
The required commands are as follows. The meaning of each line is explained at the end of this topic.
Set-ItemProperty -Path “HKLM:\SYSTEM\CurrentControlSet\Services\W32Time\Parameters” -name “Type”  -value NoSync -Type STRING
Set-ItemProperty -Path “HKLM:\SYSTEM\CurrentControlSet\Services\tzautoupdate” -name “Start”  -value 4 -Type DWORD
net user AXIS AXIS
Set-LocalUser -name “AXIS” -PasswordNeverExpires 1
net user AXIS | findstr /C:expires
netsh advfirewall set allprofiles state off
Set-ItemProperty -Path “HKLM:\System\CurrentControlSet\Control\Terminal Server” -name “fDenyTSConnections”  -value 0
New-Item -Path "HKCU:\Software\Policies\Microsoft\Windows\Explorer"
New-ItemProperty -Path "HKCU:\Software\Policies\Microsoft\Windows\Explorer" -Name "DisableNotificationCenter" -Value 1 -Type DWORD
Restart-ComputerPlease note: if you want to change the name of the computer, replace the last line with the one below.
Rename-Computer -Name "NEW COMPUTER NAME" -Restart -ForceCommand Lines (for Windows Automatic Logon)
The following commands are optional. They can be used to activate the Windows automatic logon.
Set-ItemProperty -Path "HKLM:\SOFTWARE\Microsoft\Windows NT\CurrentVersion\Winlogon" -name "AutoAdminLogon"  -type Dword -value 1
Set-ItemProperty -Path "HKLM:\SOFTWARE\Microsoft\Windows NT\CurrentVersion\Winlogon" -name "DefaultUserName"  -type String -value "AXIS"
Set-ItemProperty -Path "HKLM:\SOFTWARE\Microsoft\Windows NT\CurrentVersion\Winlogon" -name "DefaultPassword" -type String -value "AXIS"For more information about the Windows Automatic Logon, see the following reference link:
Command Line Meanings
The meaning of each command is described below. You can use these code blocks to copy and paste the lines individually.
Command #1
Set-ItemProperty -Path “HKLM:\SYSTEM\CurrentControlSet\Services\W32Time\Parameters” -name “Type” -value NoSync -Type STRINGDisables the "Set time automatically" on Waves Axis Scope computer.
Command #2
Set-ItemProperty -Path “HKLM:\SYSTEM\CurrentControlSet\Services\tzautoupdate” -name “Start” -value 4 -Type DWORDDisables the "Set time zone automatically" on the Waves Axis Scope computer.
Command #3
net user AXIS AXIS Assigns the password AXIS to the AXIS user.
Command #4
Set-LocalUser -name “AXIS” -PasswordNeverExpires 1Sets the password to "never expires".
Command #5
net user AXIS | findstr /C:expiresChecks that command #4 was executed correctly.
Command #6
netsh advfirewall set allprofiles state offDisables all Windows firewall profiles.
Command #7
Set-ItemProperty -Path “HKLM:\System\CurrentControlSet\Control\Terminal Server” -name “fDenyTSConnections” -value 0Enables the Windows Remote Desktop.
Command #8
New-Item -Path "HKCU:\Software\Policies\Microsoft\Windows\Explorer"Creates a new registry key in the Windows registry.
Command #9
New-ItemProperty -Path "HKCU:\Software\Policies\Microsoft\Windows\Explorer" -Name "DisableNotificationCenter" -Value 1 -Type DWORDCreates a new key property in the Windows registry to disable the notifications center.
Command #10
Restart-ComputerOR
Rename-Computer -Name "NEW COMPUTER NAME" -Restart -ForceRestarts the computer OR renames the computer and then restarts it.
Windows Auto Logon Command Line Meanings
Command #1
Set-ItemProperty -Path "HKLM:\SOFTWARE\Microsoft\Windows NT\CurrentVersion\Winlogon" -name "AutoAdminLogon" -type Dword -value 1Activates the Windows Auto Logon.
Command #2
Set-ItemProperty -Path "HKLM:\SOFTWARE\Microsoft\Windows NT\CurrentVersion\Winlogon" -name "DefaultUserName" -type String -value "AXIS"Sets the user name for the Windows Auto Logon.
Command #3
Set-ItemProperty -Path "HKLM:\SOFTWARE\Microsoft\Windows NT\CurrentVersion\Winlogon" -name "DefaultPassword" -type String -value "AXIS"Sets the password for the Windows Auto Logon.