Lawo Flex - Activate the Resource(s) in HOME
This topic describes how to utilize the available credits to unlock a licensed resource in HOME.
It is assumed that you have transferred some credits to the HOME system (as described earlier).
Overview
To start or activate a licensed resource in HOME, the system must have enough perpetual licenses and/or valid credits.
By default, HOME uses any available perpetual licenses first, and then tops-up with credits. The number of credits required varies depending on the application or function.
Once credits are transferred to the HOME system, they have a default validity period of 30 days. At the end this period, HOME must "check-in" with the Lawo Flex account to obtain a new copy of the credits. If HOME is online, then this happens automatically (via the licensing cloud). If HOME is not online, then the credit refresh must be performed manually (as described here).
Please note: Resources cannot be activated if there are not enough valid credits. In this instance, you have three options:
- Top-up the number of credits (by activating a new Lawo Flex subscription),
- Revoke (and reassign) some existing credits from another HOME system,
- Stop an existing resource by disabling an app or function.
In HOME, there are two places where you can manage the licensed resources: the "Start App" dialog (or equivalent) and the Licenses page. The former shows how many perpetual licenses and/or credits are required to start the application (or function). The latter provides an overview of the available credits and their usage.
Available Credits
The number of available credits can be checked from HOME's Licenses page.
- Open a HOME web UI session.
- Select the Licenses page and Credits tab.
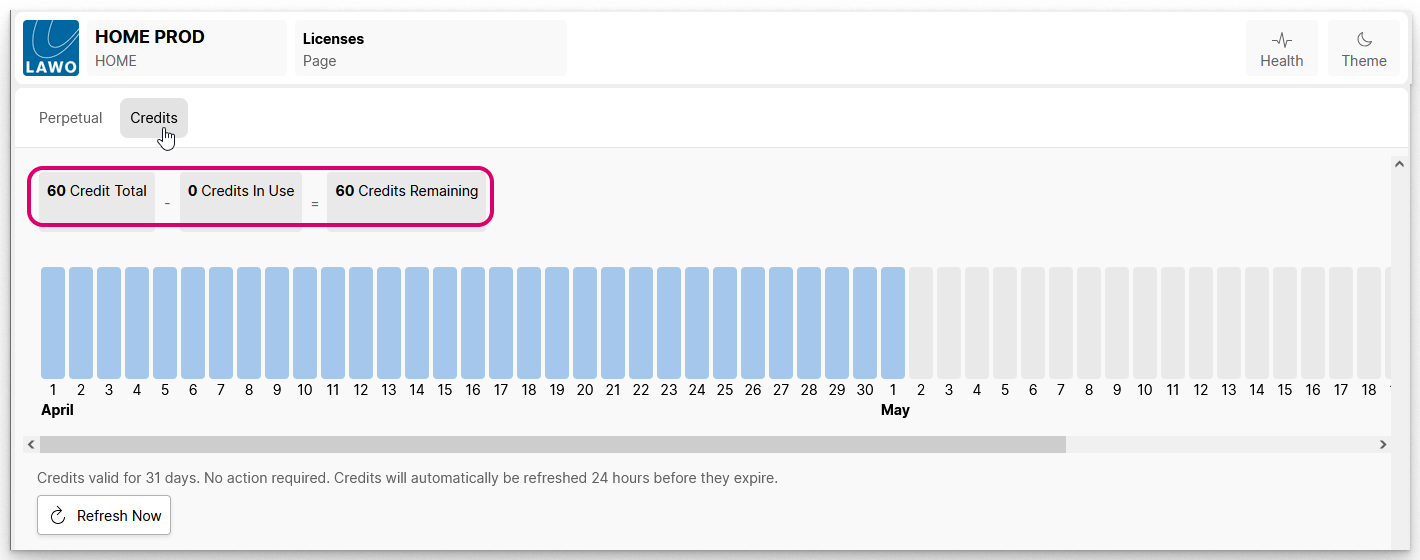
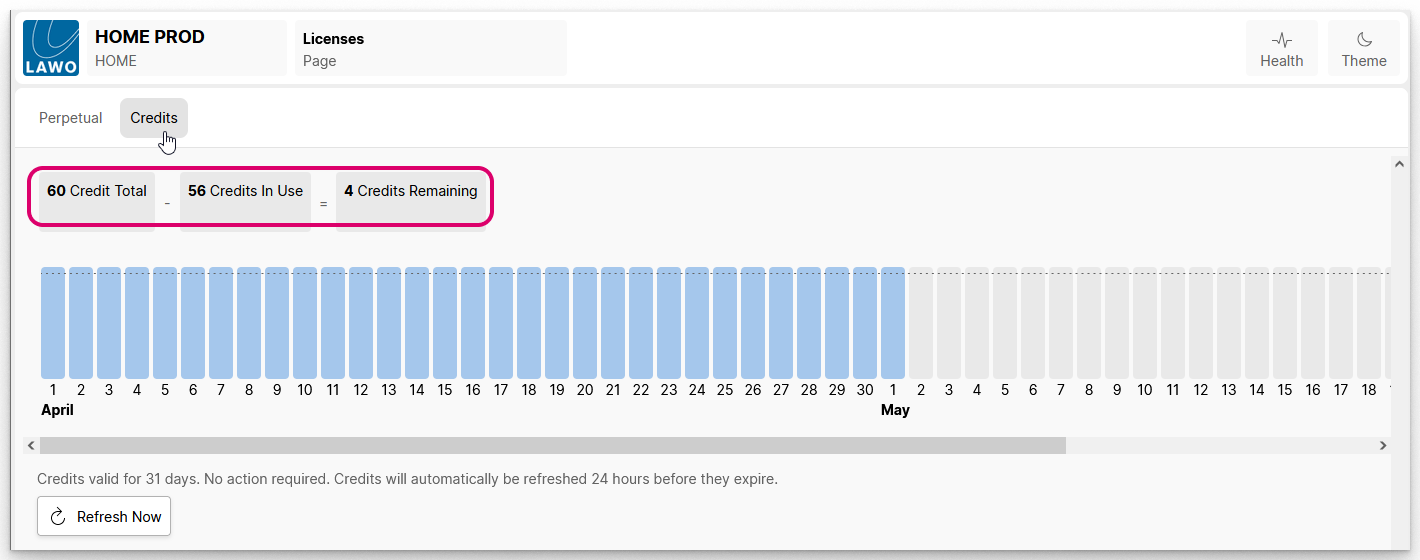
- Use the Credit Total, Credits in Use and Credits Remaining values to check the current status.
- The timeline shows the current and predicted usage. The bars are color-coded as follows:
- Blue = credits are valid and usage is ok; no action required.
- Light grey = credits will automatically refresh; no action required.
- Pink = credit usage is (or will be) exceeded; please take note of the alerts at the bottom of the page.
- Yellow (can appear if the HOME system is disconnected) = credits require manual refresh before their validity expires.
- If any actions are required, then these appear as alerts at the bottom of the page.
- The Refresh Now button can be used to refresh the validity of the credits. This is described in more detail later.
The screenshots below show how the credits assigned (earlier) from the licensing portal correspond to the Licenses page in HOME. In this example, there are 60 credits available to use.

If you have any perpetual licenses running on the HOME system, then these can be checked from the Licenses page and Perpetual tab in HOME.
Credits Required
For each licensed resource, the number of credits required is dependent on two factors: whether there are any perpetual licenses running on the HOME system and the functionality of the resource.
This means that there is no fixed value for a resource, as this varies according to the customer's individual setup and needs. The best way to check what's required is to open the "Start App" dialog (or equivalent) as described below.
Starting a Resource
The instructions below describe how to start a HOME Apps Multiviewer. The same principles can be applied to any licensed resource. It is assumed that you have an existing app (or function) pre-configured.
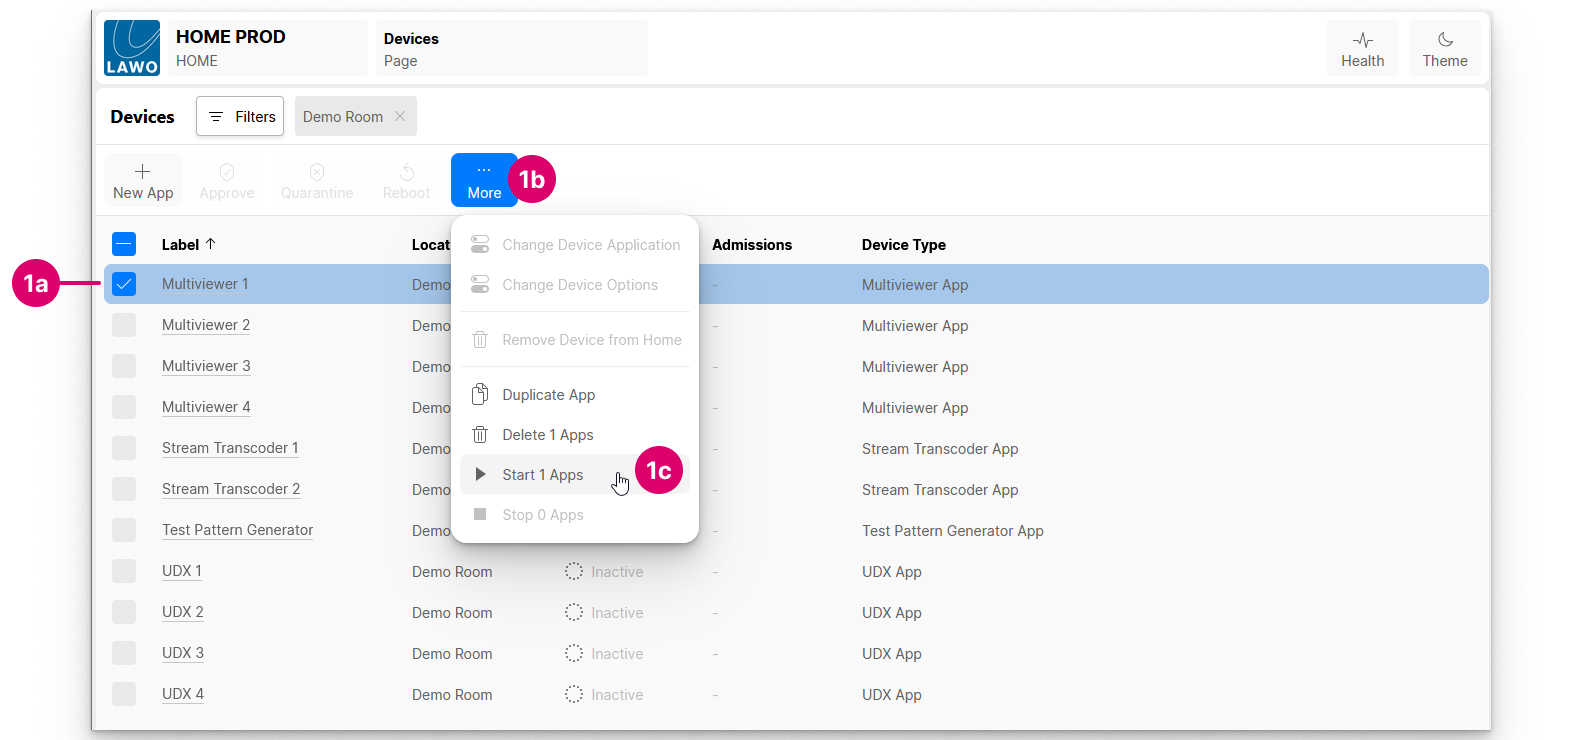
- Select the app(s) you wish to start (e.g. Multiviewer 1). You can select more than one app if you wish.
- Click on More and choose Start Apps from the drop-down menu.
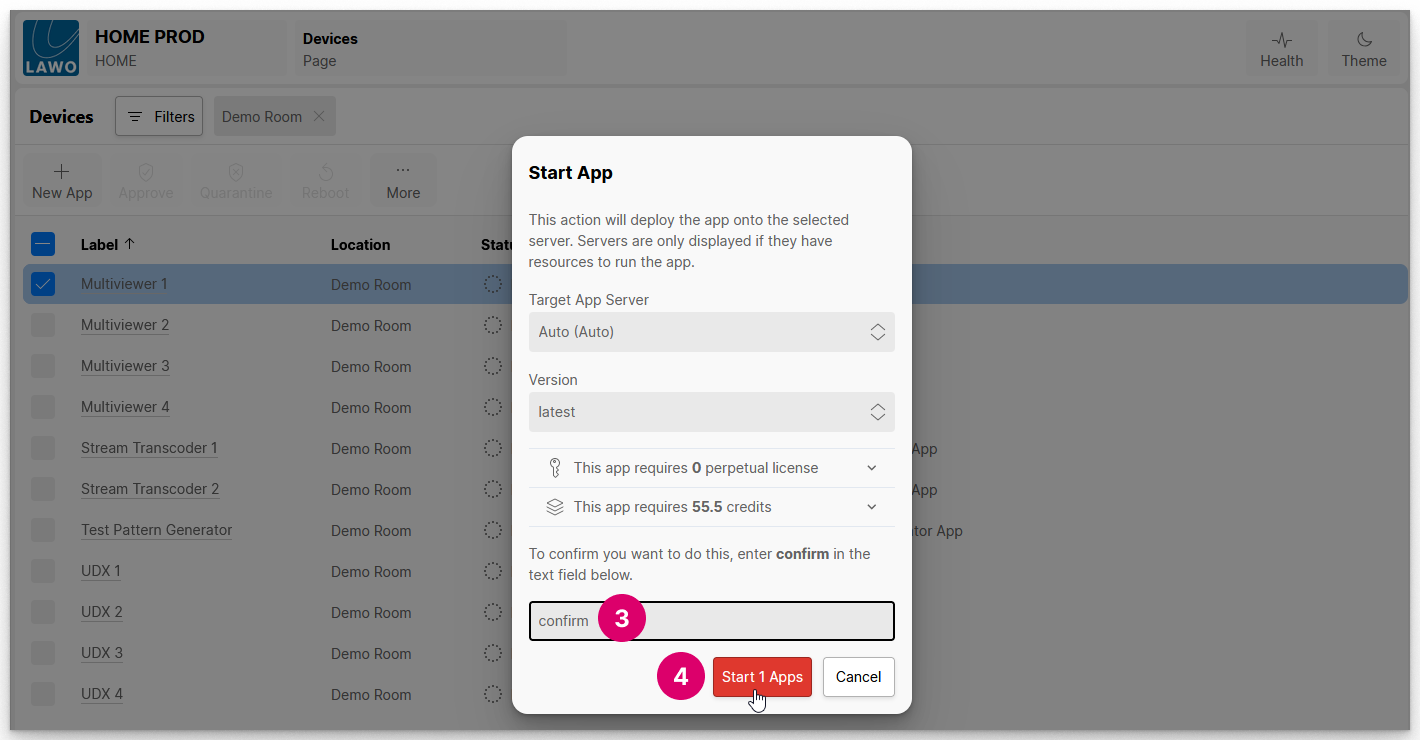
2. Check the options and licensing information in the 'Start App' dialog.
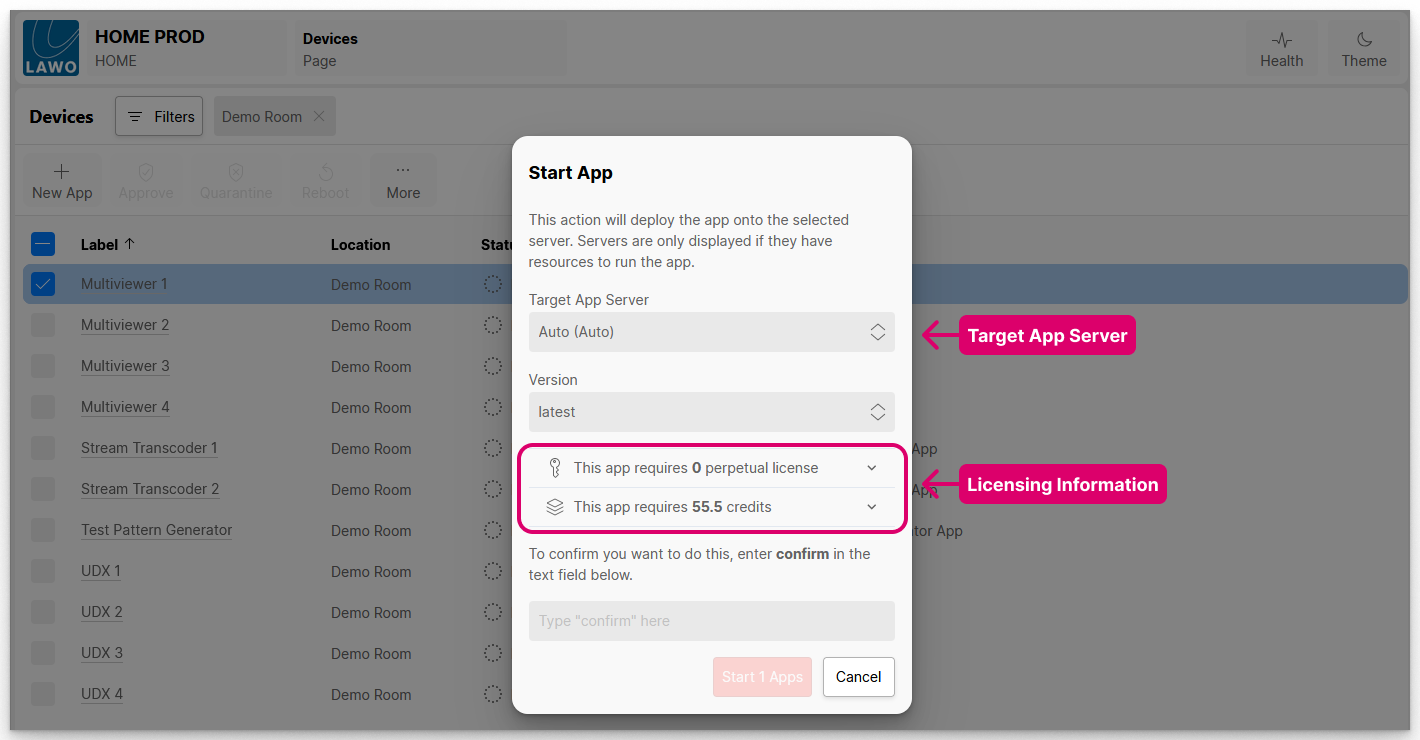
By default, the Target App Server is set to Auto and the app Version to the latest release. You can use the drop-down menu(s) to change the settings as follows:
- Target App Server - can be set to Auto or a specific HOME Apps server. Servers are only displayed if they are online and have sufficient resources to run the app. If Auto is selected, then HOME chooses a server automatically based on the available resources.
- Version - can be set to any available release. To ensure correct operation, the app version must be compatible with the HOME release. You can find more information about the release versions in the individual app chapters of the "HOME Apps - User Manual".
The licensing information is shown next.
You can interrogate the usage further by clicking on the reveal/hide arrow.

The total number of licenses and/or credits is determined by the configuration of the app. In our example, the Multiviewer is configured with 9 PIPs which means that it requires the following perpetual licenses OR an equivalent amount of credits:
- 9 x Input + 1 x MV + 1 x Output
If the configuration changes (e.g. there are more PIPs), then the requirements for the Input processing will increase.
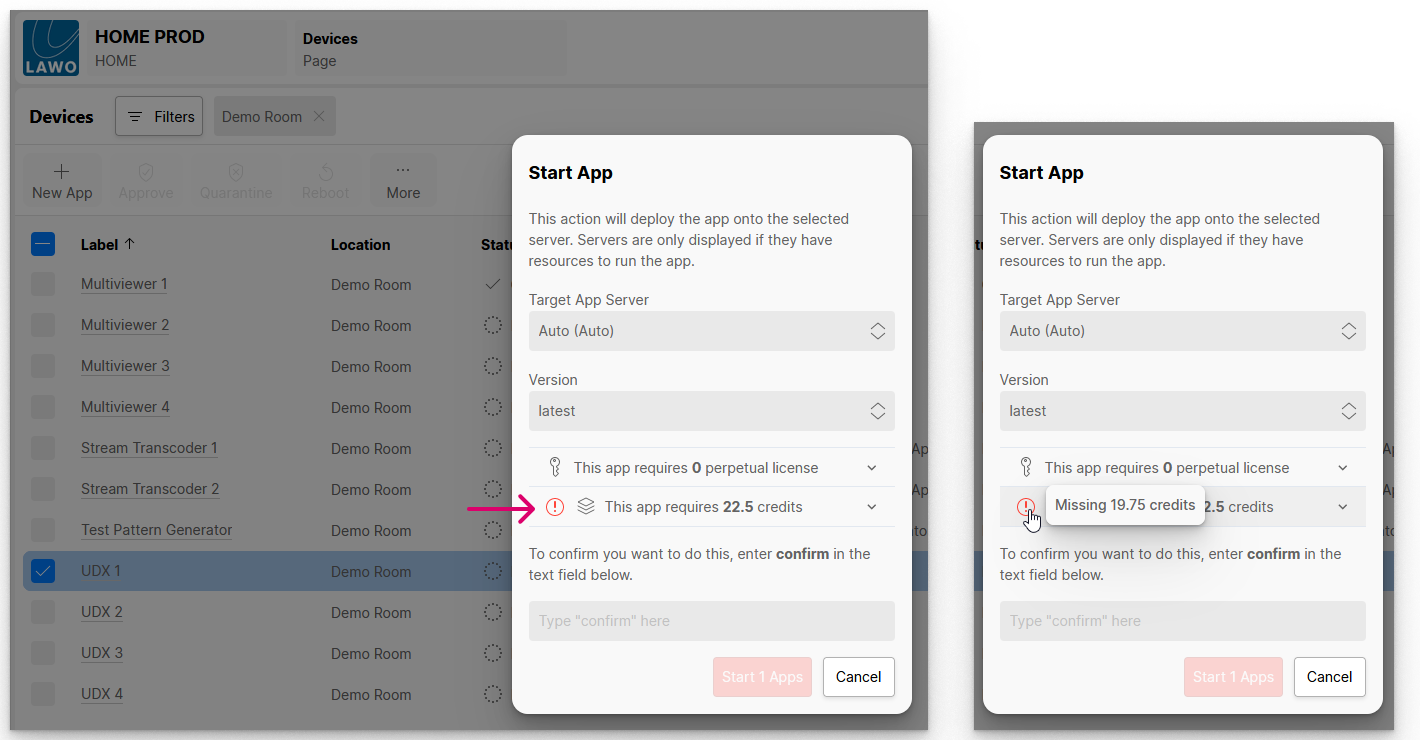
Important: If there are not enough perpetual licenses or credits, then a warning indicator appears beside the licenses or credits icon. In this instance, if you continue, the app will fail to start.
Hover over the icon to see how many licenses or credits are missing.
- Add more perpetual licenses (by uploading a new licensing file).
- Top-up the available credits (by activating a new Lawo Flex subscription).
- Revoke some credits (from another HOME system) so that they can be reassigned.
- Sacrifice an existing resource (by stopping a licensed app or function).
- For HOME Apps, edit the configuration of the app (to reduce its licensing requirements).
3. Once you are happy with the options, follow the on-screen instructions to confirm.
You must type in the text confirm (in order to select the Start Apps button).
4. Click on Start Apps to complete the operation.
The 'Devices' list updates and the app Status changes from Inactive to Online.

5. Re-open the Licenses page and select the Credits tab.
In our example, there are now 56 Credits in Use and 4 Credits Remaining.
You can repeat the previous steps to start/enable more resources and, if necessary, assign more credits.
In the next chapter, we describe how to manage the available credits and how to take credits back from a system (using Revoke).