HOME Delay - Configuration and Control
A HOME Delay Inserter is configured and managed by HOME in the same manner as other HOME Apps.
Once configured, its parameters are also available (over NATs) via the HOME API. This supports integration with external broadcast control systems such as Lawo's VSM.
Common information that applies to all app types can be found in HOME Apps - General Operation.
This topic provides information that is specific to a HOME Delay.
Configuring the App Server(s)
- Automatic deployment and Server Groups - determine how apps are deployed to the available App Server(s).
- Stream Redundancy - required for dual-redundant streaming, compatible with SMPTE ST2022-7.
- Single SRD mode - important for compatibility with some third-party (video) devices.
- Redundancy Groups - can be used to configure app failover (for redundancy).
- PTP Configuration - essential for correct synchronization of the media streams and compatibility with SMPTE ST2110-xx.
For more information, please see HOME Apps - App Server Configuration.
Preparing a HOME Delay Inserter
- Open a connection to HOME.
- Create a new app.
- Start the app.
- Check the app's health.
To open a connection to HOME, you will need a computer that is installed with a suitable web browser application. The computer must be connected to the same network and subnet as the HOME management system server(s). The HOME UI is accessed by entering the IP address, or domain name, of the HOME server into a web browser and then signing in. Following a successful sign in, the HOME 'Devices' page appears.
From HOME's 'Devices' pages, you can create an app using the New App function. This can be done at any time, with or without an app server. This step labels and configures the app, and adds it to HOME's 'Devices' list.
Please note: During the app creation process, the user is presented with a range of options that define the fundamental functionality and streaming capability of the app. The choices made here will determine the resources required to run the app: I/O bandwidth, CPU resources, etc. This allows the IP senders and receivers to be tailored to the application and network (to help manage the bandwidth of the switches and NICs). Note that the initial configuration options can be edited later but this is only possible once the app is stopped.
Once an app exists it can be started either from HOME (using Start App) or remotely (via the HOME API). This step deploys the app's processing to one of the available app servers. To start an app successfully, there must be sufficient capacity (on a HOME Apps server) and enough available licenses or credits (on the HOME system). The resources can be checked by looking at the Target App Server and Licensing information (in the 'Start App' dialog).
Once an app is started, you should check the app's health. This step confirms that the processing is correctly deployed. Click on the app's label (to open the ' Device → General ' settings) and check the Lifecycle area. If the status shows as " Running on <name of app server> " and " Currently reporting healthy ", then the app is ready to use.
App Configuration
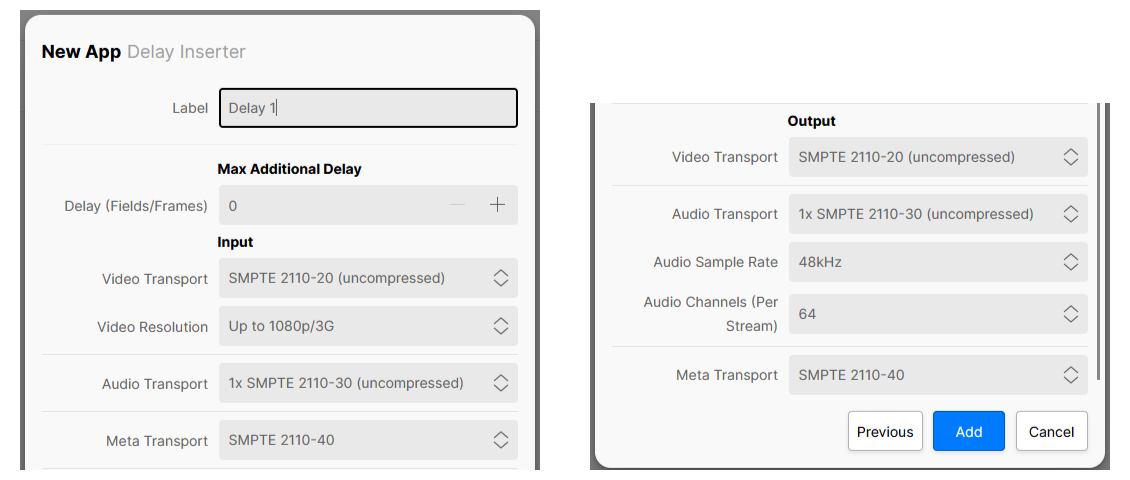
For a HOME Delay, the options in the app configuration define the maximum amount of additional delay that can be applied, and the app's input and output streams.
It should be noted that the Max Additional Delay control sets the maximum additional delay supported by the app which, in turn, defines the amount of App Server memory (used to buffer the app's incoming sources once the app is running).
By setting the maximum additional delay to a lower value, the user can limit the amount of App Server memory reserved by the app. This can be advantageous as, when the user attempts to start the app, the system presents only App Servers with enough available resources. Thus, if a lower value is specified, then the user may be able to deploy the app to a wider choice of App Servers.
Once the app is configured and running, the user can adjust the amount of additional delay (up to the Max Additional Delay value) using the app's Advanced → Delay controls.
Note that Max Additional Delay control cannot be modified whilst the app is running. If you need to change this value later, then you will need to stop the app and edit the app configuration.
For more information about the app configuration options, please see HOME Delay - App Configuration.
IP Senders and Receivers
For all HOME Apps, the available senders and receivers are pre-defined according to the app configuration options defined by the user. i.e. the number and type of I/O.
A HOME Delay Inserter has one output and one input, and so the available senders (TX) and receivers (RX) are as follows.
Sources (app senders):
- TX 1 = Delay Inserter Output
Destinations (app receivers):
- RX 1 = Delay Inserter Input
When considering the app's configuration, the Video/Audio/Meta Transport options determine the number and type of flows.
Note that this app can be configured to receive and transmit the following streams: Video (only); Video and Audio; Video and Meta; or Video, Audio and Meta.
Once an app is running, its actual senders and receivers can be checked and edited from the Senders or Receivers page. See HOME Delay - Senders and HOME Delay - Receivers.
Further controls are available via the Advanced parameters page. See HOME Delay - Advanced -> Senders and HOME Delay - Advanced -> Receivers.
Connecting Signals
When viewed from HOME's 'Stream Routing' page, the available senders and receiver appear in the Source and Destination lists (as shown below).
From here you can connect the incoming and outgoing video, audio and meta streams.
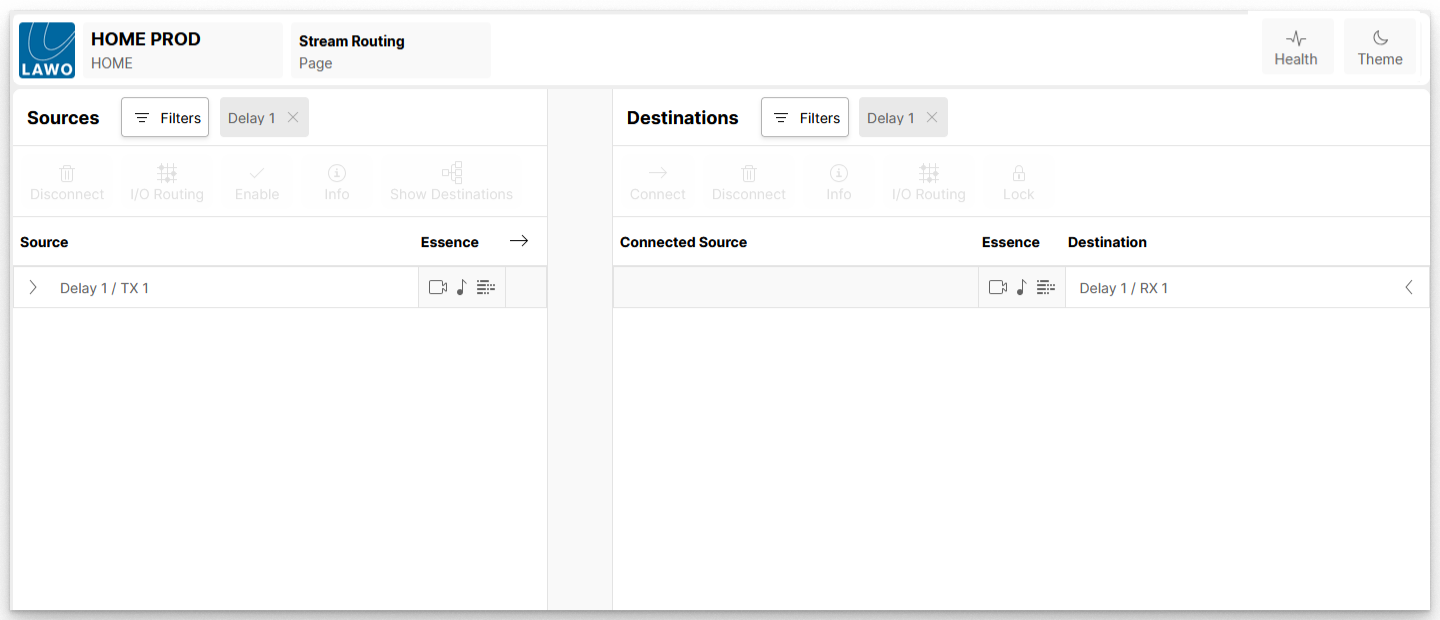
HOME uses the following naming convention for each sender or receiver: <App Label> / TX n or <App Label> / RX n, where the App Label is provided by the user (and can be edited via the Edit Device Info dialog).
If the senders (or receiver) are configured to handle multiple flows, then the flows are grouped so that they can be connected in one operation. By clicking on the reveal arrow, you can expand a sender (or receiver) group to access the individual flows. This can be useful if you need to deviate from the default routing. For example, to connect a different audio source to the Delay Inserter audio receivers.
The steps below describe how to connect the app using the 'Stream Routing':
- To connect a signal to the Delay Inserter input: choose a suitable source on the left, and the Delay Inserter receiver on the right (e.g. Delay Inserter 1 / RX 1). Then press Connect.
- To connect the Delay Inserter output to a destination: choose the Delay Inserter sender on the left (e.g. Delay Inserter 1 / TX 1), and a suitable destination on the right. Then press Connect.
For more information, please see HOME Apps - Connecting Signals.
Using the Delay Inserter
Once the app is configured and running, the user can set the amount of additional delay to be applied, for each stream type, up to the Maximum Additional Delay value (defined in the app configuration).
This is done from the app's Advanced → Delay menu controls. See HOME Delay - Advanced -> Delay.
Editing an Existing App
From here, you can view and edit a variety of app-specific parameters such as the label and location, license type, initial configuration, senders and receivers, and so on.
How to use the individual app pages is described in HOME Delay - Reconfiguring an App.
Parameter Control
The same parameters can be accessed (over NATs) via the HOME API. This supports integration with external broadcast control systems such as Lawo's VSM.
It should be noted that the available menus and controls may change, depending on the app's configuration. In addition, some controls only become available once the app is running; these appear at the bottom of the parameter tree and host the app's runtime controls.
The latest settings are saved (by HOME) whenever a change is made. If a restart is required, then this is noted in the documentation.
All possible controls are described in HOME Delay - Advanced parameter control.