mc²96 - Bus Assign
The console supports three types of mix bus: Groups, Auxes and Sums.
The total number of each bus type is defined by the DSP Configuration. The differences between the bus types are as follows.
- Input channels can assign to any bus - Aux, Group or Sum.
- Groups can assign to any Aux, another Group or any Sum.
- Sums and Auxes are designed to be the final point in the signal chain, and cannot be reassigned to another bus. To do this, you would need to route the Sum or Aux output back to an input channel.
In terms of signal flow:
- Groups and Sums have on/off assignment and are always fed post-fader and post-processing.
- Auxes have on/off assignment and a variable send level. They can be fed from one of three possible pickup points: post-fader, pre-fader or pre-EQ.
Any odd/even pair of mono buses can be linked for stereo, and a range of buses can be configured for surround. The formats are defined in the same way as for input channels and are stored in both snapshots and productions. To learn more, please see mc²96 - Channel Formats.
For stereo and surround bus assignments, the corresponding pan law is applied. The panning tools are described here.
Checking Bus Assignments

If the bus assignments are not visible, then check the following options in the System Settings display. In both cases, the options affect only what is displayed, and not what is available.
- Bus Routing must be enabled (under "Channel Display → Strip Layout").
- The number of buses displayed can be edited using the "Channel Display → Bay/Main Bus Count" options.
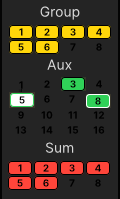
Each indicator represents a mono bus. So, for a 5.1 Sum, you will see all six individual assignments: Sum 1 = L; Sum 2 = R; Sum 3 = C; Sum 4 = LFE; Sum 5 = Ls; Sum 6 = Rs.
The indicators are color-coded as follows: Groups (yellow), Auxes (green) and Sums (red). The Aux indicator colors vary slightly to distinguish the different pickup points for each send: full green = post-fader (e.g. Aux 3); white/green = pre-fader (e.g. Aux 5); green/white = pre-EQ (e.g. Aux 8).
For simplicity at this stage, you should check that all channels are assigned to Sum 1 to 6 (if working in 5.1) or Sum 1 & 2 (if working in stereo). This ensures that once channel panning is turned on, you will benefit from surround, or stereo, panning.
Editing Bus Assignments
There are several ways to edit the bus assignments.
The forward assign methods are best to edit the routing from a channel.
- Bus Assign from the Channel Display
- Bus Assign from the Free Controls
- FADER FORWARD Assign
- The Bus Assign display
The reverse assign methods are a great way to reverse interrogate an output.
The rest of this topic describes all possible methods.
Bus Assign from the Channel Display
This method uses the Channel Display touch-screen to edit the assignments from a channel onto the Groups, Auxes and Sums. If you create a couple, then any changes are applied to all members of the couple group.
- Touch anywhere within the bus assign area to open the "input x" pop-up.
- Note that the same pop-up can be opened by touching any of the following areas: VCA, Mix Minus, Group, Aux, Sum, AMX (Automix) or Signal Present/Source Control.
- Select a page (e.g. Sum Routing).
- Touch the buttons to edit the assignments. You can select a different channel or page without closing the pop-up.
- If the destination is stereo or surround, then the first touch assigns the channel to all components (e.g. to all six Sums). You can then touch again to turn off the individual assignments (e.g. touch Sum 4 to remove the channel from the LFE bus).
- When you have finished editing, touch X at the top right to close the pop-up.
Bus Assign from the Free Controls
This method allows you to spread the aux or group/sum assignments across all of the Free Controls within an isolated bay.

- Turn on ISOLATE on the Channel Display ISO Bay Panel (shown above).
- Press a fader SEL button within the bay to choose the channel you wish to edit.
- Select either AUX or BUS (on the ISO Bay Panel) - the aux or group/sum assignments appear on the Free Controls. The controls are clearly labelled by their displays.
- Use the left and right arrow keys (on the ISO Bay Panel) to scroll through the available pages.
- For AUX or BUS, press the Free Control on/off buttons to edit the bus assignments.
- For AUX, turn the rotary Free Controls to adjust the send levels.
FADER FORWARD Assign
This method uses the fader SEL buttons to make assignments from the channel in access. It is ideal for assigning a channel to multiple bus outputs (if the masters are assigned to the surface).
1. Select the source channel (e.g. INP 1) - either by pressing its fader SEL button or using the Access/Assign panel.
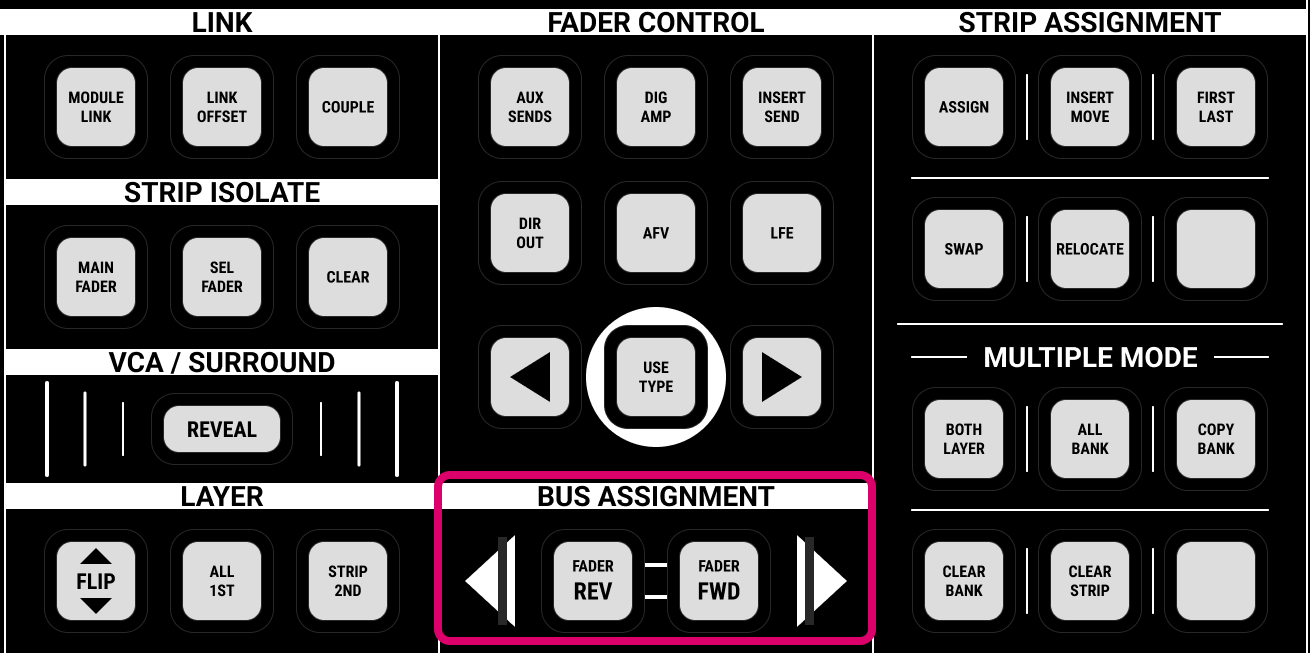
2. Press FADER FORWARD on the BUS ASSIGNMENT panel:
The BUS ASSIGNMENT buttons can be locked, to protect existing assignments, using the Lock ASN option (on the Extra Buttons display). Therefore, if you cannot make a selection, check the status of this option.
The button starts to flash, and the fader SEL buttons across the console light to show the current status:
- Red (steady state) = assigned.
- Green (flashing) = not assigned.
- Not lit = assignment not permitted (e.g. you cannot assign INP 1 to another input channel).

3. Press the fader SEL buttons to edit the assignments.
If the destination is stereo or surround, then the assignment is made to all of the component channels (L/R, C, LFE, etc). To edit the individual assignments (e.g. to the LFE), you can either press REVEAL (to access the component channels) or use the Bus Assign display on the Central GUI.
4. Deselect FADER FORWARD, or press ESC (on the SCREEN CONTROL panel), to exit the bus assign mode.
The Bus Assign display
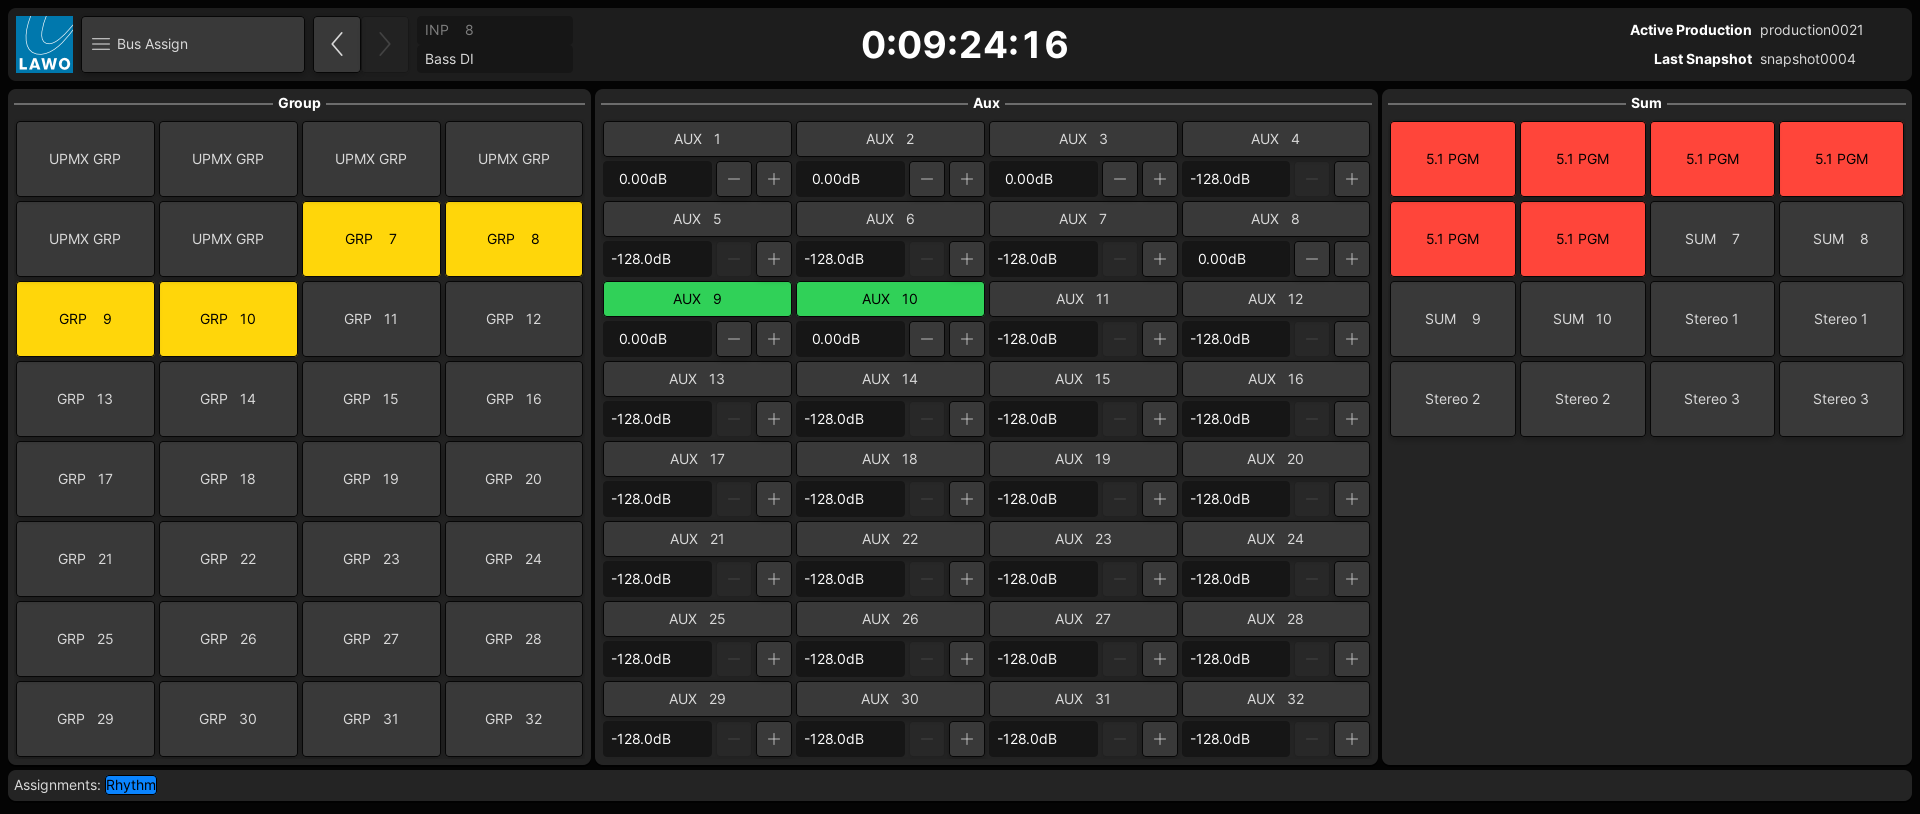
The Bus Assign display shows all possible assignments from the channel in access. It is a great way to check and correct the bus assignments from an individual channel.
1. Select the source channel (e.g. INP 8) - either by pressing its fader SEL button or using the Access/Assign panel.
2. Open the Bus Assign display on the Central GUI, using one of the following methods.
- Press the BUS button on the SCREEN CONTROL panel.
- Select Buses → Bus Assign from the GUI page menu.
- Press CTRL + 2 on the console keyboard.
The display shows all possible bus assignments from the channel in access. The name and label of the channel in access is shown in the title bar.
Each button represents a mono destination. So, for a 5.1 Sum, you will see all six individual assignments. The bus types are color-coded in the usual manner: Groups (yellow), Auxes (green) and Sums (red).

3. Touch the buttons to edit the assignments.
If the destination is stereo or surround, then the first touch assigns to all of the component channels (e.g. L/R, C, LFE, etc). You can then touch again to edit the individual assignments (e.g. to remove the assignment to the LFE).
4. For the auxes, it is also possible to change the aux send levels:
- either, touch the up/down arrow buttons (beside the send level field)
- or, select the send level field and type in a value using the console keyboard.
For convenience, the Assignments area at the bottom of the display shows a list of all VCA and link group assignments. Note that this area is for information only; you cannot change VCA or link grouping from here.
FADER REVERSE
1. Select the destination channel (e.g. Sum 1/2) - either by pressing its fader SEL button or using the Access/Assign panel.
If you are working in surround, then select the surround VCA master (e.g. SUR S 1).
2. Press FADER REVERSE on the BUS ASSIGNMENT panel:

The BUS ASSIGNMENT buttons can be locked, to protect existing assignments, using the Lock ASN option (on the Extra Buttons display). Therefore, if you cannot make a selection, check the status of this option.
The button starts to flash, and the fader SEL buttons across the console light to show the current status:
- Red (steady state) = assigned.
- Green (flashing) = not assigned.
Not lit = assignment not permitted.

3. Press the fader SEL buttons to edit the assignments.
If the destination is stereo or surround, then the channels are assigned to all of the component channels (L/R, C, LFE, etc). To edit the individual assignments, either put the component channel into access (using the Access/Assign panel) or use one of the forward assign methods.
4. Deselect FADER REVERSE, or press ESC (on the SCREEN CONTROL panel), to exit the bus assign mode.
The Buses Reverse display
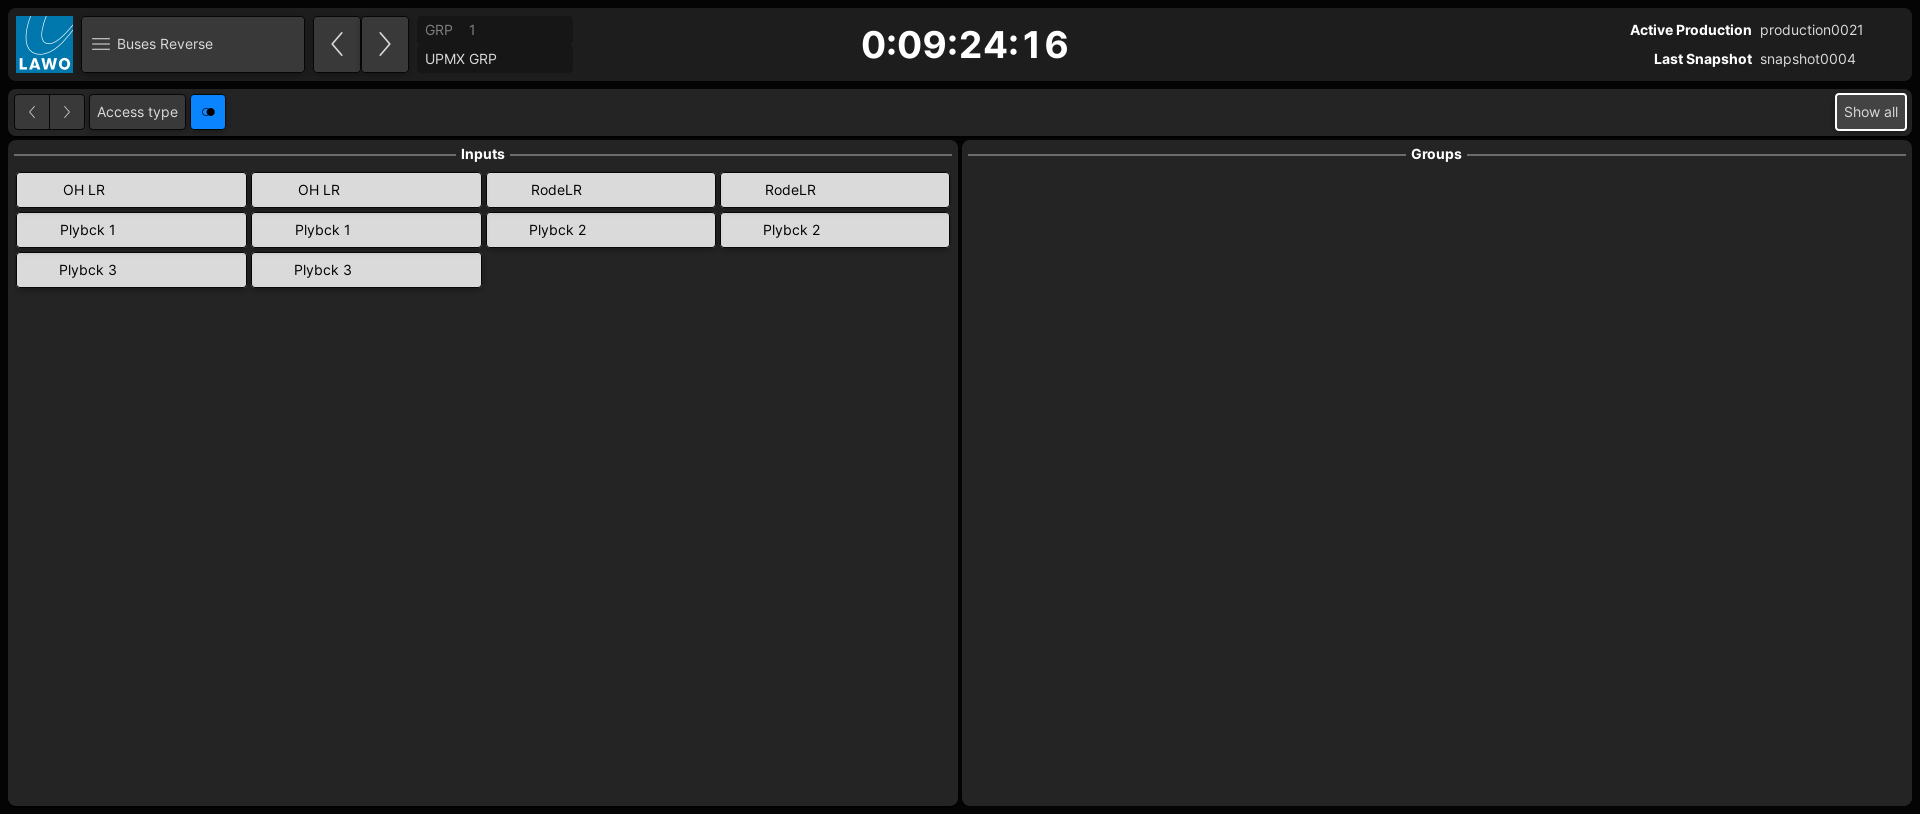
The Buses Reverse display shows all possible assignments to the channel in access. It is a great way to reverse interrogate an output.
1. Select the destination channel (e.g. Grp 1) - either by pressing its fader SEL button or using the Access/Assign panel.
2. Open the Buses Reverse display on the Central GUI, using one of the following methods.
- Press the BUS button on the SCREEN CONTROL panel.
- Select Buses → Buses Reverse from the GUI page menu.
- Press CTRL + 2 on the console keyboard.
If the Show All option is turned off, then the display shows the channels that are assigned to the channel in access. The name and label of the channel in access is shown in the title bar.

3. Turn on Show all to reveal all available source channels. 
4. Touch the buttons to edit the assignments.
If the destination is stereo or surround, then the channels are assigned to all of the component channels (L/R, C, LFE, etc). To edit the individual assignments, either put the component channel into access (using the Access/Assign panel) or use one of the forward assign methods.
5. For convenience, the Buses Reverse display supports three additional options/operations.
Channel in Access
You can change the channel in access as follows:
- Click on the left/right arrows beside Access Type to increment or decrement the channel in access.
- Click on Access Type to cycle through the different DSP channel types: auxes, groups and sums.
- Right-click on one of the source channels (e.g. INP 1) and select Access:
Mono/Stereo Format
You can also change the mono/stereo format of the channel in access, by touching the green/red circle icon (beside the Access Type button).
Mute Channel to Bus
You can mute the feed from an individual channel (as an alternative to removing the bus assignment):
- Right-click on the source channel and select Mute.
- The display updates to show that the source channel is now in a muted state:

- Right-click and deselect Mute to clear the channel mute.