.edge - Advanced -> License Configuration
The License Configuration page manages all of the licensed features for the processing blade.
From here, you can see which licensed options are configured and unlock new functionality (using perpetual licenses and/or Lawo Flex credits).

Important: To use Lawo Flex credits, the blade's system clock must be synchronized to the licensing service running on HOME. This can be achieved either by synchronizing the blade to an NTP server or extracting Time of Day from PTP arriving from the network.
To sync to an NTP server,....
To use PTP, the blade must be configured to operate as a PTP slave (as described in .edge - Synchronization). You can then turn on the Allow PTP clock to set System Clock option (in the Synchronization → PTP advanced parameters) to extract Time of Day from the PTP clock signal.
If the blade's system clock is not correctly synchronized, then it cannot access HOME's credits (and the Subscription License fields cannot be configured). If an option is licensed using credits and synchronization is lost, then the option will continue to function until the next restart of the blade.
Operation (using HOME)
From the main page you can change the operating mode, fetch the perpetual license(s) and configure the core licensed options: 100G operation, additional SDI interfacing and Audio Router.
There is then a sub-page for each of the add-on licensed options: Video Gearboxing, Input Frame Synchronization, etc.
The last two sub-pages are special cases:
- Current License Operation (read-only) - provides an overview of the current configuration. You can use this page to check which licenses are enabled (in a single view).
- File - can be used to manually upload perpetual licenses to the blade (as an alternative to the Fetch License method).
License Configuration
The instructions below describe how the parameters on the main page are used.
Operating Mode
The first three fields can be used to change (and check) the FPGA mode of the blade.
Important: You will need to set aside some time to change the mode, as the first reboot can take up to 6 minutes (due to the FPGA re-programming).
- Use the Operating Mode field to prepare the new mode. All possible options are described here.
Important: The user must ensure that the correct licenses are available to support the selected mode. For example, if one of the 100G operating modes is selected, then the 100G License is required.
If the required licenses are not available, then....
You can use Fetch License to fetch any newly available perpetual licenses from HOME, or use the Subscription License fields to unlock a licensed option using Lawo Flex credits. This can be done either before or after the change of mode. - For security, the change of mode must be confirmed: click on the pencil icon (to open the confirmation dialog), type in "confirm" and then click on Confirm.
- The processing blade now goes offline while it reprograms the FPGA and reboots. This can take up to 6 minutes (due to the FPGA re-programming).
- During this time, you can use the FPGA Status field to check the progress:
- After a change of mode, you will see "Reprogramming", and then "Rebooting", with the time left to complete.
- Once you see "Loaded type:<FPGA mode>", the FPGA is ready for operation. The syntax describes the operating mode.
- The next steps are to check the rest of the configuration (for changes to the active media ports and options such as the Audio Matrix and Color Corrector).
| Advanced (tree path) | Parameter | Possible Values | Description |
|---|---|---|---|
| License Configuration | Operating Mode | Various | Allows the user to choose one of the available FPGA modes. All possible options are described here. |
| Type "confirm" to start FPGA reprogram | Text entry | For security, the change must be confirmed (as described above). | |
| FPGA Status | Read-only | Shows the current status of the FPGA. |
Fetch License
This field can be used to fetch all of the available perpetual licenses from HOME to the processing blade.
This step is necessary if you wish to use perpetual licenses to unlock the licensed options on the blade.
Please note: Before using Fetch License, you must upload your licensing file(s) to the license server using HOME's Files page.
Then follow the steps below to load the licenses to the blade:
- Open the Advanced parameters (using the HOME Web UI).
- From the parameter tree (on the left), select License Configuration.
- To the right of the Fetch License field, click on Trigger Event - the processing blade fetches the license(s) from the licensing file.
- The processing blade goes offline, temporarily, in order to reboot and load the new license(s).
- Following a successful operation, the Status fields (for each licensed option) update.
| Advanced (tree path) | Parameter | Possible Values | Description |
|---|---|---|---|
| License Configuration | Fetch License | Trigger Event | Use Trigger Event to fetch the perpetual licenses from HOME to the processing blade. |
Licensing Service (on HOME)
Operation (using HOME)
From the main page, you can configure the operating mode and SDI interfacing. There are then two sub-pages where you can assign the licenses for 3G UHD Gearboxing and Input Frame Synchronization.
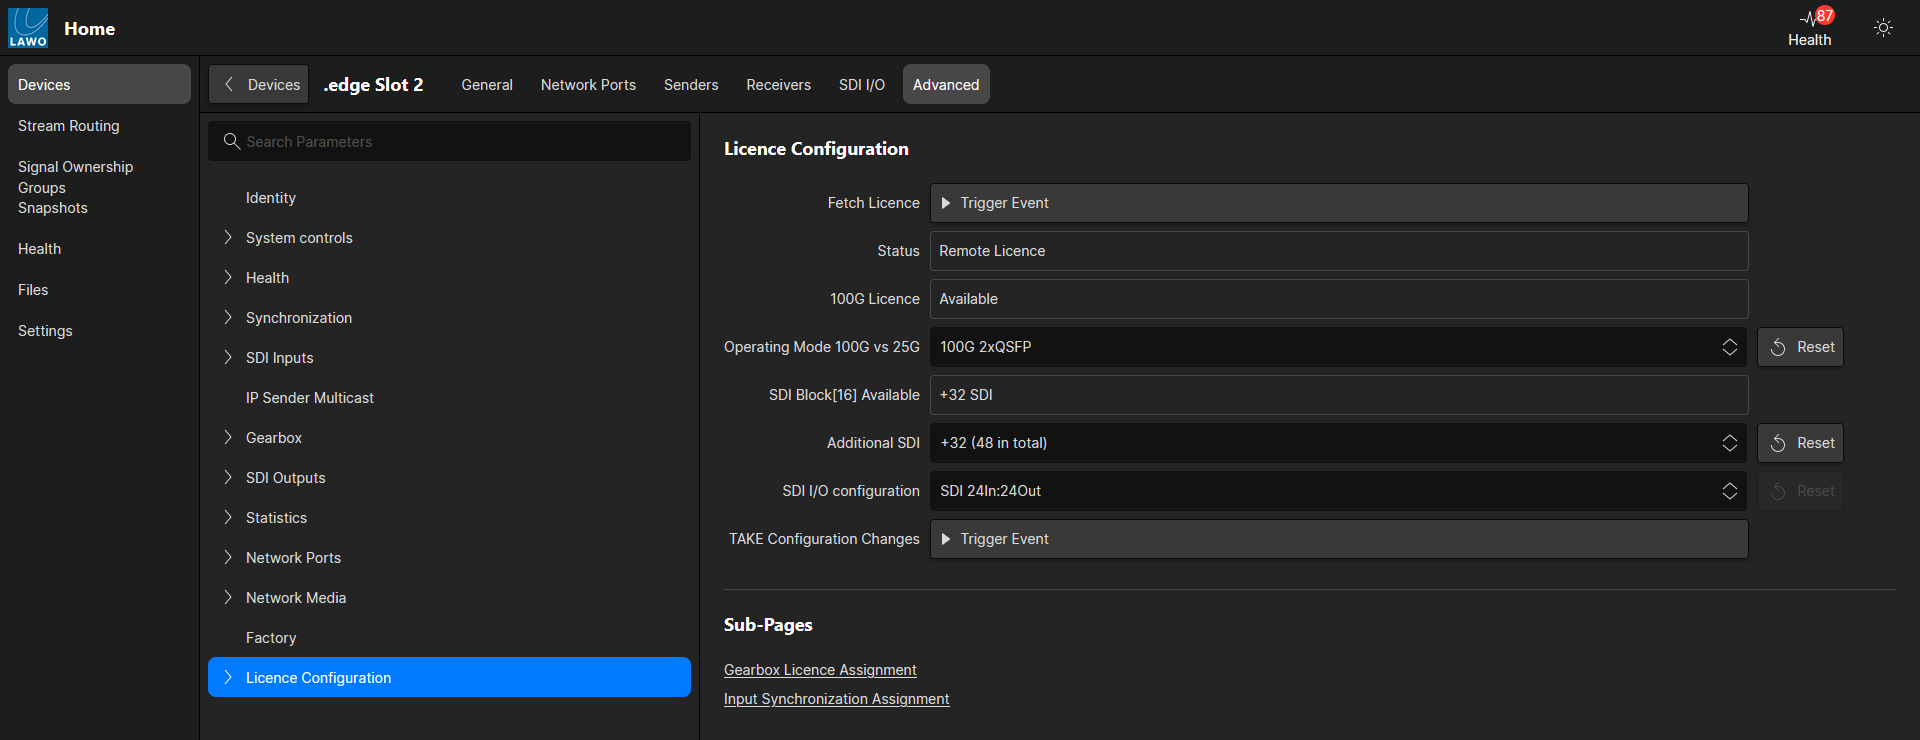
For more information, see .edge - License Activation.
The final step is to choose which licenses are active, or how they are assigned using the License Configuration page (in HOME's Advanced parameters).
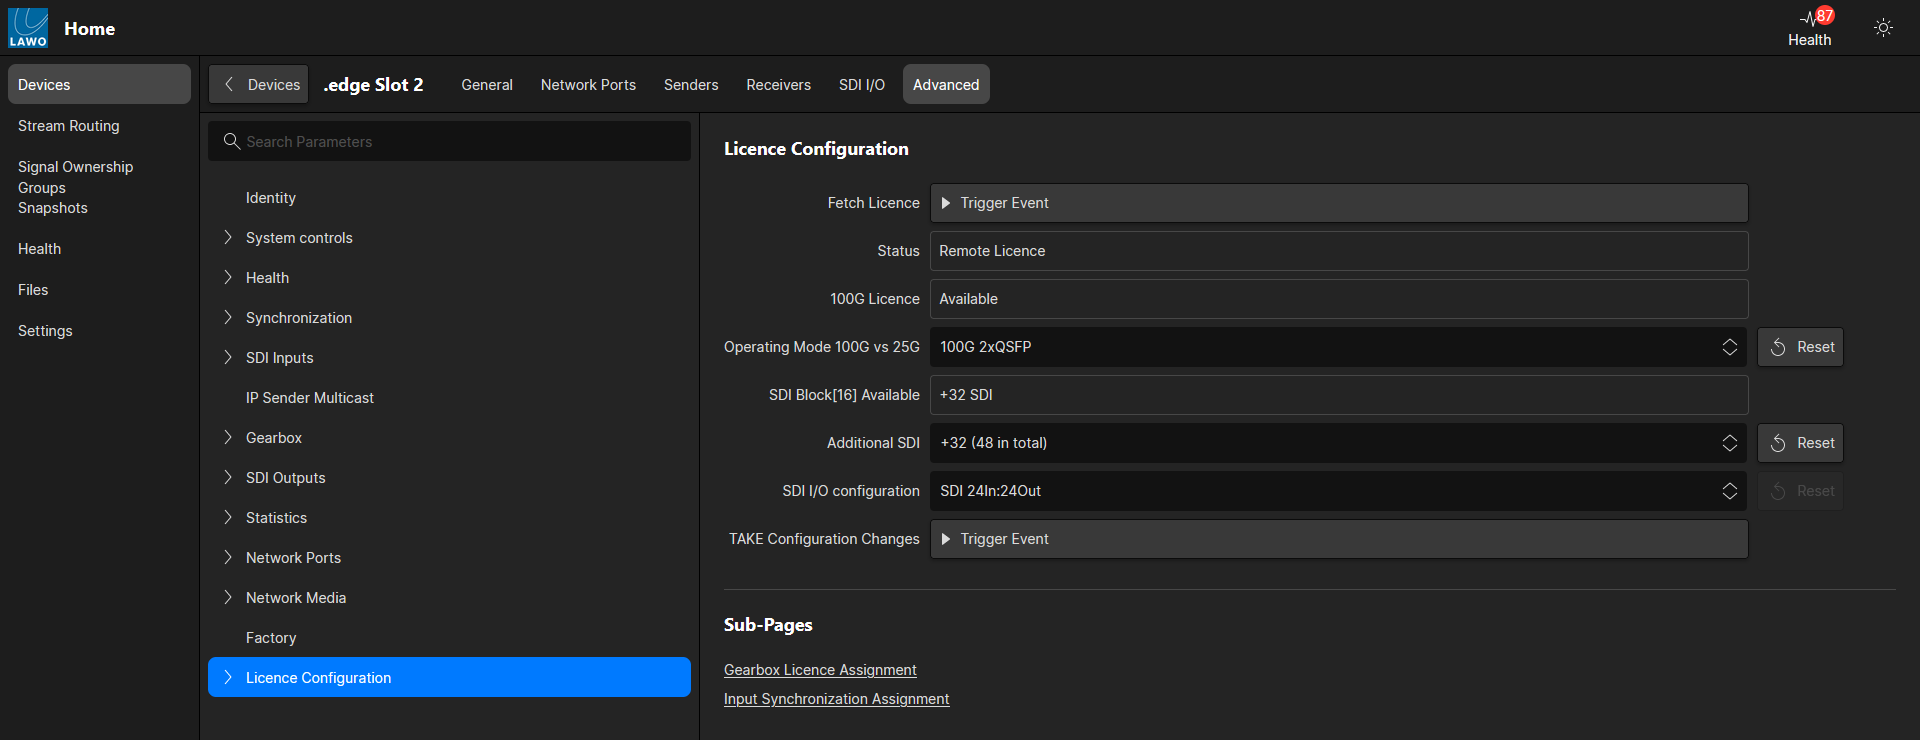
License Configuration (main page)
From the main page, you can configure the operating mode and SDI interfacing. There are then two sub-pages where you can assign the licenses for 3G UHD Gearboxing and Input Frame Synchronization.
In each case, you must edit the parameter field(s) and then push the changes to the processing blade as follows:
- To the right of the TAKE Configuration Changes field, click on Trigger Event.
- The processing blade goes offline, temporarily, in order to reboot and load the new configuration.
Operating Mode 100G vs 25G
This parameter sets the operating mode of the processing blade. There is one informational field (100G License) and one adjustable parameter (Operating Mode 100G vs 25G).
- If a 100G License is Available, then the Operating Mode can be set to either 25G 4xSFP or 100G 2xQSFP.
- If a 100G License is Unavailable, then only one mode is possible: 25G 4xSFP.
Any change to the operating mode must be pushed to the processing blade as follows: click on TAKE Configuration Changes -> Trigger Event.

After a change of operating mode, a processing blade reboots to load the new configuration. Note that this can take up to 6 minutes (as the change of mode forces a change of FPGA).
Once the processing blade comes back online, the new operating mode can be easily checked from HOME's General tab.
SDI Interfacing
The following parameters define the SDI I/O configuration of the processing blade. There is one informational field (SDI Block Available) and two adjustable parameters (Additional SDI and SDI I/O configuration).
- SDI Block Available - shows the number of additional SDIs, based on the number of available ".edge_sdi" licenses.
- Additional SDI - can be used to activate the additional SDIs (if more than one license is available).
- SDI I/O configuration - defines the number of SDI inputs versus outputs.
Note that if you change the Additional SDI value, then this must be pushed to the processing blade before you can select a valid SDI I/O configuration. So, to change the number of SDIs, the complete workflow is as follows:
- Edit the Additional SDI parameter.
- Push the change to the processing blade: click on TAKE Configuration Changes -> Trigger Event.
- After the reboot, edit the SDI I/O configuration parameter.
- Push the change to the processing blade: click on TAKE Configuration Changes -> Trigger Event.
Once the processing blade comes back online, the new I/O configuration can be easily checked from the HOME's SDI I/O tab.
3G UHD Gearboxing
From the Gearbox License Assignment sub-page, you can assign the video gearboxing licenses to the SDI I/Os.
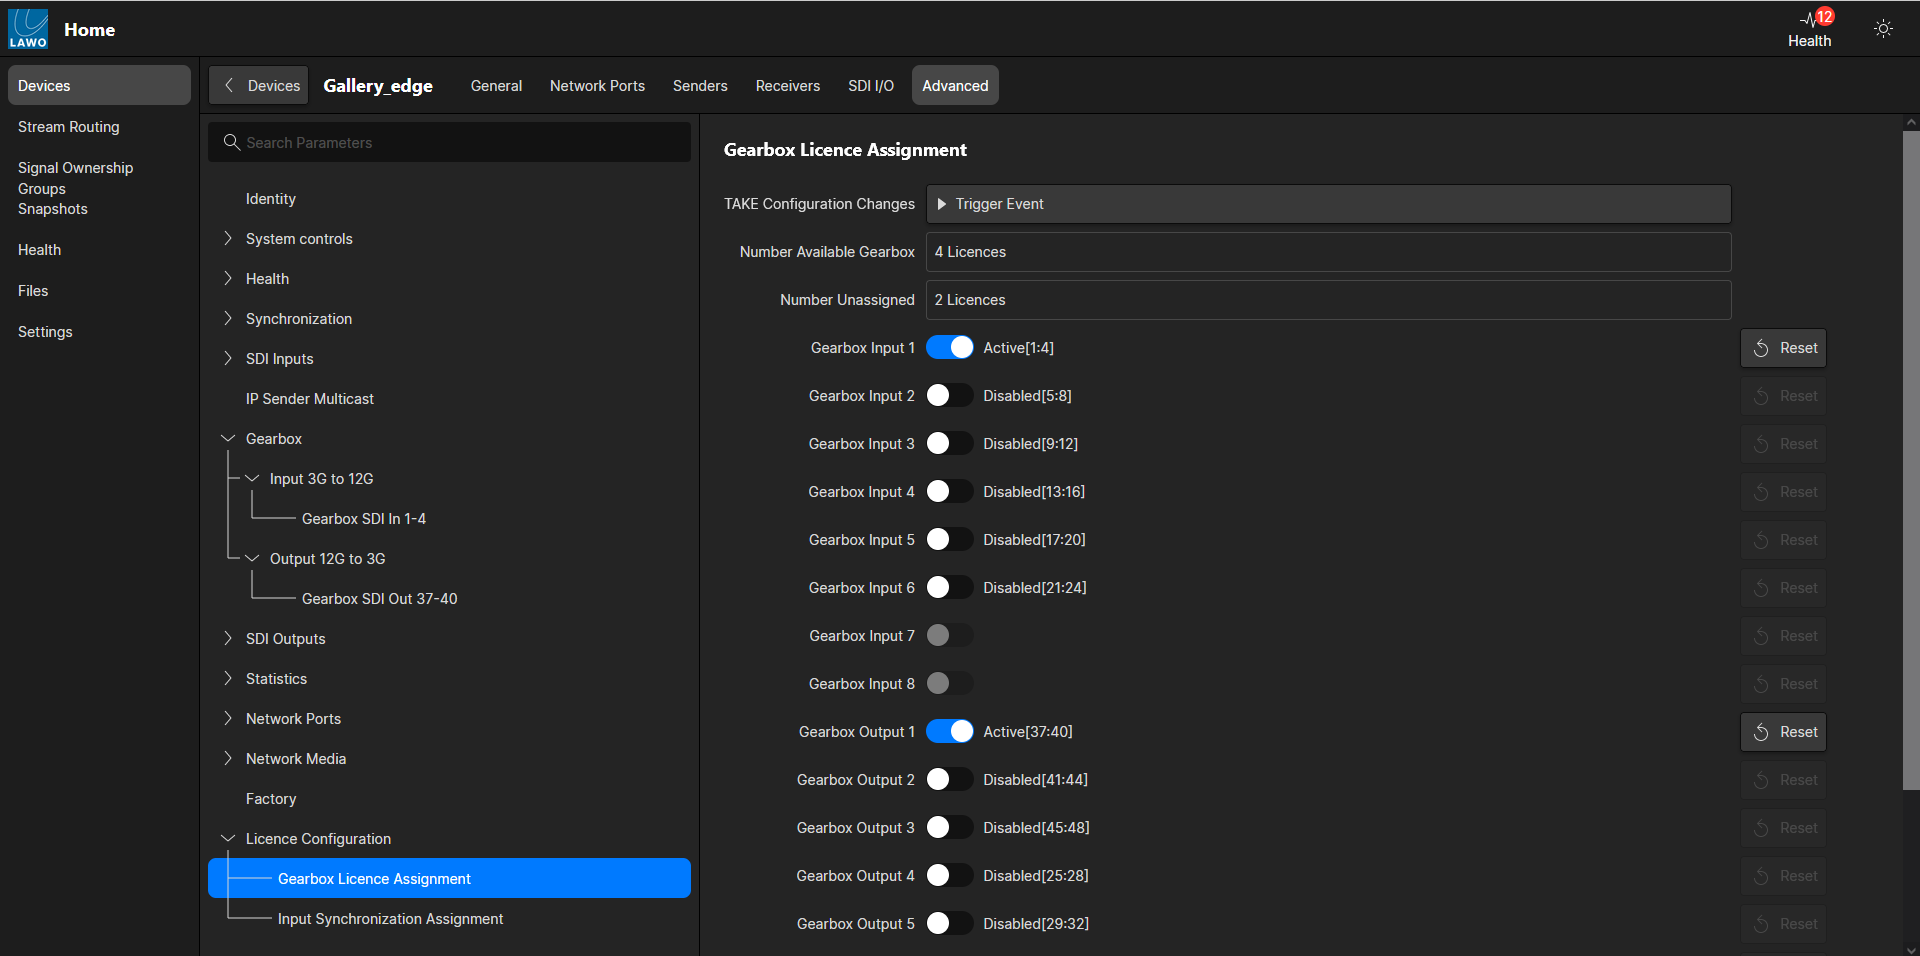
License Configuration → Gearbox License Assignment
Firstly, there are two informational fields that show the license usage:
- Number Available Gearbox - shows the number of available ".edge_gbox" licenses.
- Number Unassigned - shows the number of unassigned licenses.
Secondly, there is a license active/disabled slider for each block of SDI I/Os:
- Gearbox Input 1 - assigns a gearboxing license to SDI inputs 1-4.
- Gearbox Input 2 - assigns a gearboxing license to SDI inputs 5-8.
- etc.
The available licenses can be assigned to any combination of input and output instances. After each change, the Number Unassigned field updates accordingly.
Once you finished editing the license assignments, any changes must be pushed to the processing blade as follows: click on TAKE Configuration Changes -> Trigger Event.
Once the processing blade comes back online, the new license assignments can be easily checked from the Gearbox page (in HOME's Advanced parameters).
Input Frame Synchronization
From the Input Synchronization Assignment sub-page, you can assign the input frame sync licenses to the SDI inputs.
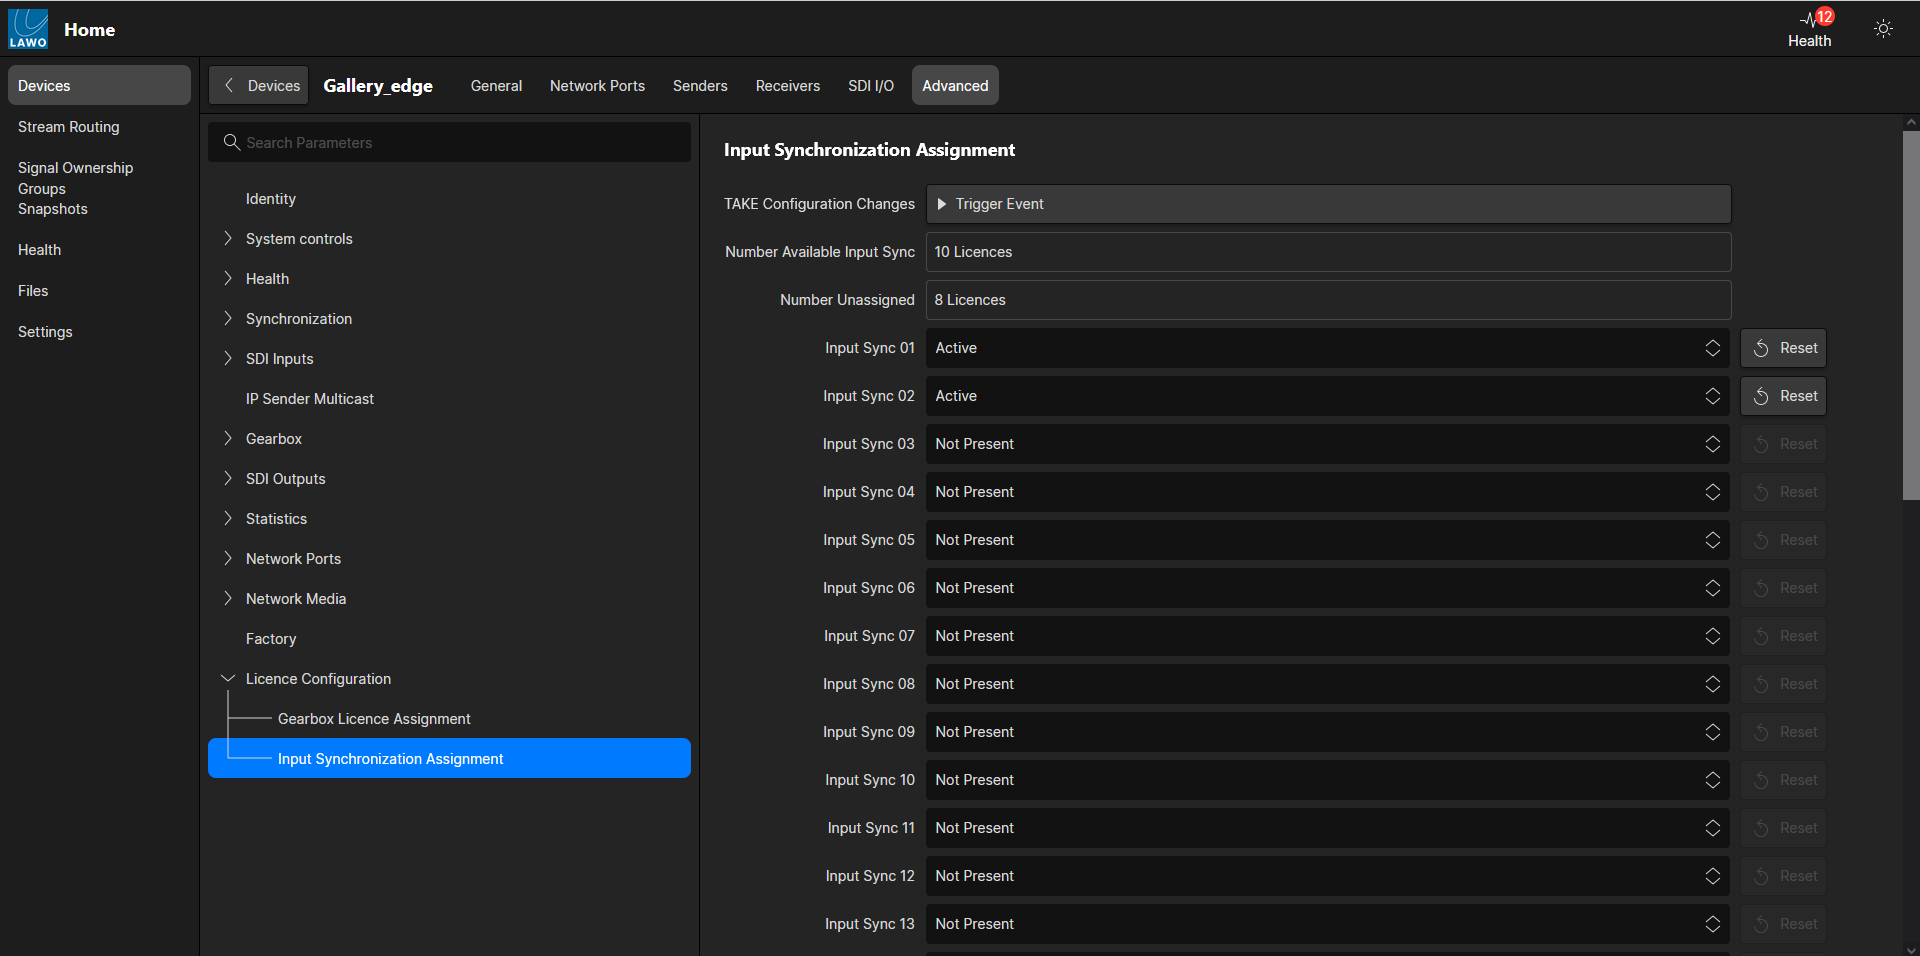
License Configuration → Input Synchronization Assignment
Firstly, there are two informational fields that show the license usage:
- Number Available Input Sync - shows the number of available ".edge_fsync" licenses.
- Number Unassigned - shows the number of unassigned licenses.
Secondly, for each SDI input, you can choose one of three options:
- Not Present = no license assigned.
- Active = license assigned to an individual SDI input.
- 12G/UHD Active = 4 x licenses assigned to a block of SDI inputs: 1-4, 5-8, etc.
The 12G/UHD Active option should be used for either single-link 12G-SDI or quad-link 3G-SDI signals. After each change, the Number Unassigned field updates accordingly. Note that each 12G/UHD Active instance uses four licenses.
Once you finished editing the license assignments, any changes must be pushed to the processing blade as follows: click on TAKE Configuration Changes -> Trigger Event.
Once the processing blade comes back online, the new license assignments can be easily checked from HOME's SDI I/O tab.