.edge - License Activation
This topic describes how to activate the licensed feature(s). For information about the license options and how to order, please see .edge - Licensed Features.
Overview
The available licenses are determined by a licensing file that is stored on the HOME server(s). There is one licensing file per blade; each file can support multiple licenses. The licensing file must be loaded from HOME to the processing blade. The user can then choose which licenses are active, or how they are assigned using the License Configuration page (in HOME's Advanced parameters).
If you do not have access to HOME, then the licensing file can be loaded to a blade using Ember+.
Please note:
- All software licenses are perpetual and locked to an individual processing blade (using the Serial Number provided by the customer).
- Licenses cannot be transferred between blades.
- If a blade fails and you need to fit a replacement, then this will require a separate licensing file (that uses the Serial Number of the replacement blade).
How to obtain a license?
.edge ships with a voucher.
The customer must advise Lawo about which license entitlements should be allocated to each processing blade by supplying the correct Serial Number(s). The Serial Number for a processing blade can be found in HOME's General tab or on the Identity page (in the Advanced parameters).
To obtain a new license, please create a license request via our Service Portal. Further information can be found here.
Step One - Upload the Licensing File
Once you have received the licensing files for your system, the first step is to upload them to the HOME server(s). This can be done using HOME's Files page as follows.
- Open the Files page (in HOME Web UI).
- Select the Licenses sub-folder to view the current license files (.lic). If this is a new installation, then the list will be empty.
- Select the Upload button and then follow the on-screen instructions.
- You can either choose a file to upload (using File Explorer) or drag and drop the licensing file into the dotted outline area.
- You can choose multiple files if you wish. For example, to upload all of the licensing files required for all processing blades on the network.
- Once a valid file is selected, click on the Upload button to start the transfer.
- Following a successful upload, the file is added to the Licenses list.
Each .lic file is specific to an individual processing blade and so you may wish to use some of the following tools (to help manage the list).
The following tools can be used once you have selected a file (or files):
- Download - downloads the selected file(s) to your computer. You can use this option to store a local backup of the licensing file(s).
- Edit - opens a pop-up where you can edit the selected filename. This can be useful if there are lots of processing blades on the network and, hence, lots of licensing files to manage.
- Delete - opens a pop-up where you can delete the selected file(s) from the HOME system. This can be useful to remove obsolete files (e.g. for a processing blade that has been replaced).
Step Two - Fetch the Licenses
Once the licensing files are uploaded to HOME, the next step is to load the licenses to each processing blade.
- Open the Advanced parameters (using the HOME Web UI).
- From the parameter tree (on the left), select License Configuration.
- To the right of the Fetch License field, click on Trigger Event - the processing blade fetches the license(s) from the licensing file.
- The processing blade goes offline, temporarily, in order to reboot and load the new license(s).
- Following a successful operation, the Status field updates.
Step Three - Activate the Licensed Feature(s)
The final step is to choose which licenses are active, or how they are assigned using the License Configuration page (in HOME's Advanced parameters).

License Configuration (main page)
From the main page, you can configure the operating mode and SDI interfacing. There are then two sub-pages where you can assign the licenses for 3G UHD Gearboxing and Input Frame Synchronization.
In each case, you must edit the parameter field(s) and then push the changes to the processing blade as follows:
- To the right of the TAKE Configuration Changes field, click on Trigger Event.
- The processing blade goes offline, temporarily, in order to reboot and load the new configuration.
Operating Mode 100G vs 25G
This parameter sets the operating mode of the processing blade. There is one informational field (100G License) and one adjustable parameter (Operating Mode 100G vs 25G).
- If a 100G License is Available, then the Operating Mode can be set to either 25G 4xSFP or 100G 2xQSFP.
- If a 100G License is Unavailable, then only one mode is possible: 25G 4xSFP.
Any change to the operating mode must be pushed to the processing blade as follows: click on TAKE Configuration Changes -> Trigger Event.
After a change of operating mode, a processing blade reboots to load the new configuration. Note that this can take up to 6 minutes (as the change of mode forces a change of FPGA).
Once the processing blade comes back online, the new operating mode can be easily checked from HOME's General tab.
SDI Interfacing
The following parameters define the SDI I/O configuration of the processing blade. There is one informational field (SDI Block Available) and two adjustable parameters (Additional SDI and SDI I/O configuration).
- SDI Block Available - shows the number of additional SDIs, based on the number of available ".edge_sdi" licenses.
- Additional SDI - can be used to activate the additional SDIs (if more than one license is available).
- SDI I/O configuration - defines the number of SDI inputs versus outputs.
Note that if you change the Additional SDI value, then this must be pushed to the processing blade before you can select a valid SDI I/O configuration. So, to change the number of SDIs, the complete workflow is as follows:
- Edit the Additional SDI parameter.
- Push the change to the processing blade: click on TAKE Configuration Changes -> Trigger Event.
- After the reboot, edit the SDI I/O configuration parameter.
- Push the change to the processing blade: click on TAKE Configuration Changes -> Trigger Event.
Once the processing blade comes back online, the new I/O configuration can be easily checked from the HOME's SDI I/O tab.
3G UHD Gearboxing
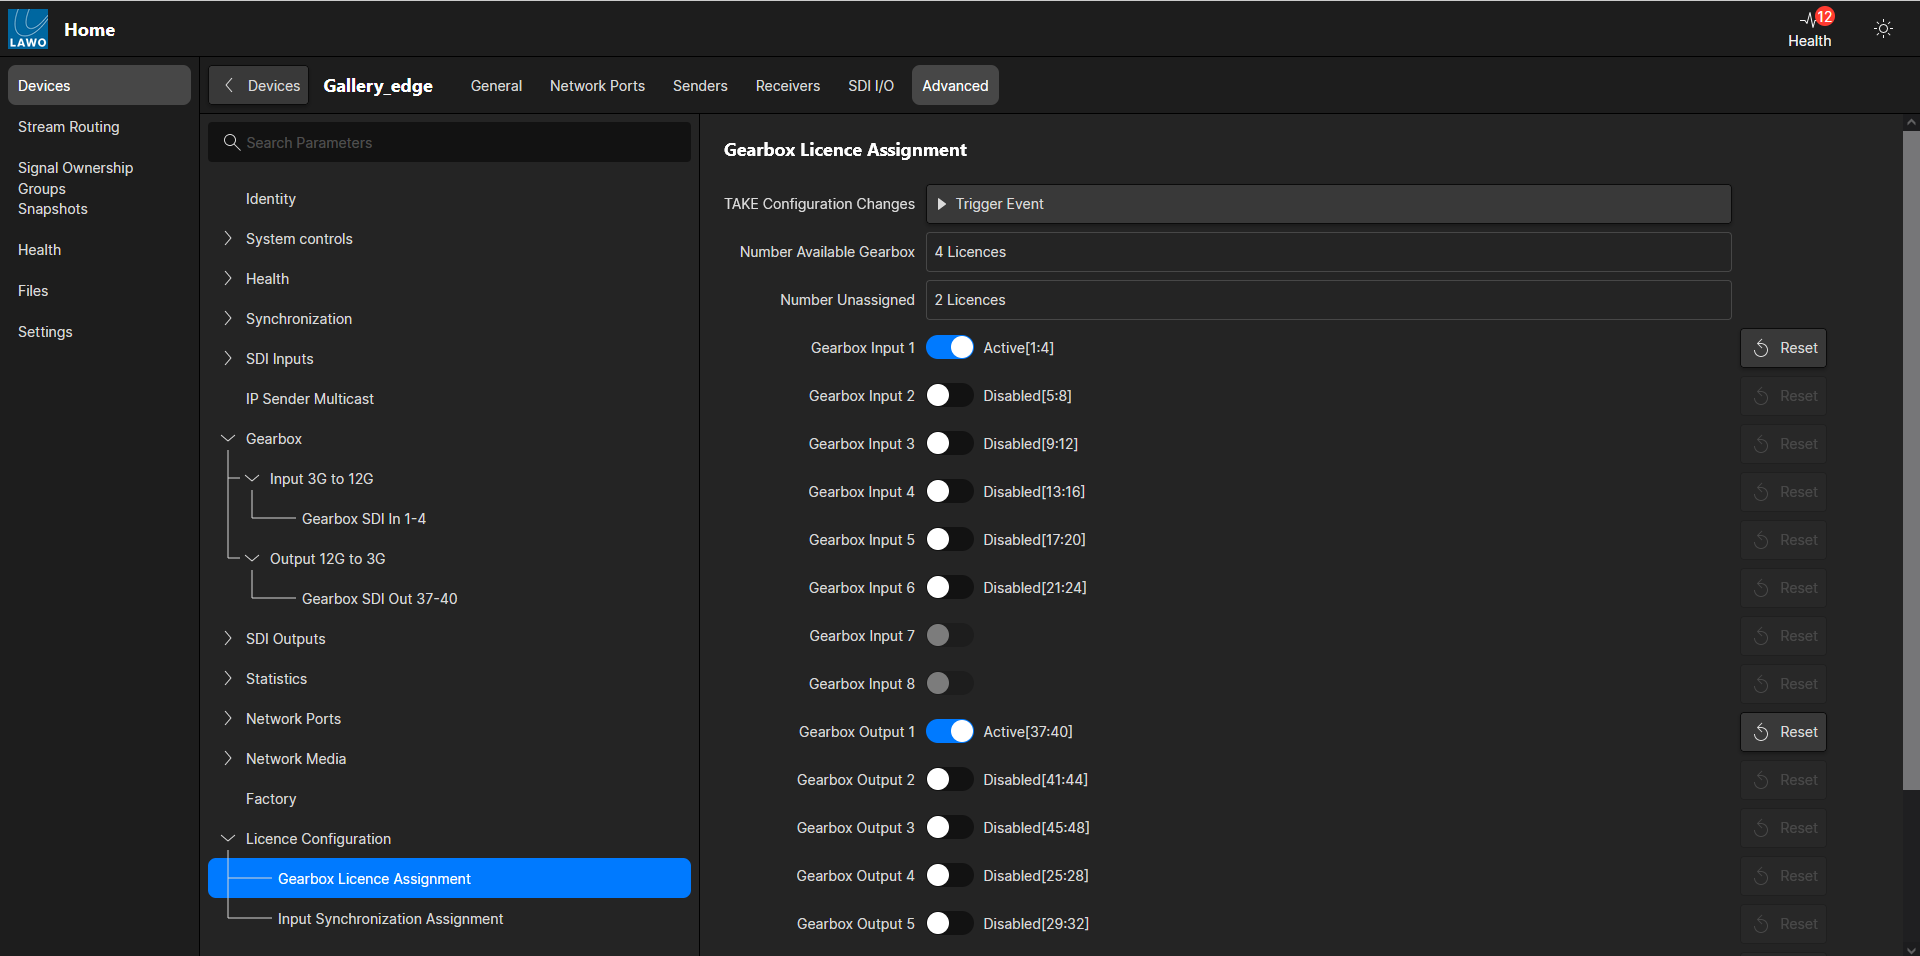
From the Gearbox License Assignment sub-page, you can assign the video gearboxing licenses to the SDI I/Os.
License Configuration → Gearbox License Assignment
Firstly, there are two informational fields that show the license usage:
- Number Available Gearbox - shows the number of available ".edge_gbox" licenses.
- Number Unassigned - shows the number of unassigned licenses.
Secondly, there is a license active/disabled slider for each block of SDI I/Os:
- Gearbox Input 1 - assigns a gearboxing license to SDI inputs 1-4.
- Gearbox Input 2 - assigns a gearboxing license to SDI inputs 5-8.
- etc.
The available licenses can be assigned to any combination of input and output instances. After each change, the Number Unassigned field updates accordingly.
Once you finished editing the license assignments, any changes must be pushed to the processing blade as follows: click on TAKE Configuration Changes -> Trigger Event.
Once the processing blade comes back online, the new license assignments can be easily checked from the Gearbox page (in HOME's Advanced parameters).
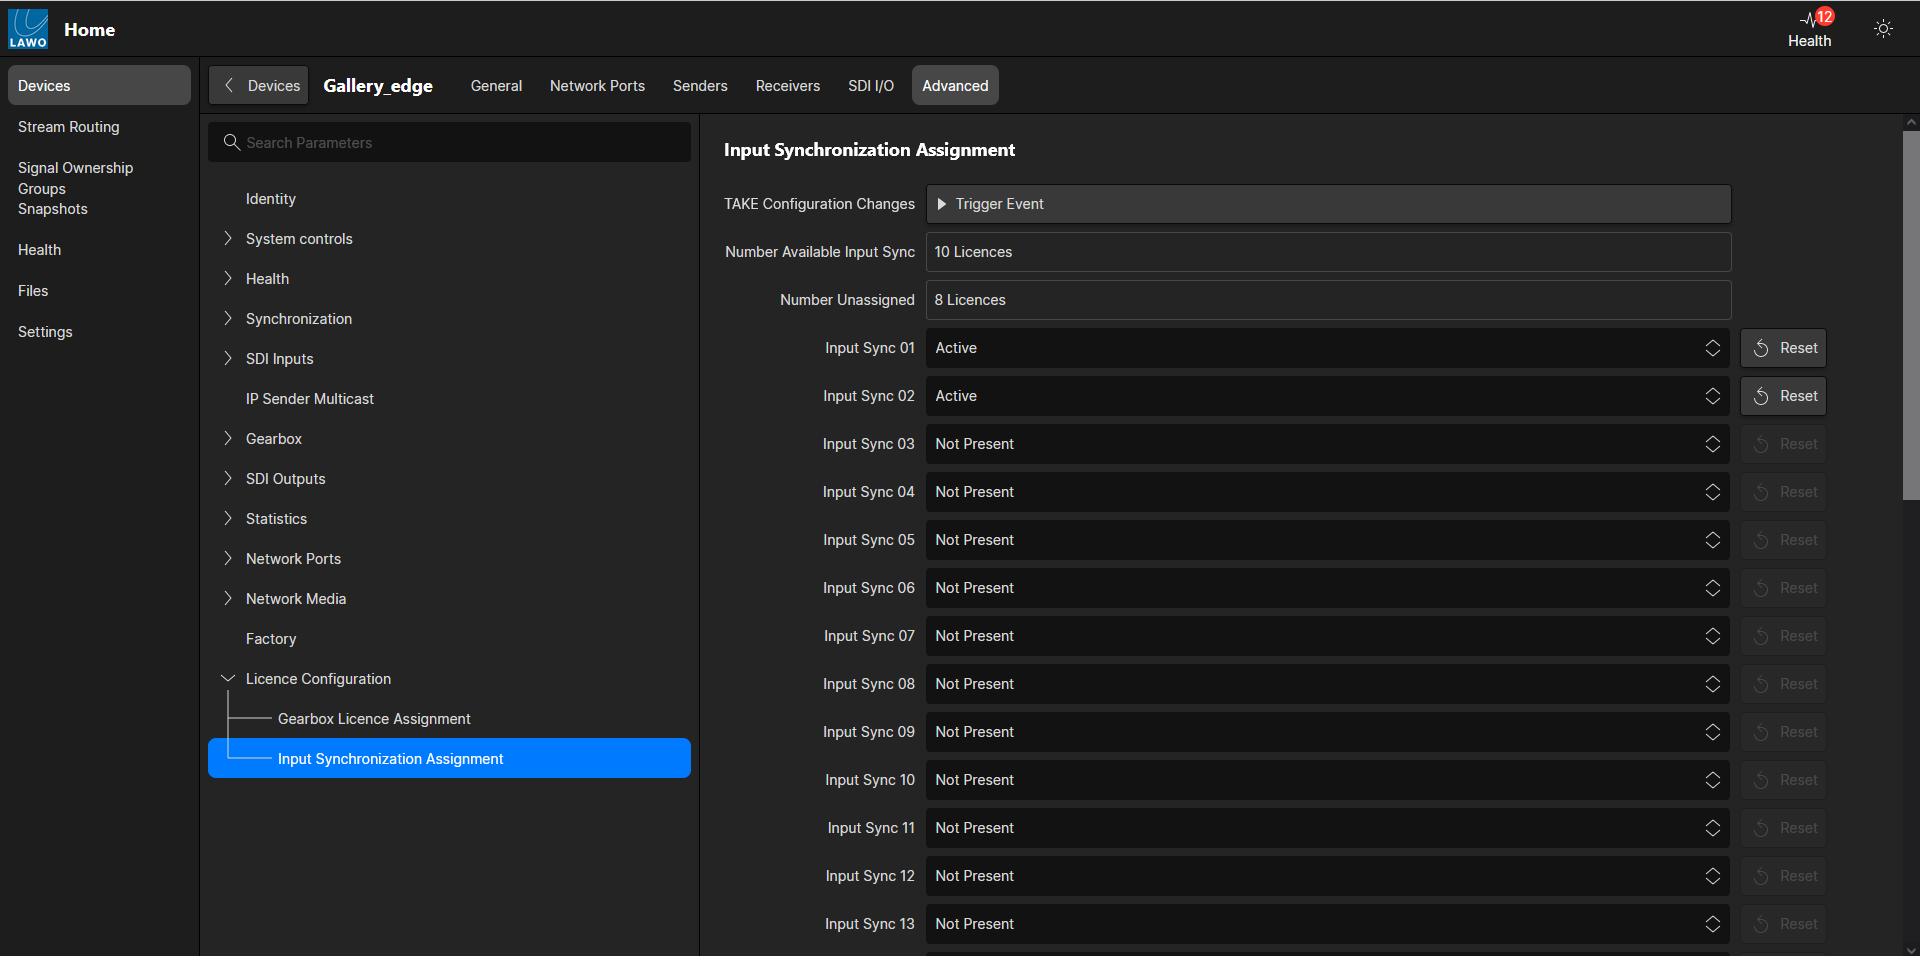
Input Frame Synchronization
From the Input Synchronization Assignment sub-page, you can assign the input frame sync licenses to the SDI inputs.
License Configuration → Input Synchronization Assignment
Firstly, there are two informational fields that show the license usage:
- Number Available Input Sync - shows the number of available ".edge_fsync" licenses.
- Number Unassigned - shows the number of unassigned licenses.
Secondly, for each SDI input, you can choose one of three options:
- Not Present = no license assigned.
- Active = license assigned to an individual SDI input.
- 12G/UHD Active = 4 x licenses assigned to a block of SDI inputs: 1-4, 5-8, etc.
The 12G/UHD Active option should be used for either single-link 12G-SDI or quad-link 3G-SDI signals. After each change, the Number Unassigned field updates accordingly. Note that each 12G/UHD Active instance uses four licenses.
Once you finished editing the license assignments, any changes must be pushed to the processing blade as follows: click on TAKE Configuration Changes -> Trigger Event.
Once the processing blade comes back online, the new license assignments can be easily checked from HOME's SDI I/O tab.