HOME DSK - Basic Functionality
A HOME DSK can be used to composite one video stream (known as the ‘Fill’) over another video stream (the ‘Background’). The area of the Fill stream which is exposed over the Background is controlled by a third video stream, known as the ‘Key’.
Each app supports up to three Keyers (with Key and Fill inputs) which can all be composited over the Background.
- The Keyers are controlled separately, and operate in one of three keying modes: Luma, Linear or Self-Key.
- On the Background layer, a separate A/B mixer can be used to apply 'Make Before Break' type switching between the two video background sources.
- The A/B mixer can be used in conjunction with the Keyer controls or independently (if all three Keyers are disabled).
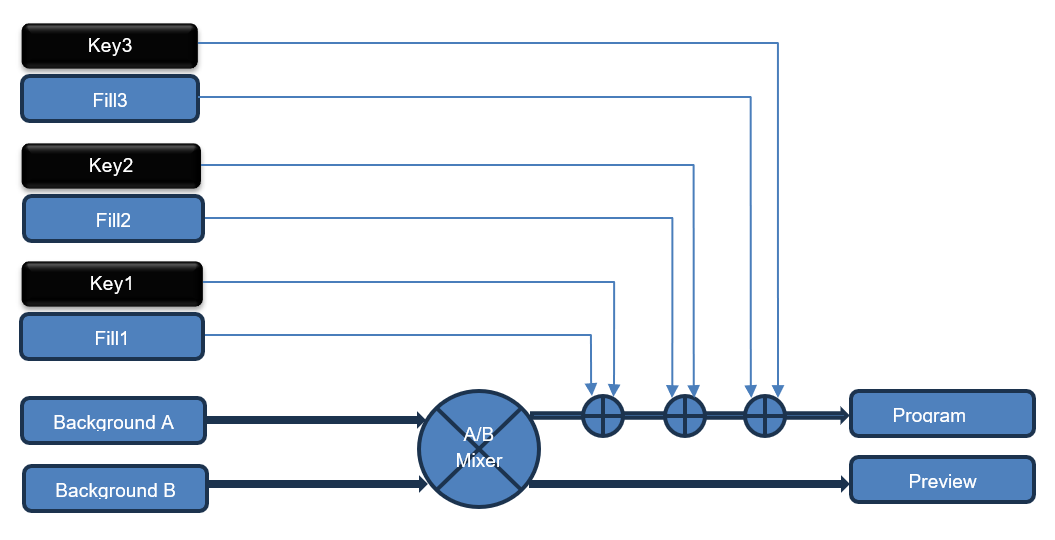
In each case, the Key signal exposes an area of the Background that is filled by the corresponding Fill signal. The result of the composition (selected Background + active Keyers) is carried by the Program output.
A second (Preview) output carries the non-selected Background (without any active Keyers). The Preview output can be forced to the same Background source as the Program output if required. For example, to carry a clean version of the Program output (without any active Keyers).
The diagram below illustrates the app's video processing:
Inputs and Outputs
Each app has 2 inputs for the Background signals, plus up to 6 inputs for Key 1 + Fill 1, Key 2 + Fill 2 and Key 3 + Fill 3.
The receivers for the keyers are provisioned automatically when the user defines the Number of Keys in the app configuration. This can be used to save input receiver resources if not all three keyers are required.
Each app has 2 outputs: Program and Preview.
The Program output carries the result of the composition of the selected Background plus any active Keyers.
By default, the Preview output carries the non-selected Background (to preview the next Background source). It can be forced to the same Background as the Program output (to generate a clean feed).
A/B Mixing
When a Program Take function is triggered, the Preview source switches to the Program output, and the Program source switches to the Preview output.
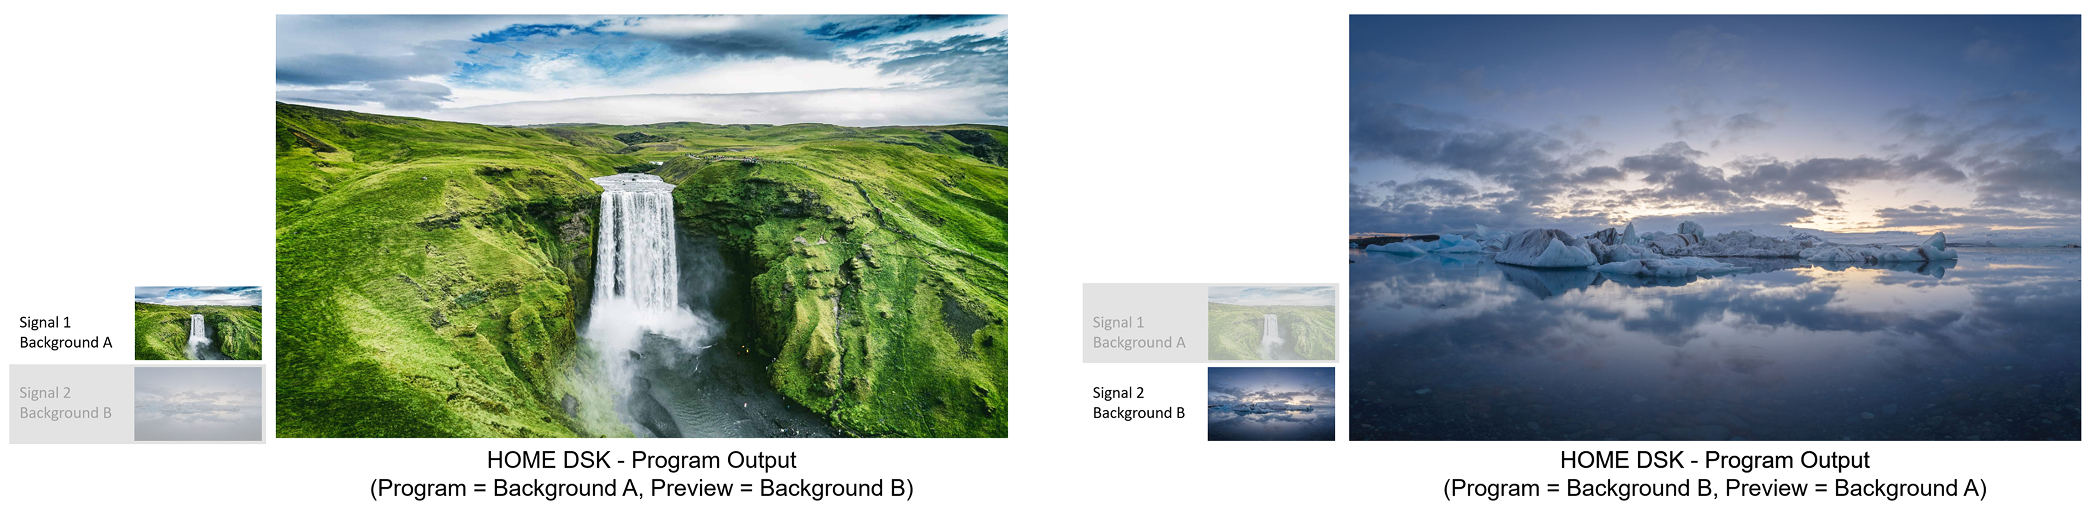
The user can define the transition type and its duration in milliseconds. Multiple transition types are available, including Cut, Fade and Cross Fade.
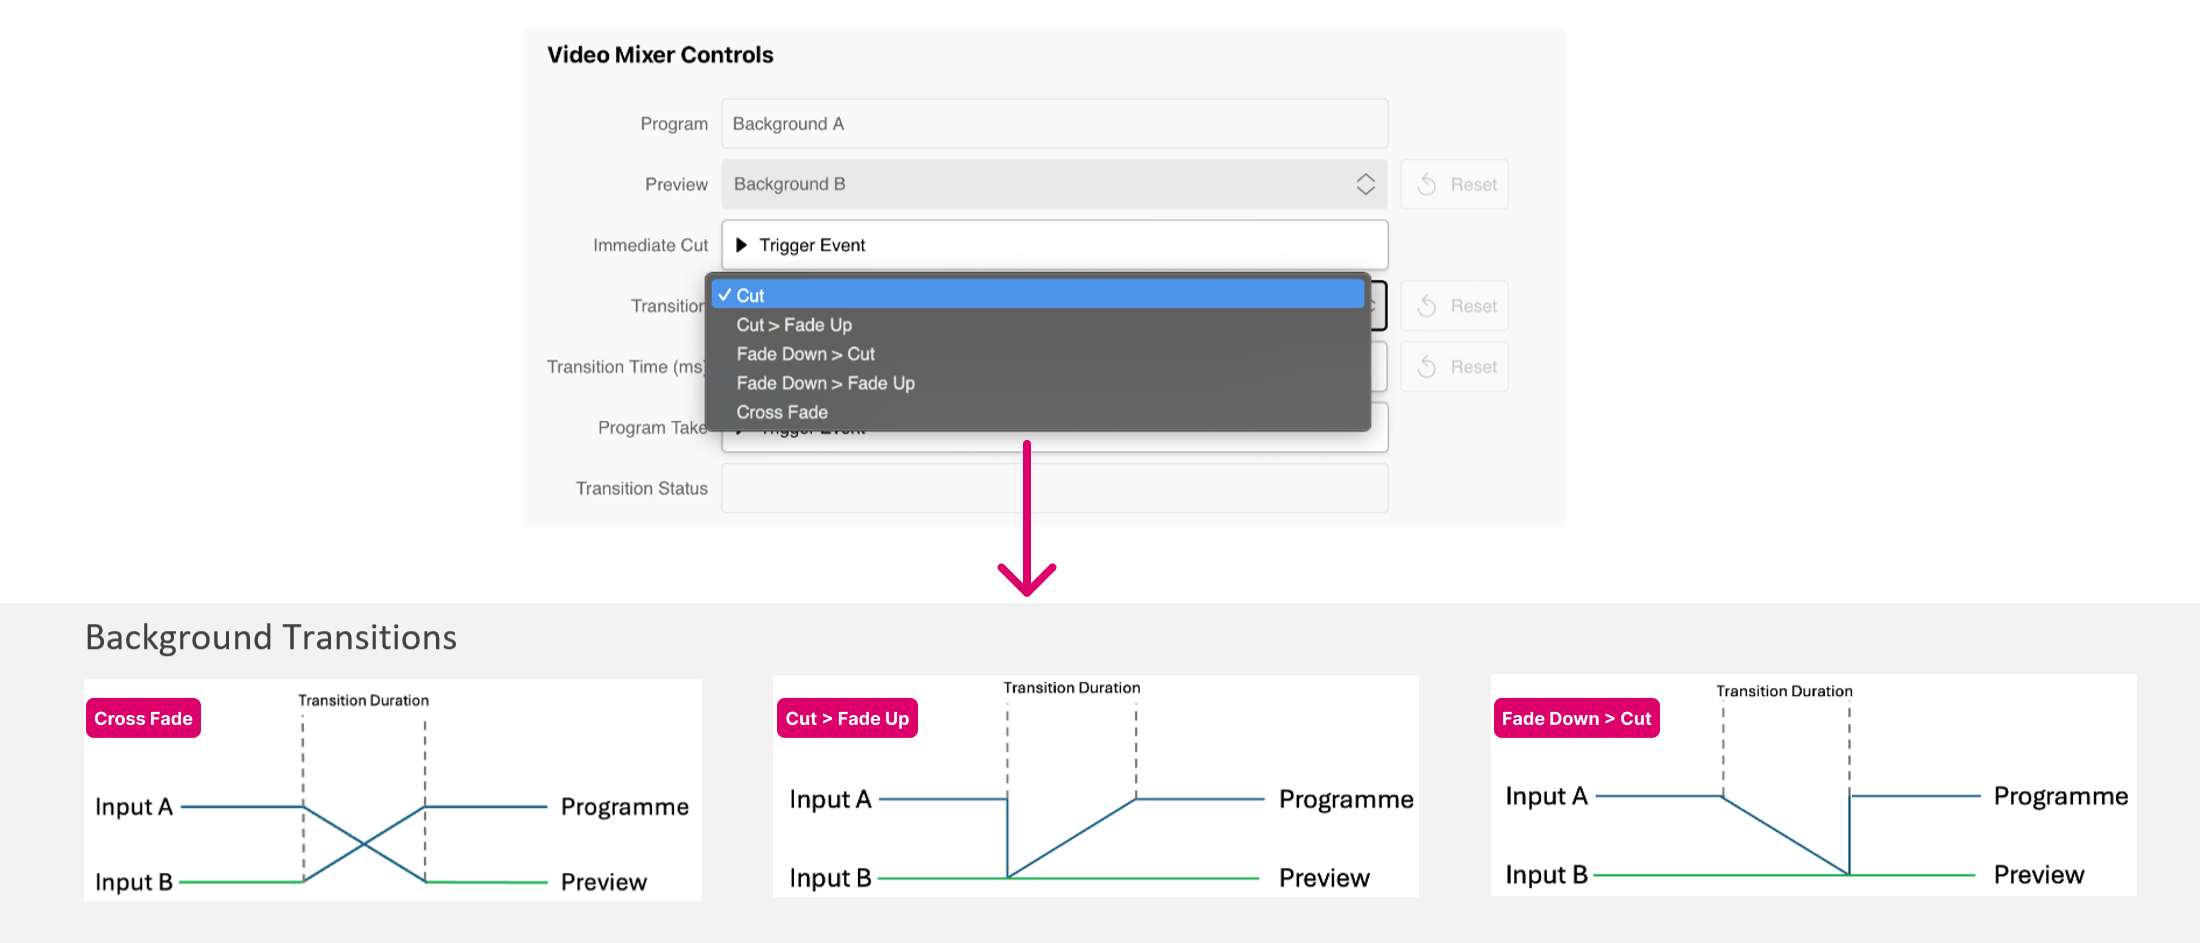
A typical workflow might be:
- Signal 1 is routed to Background A, Signal 2 is routed to Background B.
- Background A (Signal 1) is seen in the Program output, Background B (Signal 2) is seen in the Preview output.
- The user prepares the next transition type and its duration. Then presses Program Take - Trigger Event to start the transition between Backgrounds A and B.
- At the end of the transition, Signal 2 (routed to Background B) is seen on the Program output, Signal 1 (routed to Background A) is seen on the Preview output.
If the Auto Transition option is enabled, then the transition starts automatically when the user routes a new signal to the inactive background (shown on the Preview output). This can be used to reduce the number of operational steps if more than two background signals are required. See Auto Transition.
Please note: When a video transition is started, the audio remains unchanged.
Downstream Keying
Each keyer has a Key and Fill input. When a keyer is enabled, the associated Fill is composited onto the current selected background, restricted by the Key. The result of the composition (selected Background + active Keyers) is carried by the Program output.
The user can control each keyer separately. For example, to define different keying modes, turn each keyer on and off, and define the keyer on/off transition type and duration.
If multiple keyers are enabled and the different Fills overlay, the composition is made with a priority:
- Keyer 3 (highest priority)
- Keyer 2
- Keyer 1
- Background (lowest priority)

A typical workflow might be:
- The Key and Fill signals are routed to Key 1 and Fill 1.
- Ahead of the production, the user presses Take → Trigger Event to turn on the Keyer and view the composite on the Program output.
- The user adjusts the Key Type and Key Level, plus any other options (e.g. Key Shaping). If a Luma key is used, then the Key Level can be used to set the amount of Luminance (in the Key signal) above which the Fill signal is displayed.
- The user prepares the transitions required for Key Off > Key On and Key On > Off.
- During the production, the Keyer is turned on (and off) by pressing Take → Trigger Event.
More information about the different Key Types can be found in HOME DSK - Keying Modes.
Runtime Controls
Once a HOME DSK is configured and running, the app provides two sets of runtime controls: for the Video Mixer and Video Keyer(s).
In each case, the latest settings are stored automatically (by HOME) whenever a change is made.
The controls are accessed from the app's Advanced parameters page (in the HOME UI). The same controls are available via the HOME API. This allows graphics to be keyed on (and off) using triggers from an external control system such as Lawo's VSM.
The Video Mixer Controls allow the user to control the A/B mixing between the two video background sources:
- The Program Take function starts the prepared transition: flipping the Preview source to Program, and the Program source to Preview.
- The Transition Type and Transition Time can be used to prepare the type of transition: Cut, Fade or Crossfade.
- If the Auto Transition option is enabled, then a Program Take is triggered automatically when the user routes a new signal to the inactive Background.
The Video Keyer Controls allow the user to enable/disable each keyer, set its keying mode and adjust other parameters such as the Keyer on/off transitions and Key Level. There is a separate set of controls for each keyer. The main points of operation are:
- The Take function turns the keyer on or off (depending on its current state).
- When a keyer is turned on, its output is used in the composites carried by the Program output: selected Background + active Keyers.
- The Transition On and Transition Off controls can be used to prepare different transition types - for example, to cut a graphic on and then fade it out over the Transition Time.
More information about the operation can be found in HOME DSK - A/B Mixing and HOME DSK - Downstream Keying.