HOME DSK - Downstream Keying
The HOME DSK supports up to three independent key layers over an A/B background mix:
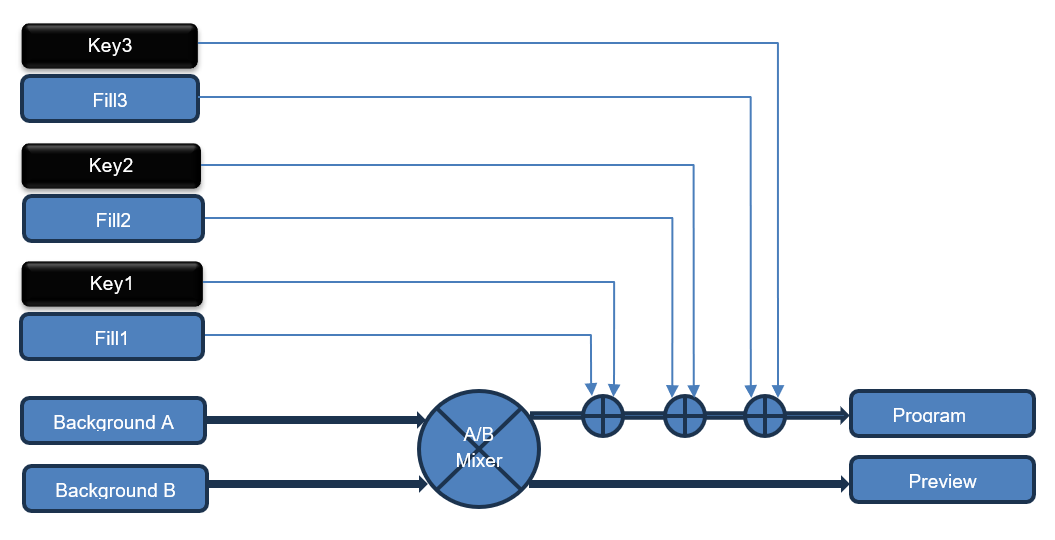
Each keyer is individually controlled and can be set to one of three keying modes: Luma, Linear or Self-Key.
The Basics of Keying
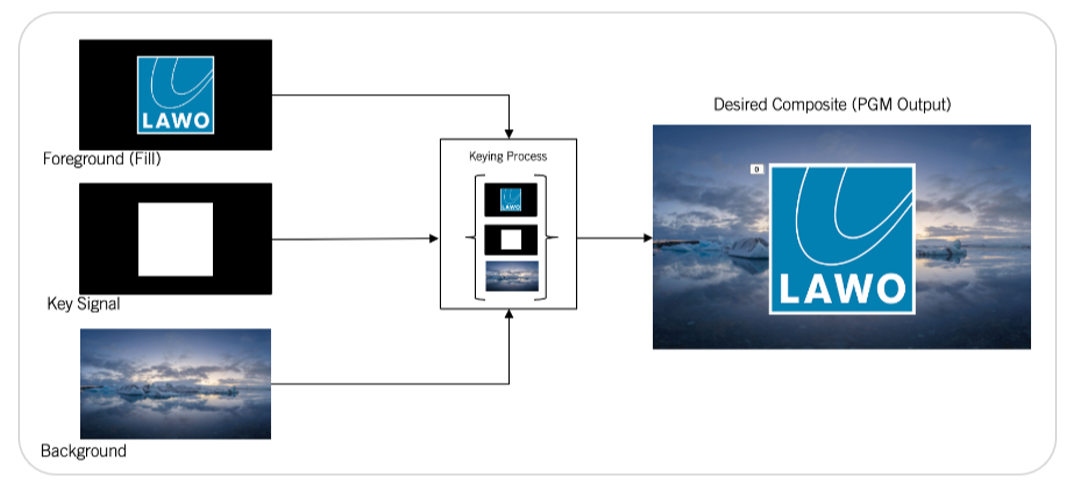
In video, a Key is usually a luminance-only (greyscale) video source which is used much like a stencil to protect an area of another video source (the Fill). When the keyer is enabled, the unprotected areas are discarded. The Key is sometimes referred to as a cookie cutter, as it is used to cut a hole in the Fill. In the HOME DSK app, the area of fill which remains after the hole has been cut by the key is then used to composite onto the background.
When viewing a Key source, white defines the areas kept, black defines areas discarded, and the values in-between can (depending on the selected keying mode) produce a blend type effect.
A common application is to use a DSK App to overlay graphics onto a background. Graphics, such as scorecards, will be produced by an external device over a black background. These graphics tools will usually also provide a key channel which is used to define the area of the graphic. In the DSK, the key can be used to ‘cut out’ the graphic from the black background, after which it can be overlayed onto the selected background: A or B.
Keyer Operation
Each keyer has a Key and Fill input. When a keyer is enabled, the associated Fill is composited onto the current selected background, restricted by the Key. The result of the composition (selected Background + active Keyers) is carried by the Program output.
The user can control each keyer separately. For example, to define different keying modes, turn each keyer on and off, and define the keyer on/off transition type and duration.
If multiple keyers are enabled and the different Fills overlay, the composition is made with a priority:
- Keyer 3 (highest priority)
- Keyer 2
- Keyer 1
- Background (lowest priority)

A typical workflow might be:
- The Key and Fill signals are routed to Key 1 and Fill 1.
- Ahead of the production, the user presses Take → Trigger Event to turn on the Keyer and view the composite on the Program output.
- The user adjusts the Key Type and Key Level, plus any other options (e.g. Key Shaping). If a Luma key is used, then the Key Level can be used to set the amount of Luminance (in the Key signal) above which the Fill signal is displayed.
- The user prepares the transitions required for Key Off > Key On and Key On > Off.
- During the production, the Keyer is turned on (and off) by pressing Take → Trigger Event.
More information about the different Key Types can be found in HOME DSK - Keying Modes.
Runtime Controls
Once a HOME DSK is configured and running, the app provides two sets of runtime controls: for the Video Mixer and Video Keyer(s).
In each case, the latest settings are stored automatically (by HOME) whenever a change is made.
The controls are accessed from the app's Advanced parameters page (in the HOME UI). The same controls are available via the HOME API. This allows graphics to be keyed on (and off) using triggers from an external control system such as Lawo's VSM.
Video Keyer Controls
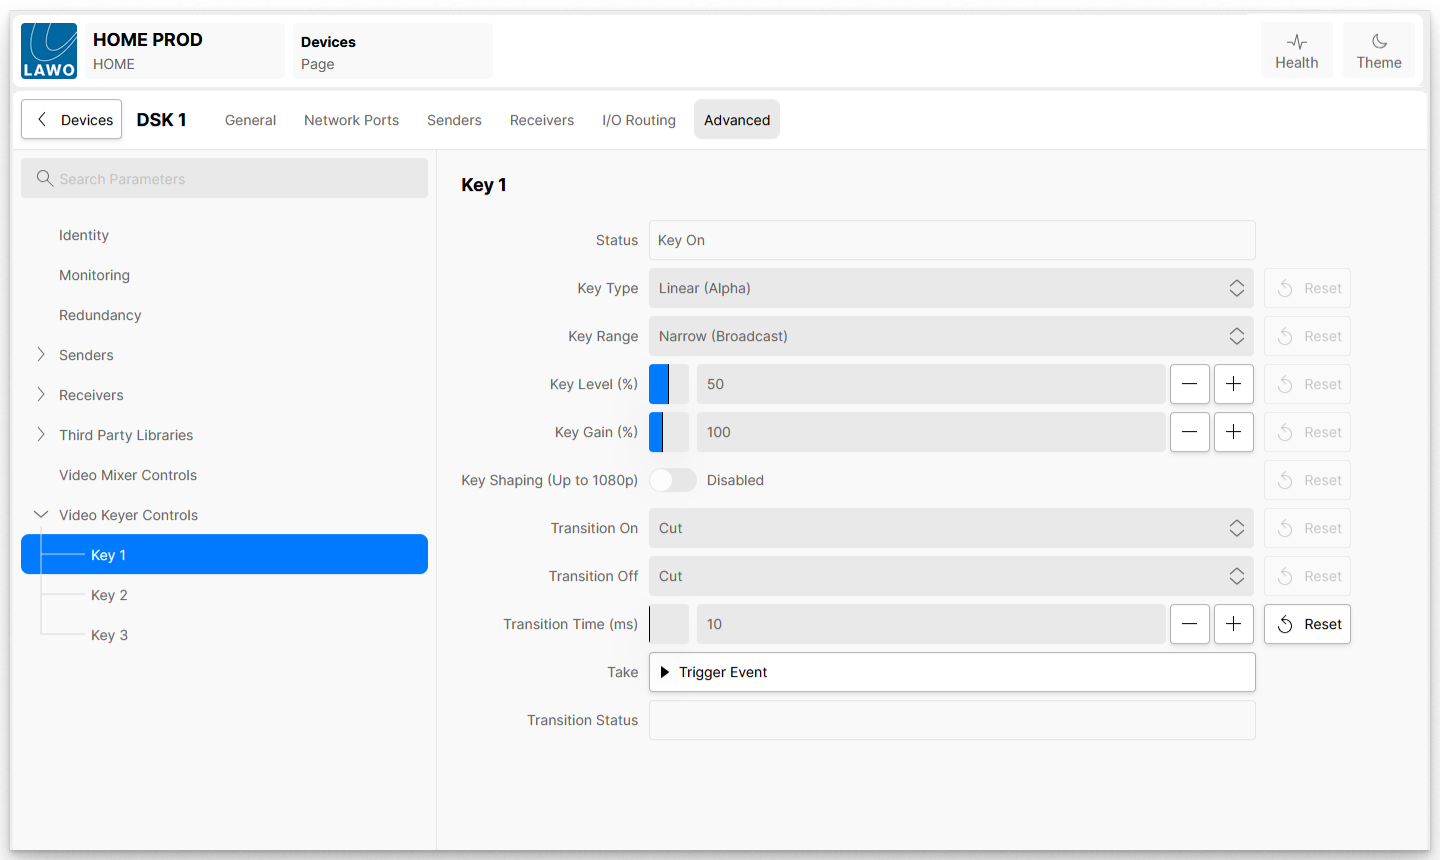
The Video Keyer Controls allow the user to enable/disable each keyer, set its keying mode and adjust other parameters such as the Keyer on/off transitions and Key Level.
There is a separate set of controls for Key 1, Key 2 and Key 3 (if all three keyers are configured). Note that, whether all three keyers are available is dependent on the Number of Keys option in the app configuration. In the example below, all three keyers are configured and the parameters for Key 1 are shown.
For general information about how to edit the parameter fields, please see HOME Apps - Advanced parameter control. Here we describe the function of each control.
The main points of operation are:
- The Take function turns the keyer on or off (depending on its current state).
- When a keyer is turned on, its output is used in the composites carried by the Program output: selected Background + active Keyers.
- The Transition On and Transition Off controls can be used to prepare different transition types - for example, to cut a graphic on and then fade it out over the Transition Time.
The table below describes all available controls.
| Control | Description |
|---|---|
| Status | Displays the current status of the Keyer: either on or off. |
| Key Type | Sets the keying mode used. There are three possible options:
For more information, please see HOME DSK - Keying Modes. |
| Key Range | Used to tell the DSK the black and white levels on the key channel:
|
| Key Level | Applies when the Key Type = Luma or Self-Key. It sets the luminance level above which the Key signal should be considered as ‘white’. i.e. retained by the keying process. By default, areas at 50% luminance (grey) or above are treated as 'white'. For more information about Luma keying, please see HOME DSK - Keying Modes. If the Key Type = Linear, then the Key Level is ignored. |
| Key Gain | Applies a gain to the key channel. It can be used to lift the brightness levels of the key prior to the key being applied to the composite. |
| Key Shaping | Applies when the Key Type = Luma or Self-Key. It applies a simple softening filter to the areas of transition between black and white of the key channel. i.e. to enhance the Key edges. |
| Transition On | Defines the type of transition applied when the Keyer is turned on. There are two possible options:
|
| Transition Off | Defines the type of transition applied when the Keyer is turned off. There are two possible options:
|
| Transition Time (ms) | Sets the duration of the Key on/off transitions in milliseconds. The value can be set from 10 to 30000 milliseconds (0.1 to 30 seconds). |
| Take | When ‘Trigger Event’ button is pressed, this starts the prepared transition. The Keyer will transition either from on to off, or off to on, depending on its current status. |
| Transition Status | Displays the status of the transition, while the transition is in progress. e.g. Key On > Key Off. |