diamond - Source Parameters
The number of available sources, and whether 5.1 is supported, is determined by the Power Core license. Note that a stereo source uses 2 resources and a 5.1 source uses 6 resources.
By default, all source channels come with a full complement of DSP. If you wish to simplify the operation, then it is possible to disable the individual DSP blocks (per source). This is done by editing the system configuration using the ON-AIR Designer (under "Source → Parm").
Signal Flow
The diagram below shows the signal flow for a diamond source.
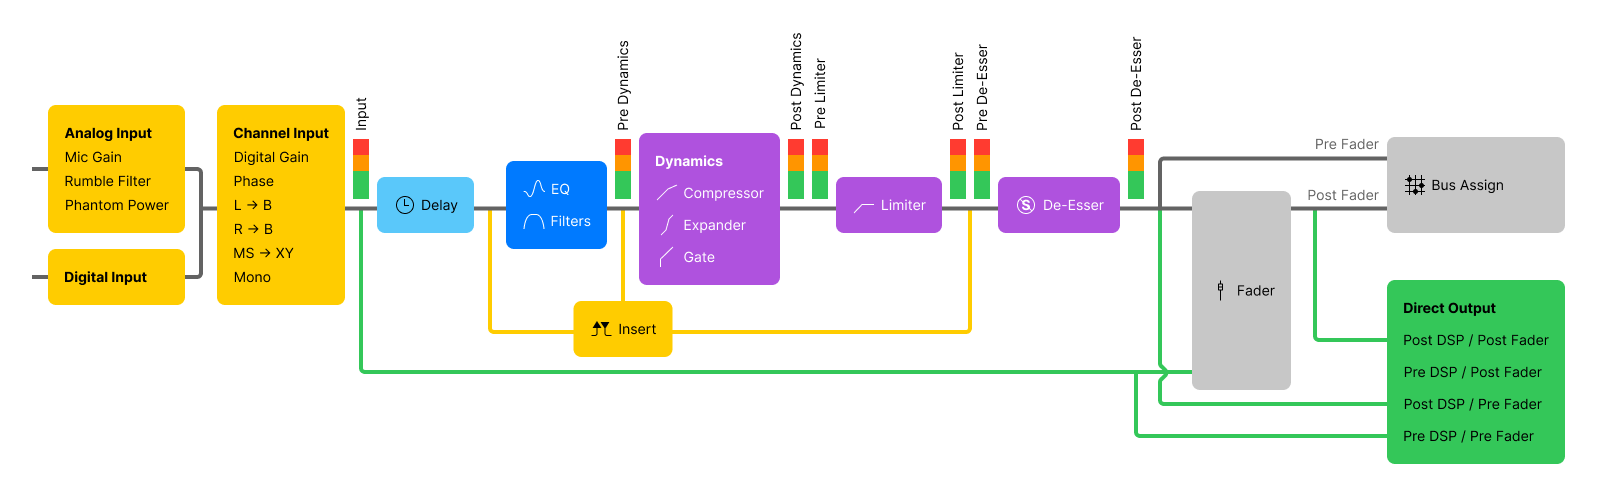 The signal processing blocks are:
- EQ: 3-band parametric EQ plus 2-band filters.
- Dynamics: Compressor, Expander and Gate.
- Limiter: independent Limiter.
- Delay: up to 5.3 seconds, adjustable in ms, meters or frames.
- De-Esser: gain reduction for sibilant frequencies.
- AutoMix: automatic level adjustment for a group of sources.
In addition, the source's insert point can be used to insert an external device. This works by assigning one of the 16 available inserts defined by the configuration. Thus, at any one time, up to 16 external inserts are possible.
Every source channel also includes an input section and metering, plus a direct out is available for each fader. The pick-up points for these elements are as follows:
- Input meter - is fixed and comes after the input section and before all processing. This meter is shown in the fader strip Source Display and on the GUI Channel Strip page (in the standard configuration).
- Pre/Post Dynamics & Limiter meters - are fixed and show the level at the input and output of the Dynamics and Limiter sections. The meters are used on the GUI Source Parameter pages (in the standard configuration).
- External insert point - can be switched to one of three positions by the operator:
- pre-EQ
- post-EQ
- post Dynamics (or post Dynamics and Limiter if both are configured)
- Direct out - is defined per fader (and not per source). Its position is defined by the configuration and remains fixed during the operation. There are four possible options:
- post-processing + post-fader
- pre-processing + post-fader
- post-processing + pre-fader
- pre-processing + pre-fader
Operating Principles
To adjust the parameters for a source, it must be placed in access.
The steps below describe the Access key colors and GUI pages defined in the standard configuration. These aspects may vary if the configuration is customized.
If the console is fitted with extension modules, then these can be used to adjust parameters for more than one source at a time. The operation of these controls is described later. See Working with Extension Modules.
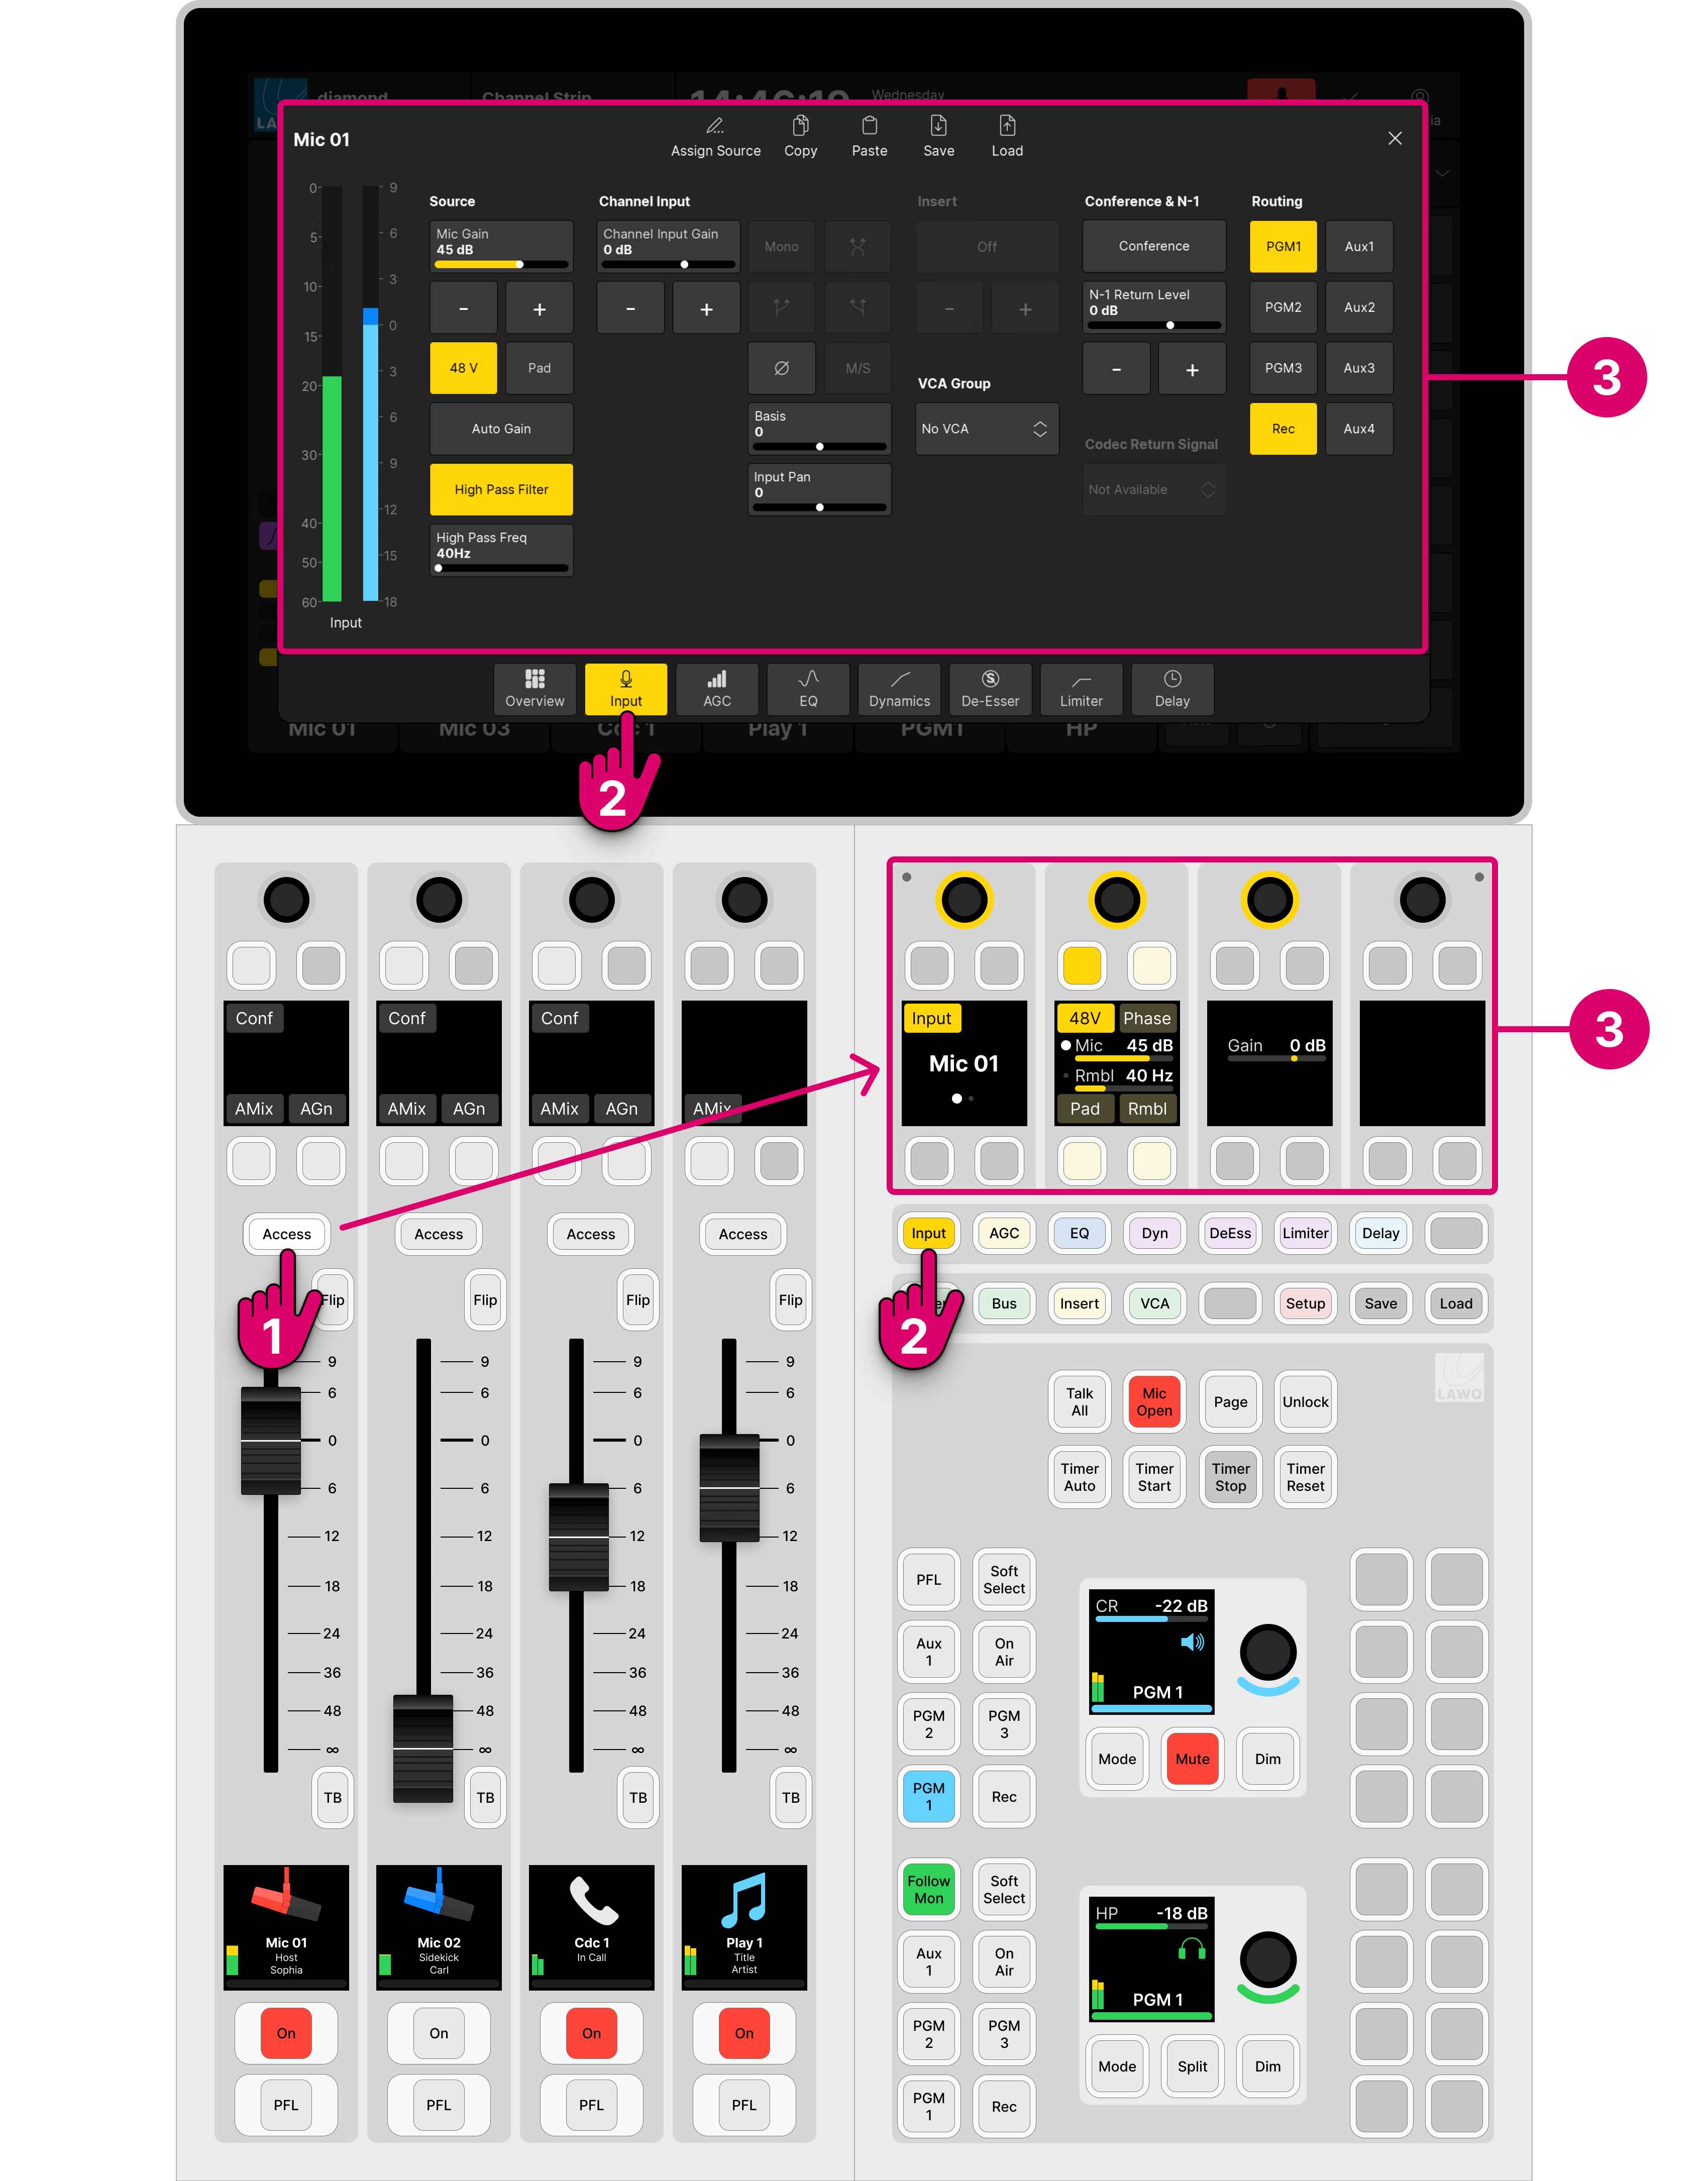
1. Select a source by pressing a fader strip Access key. Take care to press once and not twice to avoid entering strip assign mode.
The Access key lights (full white) and the Central Rotary Controls switch into "source parameter" mode. On the GUI, the 'Source Parameter' dialog box opens to the last viewed page.
2. Choose the parameters you wish to adjust by pressing a Central Function Key (on the surface) or a page button (on the GUI).
For example, press Input to adjust the input and pan parameters.
There are seven DSP functions to choose from. The controls use the Lawo LUX color-coding for easy identification: Input (yellow), AGC (yellow), EQ (blue), Dyn (magenta), DeEss (magenta), Limiter (magenta) and Delay (cyan).
The surface and GUI pages are selected independently. This allows you to adjust different parameters in parallel - for example, EQ on the surface and Dynamics on the GUI. If a DSP block is disabled in the configuration, then the corresponding controls are unlit (on the surface) and greyed out (on the GUI).
The Overview page appears only on the GUI and is for information only. If you touch something on the Overview, then the corresponding parameter page opens.
3. Adjust the parameters from either the surface or GUI (as described below).
4. At any time you can press an Access key on a different fader strip to adjust the parameters for another source.
5. When you have finished adjusting the parameters, deselect the Access key (with a single press).
The surface controls return to their default functions, and the 'Source Parameter' dialog box closes.
You can quickly check which DSP sections are enabled by looking at the 'Processing' area on the GUI 'Channel Strip' page.
Please note:
- On a Combo module, while a source is in access, you will lose the upper rotary control and four soft key functions on the fader strips adjacent to the central controls.
- The remaining controls operate as normal (and so you can place these sources in access, adjust their level, etc).
- To return the fader strips to their normal mode of operation, cancel the "source in access" (by turning off the selected Access key with a single press).
Source Parameter Control
Once a source is in access, its parameters can be adjusted from either the surface or GUI as follows.
On the surface...
Press a Central Function Key to choose the parameters. For example, press Input to adjust input and pan. The available parameters appear on the four sets of upper rotary controls (on the Central or Combo module).
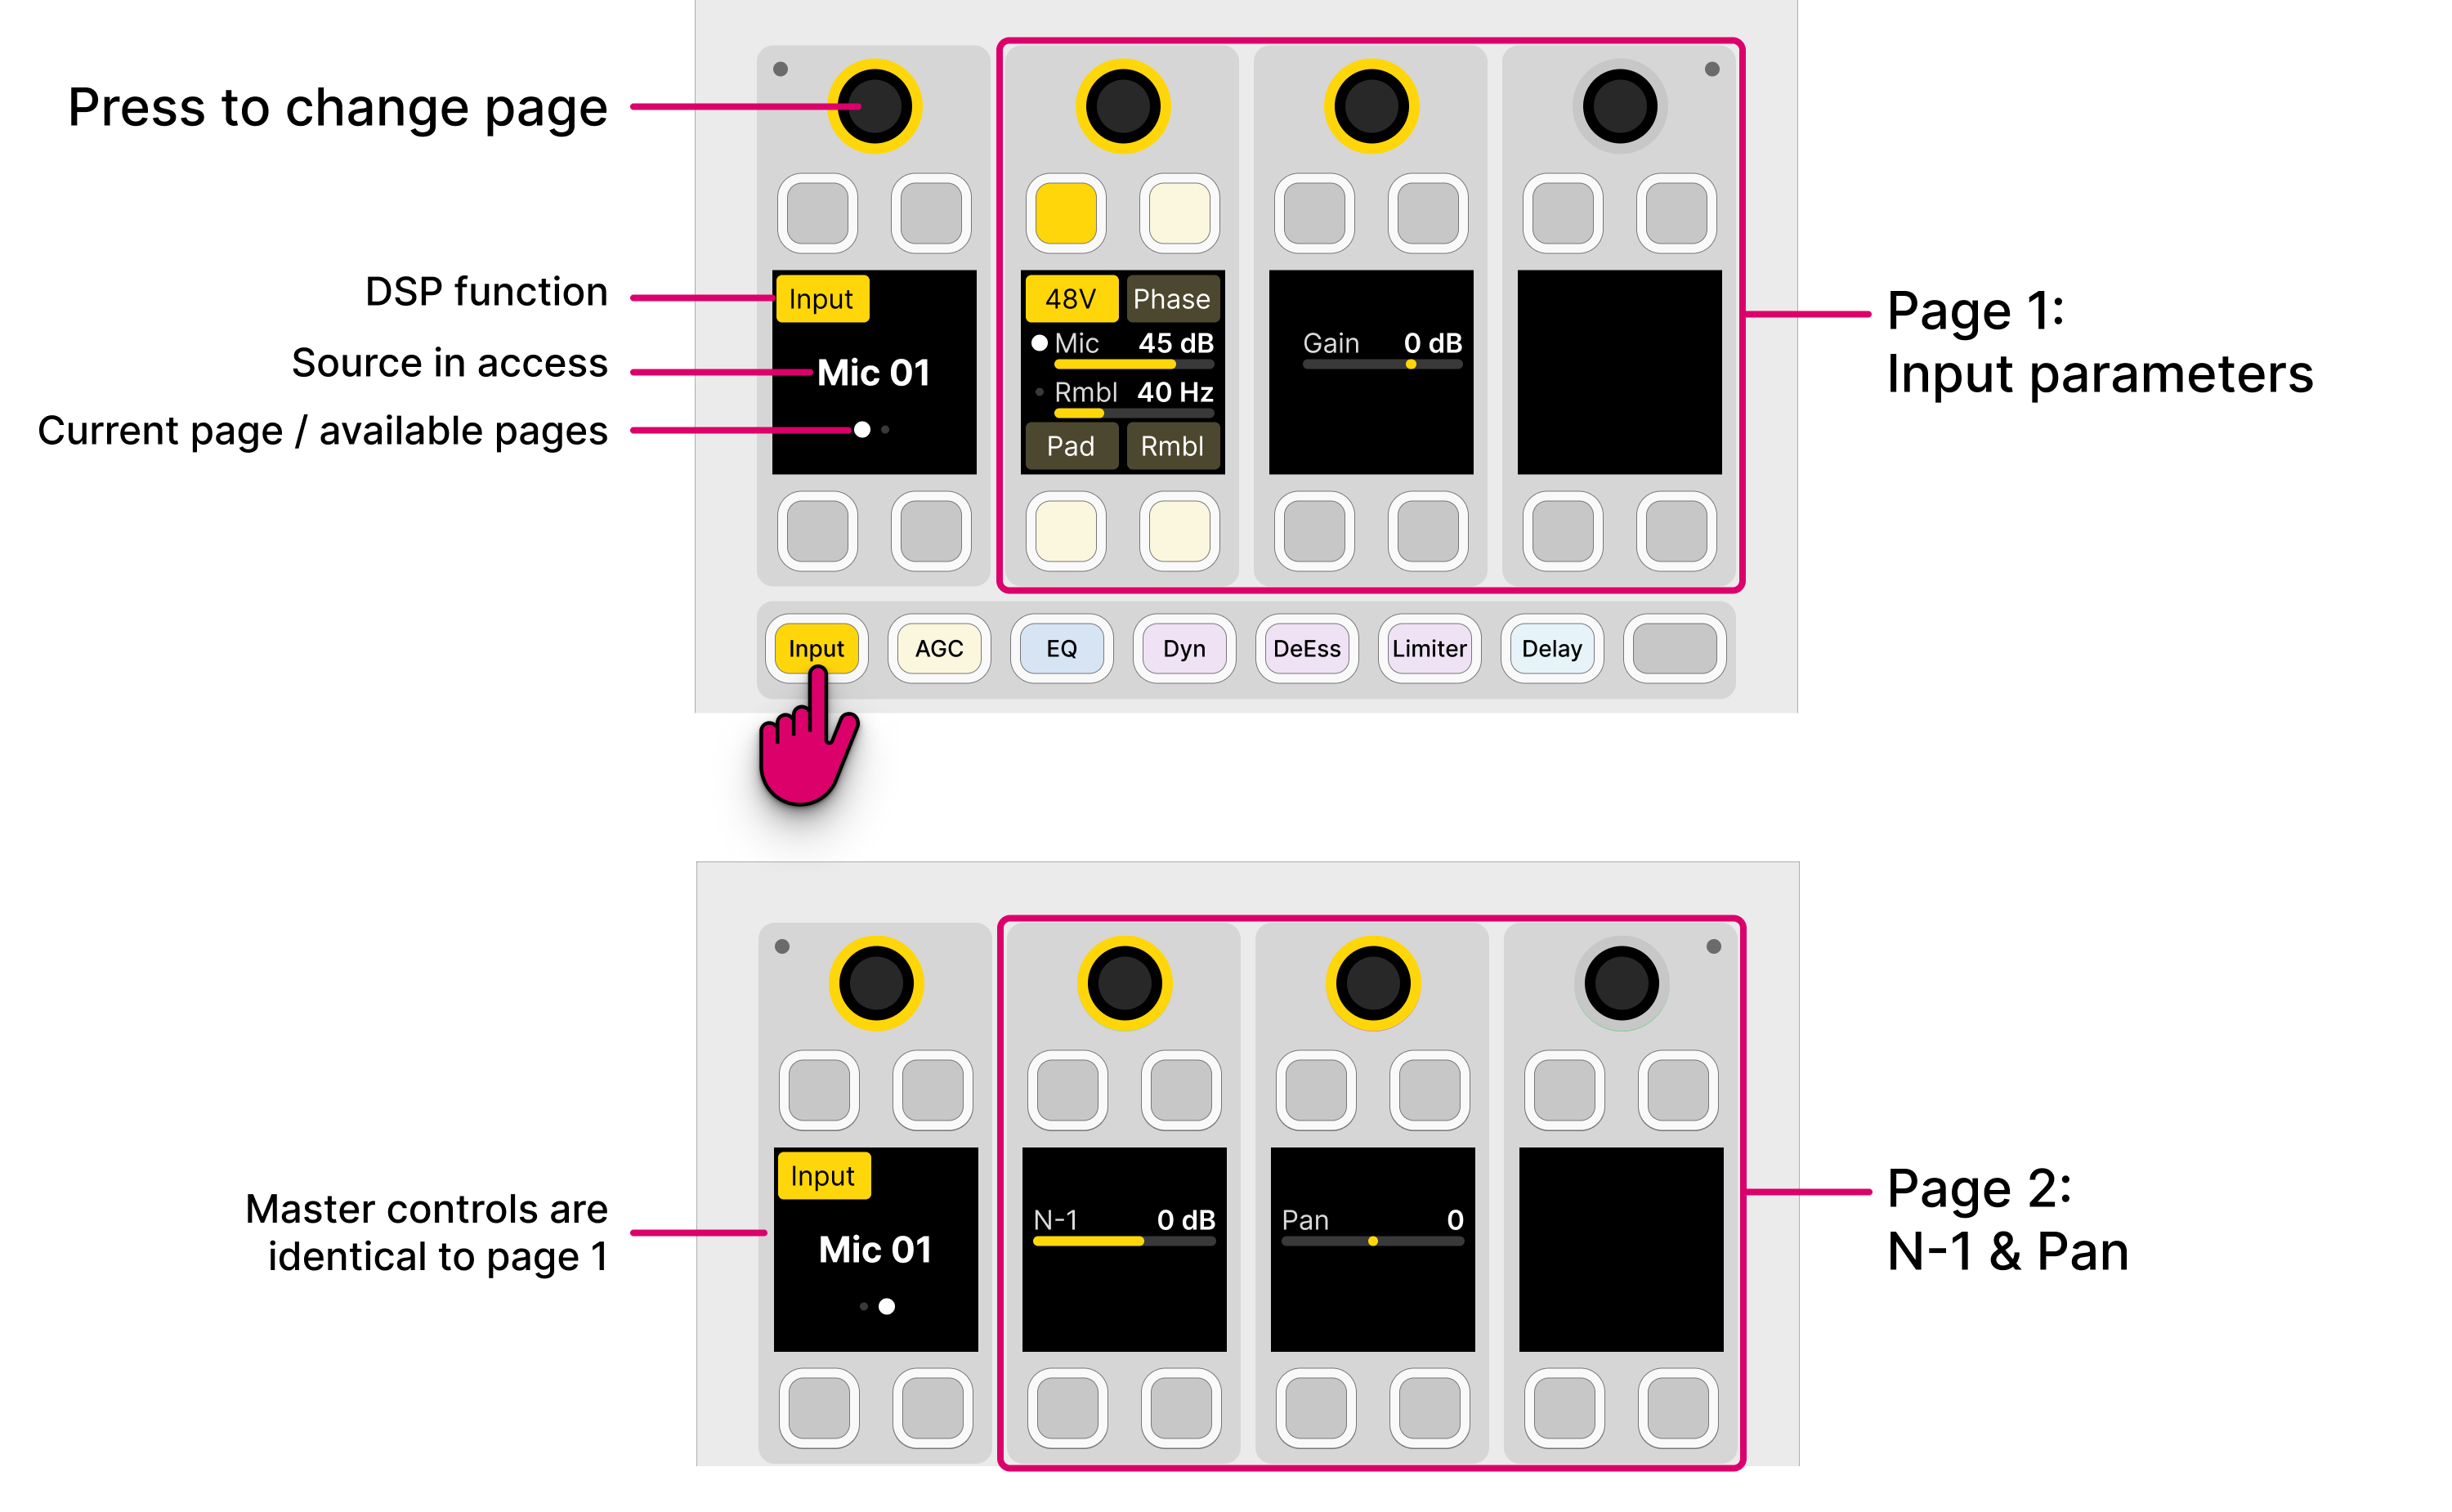
The master controls (on the left) provide information and page switching:
The display shows the selected function (e.g. Input) and source (e.g. Mic 01).
- If the processing section has a master on/off key, then this also appears here. (Applies to all DSP functions except Input).
If there is more than one page of parameters, then a dot appears below the source name. This indicates the current page and the number of available pages. Press down on the rotary control to step through the pages.
The remaining controls are used to adjust the parameters:
For switched parameters, press the soft key to turn the option on or off: lit (full) = on; lit (dim) = off.
For variable parameters, turn the rotary control to adjust the value - the current value is shown in the display. If a second parameter is available, then push down and turn to adjust the second function. The dot indicates the current function.
- If a rotary control or soft key is unlit, then it has no function.
On the GUI...
Press a page button to choose the parameters (e.g. Input for input and pan).
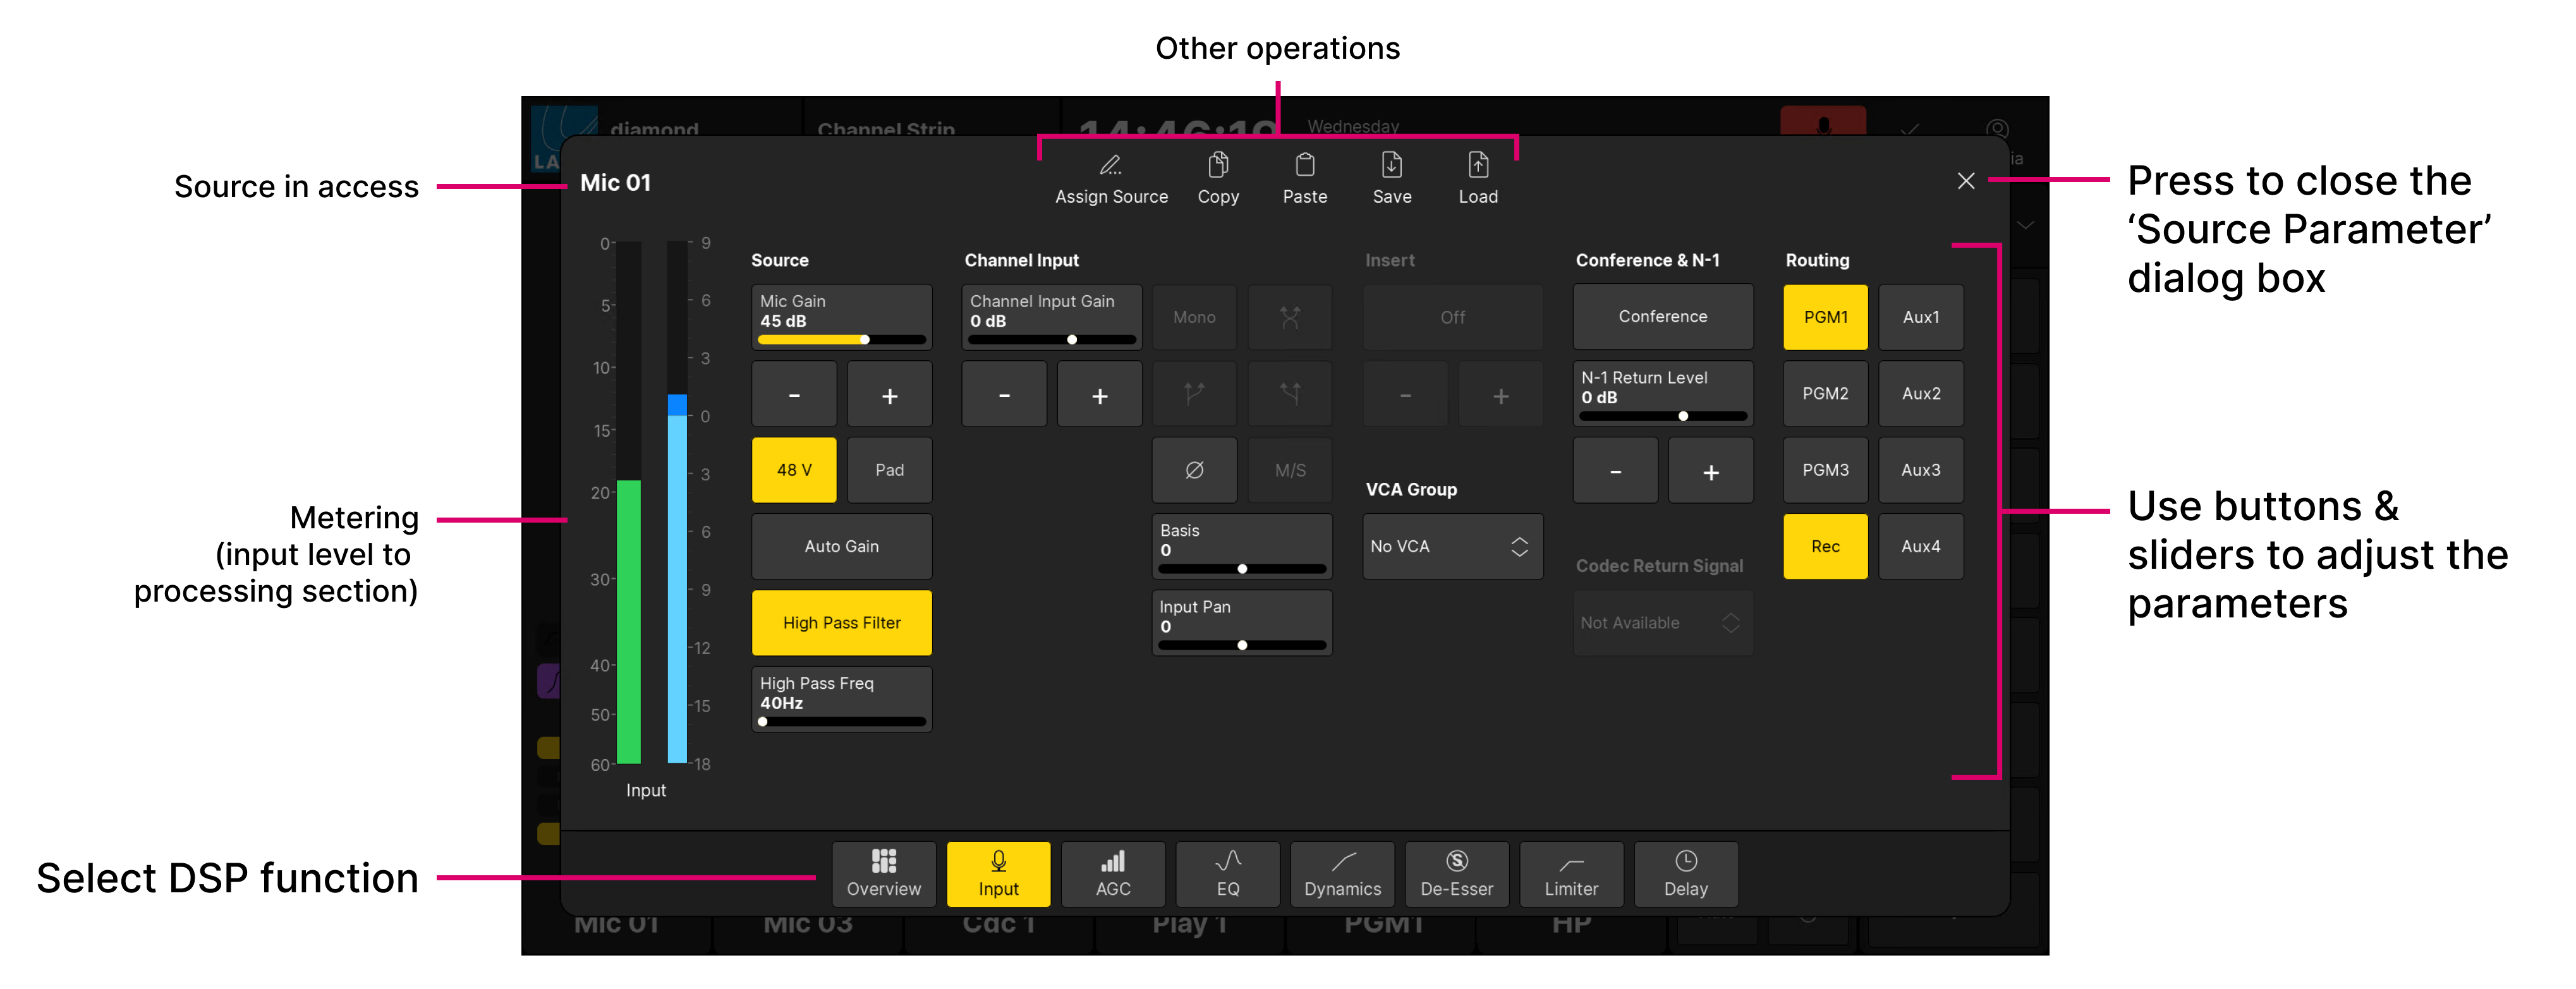
All of the parameters are shown on a single page:
- For switched parameters, touch the button to turn the option on or off: lit = on; unlit = off.
- For variable parameters, touch and drag anywhere inside the parameter box: either left/right or up/down. Or use the on-screen + and - buttons.
- If an option is greyed out, then the parameter is not available. For example, the stereo input options are not available for a mono source.
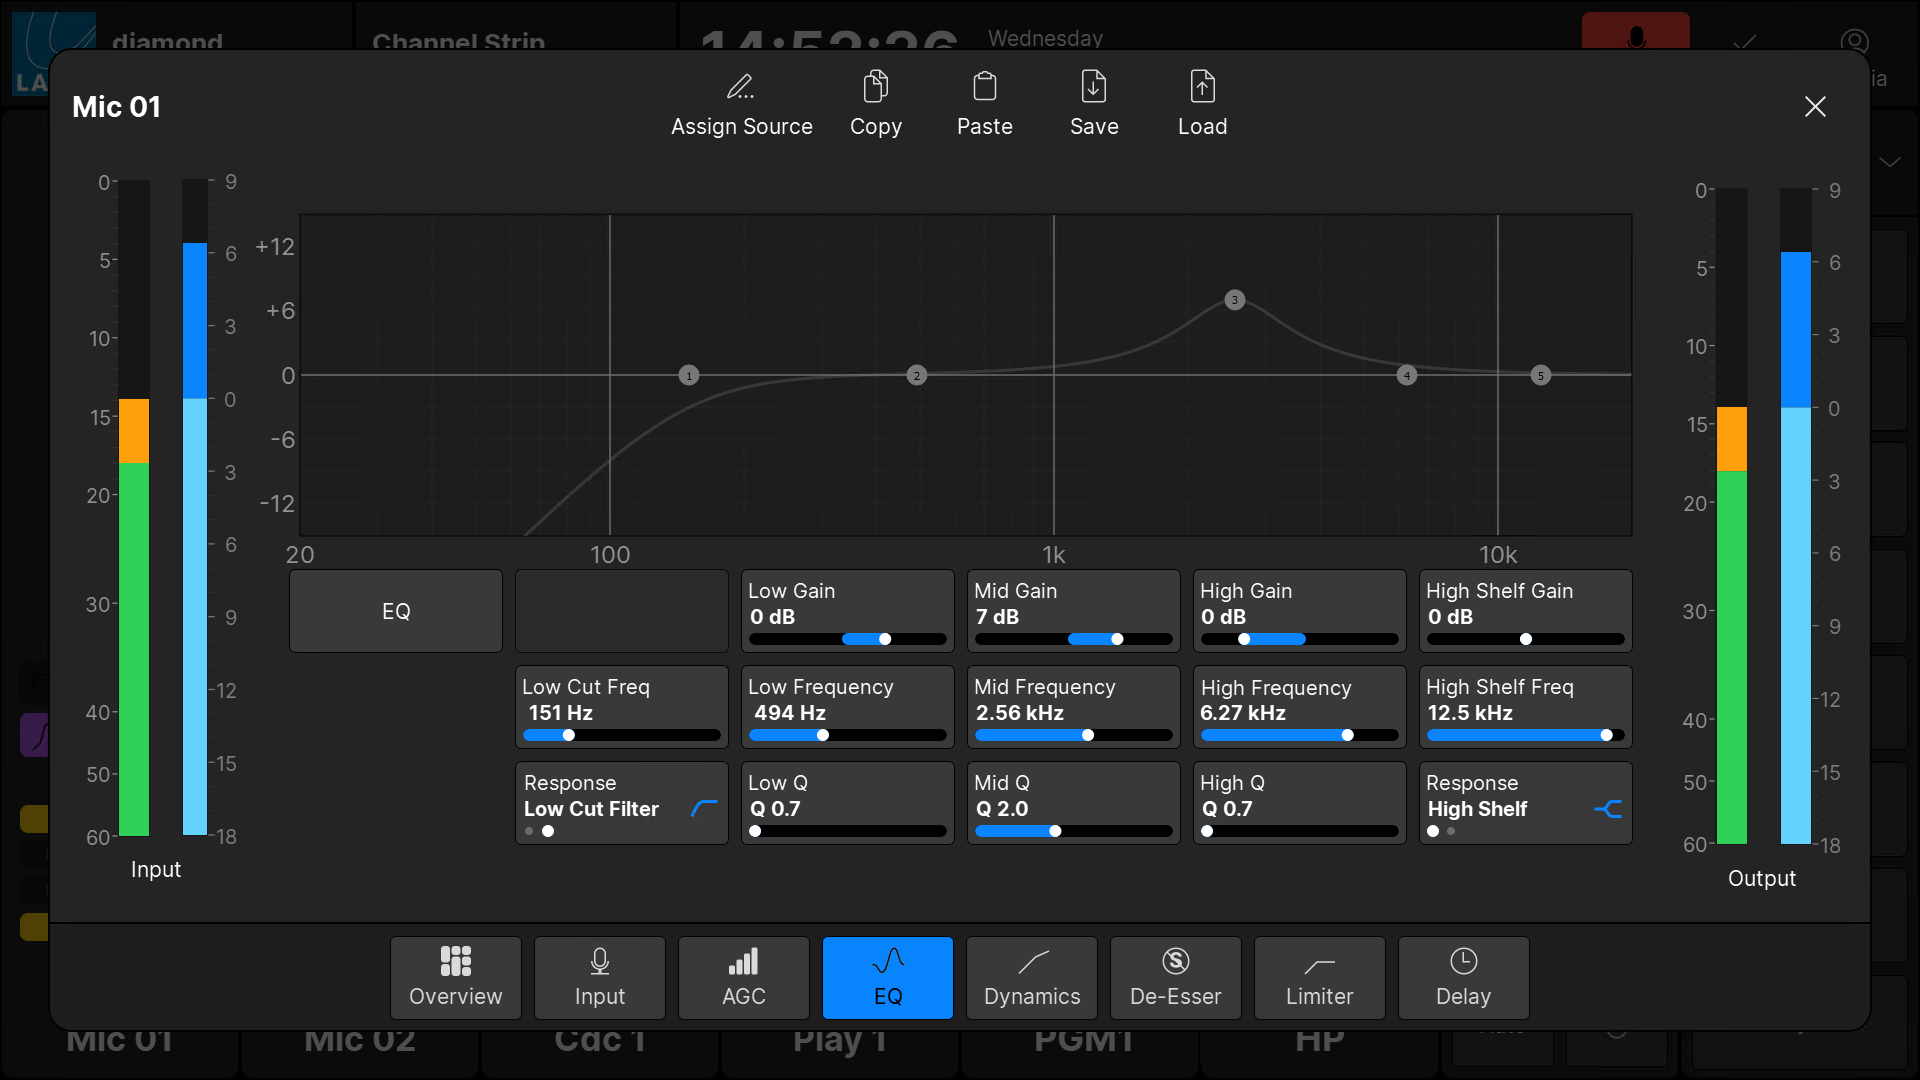
On the EQ page, you can touch and drag the numbered points on the EQ curve to adjust the gain and frequency of each band.
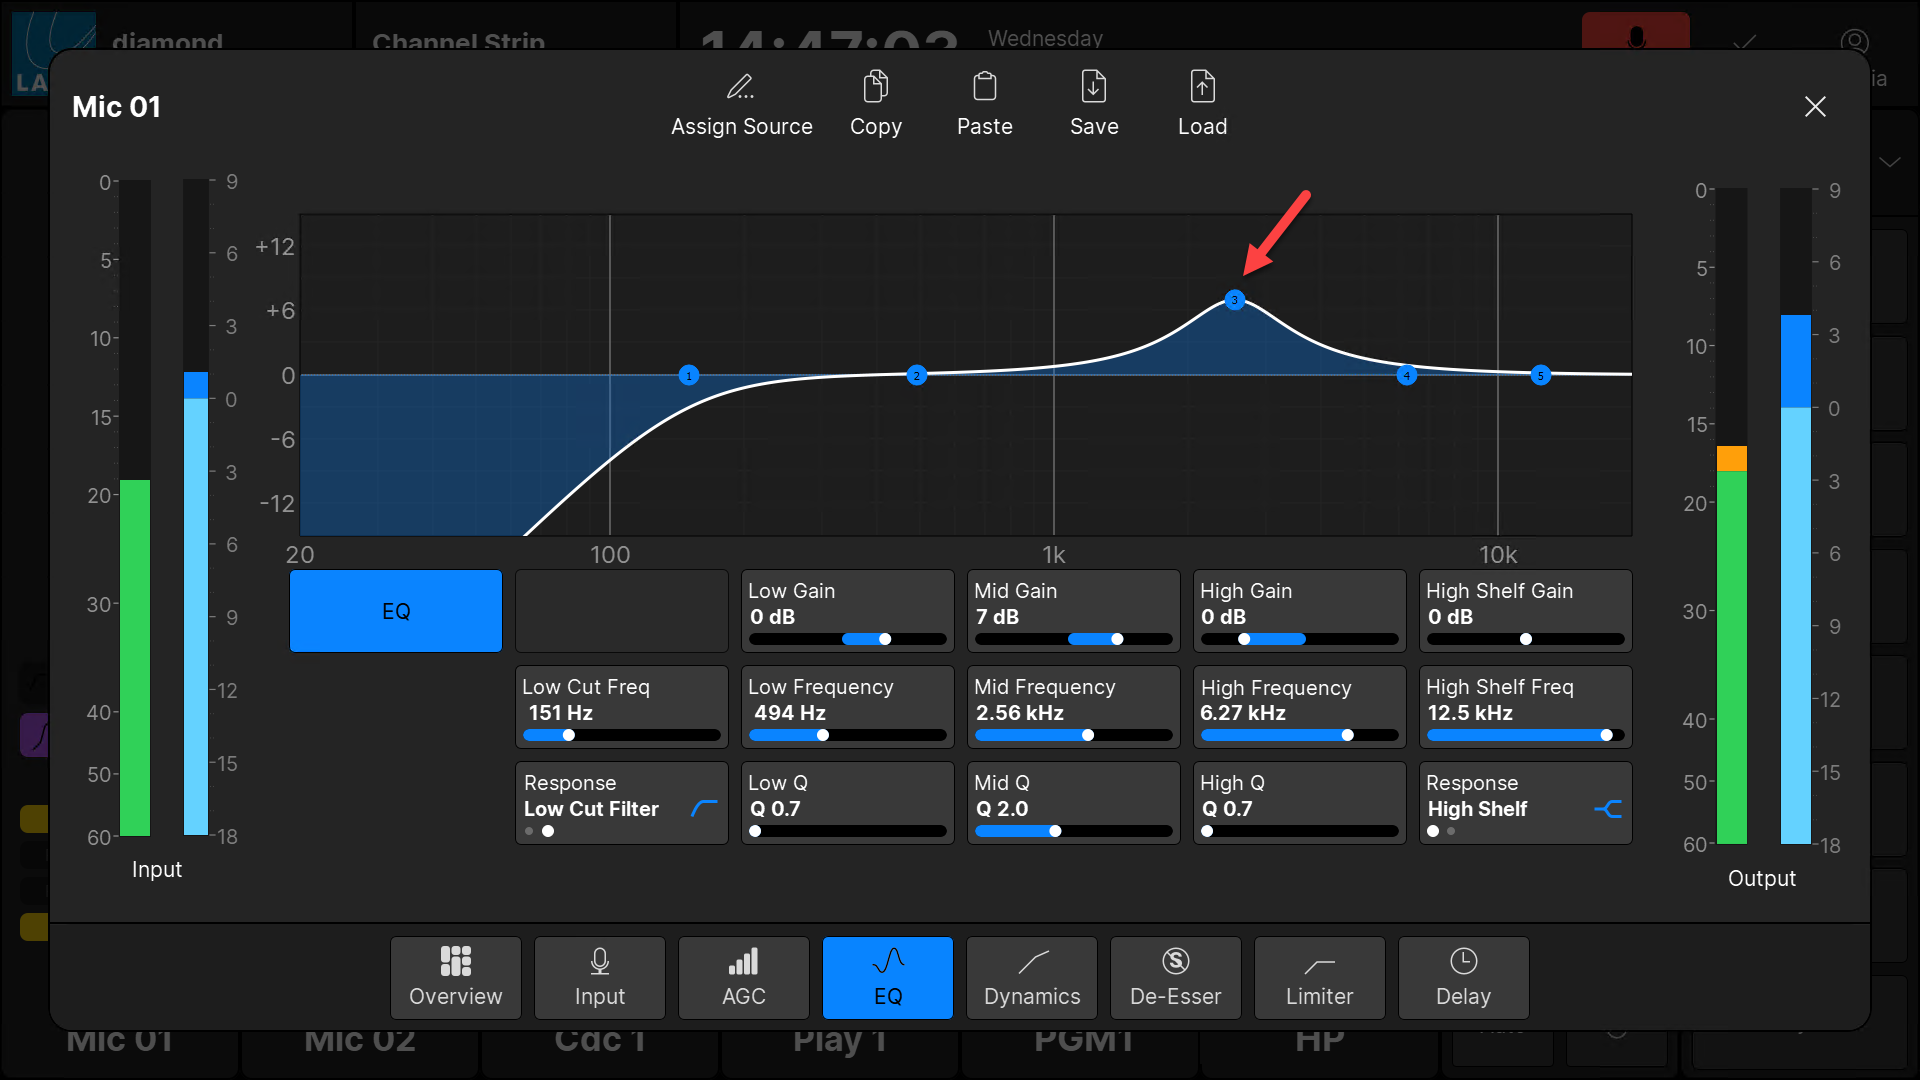
On the EQ and Dynamics pages, the curve provides an easy way to check if the processing is turned on or off:
- Curve (filled) = processing on.
- Curve (not filled) = processing off.
In the example below, the EQ is turned off.
For convenience, the following operations can be accessed from the top of every page:
- Assign Source - press to open the 'Assign Source' dialog box. From here you can assign a different source to the selected fader strip.
- Copy - press to copy settings from the source in access to the clipboard.
- Paste - press to paste settings from the clipboard to the source in access.
- Save - press to open the 'Save Snapshot' dialog box.
- Load - press to open the 'Load Snapshot' dialog box.
When using Copy and Paste, note that all of the parameter sections are included and not just the one in view.
Parameters
The rest of this section describes each set of parameters in more detail.