diamond - Web UI
The diamond Web UI can be used to provide status information about the surface components and perform a number of administrative and diagnostic tasks.
It can be reached by entering the IP address or hostname of the diamond frame into a web browser (e.g. 192.168.101.241 if the default IP is in use). The computer you use must be connected to the same network as the diamond frame. For more information, see diamond - Configuration Tools and Opening a Web UI Session.
If the surface has more than one frame connected via IP, then each frame's IP module has a different IP address. In this instance, you will need to open a separate Web UI session for each section of the surface.
In User mode, information is displayed as "read-only" with no editable fields. If you wish to edit or access the permitted options, then you must login as either Supervisor or Administrator. The default passwords are orion for Supervisor and hydra for Administrator.
Once you have opened a connection and logged in, you will see the available pages/tabs. In the current release, there are six pages/tabs.
Quick Links
The table below provides quick links to some of the most useful functions.
| How to... | ||
|---|---|---|
| Check the status of the surface modules. | Open the "Surface Modules" tab. | |
| Test the keys, displays, faders and encoders. | Open the " Module-Tests" tab. | |
| Change the IP address of the frame's ETHERNET port | Edit the IP Address field in the " Network" tab. | |
| Reboot the frame. | Press the Reboot System button in the "System Control" tab. | |
| Reboot an individual module. | Press the Reboot button (for the module) in the "Surface Modules" tab. | |
| Change the passwords (for Supervisor and Administrator) | Use the Edit Access Passwords area in the "System Control" tab. | |
System Information
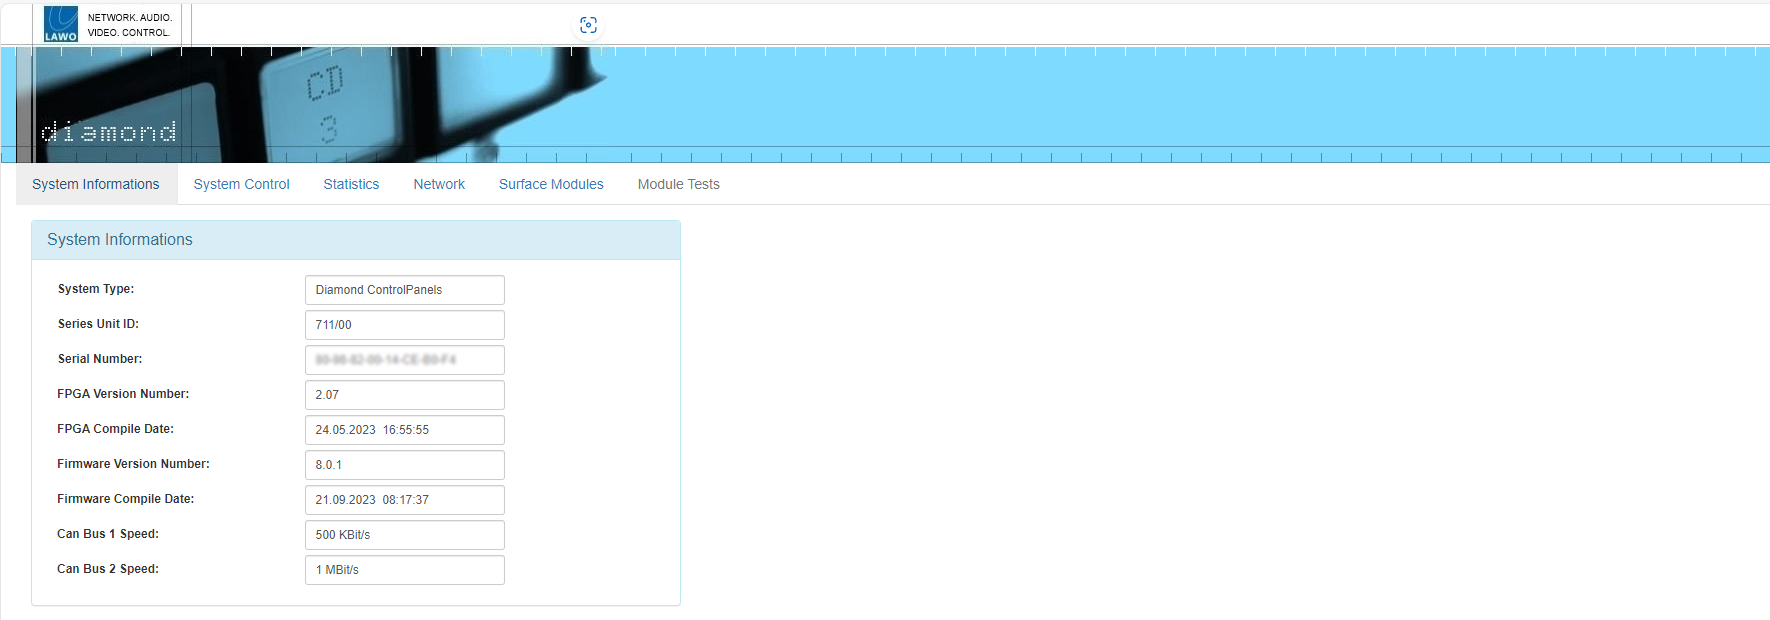
The System Information tab is the first tab to be shown following a successful login. It displays basic information about the frame such as the serial number, software / firmware version numbers and speed of the two CAN bus connections. It is for diagnostic use only; there are no editable fields.
System Control
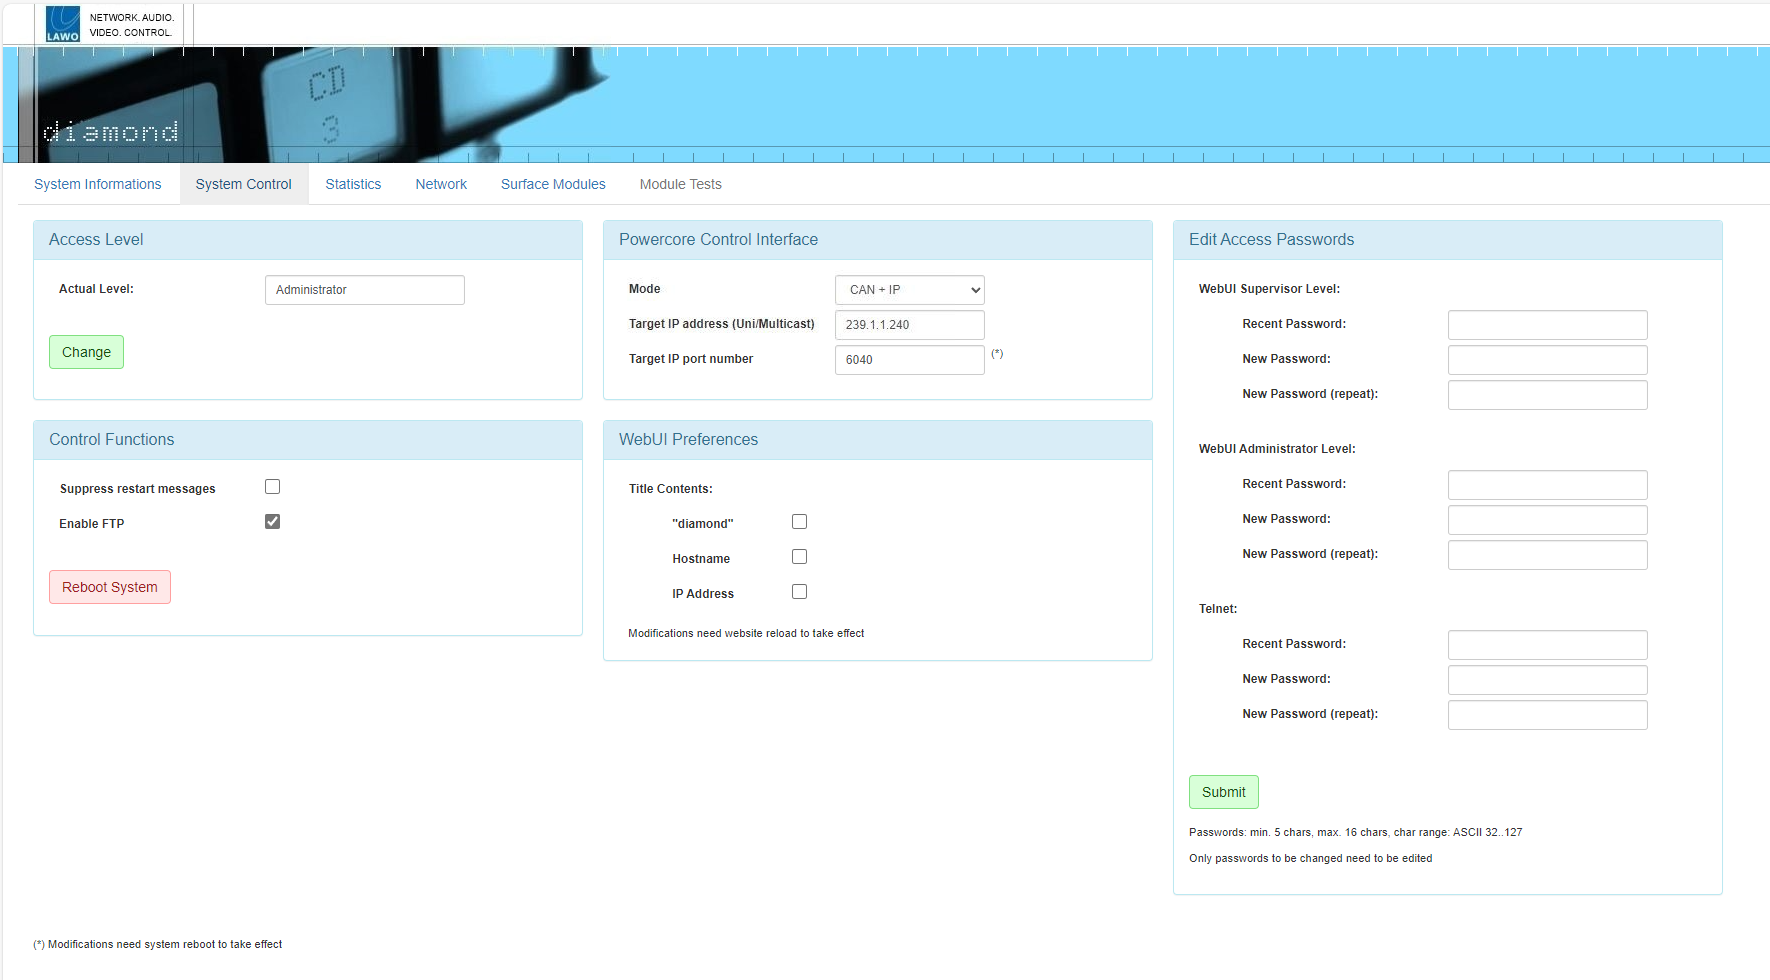
The System Control tab can be used to configure the device's external control options. For example, to permit access via FTP, reboot the system, define the Power Core control interface and/or edit the passwords for the various user modes.
The options shown are determined by the current "Access Level". In User mode, this is the only section visible. In Supervisor mode, you will also see "Control Functions". In Administrator mode, there are more options in the "Control Functions" plus sections for the "Powercore Control Interface", "WebUI Preferences" and "Edit Access Passwords".
Access Level
The current user mode is displayed in the Actual Level field.
To change the current access level, click on Change - this opens the Login screen. Select a different Access Level and enter the Password:
- User (no password required).
- Supervisor (default password = orion).
- Administrator (default password = hydra).
Now re-select the "System Control" tab to return to this page.
Control Functions
In Supervisor and Administrator modes, the "Control Functions" section becomes visible. Note that the Enable FTP option is only visible in Administrator mode.
- Suppress restart messages - by default, an on-screen message appears whenever the surface restarts. You can turn the messages off by selecting this option.
- Enable FTP - by default, this option is turned on to allow file transfers to the diamond surface via FTP. Turn this option off to prevent FTP access.
The Reboot System button at the bottom of this area can be used to reboot the frame's IP module. During this time you will see the "boot-up" screen on the IP module and "Connection Lost" on all other modules (connected via CAN). Once the reboot is complete, all modules refresh and the controls return to their former positions/state.
Power Core Control Interface
In Administrator mode, the "Powercore Control Interface" section becomes visible. These parameters define the IP connection to Power Core (as described earlier).
Web UI Preferences
In Administrator mode, the "Web UI Preferences" section becomes visible. These options adjust what is shown in the browser's "title" for the Web UI session. If nothing is selected, then the page address (URL) is shown. Any changes take affect after a refresh of the browser page.
Edit Access Passwords
In Administrator mode, the "Edit Access Passwords" section becomes visible.
This area can be used to edit the passwords for the Supervisor and Administrator modes in the Web UI, and/or the device's Telnet login. In each case:
- Enter the current password into the "Recent Password" field, followed by the new password into the two "New Password" fields.
- The new password must meet the following requirements: minimum of 5 characters; maximum of 16 characters; permitted character range: ASCII 32..127.
- Click on Submit to apply the changes - an on-screen message appears to confirm (or deny) the operation.
Statistics
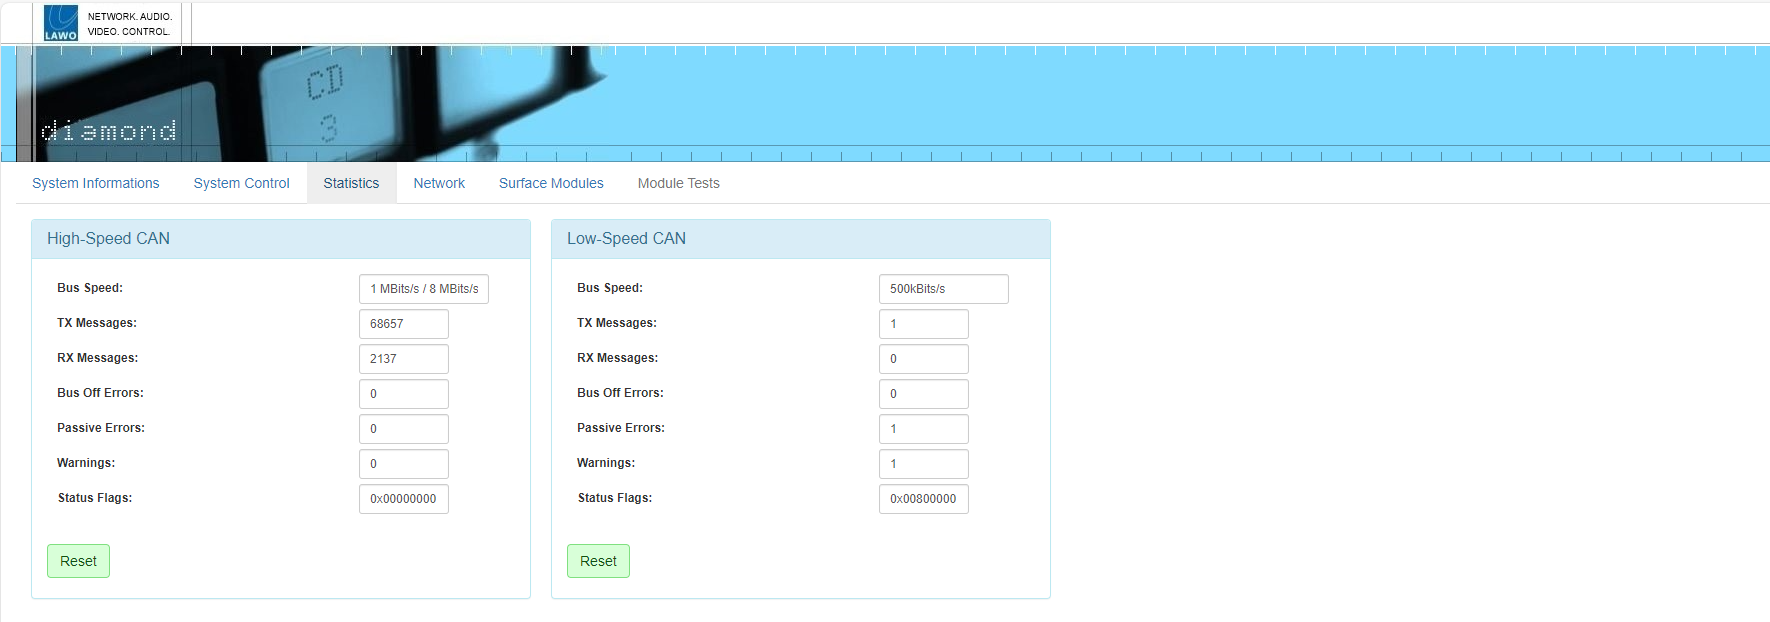
The Statistics tab shows information about the CAN bus. It can be used to analyse the number of messages sent and received, and if there are any TX or RX problems.
To reset all of the message/error/flag counters to zero, click on the Reset buttons at the bottom of the page.
Network
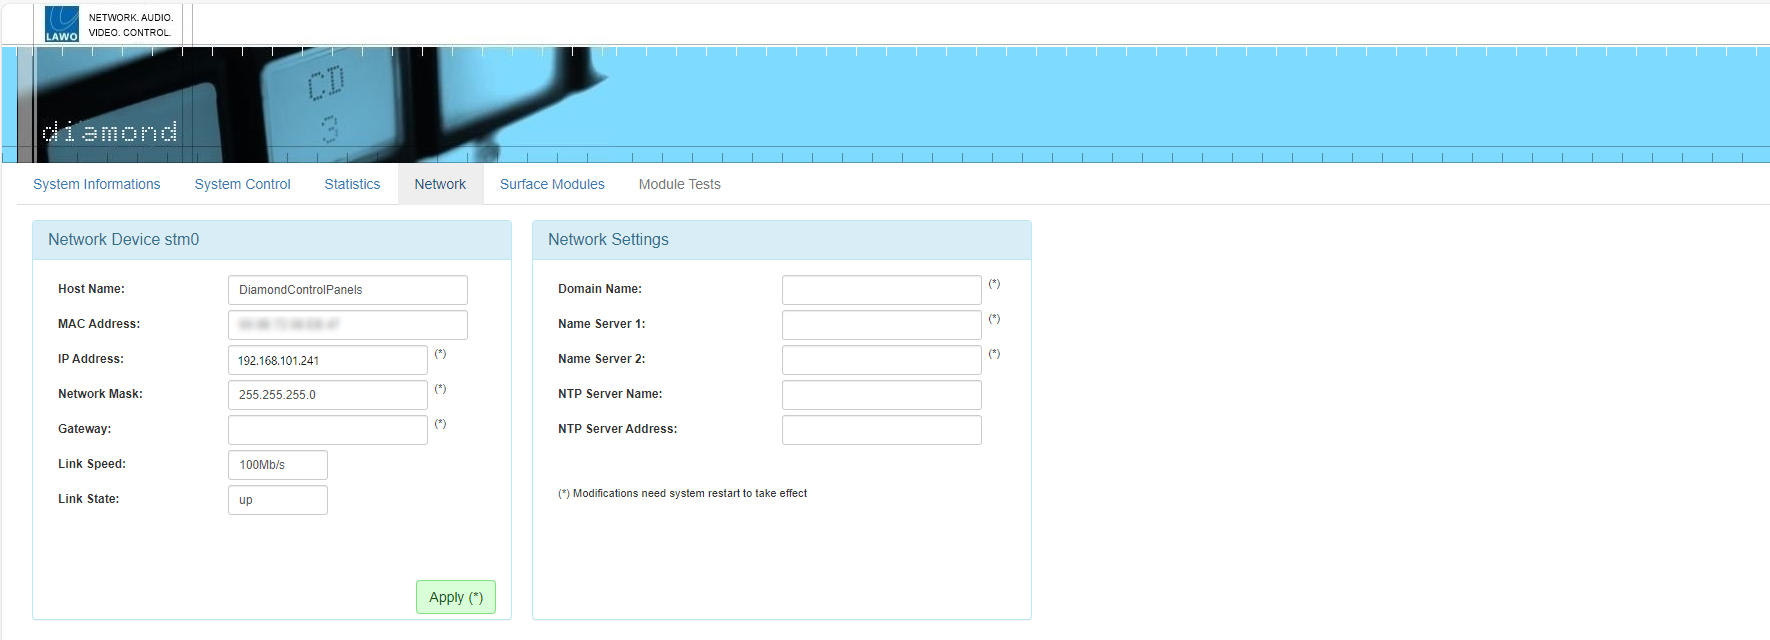
The Network tab provides access to the network settings for the frame's ETHERNET port.
Network Device
This section displays the port's Host Name (defined by the ON-AIR Designer configuration) and MAC address, plus the network IP Address, Network Mask and Gateway (if used). The Link Speed and State show the speed of the connection and its current status (up or down).
In User mode, all fields are non-editable. In Supervisor or Administrator mode, you can enter a new IP Address, Network Mask and/or Gateway. If any settings are changed, you must click Apply to save the changes. IP Address changes are made immediately and so you will lose your browser connection once the settings are applied. To continue with the system administration, enter the device's new IP address into your browser and login again (from the Login screen).
Network Settings
Using the fields in this area, you can enter the Domain Name of your network and DNS Name Server IP Addresses, plus the settings for your network's NTP server. As above, remember to click Apply to save the changes.
To configure a NTP server, either enter its name in the Server Name box, or its IP Address in the Server Address box. If you type "ntp.internal" in the Server Name box, the IP Address will be automatically filled.
Surface Modules

The Surface Modules tab lists all of the modules fitted to the surface and their firmware versions. The important fields are as follows.
Mode - can be either M or S:
- M - identifies the master module (connected to Power Core via IP).
- S - identifies the slave modules (connected internally, or externally, via CAN).
Act. Slot - shows the module's active slot ID. This is important as it determines the functionality of the module (as described earlier).
The active slot ID can be changed either, permanently, by editing the Dflt (default) value or, temporarily, by loading one of the alternate mappings (Map 1 to 4). How to do this is described in diamond - Slot IDs.
Identify - click to identify a module - the top left button on the module flashes three times.
Test - opens the "Module Test" tab.
Reboot - reboots the module.
Module Tests

The Module Tests tab can be used to test the components on a module.
Module - enter a slot number to choose a module.
Keys/LEDs - click on a key to light its LED; click on Test all LEDs to light all keys; click on AutoTest to start the auto test sequence.
TFT Displays - click on an option to display an image on the module's displays.
Faders - choose either From Panel or To Panel to set the direction and then perform the test. For example:
- From Panel + move a fader on the surface = the on-screen fader should follow.
- To Panel + click Start / Stop = the fader on the surface should open / close.
You can use Auto Test or Calibrate to start the auto test sequence or fader calibration.
Incremental Encoders - works in a similar manner to the faders.