HOME Apps - SDP Data
The SDP Data button (in the Senders or Receivers page) can be used to access the SDP data for an existing sender or receiver.

SDP (Session Description Protocol) is a format for describing streaming media communication parameters. It is commonly used in standard networking applications.
Please note: The SDP Data is only applicable when the selected sender or receiver is 2110-20 (uncompressed video), 2110-22 (JPEG-XS video), 2110-30 (Audio) and 2110-40 (Meta). It is not applicable to NDI, SRT or WebRTC streams.
For a sender, the SDP information is generated automatically by the app, according to the various app configuration options defined by the user. From the 'SDP Data' dialog, the user is able to check (and edit) the SDP information for diagnostic purposes, and make a copy to the clipboard. This can then be pasted into the SDP Data of a receiver as an alternative method of routing signals (known as SDP Patching).
For a receiver, the 'SDP Data' dialog displays the SDP file associated with the connected source:
- Once a source is connected, the 'SDP Data' dialog can be used to check (and edit) the SDP information provided by the sender. This can be useful if, for example, if the SDP information provided by the sender is incorrect.
- If there is no source connected, then the receiver's 'SDP Data' dialog is empty. In this instance, a source can be connected using either the 'Stream Routing' page or the SDP Patching method (described here).
Important: When using SDP Patching, it is important that the user only patches SDP data to a receiver of the same type as the sender. i.e. from a video sender to a video receiver.
The rest of this topic explains how to use the 'SDP Data' dialogs for a sender and receiver. The examples shown below are taken from a HOME Test Pattern Generator. The same principles can be applied to other app types.
Using the 'SDP Data'
The instructions that follow describe how to access the SDP Data for a sender. The method for receivers is identical (but from the Receivers tab).
1. From the Senders tab, select a stream and click on SDP - the 'SDP Data' dialog opens.
Note that the SDP button is not available if you select more than one sender, or if the stream is using one of the following transport types: NDI, SRT or WebRTC.
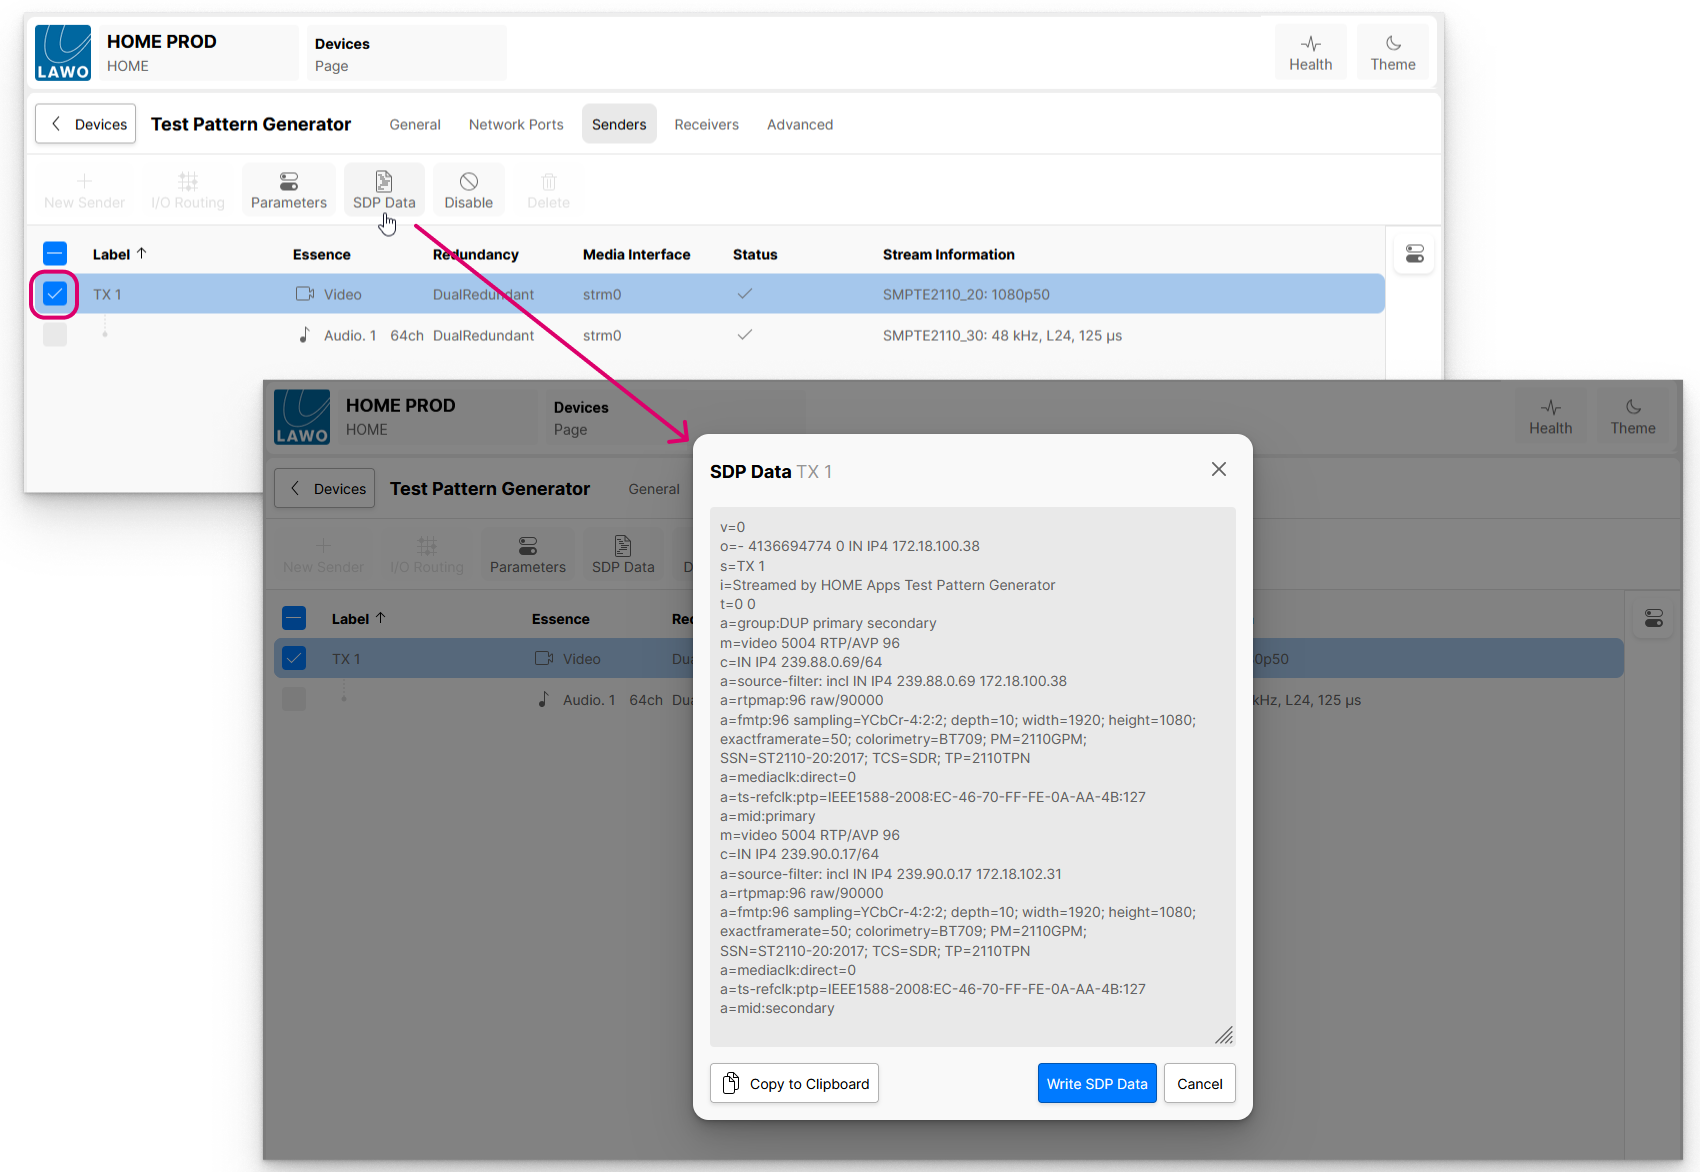
2. The main area shows the SDP information for the stream. Or, for the connected source stream if you are viewing the SDP of a receiver.
If the stream is redundant, the SDP contains information about both network paths.
If a receiver has no connected stream, then there is no SDP information and the dialog is empty.
3. The following operations are possible:
- Copy to clipboard - copies the SDP data to the clipboard. You can use this to set up a streaming connection via SDP Patching (as described below).
- Write SDP Data - if you click anywhere inside the main area, then it is possible to edit the SDP data. To save the changes, click on Write SDP Data. This can be used to edit the SDP manually, or via a copy & paste (as described below).
- Cancel - closes the SDP data dialog without saving.
The latest SDP Data is saved (by HOME) whenever a change is made. If the app is stopped, then the SDP is loaded on the next start up of the app.
Connecting Signals (via SDP Patching)
The SDP data can be used to set up a streaming connection between a specific sender and receiver. It provides an alternative method of connecting signals known as SDP Patching.
Important: If you use this method, then the streaming connection is not shown in HOME's 'Stream Routing' page. In this instance, it is important not to make another connection to the same receiver. Connecting more than one stream to the same receiver can lead to strange results!
When using SDP Patching, it is important that the user only patches SDP data to a receiver of the same type as the sender. i.e. from a video sender to a video receiver.
1. Start by copying the SDP information from the sender.
If the device is known to HOME, then you can open the SDP data (as described above) and select Copy to clipboard. An on-screen confirmation appears once the SDP is copied.
If the device is not known to HOME, then you will need to obtain the SDP data using another method (e.g. via the device's own Web UI).
2. Now open the SDP Data for the receiver.
The SDP information area should be empty (as there is no existing connection).
3. Click anywhere inside the main area and paste the contents of the clipboard (press CTRL+V, or right-click and select Paste).
4. Click on Write SDP Data to save the changes and exit.
The receiver "Status", "Connected Source" and "Stream Information" should update (providing that the stream subscription is successful).
Creating an Empty Receiver
If you clear the SDP data of an existing receiver, then this creates an empty receiver. Follow the steps below to clear the SDP data.
- Select the receiver and open its SDP data.
- Click anywhere inside the main area and select all of the data (press CTRL+A).
- Click on Write SDP Data to save the changes and exit.