mc²96 - Snapshots
Snapshots are one-shot memories that are saved within a production. They can be used to store different setups (within the same production), or reset the system during a show.
When using snapshots, you should create a production for the studio or type of show. Then create "user" or "show" folders to store your snapshots.
To manage the reset, there are three main features:
- Snapshot isolates can be applied to individual channels, specific modules, individual signals or global elements of the desk.
- Snapshot offsets can be applied to trim the mix parameters. Changes can be stored as either absolute or relative values, and saved as partial snapshots if required.
- For variable mix parameters such as fader level, snapshot crossfades can be applied (either globally or to selected channels/modules). Note that, to apply snapshot crossfades, the snapshots must be played out from a cuelist.
The rest of this topic describes the basic operation. The more advanced features are described separately in Snapshot Offsets, Cuelists and Snapshot Crossfades.
Note that a production stores the same settings as a snapshot plus other lower level settings. For more information about the differences, please see What's Stored in a Production/Snapshot.
Important: Snapshots and their folders are written to the user data card whenever you save or update a production. This means that you must remember to update the production after creating new snapshots or snapshot folders.
The Snapshot List Display
Snapshots are managed from the Snapshot List display.
- Press the SNAPSHOT button on the SCREEN CONTROL panel.
- Select Snapshots → Snapshot List from the GUI page menu.
- Press CTRL + 6 on the console keyboard.
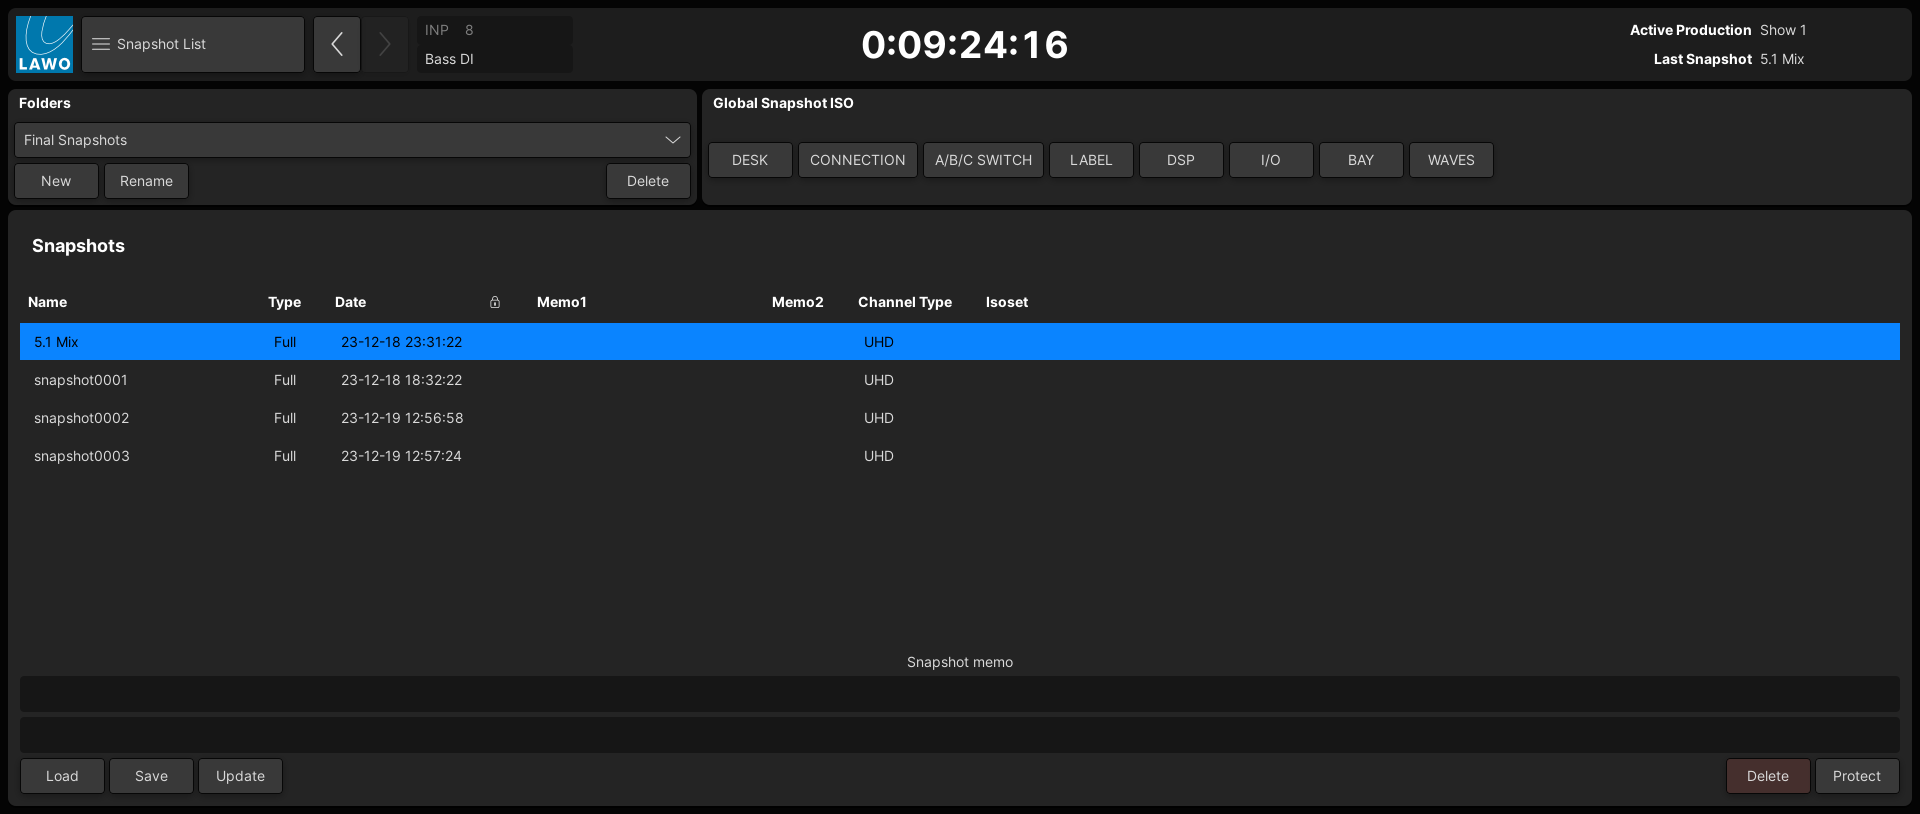
At the top of the display you can manage the snapshot folders and isolate global elements from a snapshot load.
The main Snapshots area lists all the snapshots stored in the selected folder. The columns show the following information.
- Name - the snapshot name.
- Type - the snapshot type: either full or partial.
- Date - the date and time when the snapshot was saved or last updated.
- Padlock Icon - identifies snapshots that are write-protected.
- Memo 1 & 2 - a summary of the two Snapshot memo text lines (if a memo is added).
- Channel Type - the channel type: either UHD or Recording. For snapshots saved on a A__UHD Core system, there is only one channel type: UHD.
- Isoset - the linked Iso Set name (if an Iso Set is applied). See Linking Iso Sets to Snapshots.
The Snapshot memo area can be used to add notes to the selected snapshot.
The name of the last snapshot saved or loaded is always shown in the title bar of the Central GUI – in our example, 5.1 Mix.
Operations are available from the dedicated touch-screen buttons, the SCREEN CONTROL panel soft keys or by right-clicking on a snapshot.
Snapshot Folders
Snapshot folders are used to organize the snapshots within a production. Each production can contain any number of folders, and within each folder you can store multiple snapshots. The File Import/Export function can be used to copy snapshots between folders. Note that a special folder called BACKUP appears if backup snapshots are enabled.
Snapshot folders can be accessed from the Snapshot List, Cuelist or Iso Sets display. In each case, the operation is identical.
1. To select a folder, click on the folder name.
A drop-down menu appears listing all Folders stored in the active production. In the example below, there are three folders.
 If you wish to change production, then go to the Production List display.
Having made a selection, the Snapshots list updates accordingly - in the example below, there are several snapshots stored in the Music folder.
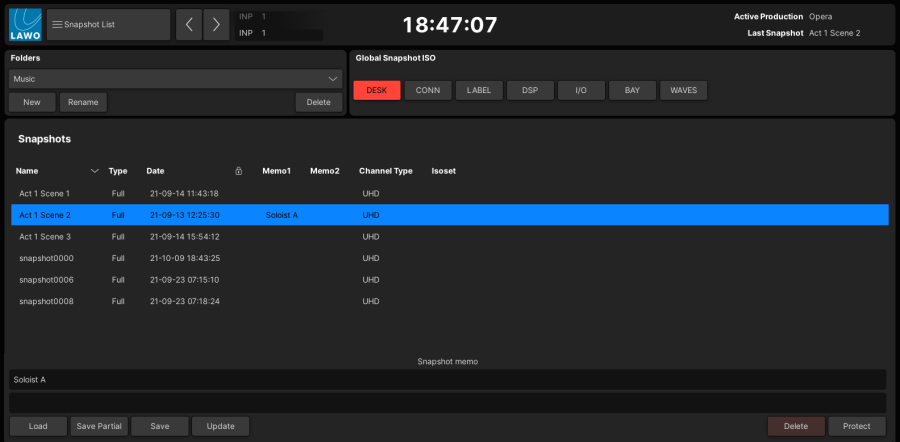
2. The following operations are possible from the Folders area. In each case, you can touch the on-screen button or press the corresponding soft key on the SCREEN CONTROL panel.
- New - creates a new folder with a default name (e.g. folder 0000).
- Rename - opens a pop-up window where you can rename the current folder.
- Enter a new name using the console keyboard and press ENTER/OK.
- Or, to exit without making a change, press ESCAPE/Cancel.
- Delete - opens a confirmation dialog box.
- To delete the current folder and all of its contents, select OK.
- To abort the operation, select Cancel.
If a folder contains snapshots or Iso sets that are protected, then it cannot be deleted. In this instance, you will need to unprotect or delete these items (from the relevant displays) if you wish to continue.
3. Remember to update (or save) a production after making changes to the snapshot folders.
4. You can import or export a folder to a USB interface, mxGUI computer or network drive using the File display.
This allows you to archive or transfer folders between systems. For more information, see File Import/Export.
Loading a Snapshot
You can load stored settings to the console at any time, even while on-air, by loading a snapshot. If snapshot offsets are active, then these are applied to the loaded parameters. Any isolated objects are not reset by the snapshot load. You can isolate individual channels, individual signals, or global console elements (as described here).
The steps below describe how to load a snapshot.
1. Select a snapshot from the Snapshots list (e.g. Act 1 Scene 2).
2. Select the on-screen Load button, press the LOAD soft key or right-click and select Load.
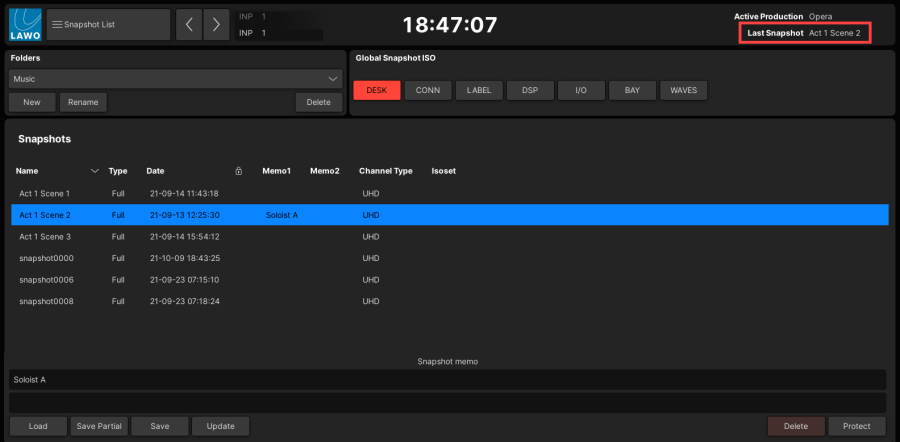
The console instantly updates and the title bar shows that "Act 1 Scene 2" is now the last snapshot saved or loaded.
Snapshot Isolate
Before loading a snapshot you can isolate certain objects, so that they are not reset by the snapshot load. You can choose to isolate individual channels, individual modules within specific channels, individual signals, or global console elements. The snapshot isolate states are saved and loaded by productions.
Isolating Channels (SNAP ISO)
To isolate a complete channel, select its SNAP ISO button. This isolates all of the channel's DSP settings including analog input control. SNAP ISO can be programmed onto a fader strip user button, or selected from the Central Control Section (in the CHANNEL area).
Note that the "Global → Status → Isolate" option (in the System Settings display) prohibits the selection of SNAP ISO buttons across the console.
Isolating Channel DSP Modules (Module ISO)
To isolate individual channel DSP modules, on a per channel basis, you can apply a module Iso Set. These are managed from the Iso Sets display (as described here).
Different Iso Sets can be stored and recalled, and linked to individual snapshots, providing a powerful tool for both front of house and live theatre applications.
Isolating Signals
Individual signals can be isolated from the Signal List display. Right-click on the source or destination, and choose Isolate from the context menu.
When a signal is isolated, this isolates its user labels, signal connections and I/O parameters (external and internal).
Global Snapshot ISO
To isolate global console elements from a snapshot recall, you can use the "Global Snapshot ISO" options (at the top of the display).

These options apply globally across the system; for example, select DESK to protect the layout of your fader strips, but still recall all of your DSP settings, signal routing, etc.
The global isolate options are as follows.
- DESK: the fader strip assignments across all banks and layers, and the current bank/layer status.
- CONNECTION: the signal connections for all sources and destinations (made in the Signal List display).
- A/B/C SWITCH: the A/B/C input switching for all input channels.
- LABEL: the user labels for all signals/channels.
- DSP: the mix parameters for all channels (including bus assign, channel signal flow and Free Control assignments).
- I/O: the signal parameters for all I/O devices (e.g. mic preamp settings).
- BAY: the desk layout for all isolated channel bays.
- WAVES: the Waves plug-in parameters (if the plug-in server option is configured).
The BAY option applies to all isolated channel bays. When enabled, it isolates the fader strip assignments, and current bank/layer selection, for all isolated channel bays. This means that if a snapshot is loaded (by the main operator), it will not affect the surface layout of the isolated bays (used by a second engineer)..
Saving a Snapshot
To save the current settings of the console into a snapshot, there are two possible methods: Save (to create a new snapshot) or Update (to overwrite an existing snapshot).
In both cases, all settings are saved regardless of the snapshot isolate status.
Save Snapshot
The steps below describe how to save a new snapshot.
1. Select the folder you wish to save into (on the left of the display).
2. Select the on-screen Save button or press the SAVE soft key.
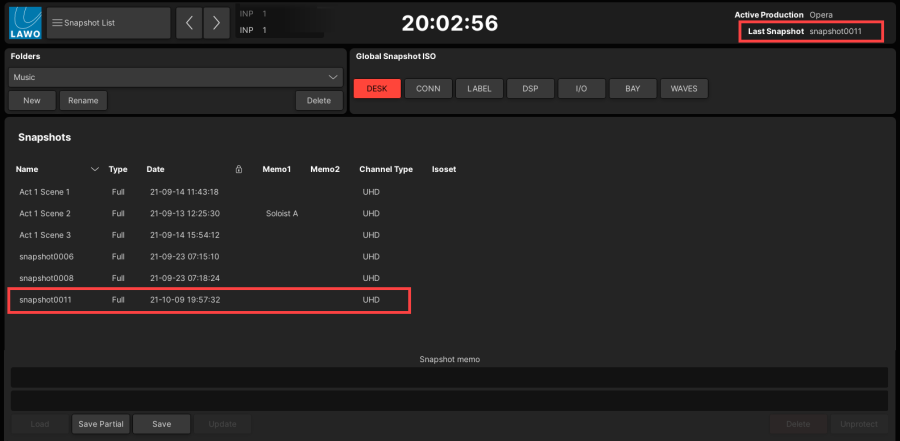
The current settings are saved into a new snapshot which is given a default name (e.g. snapshot 0011).
The snapshot is date and time stamped, and the title bar updates (to show that "snapshot0011" is now the last snapshot saved or loaded.
3. Remember to update (or save) a production after saving a new snapshot.
Update Snapshot
The steps below describe how to update an existing snapshot.
Important: This operation will overwrite the selected snapshot, so make sure that the correct snapshot is selected; there is no undo from this operation!
If a snapshot is protected, then it cannot be updated. It is recommended to use Protect to safeguard important snapshots.
1. Select the snapshot you wish to update from the Snapshots list (e.g. Act 1 Scene 3).
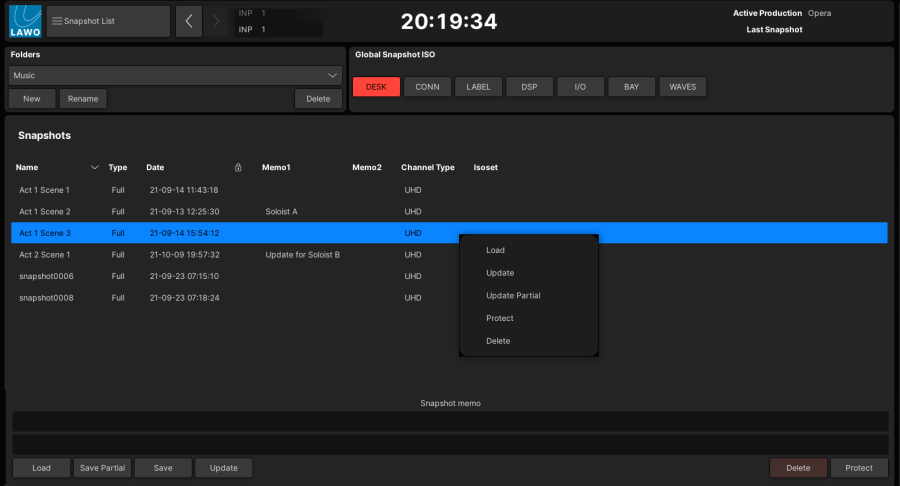
2. Select the on-screen Update button, press the UPDATE soft key or right-click and select Update.
The selected snapshot is overwritten with the current settings. You can confirm this by looking at the new date and time stamp.
3. Remember to update (or save) a production after updating a snapshot.
Renaming a Snapshot
The steps below describe how to rename a snapshot.
1. Using the trackball, click on the snapshot name.
You can click once to select all, or twice to modify an existing name (you will see a flashing cursor).

2. Enter a new name using the console keyboard.
3. Then press ENTER (to confirm) or ESCAPE (to cancel and exit).
The changes are saved when you next update (or save) the production.
Adding a Memo
The two Snapshot Memo lines can be used to add notes and information about a snapshot. The text can be entered using either the Memo1 and Memo2 fields (in the list of Snapshots) or the Snapshot memo area (for the selected snapshot).
In each case:
- Click once to start the text entry - a cursor appears.
- Now enter your text using the console keyboard. You can enter up to 31 characters in each line; the Memo# columns resize automatically.
- If you cannot enter any memo text, check that the snapshot is not protected.
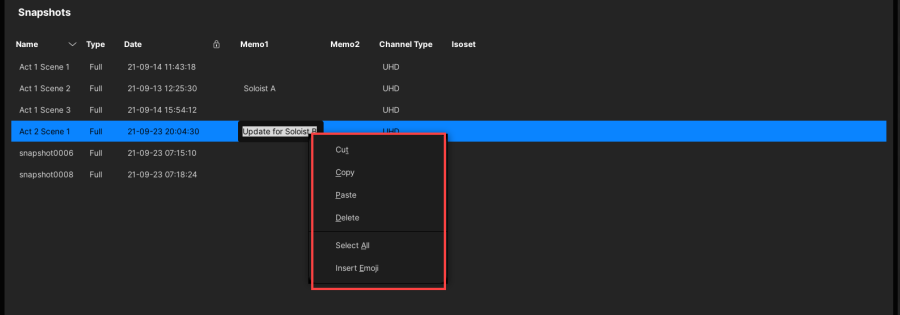
- To copy and paste the text from a memo field to another snapshot, right-click to reveal the context menu (as shown below).
- The memo lines are saved when you next update (or save) the production.
Protect & Delete
A protected snapshot cannot be updated or deleted. You can use this safeguard any important snapshots which you do not want to overwrite or delete.
- Select a snapshot from the Snapshots list.
- Select the on-screen Protect button, press the PROTECT soft key or right-click and select Protect.
- A padlock icon appears when a snapshot is protected.
Delete removes a snapshot from the console memory. Note that protected snapshots cannot be deleted.
- Select a snapshot from the Snapshots list.
- Select the on-screen Delete button, or press the DELETE soft key or right-click and select Delete.
- Confirm by selecting OK. (Or, select Cancel to abort the operation).
Changes to the snapshot list are saved when you next update (or save) the production.
Backup Snapshots
Backup snapshots can be used to provide levels of undo.
This feature works by taking a snapshot automatically every n seconds (so that it can be loaded to revert to an earlier point in time). The frequency and number of backup snapshots is defined using the "Global → Backup" options in the System Settings display. For example, if the backup snapshot interval is 5 minutes, and the number of backup snapshots is set to 12, then this provides a 1 hour undo window (before the first backup snapshot is overwritten).
All the backup snapshots for a particular production are stored within a special folder named BACKUP.
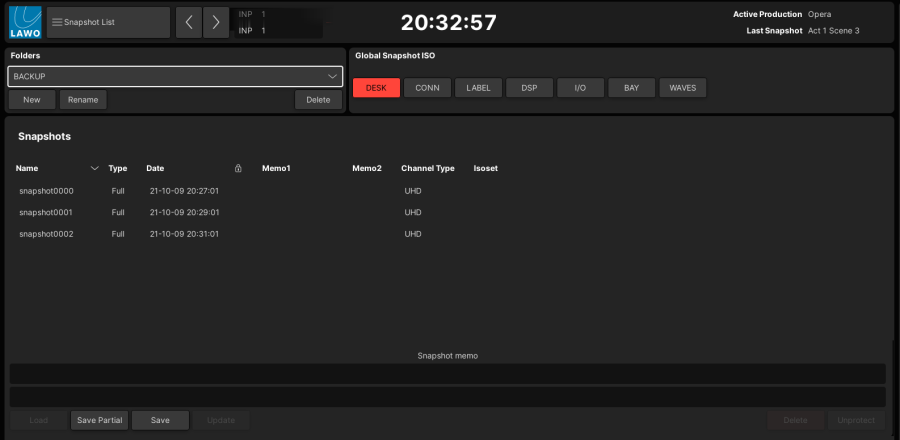
From here, a snapshot can be loaded in the usual manner. Note that the BACKUP folder cannot be deleted but it can be renamed if you wish to keep the last set of backup snapshots. In this instance, a new BACKUP folder is created after the next backup snapshot interval.
To turn the backup snapshots off, set the backup snapshot limit value to 0. This is recommended during live/on-air operation, as each automatic save causes a brief interruption to console control.
Importing and Exporting Snapshots
Individual snapshots can be imported and exported using either the File display or mxGUI. This allows you to archive or transfer snapshots between systems.