mc²96 - Cuelists
For convenient recall of snapshots and other output events during a live show, the *mc²56* provides real-time "cuelist" automation.
A cuelist contains a series of "cue points" which can be loaded in sequence. Each cue point can load a snapshot, a series of output events or a combination of both. Output events can be specific channel parameters (e.g. open a fader), load events (e.g. load a DSP preset), global operations (e.g. clear snapshot ISOs) or remote events such as GPIOs or MIDI messages. By combining a snapshot load with multiple output events, you can execute a complex set of changes from each change of cue!
Note that cue points do not store any actual settings, but are pointers to snapshots and output events within the active production. Multiple cuelists can be created and stored in folders. This allows you to create a cuelist for each version of a show. Cuelists and their folders are written onto the user data flash card when you save or update a production.
The Cuelist display is used to create, edit and play out the automation. In summary:
- You can save snapshots and cue points into a cuelist as you work through a rehearsal. This approach works well when the rehearsal runs in the same order as the show, as you can save each snapshot and add it to the cuelist in one operation.
- You can add existing snapshots into a cuelist at any time. For example, if the rehearsal is unlikely to follow the same running order as the show, then it may be better to save your snapshots into a folder from the Snapshot List display, and then create the cuelist at a later time.
- Cue points can load any snapshot stored in the active production (in any folder), but NOT snapshots stored in a different production. Therefore, if you are saving snapshots which you intend to use in a cuelist later, make sure that they are saved in the same production. If not, you will need to copy the snapshot folder(s), see Copying Files Internally.
- To fade automatically from one cue to the next, the cue points must load a snapshot and a fade set. The fade set specifies the channels and modules which will crossfade. You can link the same fade set to multiple snapshots, or fade sets can be snapshot-specific. Thus, you can define exactly which parameters will crossfade at each change of cue.
- At any time you can edit a cue point to change its snapshot or include other output events.
- During play out, you can load the cue points in sequence, or choose to skip or revert to the previous cue at the touch of a button.
Finally, cue points themselves can be triggered by an event. For example, to trigger a specific cue change from a GPI input.
You can apply offsets to each snapshot load using the Snapshot Trim Sets display. This is great if there are last minute changes you wish to make to the whole show.
You can also apply snapshot isolates to protect global elements, individual channels or DSP modules, see Snapshot Isolate and Module ISO.The Cuelist display is used to create, edit and play out cuelists.
The Cuelist Display
1. Open the Cuelist display on the Central GUI. Our example shows a prepared cuelist.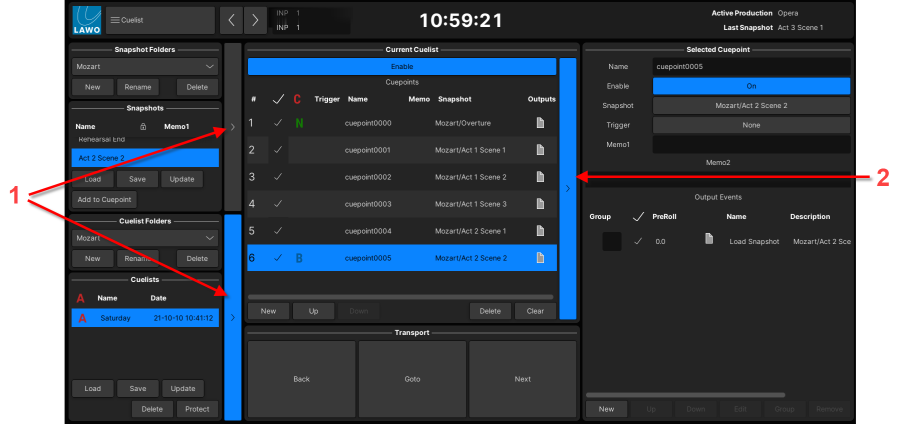 ADD New Cue & Make Snap and Cue
On the left you will see all the Snapshots within the selected Snapshot Folder, and all the Cuelists within the selected Cuelist Folder. From here you can manage the folders, save new snapshots and manage the cuelists. If a cuelist has already been saved, then it will appear in the Cuelists area (e.g. Saturday).
The middle of the display can be toggled between two views: the Snapshots stored in the selected Snapshot Folder OR the Current Cuelist - click on the blue access bars (1) to change the view.
When viewing the Current Cuelist, you will see the following information for each cuepoint:- # - the cuepoint index.
- Individual Enable (Tickbox) - enables (or disables) a cuepoint during playout.
- B, C or N - indicates the Back, Current or Next cue point to be actioned during playout
- Trigger - assigns an input trigger to the cue point.
- Name & Memo - here you can name the cuepoint and add a memo.
- Snapshot - shows the snapshot assigned to the cuepoint in the format: "SnapshotFolderName" / "SnapshotName"
- Outputs - here you will see icons indicating the type of event(s) assigned to the cuepoint.
Use the Enable button (at the top of the area) to enable or disable the cuelist automation.
The New Cue, Make Snap and Cue, Up/Down, Delete and Clear buttons can be used to manage cuepoints in the list. The Back, Goto and Next buttons (in the Transport area) will play out the cuelist.
On the right, you can reveal which Output Events are assigned to the Selected Cuepoint - in our example, cuepoint0005 will recall the snapshot named "Act 2 Scene 2" from the snapshots folder "Mozart". The blue access bar (2) can used to show or hide this area.
Changing Views
The middle of the display can be toggled between two views by clicking on the blue access bars (upper or lower): the Snapshots stored in the selected Snapshot Folder OR the Current Cuelist.
Snapshots list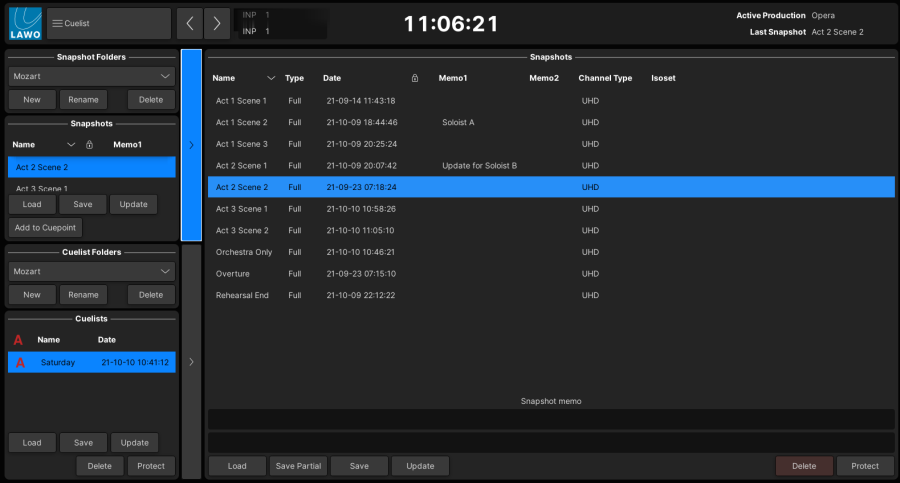
Current Cuelist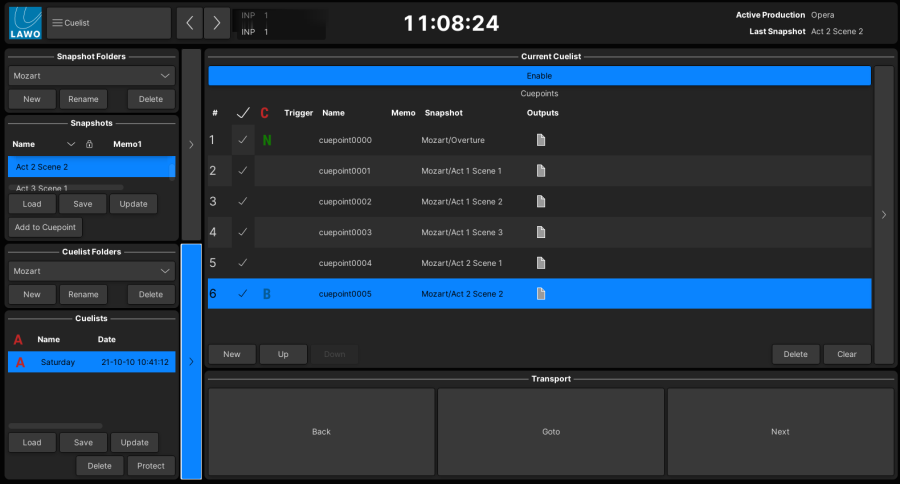 ADD New Cue & Make Snap and Cue
When the Current Cuelist is in view, click on the right access bar to show or hide the Selected Cuepoint/Output Events area.
Selected Cuepoint/Output Events revealed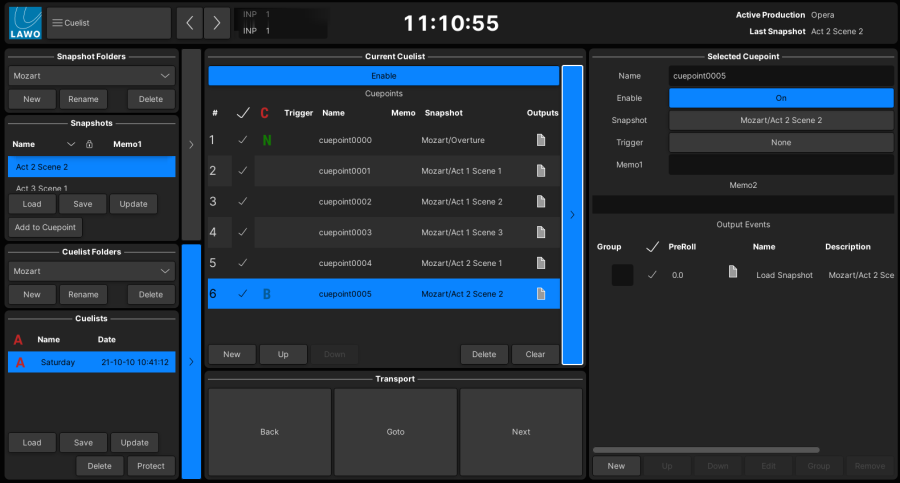 ADD New Cue & Make Snap and Cue
In addition, you can click and drag on the dividing lines to increase or decrease the size of an area. For example, to reduce the width of the Snapshots and Cuelists areas (on the left). This is ideal once a cuelist is prepared and you are ready for playout:
Current Cuelist (area maximised)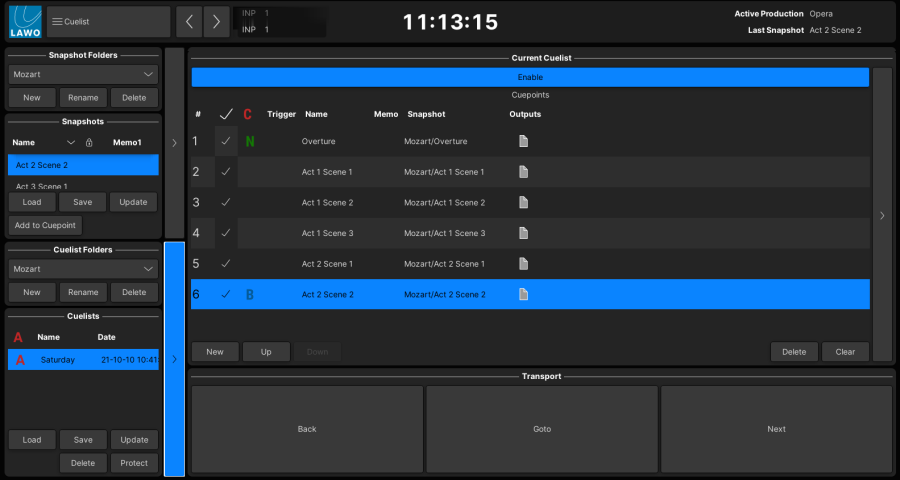 ADD New Cue & Make Snap and Cue AND UPDATE SO CURRENT CUELIST IS AT MAXIMUM SIZE
First Steps
To prepare a simple cuelist:
1. Open the Cuelist display on the Central GUI.
If there are no cuelists saved in the active production, then you will see an empty display.
2. Select a Snapshot Folder.
This can be an existing folder (containing snapshots) or you can create a new folder (using the New button). In our example, we have selected a folder named "Mozart" which contains some snapshots taken earlier. The contents of the selected folder appears in the Snapshots list.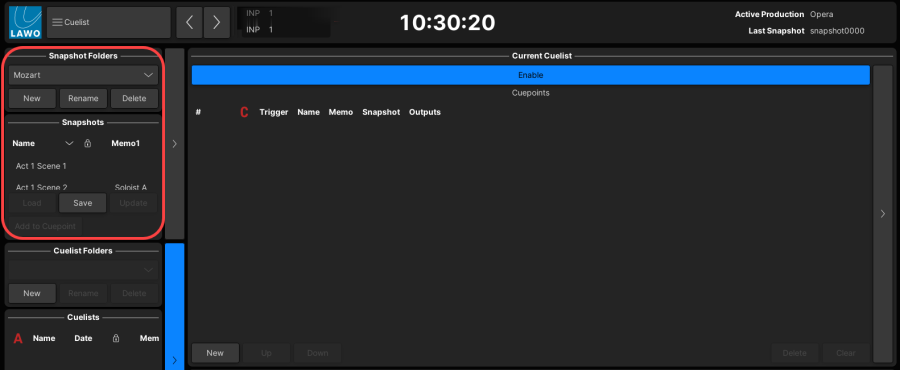 ADD New Cue & Make Snap and Cue
3. Next, select a Cuelist Folder, or create a New folder, to store your cuelist(s).
Multiple cuelists can be stored in each folder making it easy to store different versions of a cuelist for the same show.
Note that the cuelist folder is separate from the snapshot folder, and a cuelist can reference any snapshot in any snapshot folder as long as it is stored in the same production.
In our example, we have chosen New and then Rename, and are using the same name as for the snapshots folder. This is a good idea if the cuelists and snapshots are closely related. ADD New Cue & Make Snap and Cue
4. Next, add some cuepoints to the cuelist using either of the following methods.
- To add existing snapshots:
Select a snapshot (from the Snapshots area) and click on Add to Cuepoint. The snapshot is added as a new cuepoint, taking the next default name (e.g. cuepoint0000). You can rename the cuepoint later if you wish. Repeat this process for each snapshot.
Alternatively, select New Cue to add some "empty" cue points.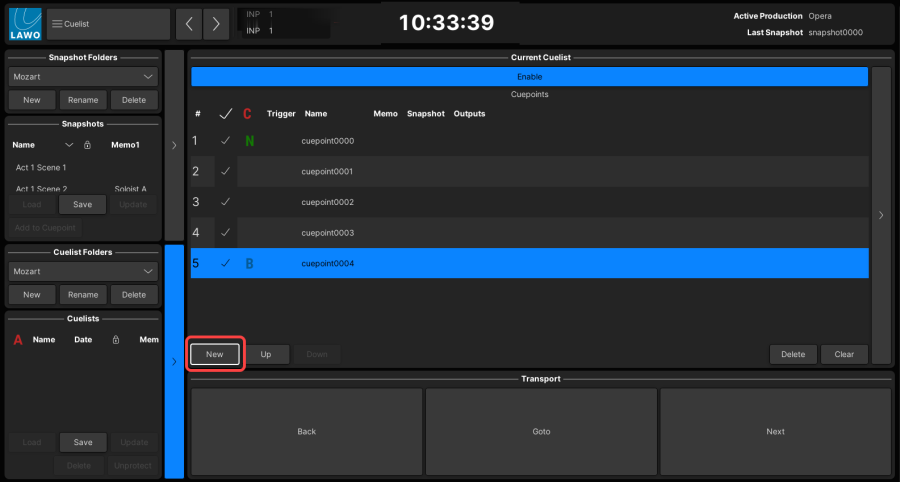 UPDATE as per V6.6.0 First Steps_03
Then select a cuepoint and click on Select snapshot (from the Selected Cuepoint area). Choose the snapshot you wish to assign (from the pop-up window). Here you will see all the snapshots available in the selected Snapshot Folder. Confirm by selecting OK.
Using this method, you can also assign a fade set and adjust the fade time and switch mode if you wish. These features are explained later in Snapshot Crossfades.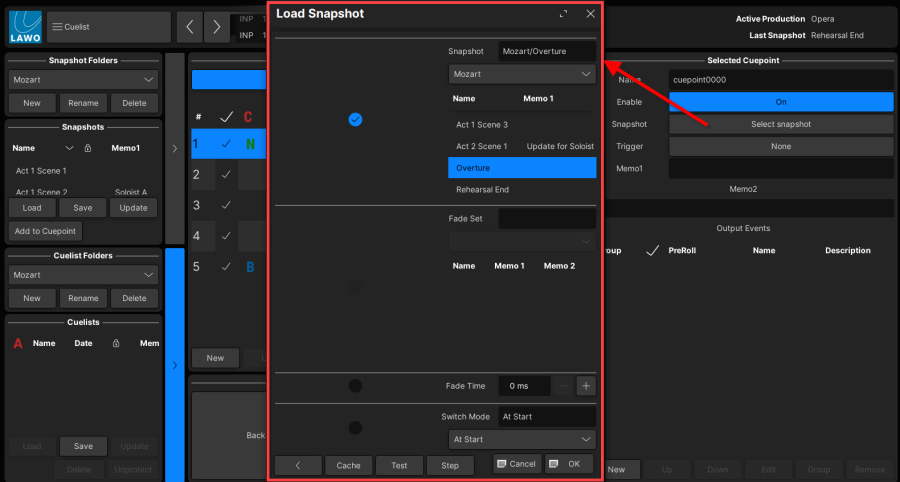 UPDATE as per V6.6.0 First Steps_04
To assign consecutive snapshots to consecutive cuepoints, click on Step to make all the assignments before selecting OK. See Using the Step Function. |
- To create new snapshots:
The Make Cue and Snap button creates a new cuepoint AND saves a new snapshot in one operation. For simplicity, the snapshots are saved in a new snapshot folder (e.g. folder0001), and the next default names are applied (e.g. cuepoint0005 and snapshot0000).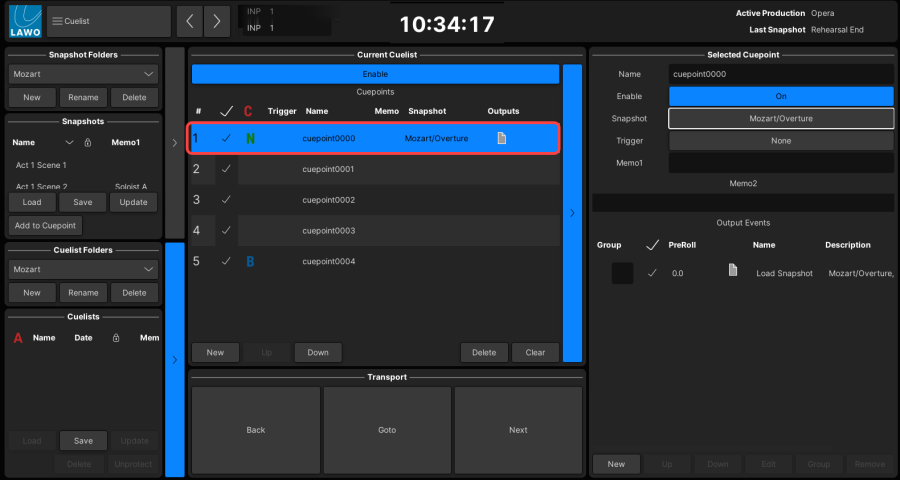 UPDATE as per V6.6.0 First Steps_05
Alternatively, select Save (from the Snapshots area) to save a new snapshot in the current folder. Then, select the snapshot and click on Add to Cuepoint. The snapshot is added as a new cuepoint.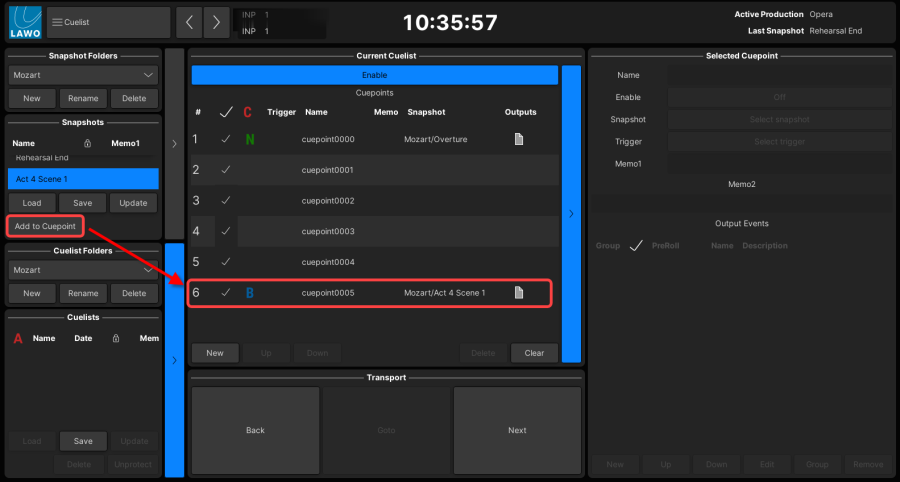 UPDATE as per V6.6.0 First Steps_06
At any time, you can use the Delete button to delete the selected cue point, or Clear to clear the entire contents of the cuelist. Note that Clear will remove ALL cuepoints from the list and should be used with caution! |
5. Next, save the contents of the cuelist by clicking on Save (in the Cuelists area) - the cuelist is saved and named automatically (e.g. cuelist0000).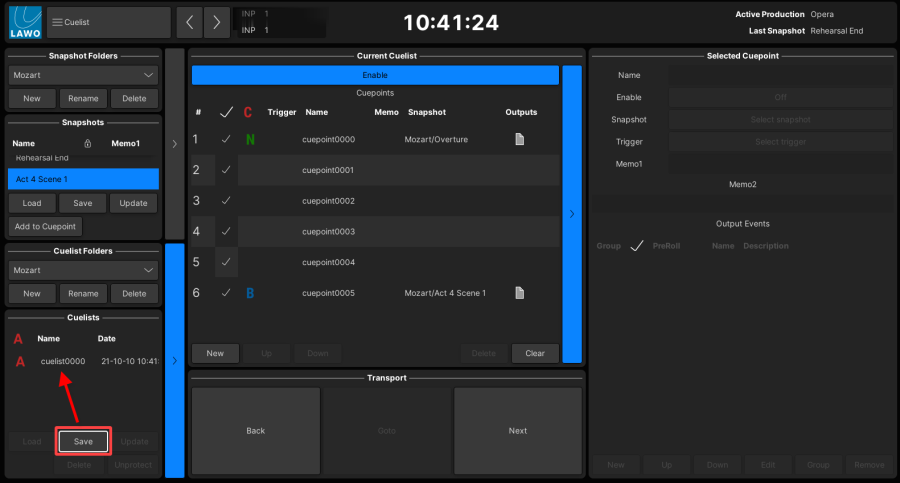 UPDATE as per V6.6.0 First Steps_07
You can rename the cuelist by clicking in the name field and typing in a new name (e.g. Saturday).
The cuelist is now prepared, saved and named, and you can use the Back, Goto and Next buttons (in the Transport area) to playout the cuelist.
6. At any time you can edit its contents by selecting a cuepoint and assigning a different snapshot or output event (from Selected Cuepoint area):
Assign Output Event UPDATE as per V6.6.0 First Steps_08
7. If you make any changes, then you must update the cuelist (right-click and select Update):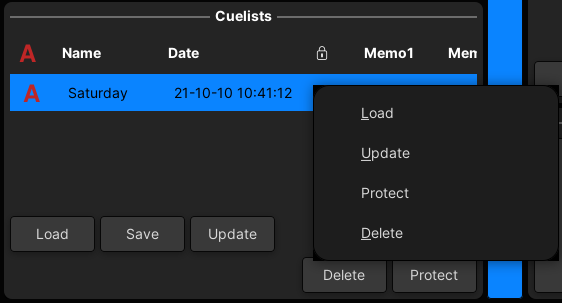
8. And then either update (or save) the production:
Note that you MUST perform steps 7 and 8 in order to save any changes, as Cuelists and their Folders are only written onto the user data flashcard when you update (or save) a production. |
Running a Cuelist (Playout)
Once you have prepared some cuepoints, you can play out the cuelist in real time.
To do this, use the on-screen Next button in the Cuelist display's Transport area. You may also wish to maximise the Current Cuelist area as described earlier. See Changing Views.
Preparing for Playout
First, make sure that the cuelist and its cuepoints are enabled for automation as follows.
1. Select either the Enable button (at the top of the Current Cuelist area), or front panel ON button, to enable the cuelist automation.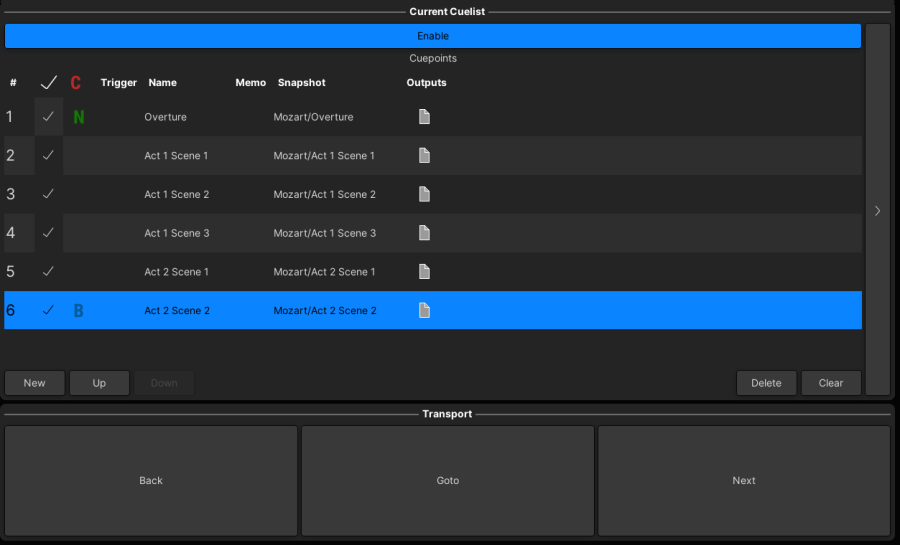 ADD New Cue & Make Snap and Cue
If the Enable button is turned off, then the Transport buttons are disabled (and greyed out on the display).
2. Make sure that the individual cuepoints are enabled (via the "enable" tickboxes).
You can use the tickboxes to include or exclude (skip) a cue if you wish.
Playout Operations
The first time you Enable the Current Cuelist, the N flag appears beside the first cuepoint in the list (e.g. Overture). This tells you that this cuepoint will be the next to play out when you press the Next button.
1. Press Next to start the play out.
If the cuepoint specifies a snapshot, then the snapshot is loaded according to any snapshot isolates and offsets you have applied. The cuepoint is marked with a C for Current and the N flag moves down to the next cuepoint in the list.
If the snapshot does not load, check your snapshot isolate settings.
2. Keep pressing Next to step down through the cues in turn.
In each case, the cuepoint loads its assigned snapshot and/or output events, and the N, C and B flags update:
- N indicates the Next cuepoint to be loaded. This shows you exactly what will be recalled when you press the Next button.
- C indicates the Current cuepoint. This is always the current cue (the last one loaded).
- B indicates the Back cuepoint.
3. To play out the cuelist from beginning to end, keep pressing Next repeatedly.
When you reach the last cuepoint in the list, the playout ends and the Next button performs no further function.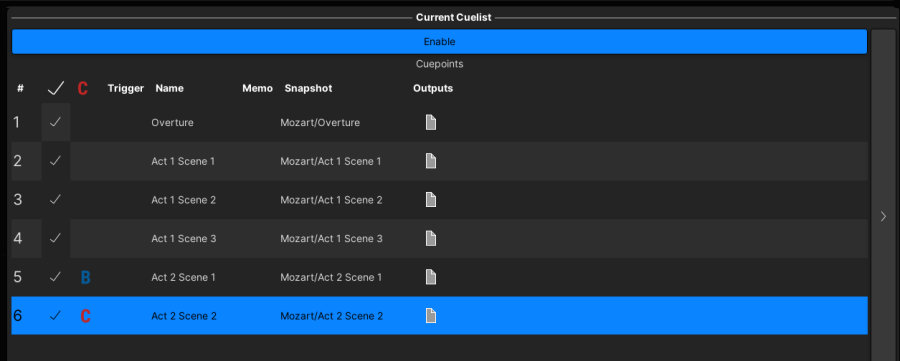
4. At any time, you can press the Back button to quickly return to the previous cue's settings. For example, if an artist misses their entrance or you press the Next button too early!
5. To skip a cuepoint, deselect its green tickbox. If the cuepoint is next to playout, then the N flag moves one position down the list. You can skip any number of cuepoints.
In the example below, we have chosen to skip Act 1 Scenes 2 and 3: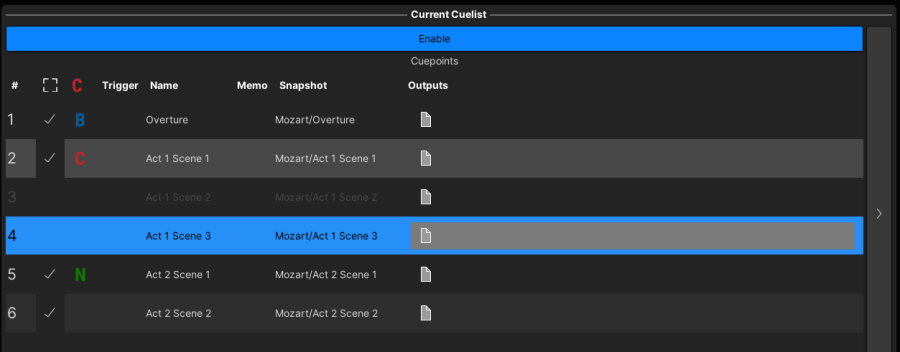
6. To restart the playout from a different position, select the cuepoint you wish to return to and select the Goto button - the N flag updates accordingly. Now press Next to restart the cuelist playout from this point.
Current Cuelist Operations
Having prepared some cuepoints, you can use the Current Cuelist (in the middle of the display) to manage the cuelist. ADD New Cue & Make Snap and Cue
For each cuepoint, you will see:
- # - the cuepoint index.
- Individual Enable (Tickbox) - enables (or disables) a cuepoint during playout.
- B, C or N - indicates the Back, Current or Next cue point to be actioned during playout
- Trigger - assigns an input trigger to the cue point.
- Name & Memo - here you can name the cuepoint and add a memo.
- Snapshot - shows the snapshot assigned to the cuepoint in the format: "SnapshotFolderName" / "SnapshotName"
- Outputs - here you will see icons indicating the type of event(s) assigned to the cuepoint.
1. Use the Enable button (at the top of the area) to enable or disable the cuelist automation.
2. Use the New Cue button to add a new (empty) cuepoint to the list. You can then assign a snapshot or output event later.
3. Use the Make Cue and Snap button to create a new cuepoint and save a new snapshot in one operation.
4. The Up/Down, Delete and Clear buttons can be used to manage cuepoints in the list.
5. The Back, Goto and Next buttons (in the Transport area) will playout the cuelist.
Renaming Cuepoints
1. Click on the name field and enter a new name using the console keyboard.
Click once to select all the text, or twice to modify an existing name (you will see a flashing cursor). |
2. To confirm, press ENTER. Or, to exit without making a change, press ESCAPE.
You can use the following keyboard shortcuts to quickly rename multiple cuepoints:
1. Click in the name field and press CTRL + A to select all text, and then CTRL + C to copy the text field.
2. Press ENTER and then the keyboard's Down arrow to select the next cuepoint.
3. Press ENTER to select the name field and then CTRL + V to paste in the copied text.
4. Now edit the text as you wish and press ENTER to confirm the name change.
5. Repeat this process to quickly rename all the cuepoints in the list.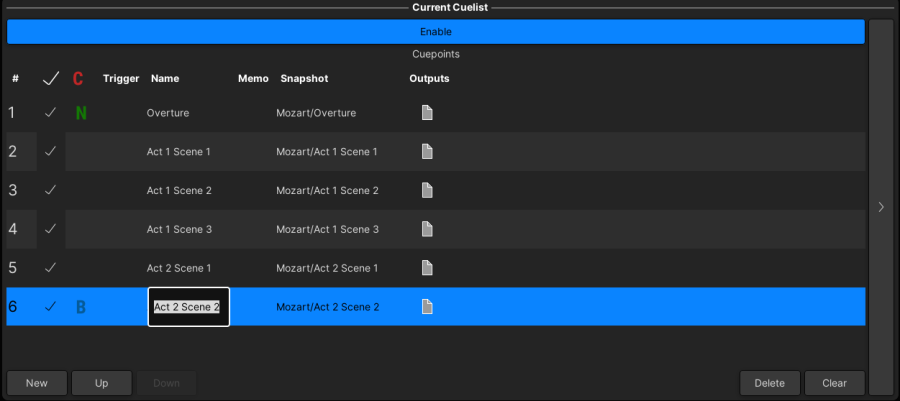 ADD New Cue & Make Snap and Cue
Changing the Order of Cuepoints
1. Select the cuepoint you wish to move.
2. Then select either the Up or Down button to move the selected cuepoint up or down the list.
At any time, you can use the Delete button to delete the selected cue point, or Clear to clear the entire contents of the cuelist. Note that Clear will remove ALL cuepoints from the list and should be used with caution! |
Assigning an Input Trigger
Each cuepoint in the Current Cuelist can be assigned an input trigger such as a GPI or fader open. This can be useful if you wish to execute a cue automatically.
1. Click on the cuepoint's Trigger field (in the Current Cuelist) to open the "Choose Trigger" window.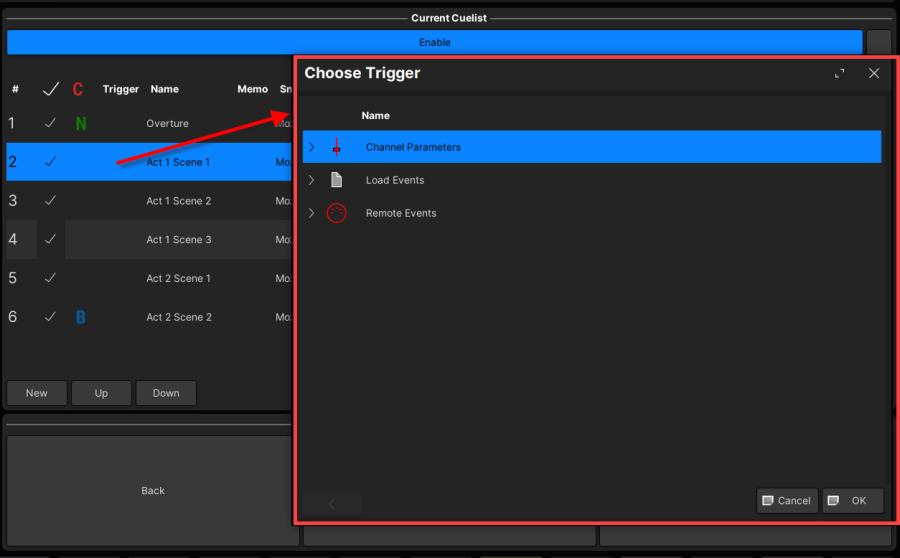
The system supports a wide variety of input triggers, and so you will see the following categories:
- Channel Parameters - specific channel events (e.g. main fader level above/below, channel cut set, aux send level above/below).
- Load Events - such as a snapshot load.
- Remote Events - such as a GPI, incoming timecode position passed or MIDI message.
2. Select a cateogory (e.g. Remote Events), an input trigger (e.g. General Purpose Input Changed) and then define its parameters.
In the example below, click to select a GPI from the drop-down menu and then set its Value (state):
- Value ticked = state high
- Value NOT ticked = state low
Input Trigger (example)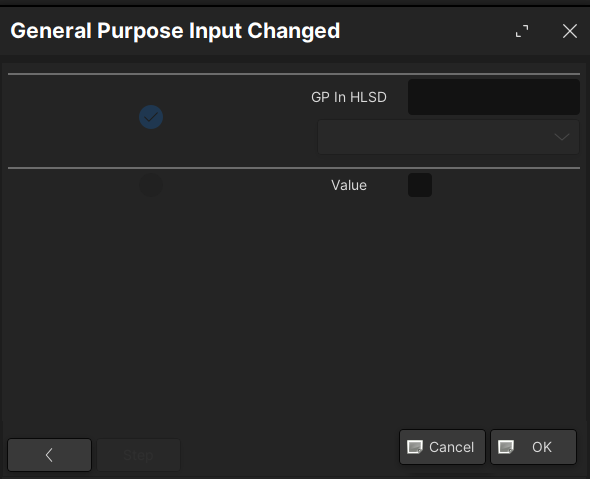
At the bottom of the window are a number of useful functions:
- < - click to step back to the last operation; in this instance, to the previous window.
- Step - click to step forwards to the next cuepoint AND automatically increment the step field (marked by the blue tick). See Using the Step Function.
3. Confirm all changes with OK or, to exit without making a change, select Cancel.
Once confirmed, an icon appears beside the cuepoint in the Current Cuelist representing the input triggger (e.g. GPI, TC, MIDI, a fader icon, etc.).
4. To remove an existing input trigger, click on the icon (to re-open the trigger assign window) and select Remove.
Input Triggers
The screenshot below shows the possible input triggers.
Selected Cuepoint Operations
The Selected Cuepoint area (on the right of the display) can be used to interrogate or assign new functions to a cuepoint. If you cannot see this area, the check the current view.
1. Select a cuepoint - the Selected Cuepoint and Output Events areas update: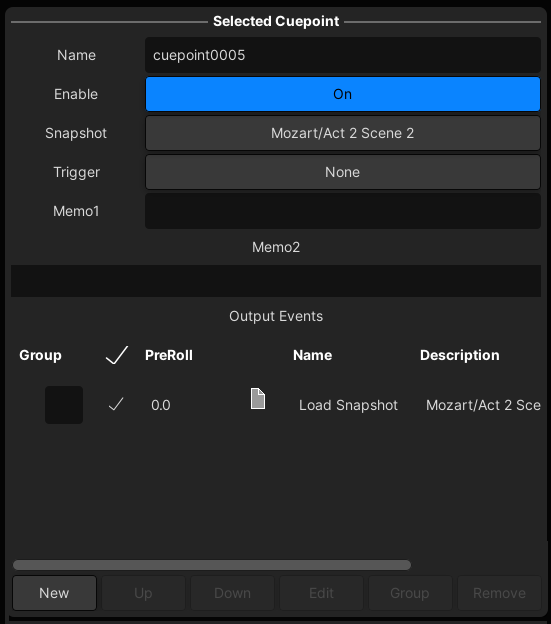
Under Selected Cuepoint you will see:
- Name - click to edit the name of the cuepoint.
- Enable - click to enable (or disable) the cuepoint during playout.
- Snapshot - click to assign a snapshot to the cuepoint.
- Trigger - click to assign an input trigger to the cue point.
- Memo1 & Memo2 - click here to enter notes about the cuepoint:
- the Memo1 field is displayed in the Current Cuelist (in the middle of the display) and accepts up to 32 characters.
- the Memo2 field is only displayed in the Selected Cuepoint area, but can accept more text then Memo1. Press SHIFT + ENTER to start a new line.
Under Output Events you will see:
- Group (tickbox) - click to select multiple events (to create a group).
- Individual Enable (tickbox) - click to enable (or disable) the event during playout.
- PreRoll - click to enter the amount of preroll (in seconds). You can use this to delay the start of an event after the cuepoint is loaded.
- Icon - here you will see an icon indicating the type of event (e.g. a file icon).
- Name & Description - here you will see the name of the output event (e.g. Load Snapshot) and a more detailed description (e.g. the name of the snapshot in the format: "SnapshotFolderName" / "SnapshotName").
2. Use the New button to add a new (empty) output event to the cuepoint. You can then assign an event type later.
3. The Up/Down, Edit, Group and Remove buttons can be used to manage the Output Events.
Assigning a Snapshot
A snapshot can be assigned to a cuepoint as follows:
1. Select a cuepoint and open the Selected Cuepoint area (on the right of the display).
2. Click on Select snapshot - the "Load Snapshot" window appears:
3. Choose a Snapshot folder and a snapshot.
At the bottom of the window are a number of useful functions:
- < - click to step back to the last operation; in this instance, it closes the snapshot assign window.
- Cache - click to add the snapshot load to the Cache.
- Test - click to load the selected snapshot (to "test" its contents).
- Step - click to step forwards to the next cuepoint AND automatically increment the step field (marked by the yellow dot). In our example, this will assign consecutive snapshots to consecutive cuepoints. See Using the Step Function.
4. Confirm all changes with OK or, to exit without making a change, select Cancel.
In the example below, snapshots from the snapshot folder named Mozart have been assigned to each of the cuepoints: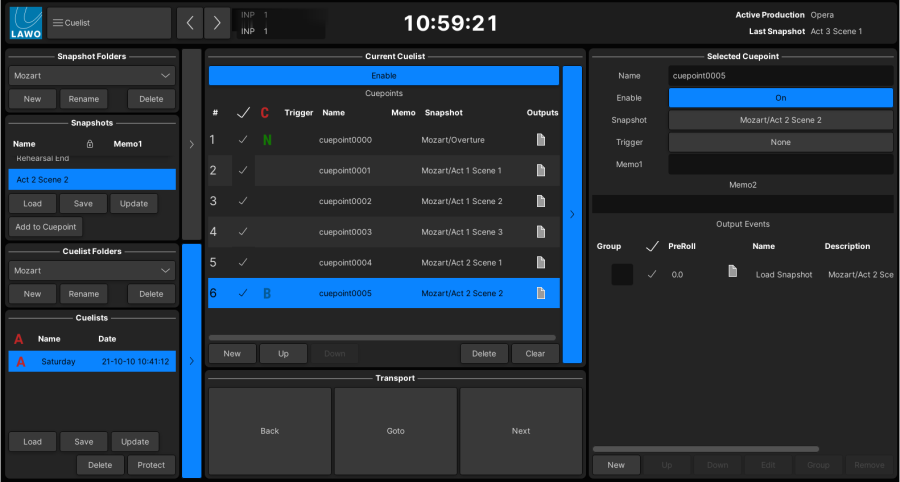 ADD New Cue & Make Snap and Cue
Once a snapshot is assigned, it automatically appears in the Output Events list. Therefore, another way to access the "Load Snapshot" window is to select the event and click on Edit. See Managing Output Events for more details.
5. To remove a snapshot assignment, select the "Load Snapshot" event (from the Output Events list) and click on Remove.
Assigning an Output Event
An output event can be assigned to a cuepoint as follows.
Note that you can assign multiple events to each cuepoint, and combine output events with a snapshot load. This allows you to execute a complex set of changes from each change of cue!
1. Select a cuepoint and open the Selected Cuepoint area (on the right of the display).
2. Click on the New button (at the bottom of the Output Events area) - the "Choose Command" window appears.
3. To assign a single output event, select New Command followed by the type of command. Alternatively, you can use New Group to create a group of events, or Cache to select events previously stored to the cache.
When you can select New Command, you will see the following categories:
- Channel Parameters - specific channel events (e.g. main fader level above/below, channel cut set, aux send level above/below).
- Load Events - such as a channel preset, snapshot, iso set or oversnap.
- Global Operations - such as clearing all iso sets.
- Remote Events - such as a GPO or MIDI message.
4. Select a cateogory (e.g. Remote Events), an option (e.g. Send MIDI Note On Message) and then define its parameters.
In the example below, select an Interface Index and MIDI Channel from the drop-down menus, and then enter the Note and Velocity values:
- Interface Index - is defined in the "post_config.tcl" file during commissioning, and is used to distinguish the optional KISS box MIDI interface from RTP-MIDI.
- MIDI Channel - from 1 to 16 (as defined by the MIDI 1.0 standard).
- Note - from 0 to 127 (as defined by the MIDI 1.0 standard).
- Velocity - from 1 to 127 (as defined by the MIDI 1.0 standard).
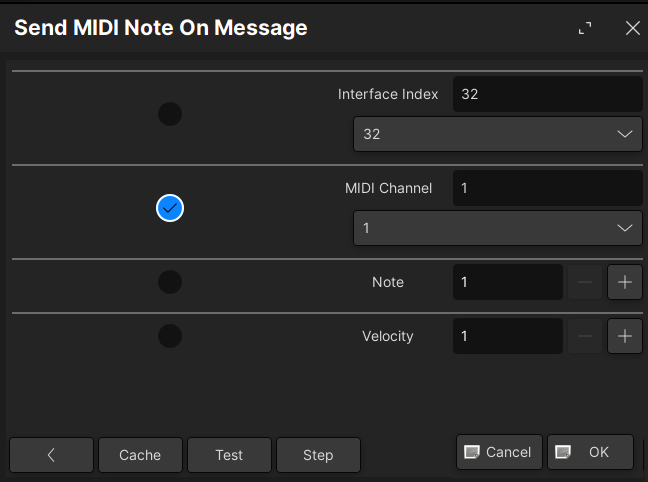
At the bottom of the window are a number of useful functions:
- Back - click to step back to the last operation; in this instance, to the previous window.
- Cache - click to add the event to the Cache.
- Test - click to load the output event (to "test" its contents).
- Step - click to step forwards to the next cuepoint AND automatically increment the step field (marked by the yellow dot). In our example, this will assign consecutive MIDI Channel Numbers to consecutive cuepoints. See Using the Step Function.
5. Confirm all changes with OK or, to exit without making a change, select Cancel.
Once confirmed an icon appears in the Outputs field to represent the assigned event (e.g. a MIDI connector icon):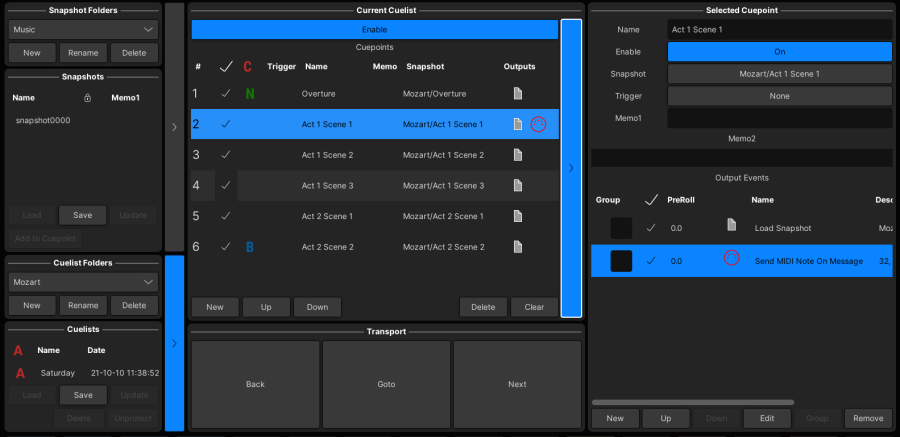 ADD New Cue & Make Snap and Cue
6. To remove an event from the selected cuepoint, select the event (from the Output Events list) and click on Remove.
Output Events
The screenshot below shows the possible output events.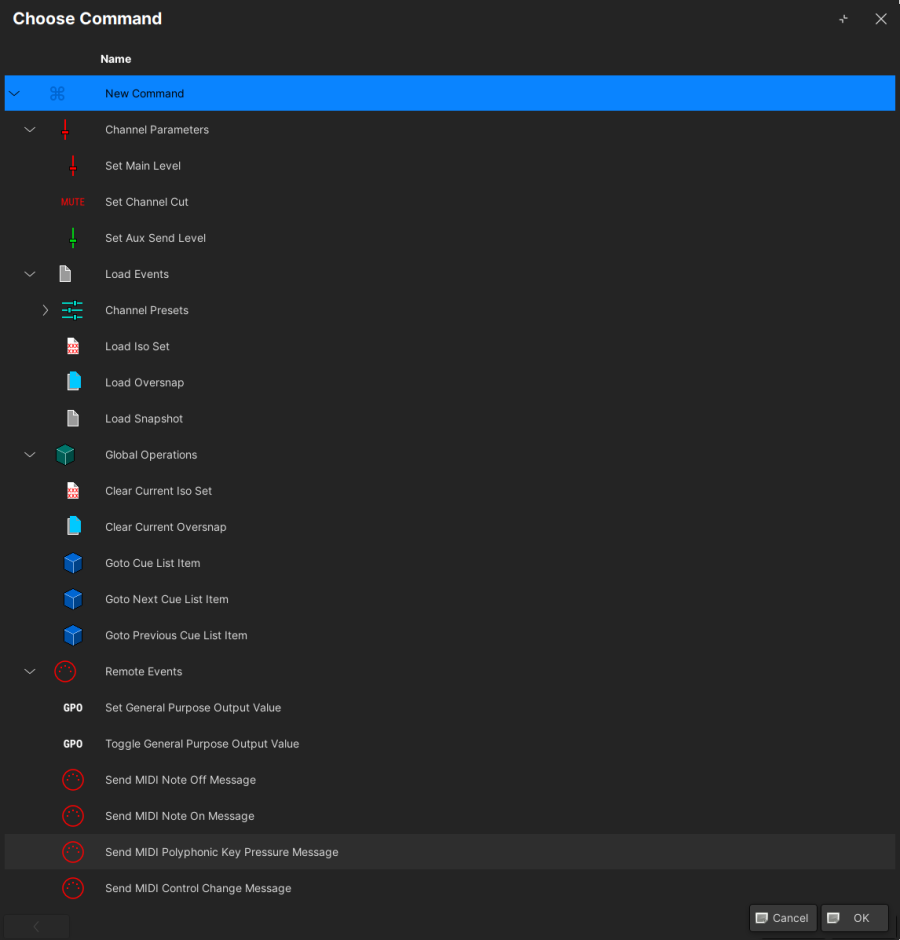
To apply crossfades between cue changes, choose Load Events and Load Snapshot. Then assign a Snapshot and Fade Set to each cuepoint. See Snapshot Crossfades.
Managing Output Events
All the events assigned to the selected cuepoint, including snapshots, are listed in the Output Events area. The Name field cannot be edited as it describes the event: e.g. Clear Current Iso Set, Load Snapshot, Send MIDI Note on Message, etc.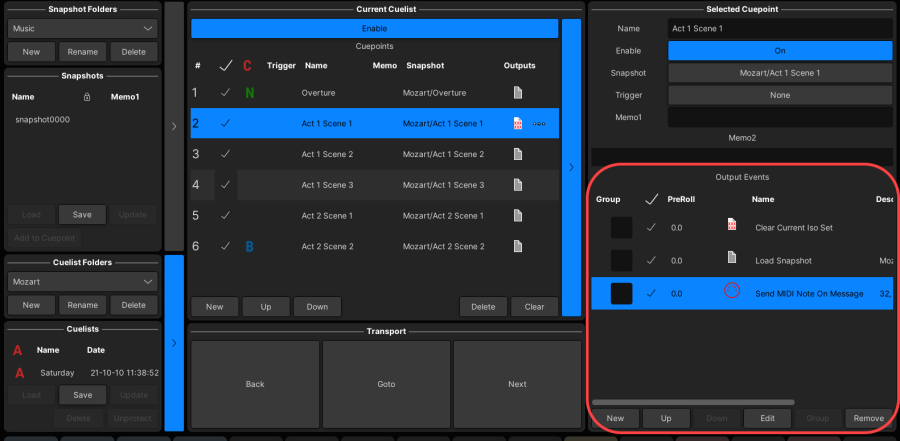 ADD New Cue & Make Snap and Cue
1. To select an event, click on its Name field.
2. Once selected, you can remove the event by clicking on Remove.
3. Or, change its function by clicking on Edit - either the Load Snapshot or Choose Command window appears. From here, you can choose a different snapshot or event.
4. The Up and Down buttons can be used to move the selected event up or down the list.
Depending on the event type, the order can be important. For example, if a specific channel parameter event is placed before a snapshot load, then this may be reset by the values stored in the snapshot!
4. To delay the start of an event, enter a value into the PreRoll field (in seconds).
5. To create a group of events, select multiple events using the Group tickboxes (as shown below), and click on Group.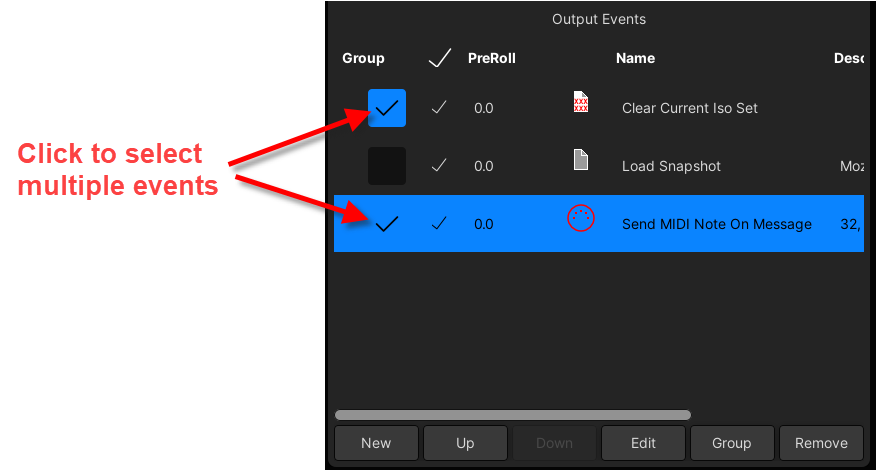
Using Keyboard Shortcuts
When assigning a trigger or event, you can use the following keyboard shortcuts to speed up the navigation and selection process:
[Cursor Up] or [Cursor Down] - scrolls up or down through the list entries.
[Enter] or [Backspace] - step forwards or backwards to the next window.
[Escape] - closes the current window.
Once an event window parameter window is open, you can also use the keyboard to adjust the parameter values:
[Cursor Up] or [Cursor Down] - increments or decrements the value of the selected field.
[TAB] or [CTRL] + [TAB] - selects the next or previous field.
MIDI Event Parameter Window
Using Groups
If you have multiple events which relate to a single operation, then it can be useful to create a group. There are two possible methods: either group some existing events OR create new events as a group from "Choose Command" window.
- To group existing events:
1. First select the cuepoint containing your events (from the Current Cuelist).
2. Select the events you wish to group using the select tickboxes (in the Output Events list) - in our example, a MIDI Note On and MIDI Program Change.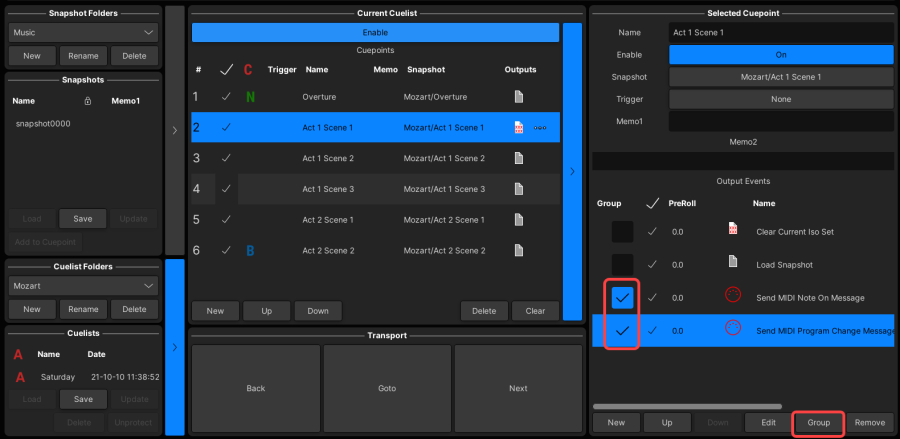 ADD New Cue & Make Snap and Cue
3. Then click on Group (at the bottom of the Output Events area) - the group is created and indicated by the following icon in the Output Events area and Current Cuelist: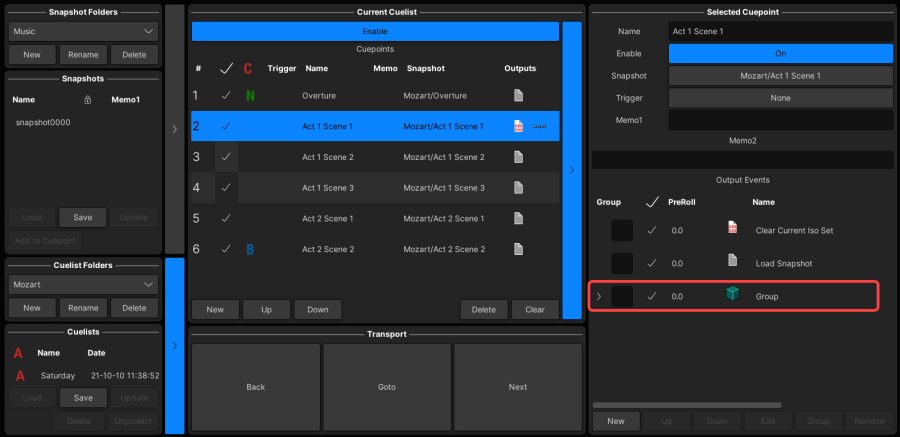 ADD New Cue & Make Snap and Cue
- To create new events as a group:
1. First select a cuepoint (from the Current Cuelist) and click on New (at the bottom of the Output Events area) to open the "Choose Command" window.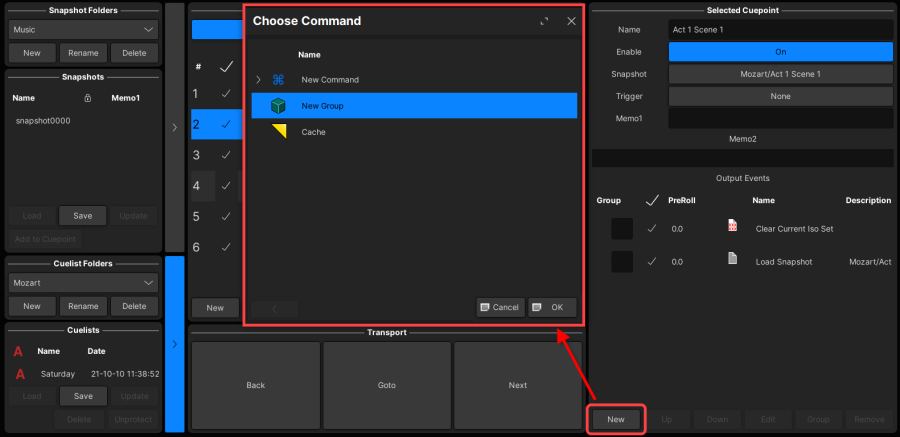 ADD New Cue & Make Snap and Cue
2. Select New Group and OK to open the "Group" window.
You can now click on New to add some output events as described on the next page.
- Group Operations
From the "Group" window you can edit and test the grouped events, or add the grouped events to the cache.
For an existing group, select the Group (in the Output Events list) and click on Edit to open the window: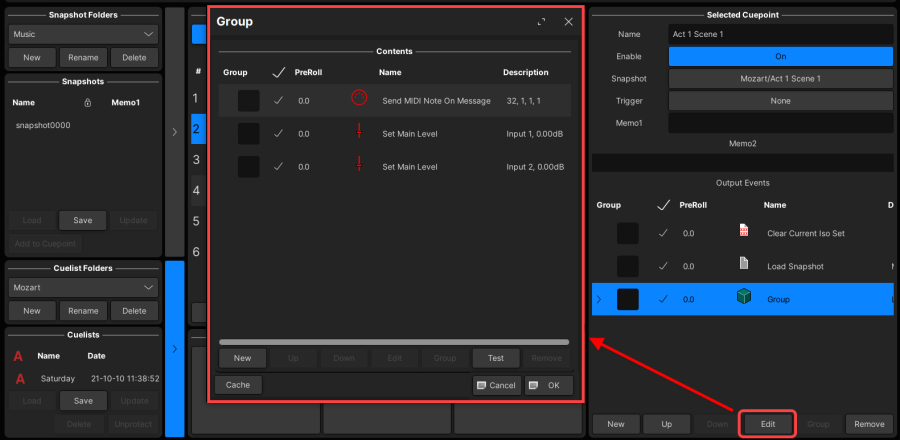
1. To add more events to the group, select New -> New Command -> choose a category (e.g. Channel Parameters) -> choose an option (e.g. Main Level), and edit the parameters.
In our example, we have added two new Main Level events which set the levels of Input channels 1 and 2 to 0dB.
2. To test the grouped events, click on Test.
3. To change the order of events, select an event and click on Up/Down.
4. To remove an event, select it and click on Remove.
5. To add the grouped events to the cache, click on Cache.
6. Once you have finished making changes, confirm with OK, or click on Cancel to exit without making a change.
7. At any time, you can click on the small arrow beside the group to interrogate its contents: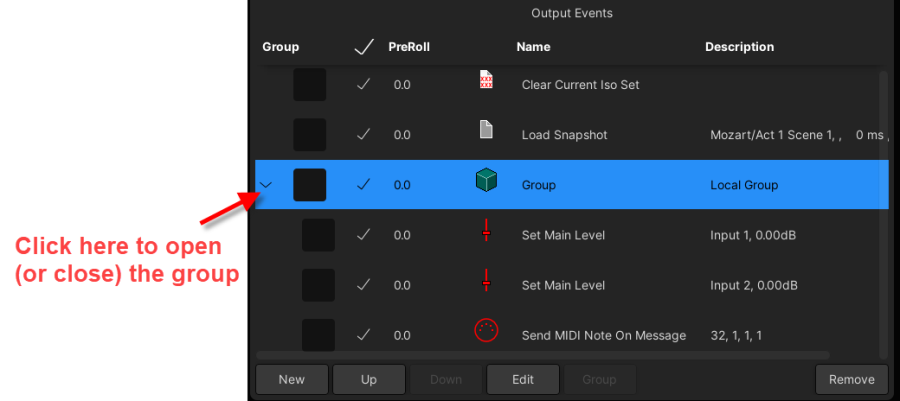
Using the Cache
The cache is a storage area which is saved in the active production. It is useful for storing events which you wish to recall later when making assignments to a cuepoint or command trigger. For example, to store the setup of an event, or group of events, which you wish to use repeatedly in several cuepoints.
The cache can be accessed from the Cuelist display (when assigning a snapshot or output event to a cuepoint), or from the Command Triggers display (when assigning a command to a trigger).
The contents of the cache are stored onto the user data flashcard whenever you update or save a production. In the current release, there is no way to clear or edit the contents of the cache, other than to save a new production. Therefore, it is recommended to only store items to the cache where necessary.
The example below describes how to save a group of events to the cache and then recall it to another cuepoint, but the same principles can be applied to single events and command trigger assignments.
- To save events to the cache:
1. First define the event(s) you wish to cache in the usual manner - for our example:
- Select a cuepoint from the Current Cuelist area (e.g. Overture).
- Click on the New button (at the bottom of the Output Events area) to open the "Choose Command" window.
- Select Channel Parameters -> Main Level, and define the parameters - in our example, to set the main level of Sum channel 1 to 0dB.
- Repeat for Sum channel 2 so that there are two "Set Main Level" events in the Output Events area.
- Then select and group the events as described earlier. (Note that this step is optional, but for our example, it makes sense to use a group).
2. Now select the event or group (from the Output Events area) and click on Edit to open the "Group" window: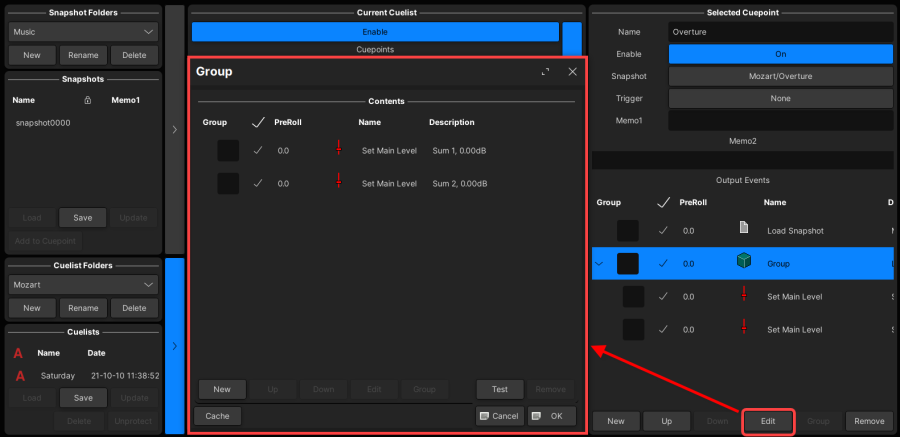
3. Click on Cache to save the event/group to the cache - you are asked to enter a Name and Description.
Note that a Name must be entered while the Description is optional. It is good idea to give cached items a short name, for easy identification, and use the description field to add more detail as necessary: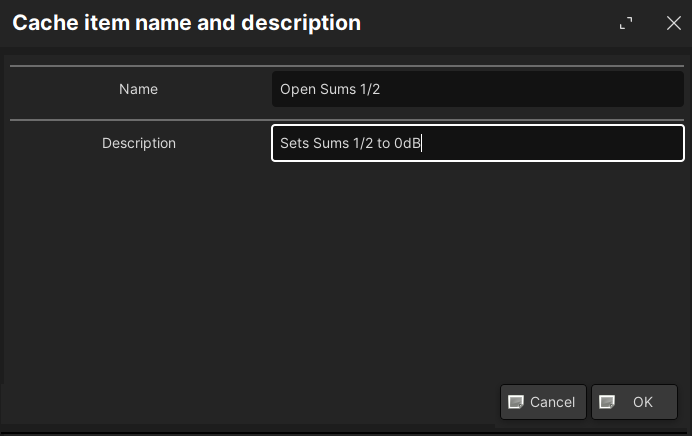
4. Select OK to confirm - your event/group is now saved to the cache.
A yellow triangle appears beside the event/group in the Current Cuelist and Output Events areas. This indicates that the the event/group is a child of the cache, meaning that if you subsequently edit its contents, any changes will be carried forward. You can prevent this from happening by re-opening the Edit window and choosing In Place Save. This is described in more detail later.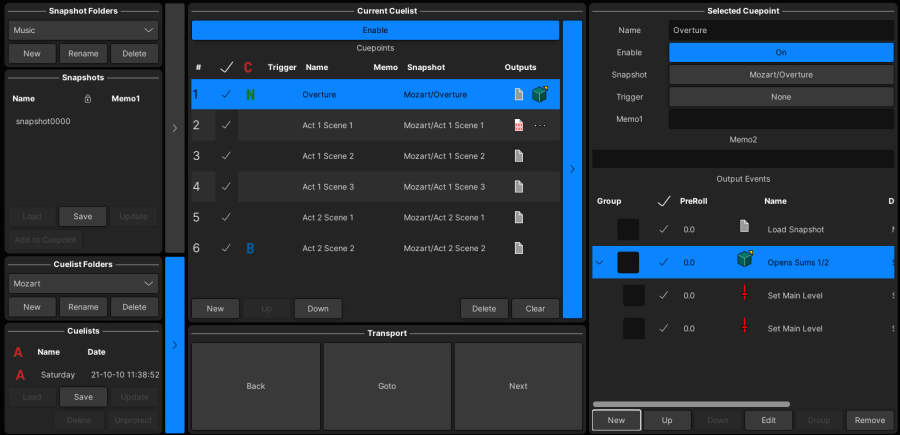 ADD New Cue & Make Snap and Cue
- Assigning a cached event to a cuepoint
Once you have added an event or group to the cache, then it can be assigned to a different cuepoint as follows:
1. First select a cuepoint (from the Current Cuelist) and click on New (at the bottom of the Output Events area) to open the "Choose Command" window: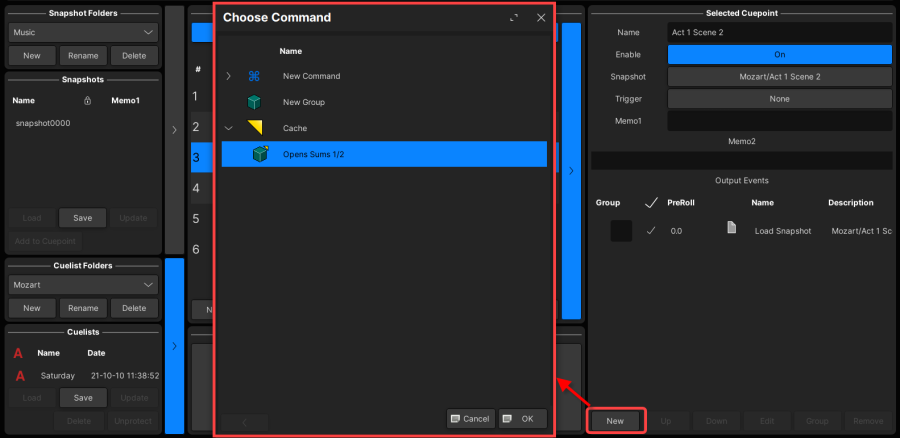
2. Open the Cache and select an entry - in our example, there is only one item available (our group named Open SUM 1/2).
3. Select OK - the following window now opens: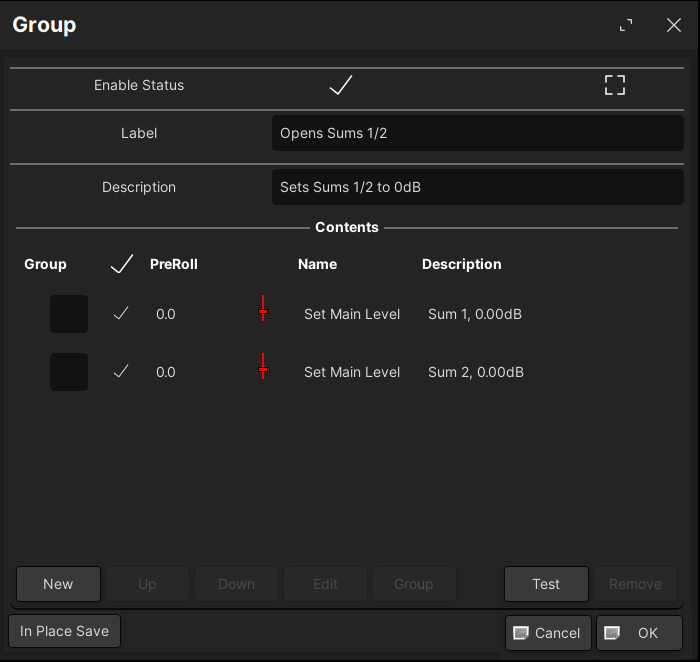
There are now two ways in which you can add the cached event/group to the cuepoint:
4. Select OK to add the event/group as a child of the cache. This means that any changes you make to the event/group at a later time will be carried forward.
5. Alternatively, select In Place Save to add the event/group as a one-time copy of the cache. (i.e. subsequent changes to the cached event/group will NOT apply).
Child of the Cache
An event or group which is a child of the cache is indicated by a small yellow triangle in the Current Cuelist and Output Events areas - in our example, both of the "Open SUM 1/2" groups remain a child of the cache.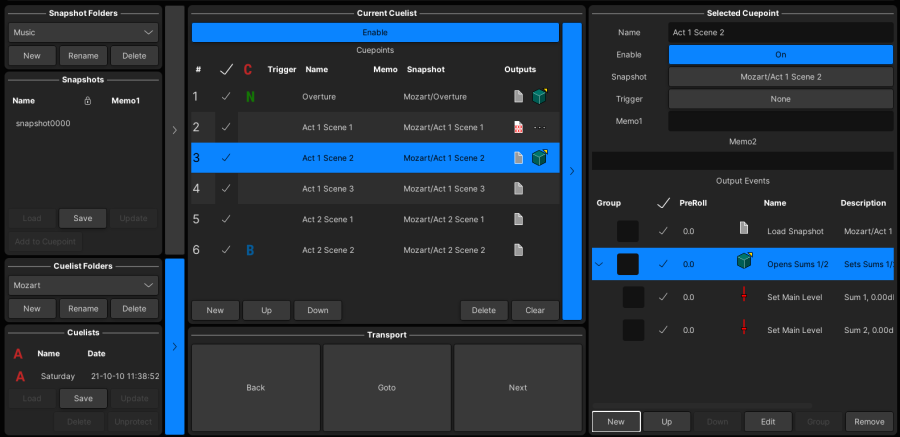 ADD New Cue & Make Snap and Cue
At any time you can re-open an event or group which is a child of the cache as follows. This allows you to edit or test its contents, or re-save the event/group using In Place Save.
1. Select the child event or group (in the Output Events list) and click on Edit.
2. In the example above, the commands New, Up/Down, Edit and Remove can be used to change the contents of the group. These commands do not appear for a single cached event.
3. To test the cached event/group, click on Test.
4. Once you have finished making changes, confirm with OK, or click on Cancel to exit without making a change. Or, to re-save the event/group to the cuepoint as a copy of the cache, click on In Place Save.
Using the Step Function
The Step function can be used make consecutive assignments to consecutive cuepoints very quickly. The function is available when assigning an input trigger, snapshot or output event to a cuepoint.
The example below describes how to assign consecutive snapshots to consecutive cuepoints, but the same principles can be applied to any event type.
1. Select the first cuepoint you wish to assign and open the Selected Cuepoint area (on the right of the display).
2. Click on Select snapshot - the "Load Snapshot" window appears: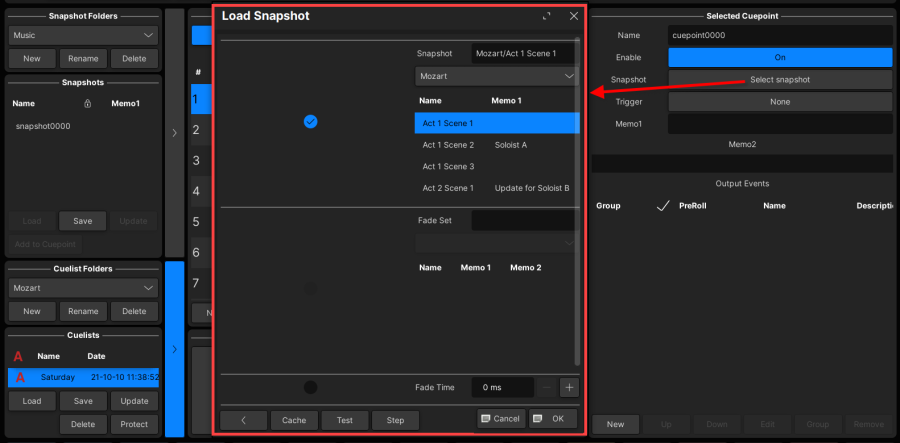
3. Choose a Snapshot folder and the first snapshot - e.g. Act 1 Scene 1.
4. Then choose the parameter you wish to "step" by clicking on the circle to the left of the Snapshot field. The selection is marked by a blue tick.
5. Now, instead of selecting OK, click on Step.
The system assigns the selected snapshot to the selected cuepoint, and then automatically increments both fields.
6. Keep pressing Step to work through all of the assignments.
7. When you reach the end of the snapshots (or cuepoints), confirm all changes with OK.
Note that you change which parameter will auto-increment by selecting a different "step" circle (e.g. beside Fade Set, Fade Time or Switch Mode).
In the example below, the step function is used with an output event. In this instance, Step will auto-increment the MIDI Channel number for the MIDI Note On Messages assigned to consecutive cuepoints.
Cuelists and Folders
Cuelists are stored in folders within the active production.
Note that the cuelist folder is separate from the snapshot folder, and a cuelist can reference any snapshot in any snapshot folder as long as it is stored in the same production.
Use the Cuelist Folders and Cuelists areas on the lower left of the display to manage the cuelists and their folders as follows: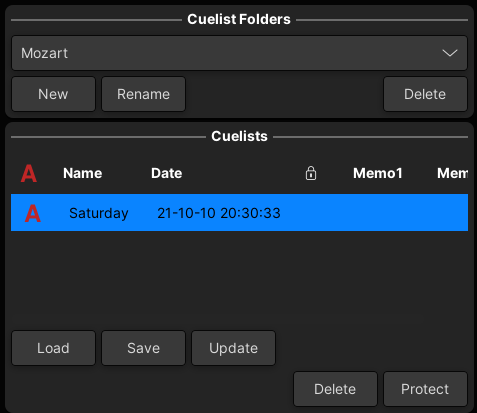
Cuelist Folders
1. Select New to create a new cuelist folder - each folder is named automatically (e.g. folder0000).
2. Select Rename to rename the current folder - a pop-up window appears asking for a new name.
3. Once more than one folder has been created, click on the drop-down menu to change folder.
4. Select Delete to delete the current folder.
Cuelists
1. Select Save to save the contents of the Current Cuelist into a new cuelist - each cuelist is named automatically (e.g. cuelist0000).
2. Click in the cuelist Name field to edit the name.
3. If you add more cuepoints to the Current Cuelist or edit the Selected Cuepoint contents, then either select Update (to update the selected cuelist), or Save (to save the contents in a new cuelist).
4. At any time, you can load the contents of a cuelist by selecting the cuelist followed by Load - the Current Cuelist updates accordingly.
Note that this will replace the entire contents of the Current Cuelist, so be sure to save any changes first (see step 3) before you a load a different cuelist!
The active cuelist is indicated by the A in the "active" column.
5. Select Delete to delete the selected cuelist.
4. Select Protect to protect the selected cueslit - a padlock icon appears in the "protect" column.
Cuelists and Snapshots
The Snapshot Folders and Snapshots listed at the top left of the display are identical to those in the Snapshot List. This means that any changes will be applied throughout the system - for example, updating a snapshot from the Cuelist display is the same as updating a snapshot from the Snapshot List.
The Snapshot Folders and Snapshots are provided for convenience so that you can manage your snapshots as you create a cuelist.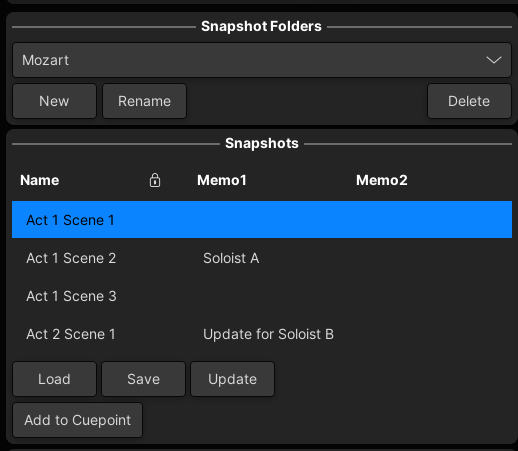
Snapshot Folders
1. If your system already has snapshots saved, then select a Snapshot Folder from the drop-down menu - the Snapshots area shows its contents accordingly.
2. Alternatively, select New to create a new snapshot folder - each folder is named automatically (e.g. folder0000).
3. Select Rename to rename the current folder - a pop-up window appears asking for a new name.
4. Select Delete to delete the current folder.
Snapshots
1. Select Save to save a new snapshot into the selected folder - the snapshot is named automatically (e.g. snapshot0000).
2. Click in the snapshot Name field to edit the name.
3. Select Add to Cuelist to add the selected snapshot to a new cuepoint.
4. The remaining functions - Load and Update - are provided for convenience:
- Select Load to load the selected snapshot. This allows you to check its settings before assigning it to a cuepoint.
Select Update to update the selected snapshot. This allows you to overwrite the snapshot with the current console settings.