MultiViewerRuleset

This chapter covers the configuration and usage of the MultiViewerRuleset, a sub-module to the Distributed Multi Viewer - Module for C100 vm_DMV.
Introduction
The Ruleset feature in vsmStudio works as a sophisticated logic add-on to the Distributed Multi Viewer module.
It exclusively addresses Textbox elements of Lawo DMV heads and was designed to set one or multiple predefined parameter values, based on vsmStudio internal GPIO or Tally triggers. A Rule consists of one or multiple conditions and is represented by an ID, that in a second step can be assigned to any Textbox element in the DMV layout design process. Each condition has its own specific trigger and parameter values. This allows to use Textbox elements as Status displays on DMV head outputs. Either standalone or in direct relation with the current source assignment of a specific PIP.
Preconditions
To make use of the Ruleset feature, Textbox resources must be available and therefore being created upfront in the DMV configuration. Also, since the Ruleset feature is working on basis of the Distributed Multi Viewer module, the Textbox resources need to be configured ahead of running the read-out process of Distributed Multi Viewer module. If Textboxes are created at a later stage, the Distributed Multi Viewer module must be triggered again, so the new resources can be read-out from the DMV via API.
Create a Rule
Once the Distributed Multi Viewer module was created, you will find the folder Rulebooks (1) with the sub-node default Ruleset (2) in the Monitor Management section (3).

The default Ruleset can contain various Rules. To create a Rule, select default Ruleset, then right-click into the white area on the right-hand side (1). Click Create Rule (2).

Set a Rule ID (1). This ID later needs to be assigned to any Textbox element, either via the DMV webUI or e.g, via theWall. Assign a Rule Name (2) and confirm with OK (3).

Conditions
A default condition is automatically created with the Rule, but each Rule can contain various conditions. To create additional conditions, right-click on the respective Rule and select Create Condition (1).

For easier administration and handling it is recommended to choose a descriptive Name for each Condition in the Property column.
By default, all available DMV Textbox Parameters are listed in columns, a right click on a condition provides the option to select and limit the Visible Columns (1). By double-clicking into the respective cell, the available value options are displayed and can be used accordingly (2). Shaded cells mean that the respective parameter value is not affected if the condition is triggered (3).
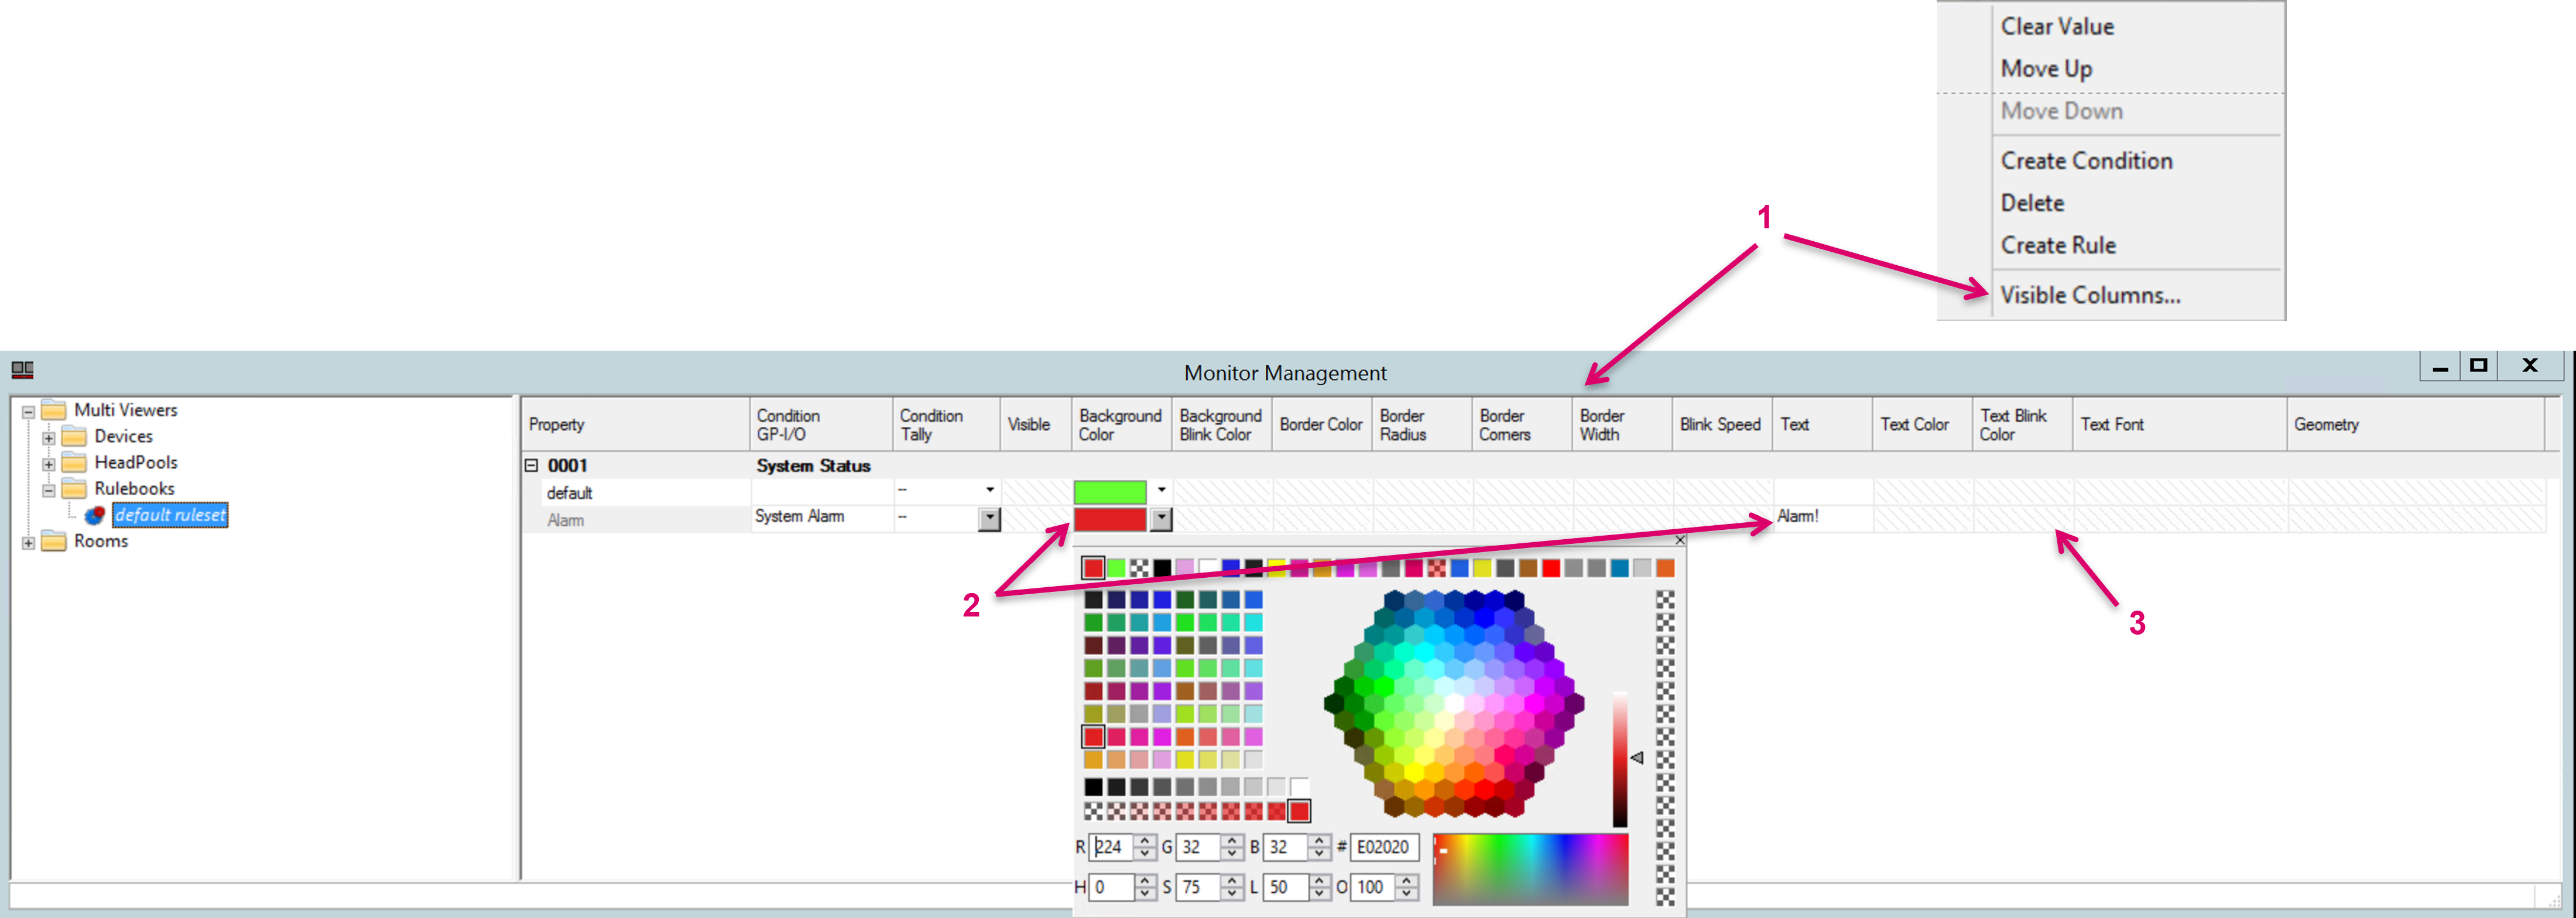
Each Condition can be triggered either by a GPI/O (1) or any System Tally (2). If both options are assigned to one Condition, they are aggregated, means both single triggers must be true to trigger the Condition. GPI/O can be dragged & dropped in the respective cell, Tally can be selected from a pull-down menu on the cell (2).

The conditions within a rule (1) are basically stacked by priority where default has always the lowest priority, means this is the fallback if no other condition is true. The second-row entry has the highest priority. So, in the example below, condition A would be prioritized over B, C, D, default. A right click on the row allows to move a condition and this way change the order of priority (2).

It is important to understand that if e.g., a parameter value is set to signal only based on a true Alarm trigger, it will need a defined value be set on the default condition, to display a “normal” state (1). The Geometry parameter should only be enabled and used if Textboxes are not managed by an external layout tool, e.g. theWall, as part of general layout building. The R checkbox next to the Geometry values allows to set the textbox geometry in relation to an optionally mapped PIP (2). The Visible Checkbox (3) may also not be applicable if theWall or another layout builder tool is in use as the result could be conflicting. If a value is not intended to be affected anymore, or was set by mistake, a right click on the cell provides a Clear Value option (4).

After creating Rules it is strongly recommended to save, close and re-open the vsmStudio configuration before proceeding with further configuration steps.
Assign Rules to Textboxes
Finally, the configured rules must be assigned to DMV Textbox elements. This can be done via the DMV webUI or e.g., via theWall application.
via DMV webUI
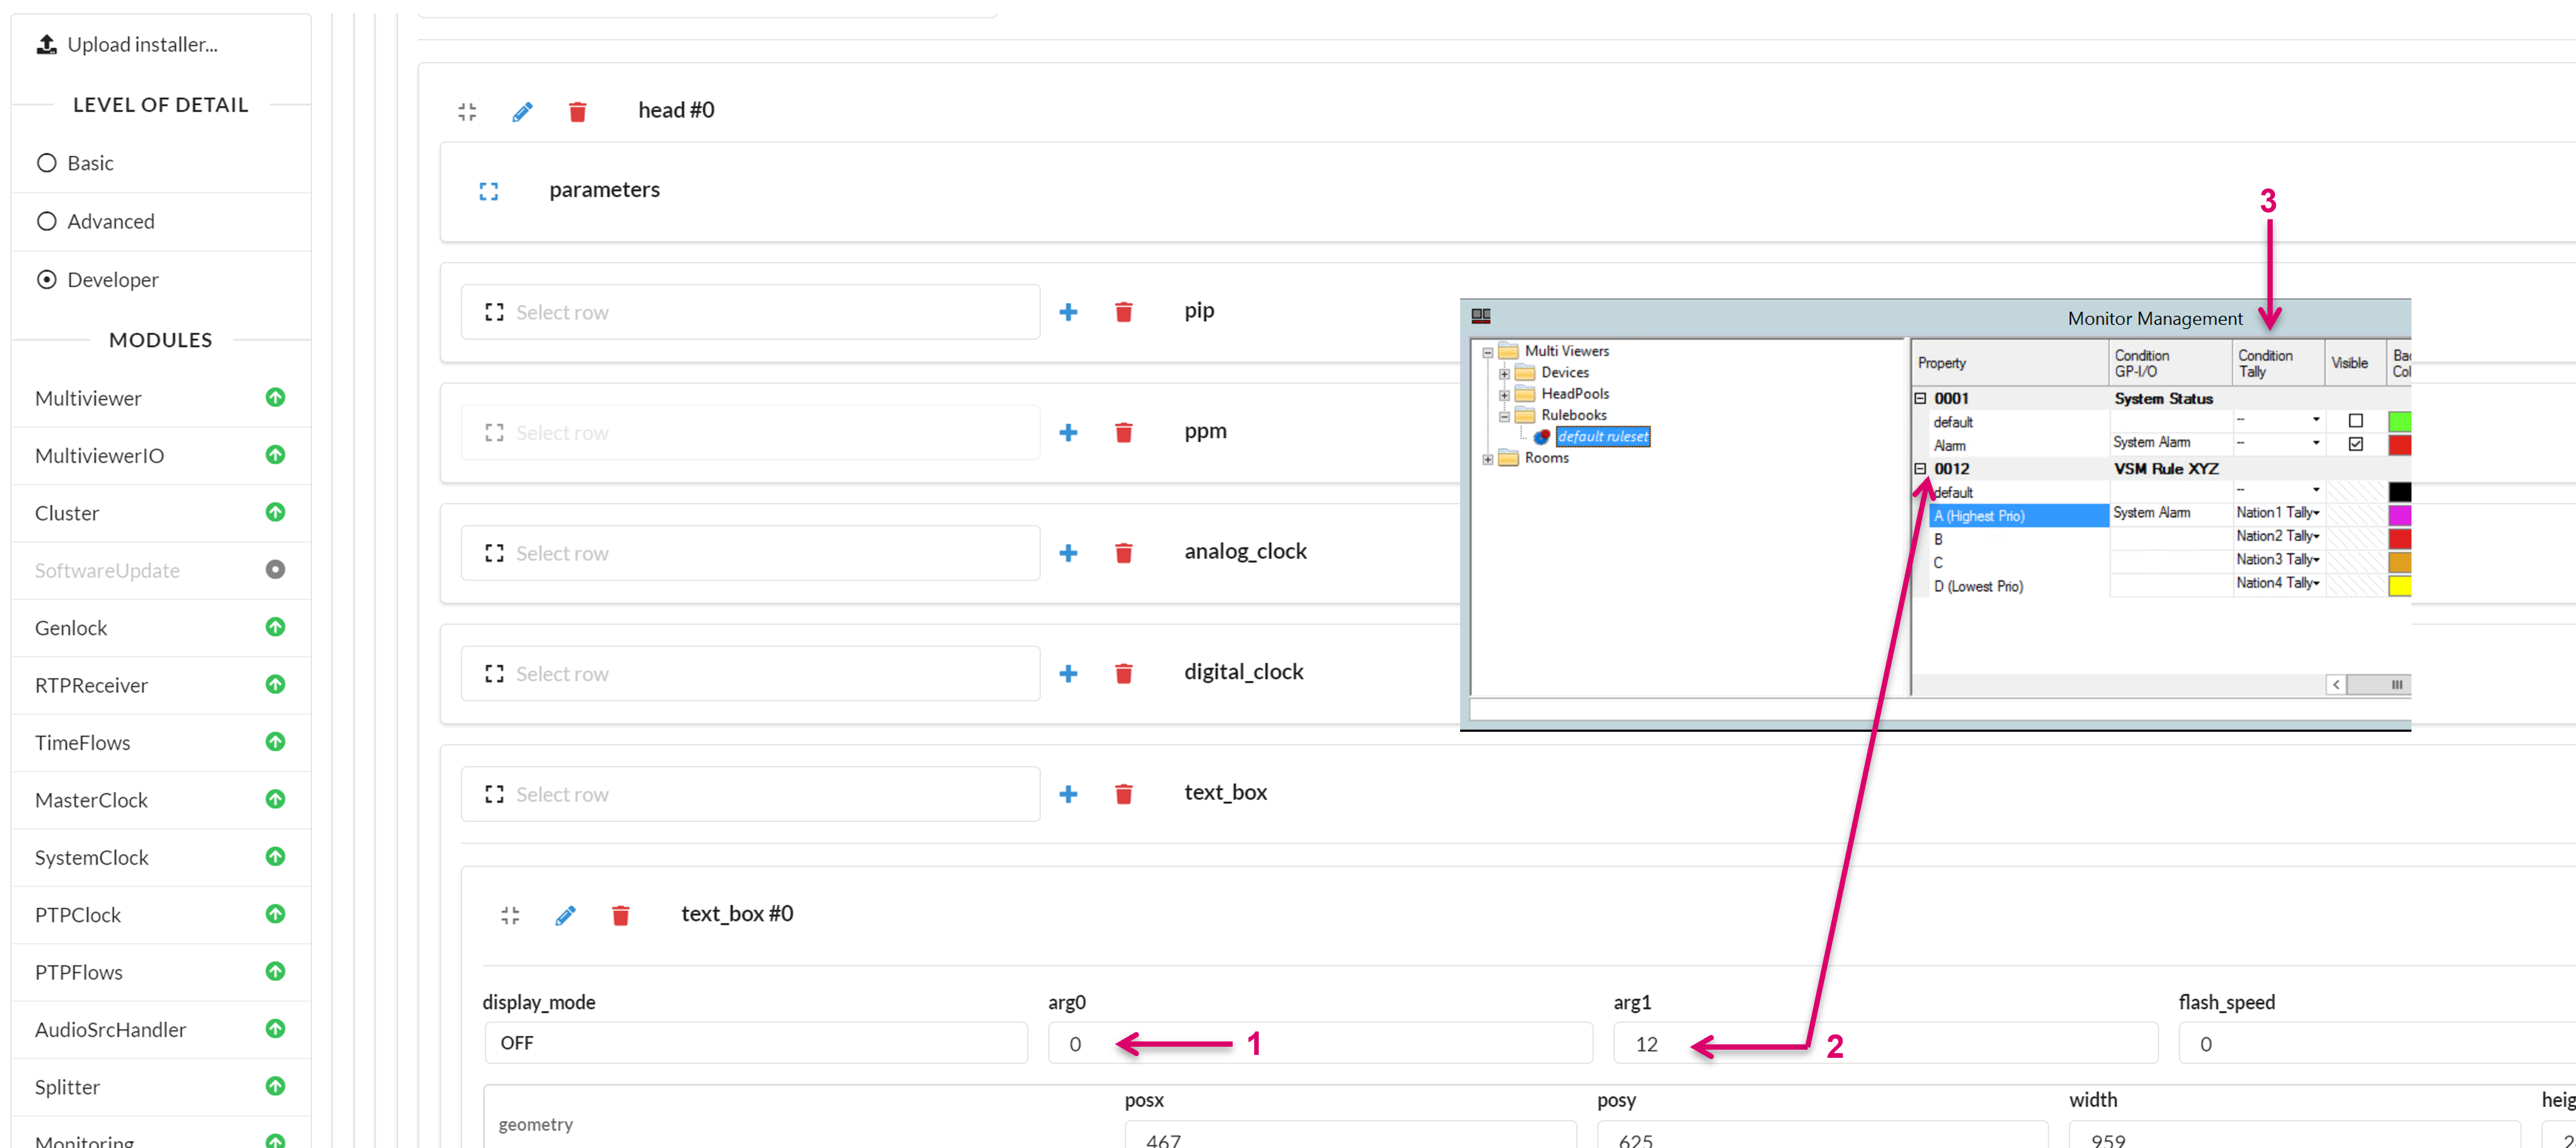
The Textboxes and related parameters within the DMV are located on the head level and are named arg0 and arg1, where arg0 defines a related PIP ID (1) and arg1 the related rule assignment (2). The arg0 mapping to a PIP is optional since a Textbox may just be used standalone to display system status or such. It is mandatory to be used though if Condition Tally is the trigger (3) since then the calculation is dynamic, based on the source that is currently assigned to the PIP.
via theWall
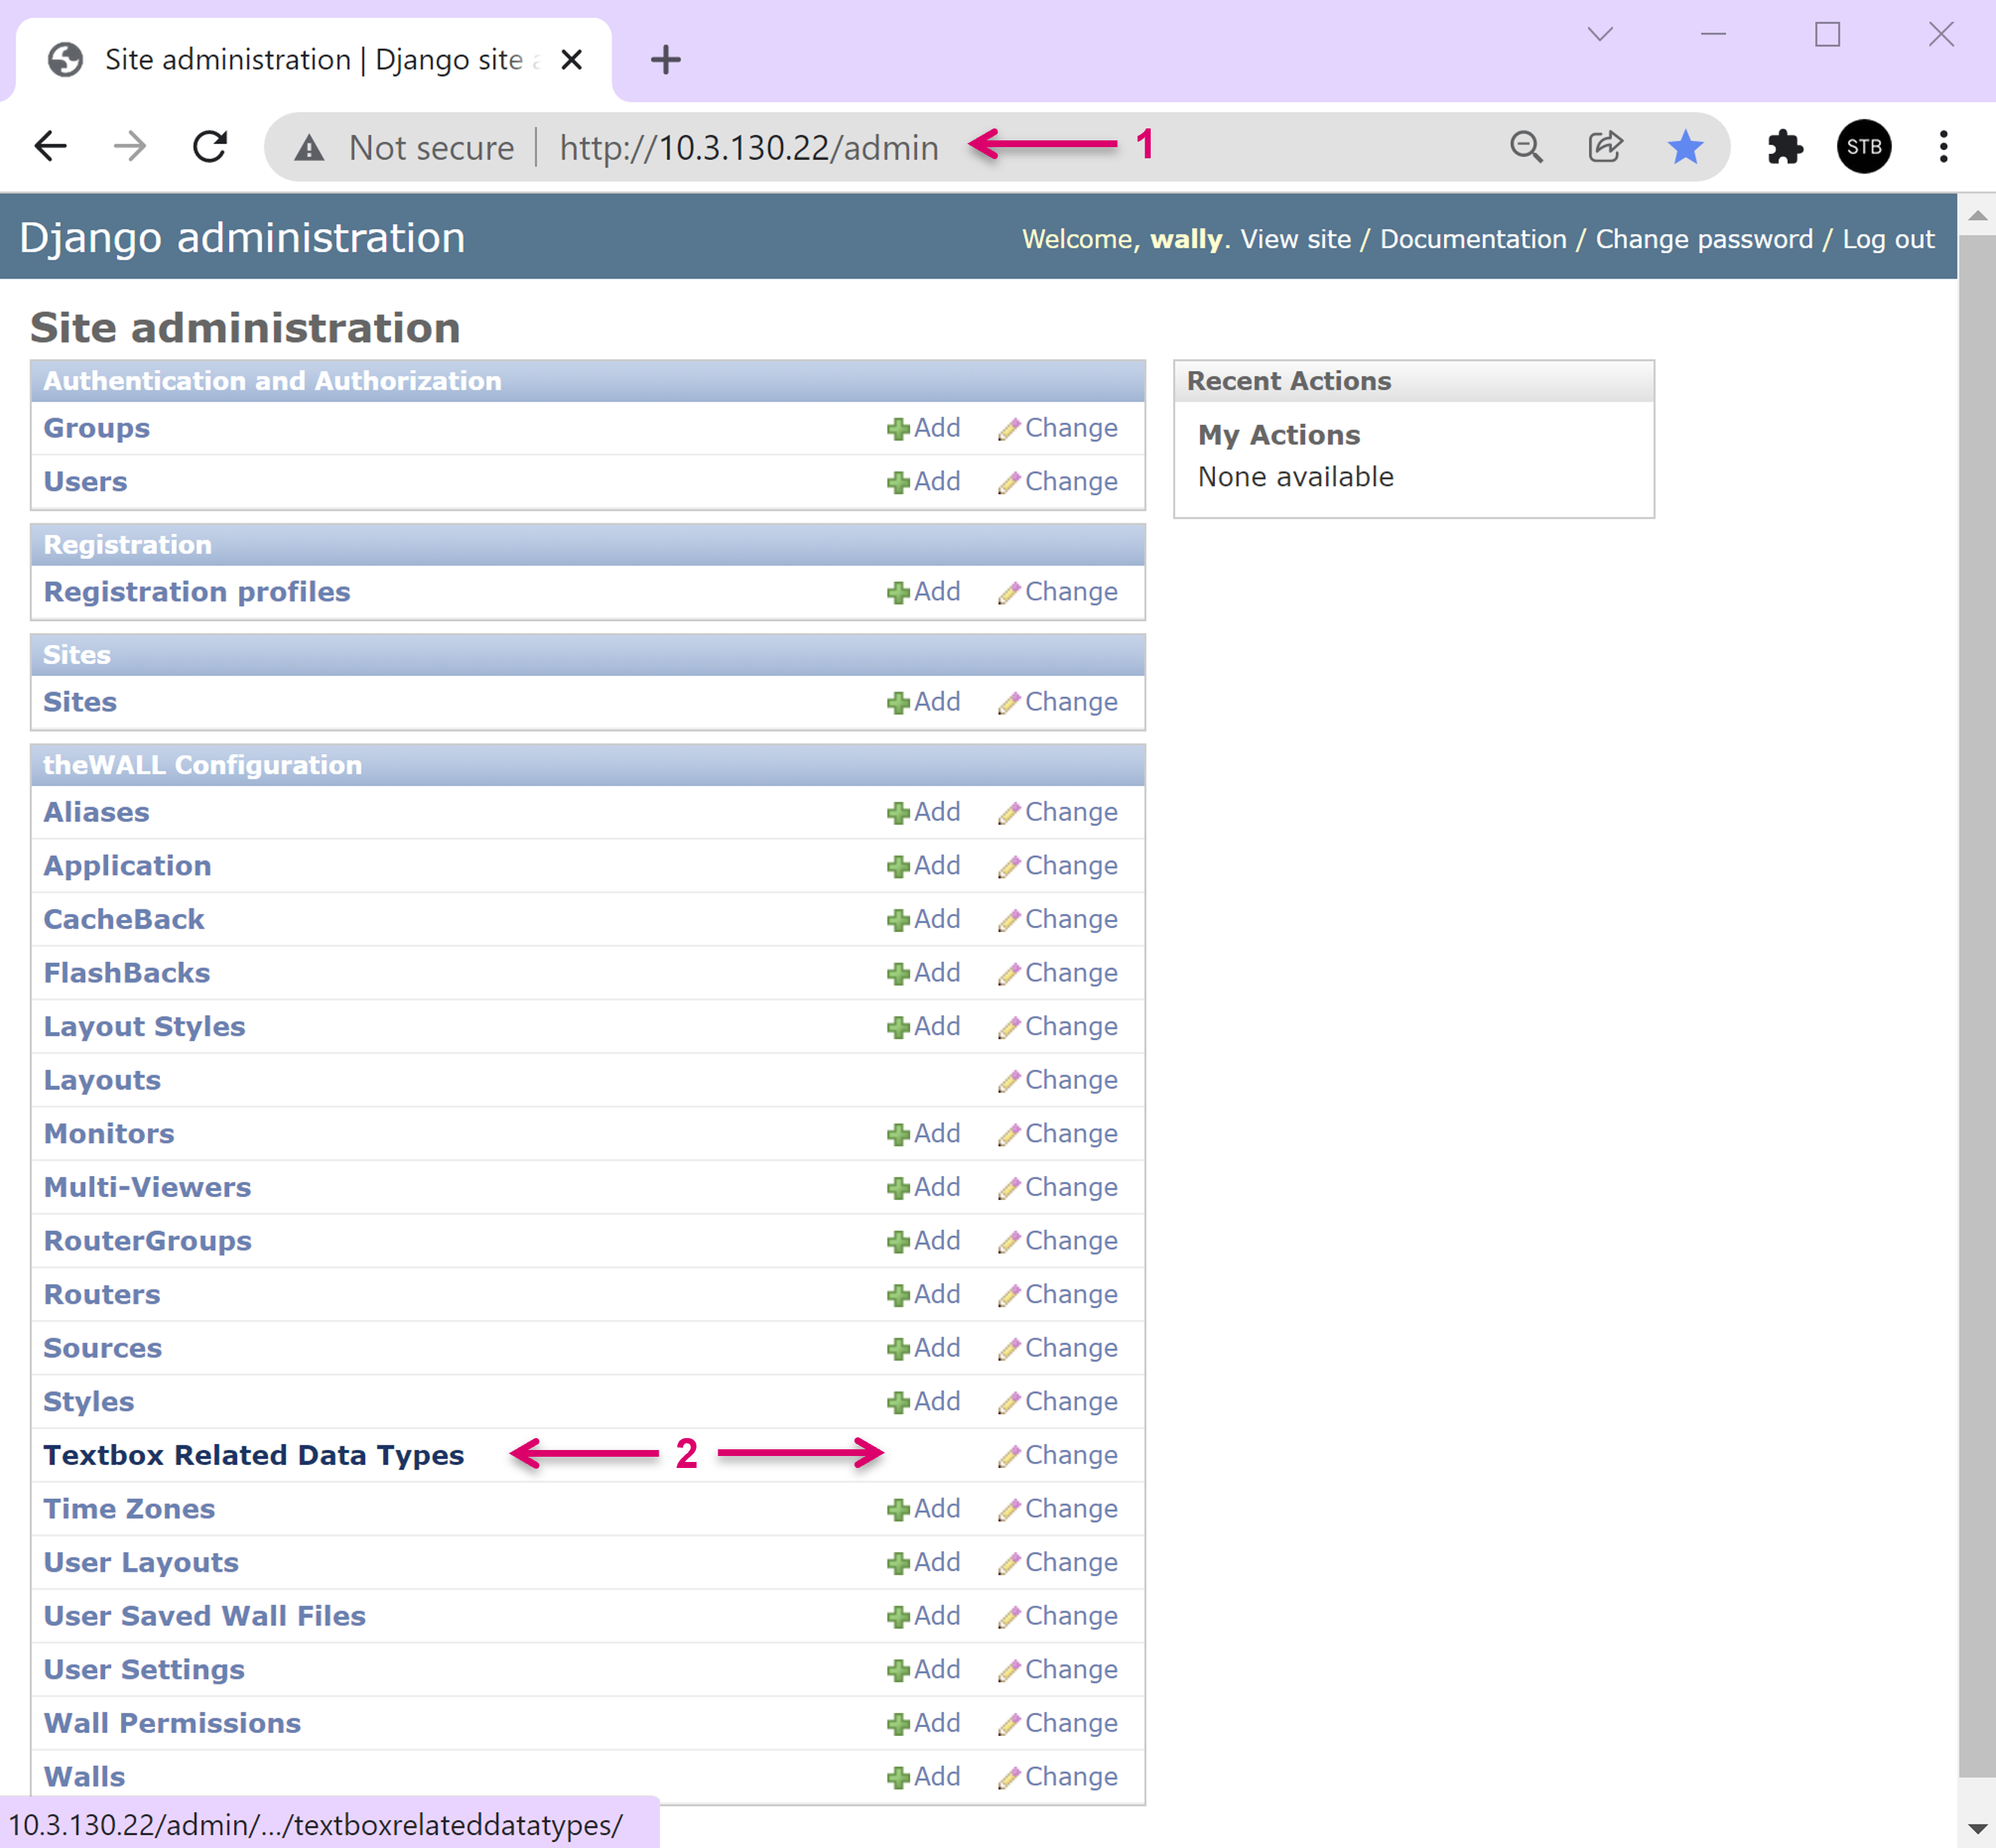
Before the arg0 and arg1 mapping can be operated via the frontend UI of theWall, the required rules need to be labelled on the admin configuration page. Open theWall server admin web UI (1) and open Textbox Related Data Types (2).
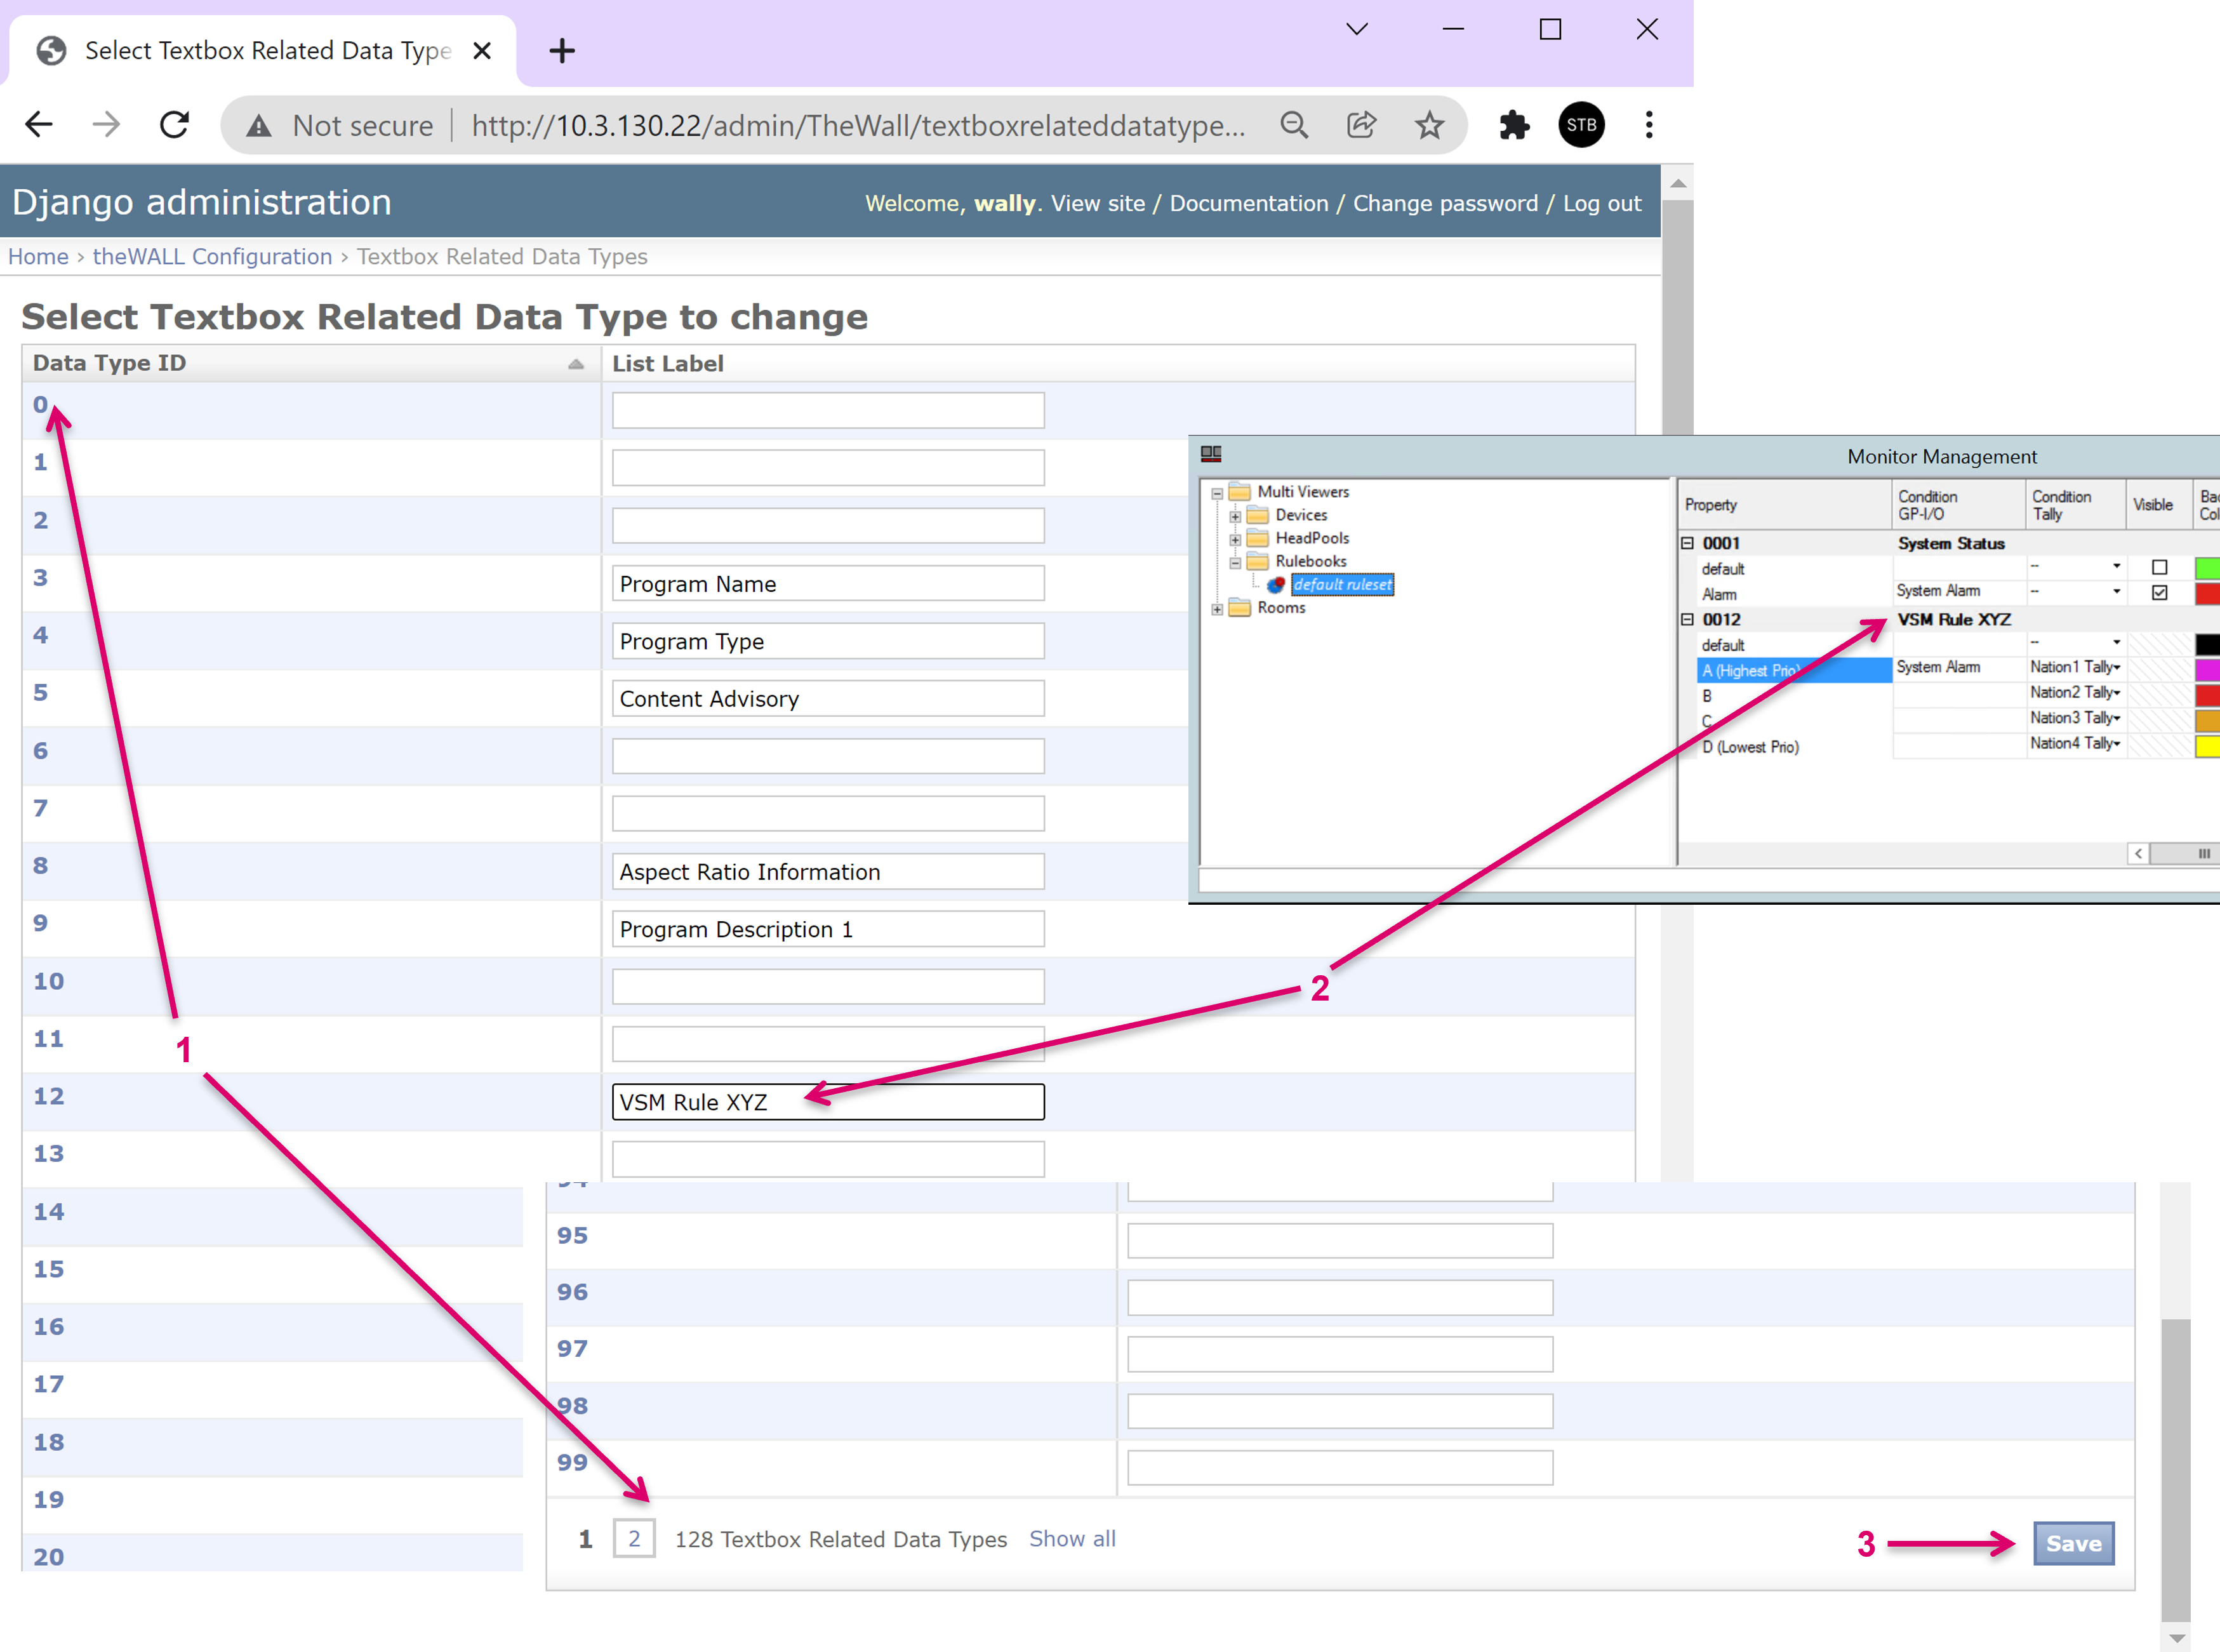
In the opening window you see a list of all available 128 rule IDs which are called Textbox Related Data Types within theWall (1). Only Data Type IDs that have a List Label assigned will be shown and selectable via the frontend UI. For better transparency the label chosen should match the rule label in VSM (2). To finish the configuration please Save (3).
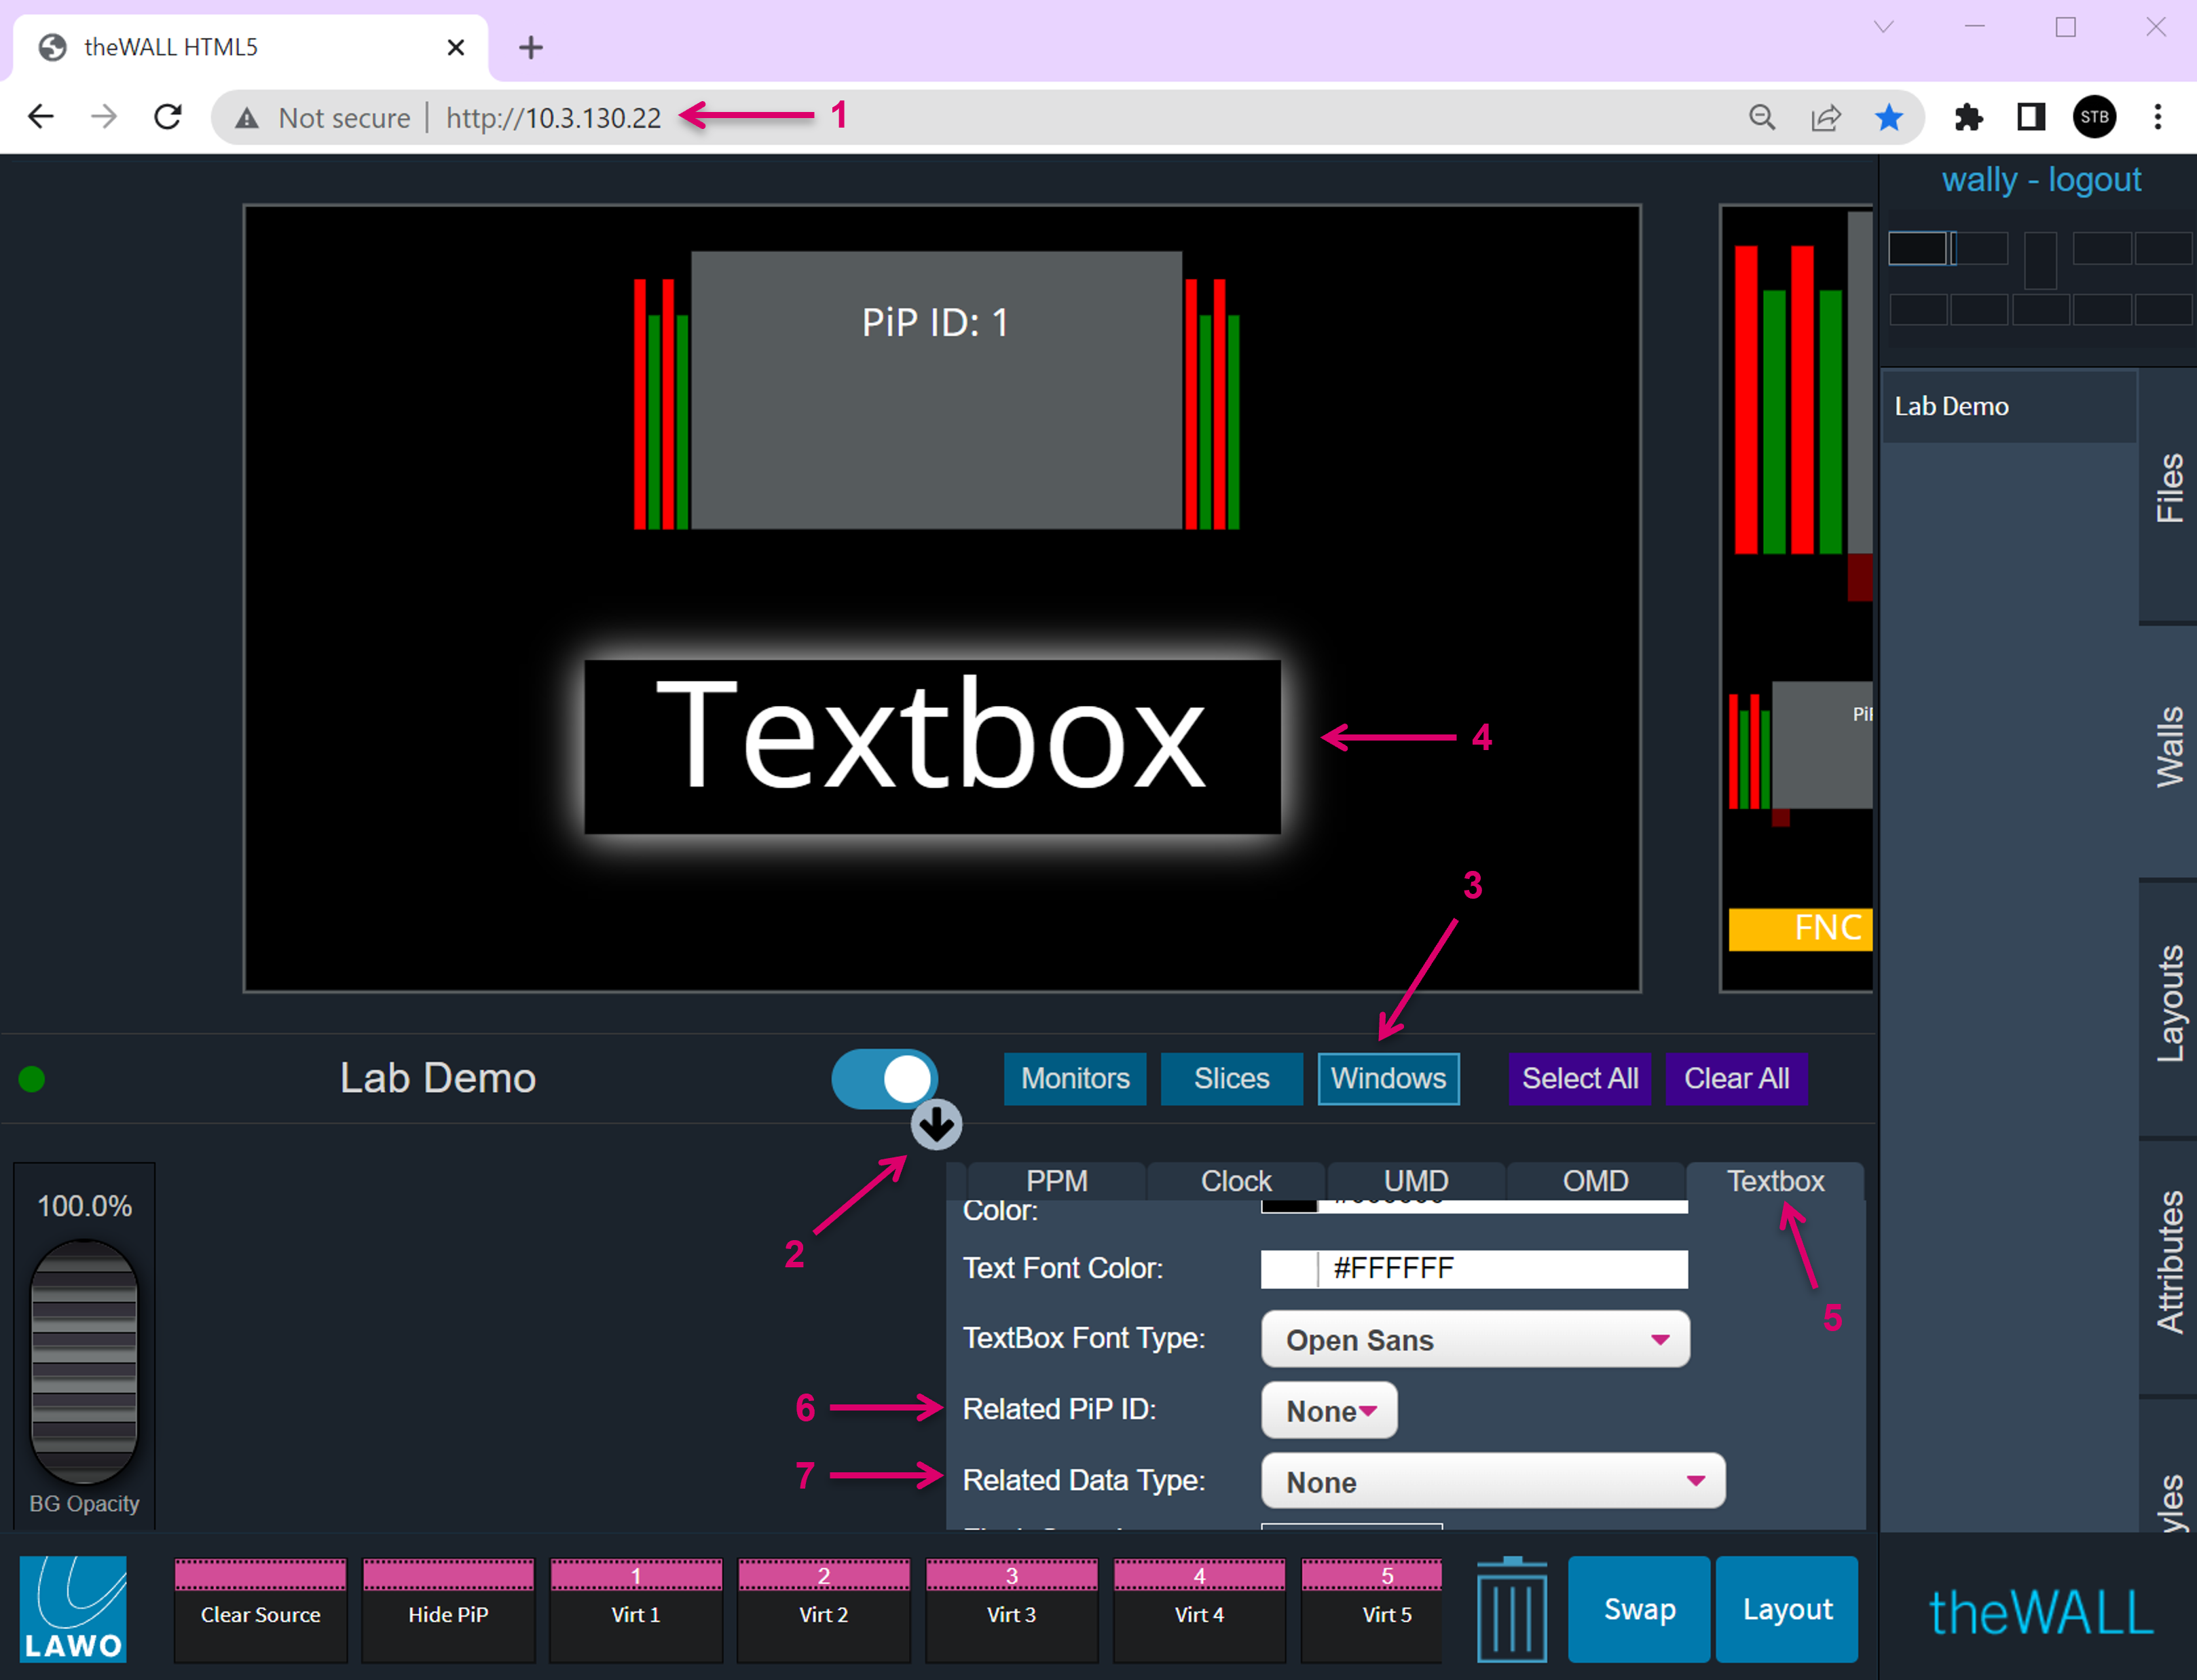
To finally assign the Rules or Data Types to Textboxes within a DMV layout, open theWall UI in a webBrowser (1). Open the sub-menu on the bottom via the arrow button (2). Choose the Windows Focus selector (3) and click on to select the respective Textbox within the layout (4). Within the sub-menu, select the Textbox tab (5). The setting Related PIP ID corresponds to DMV arg0 (6), and Related Data Type to DMV arg1 (7).
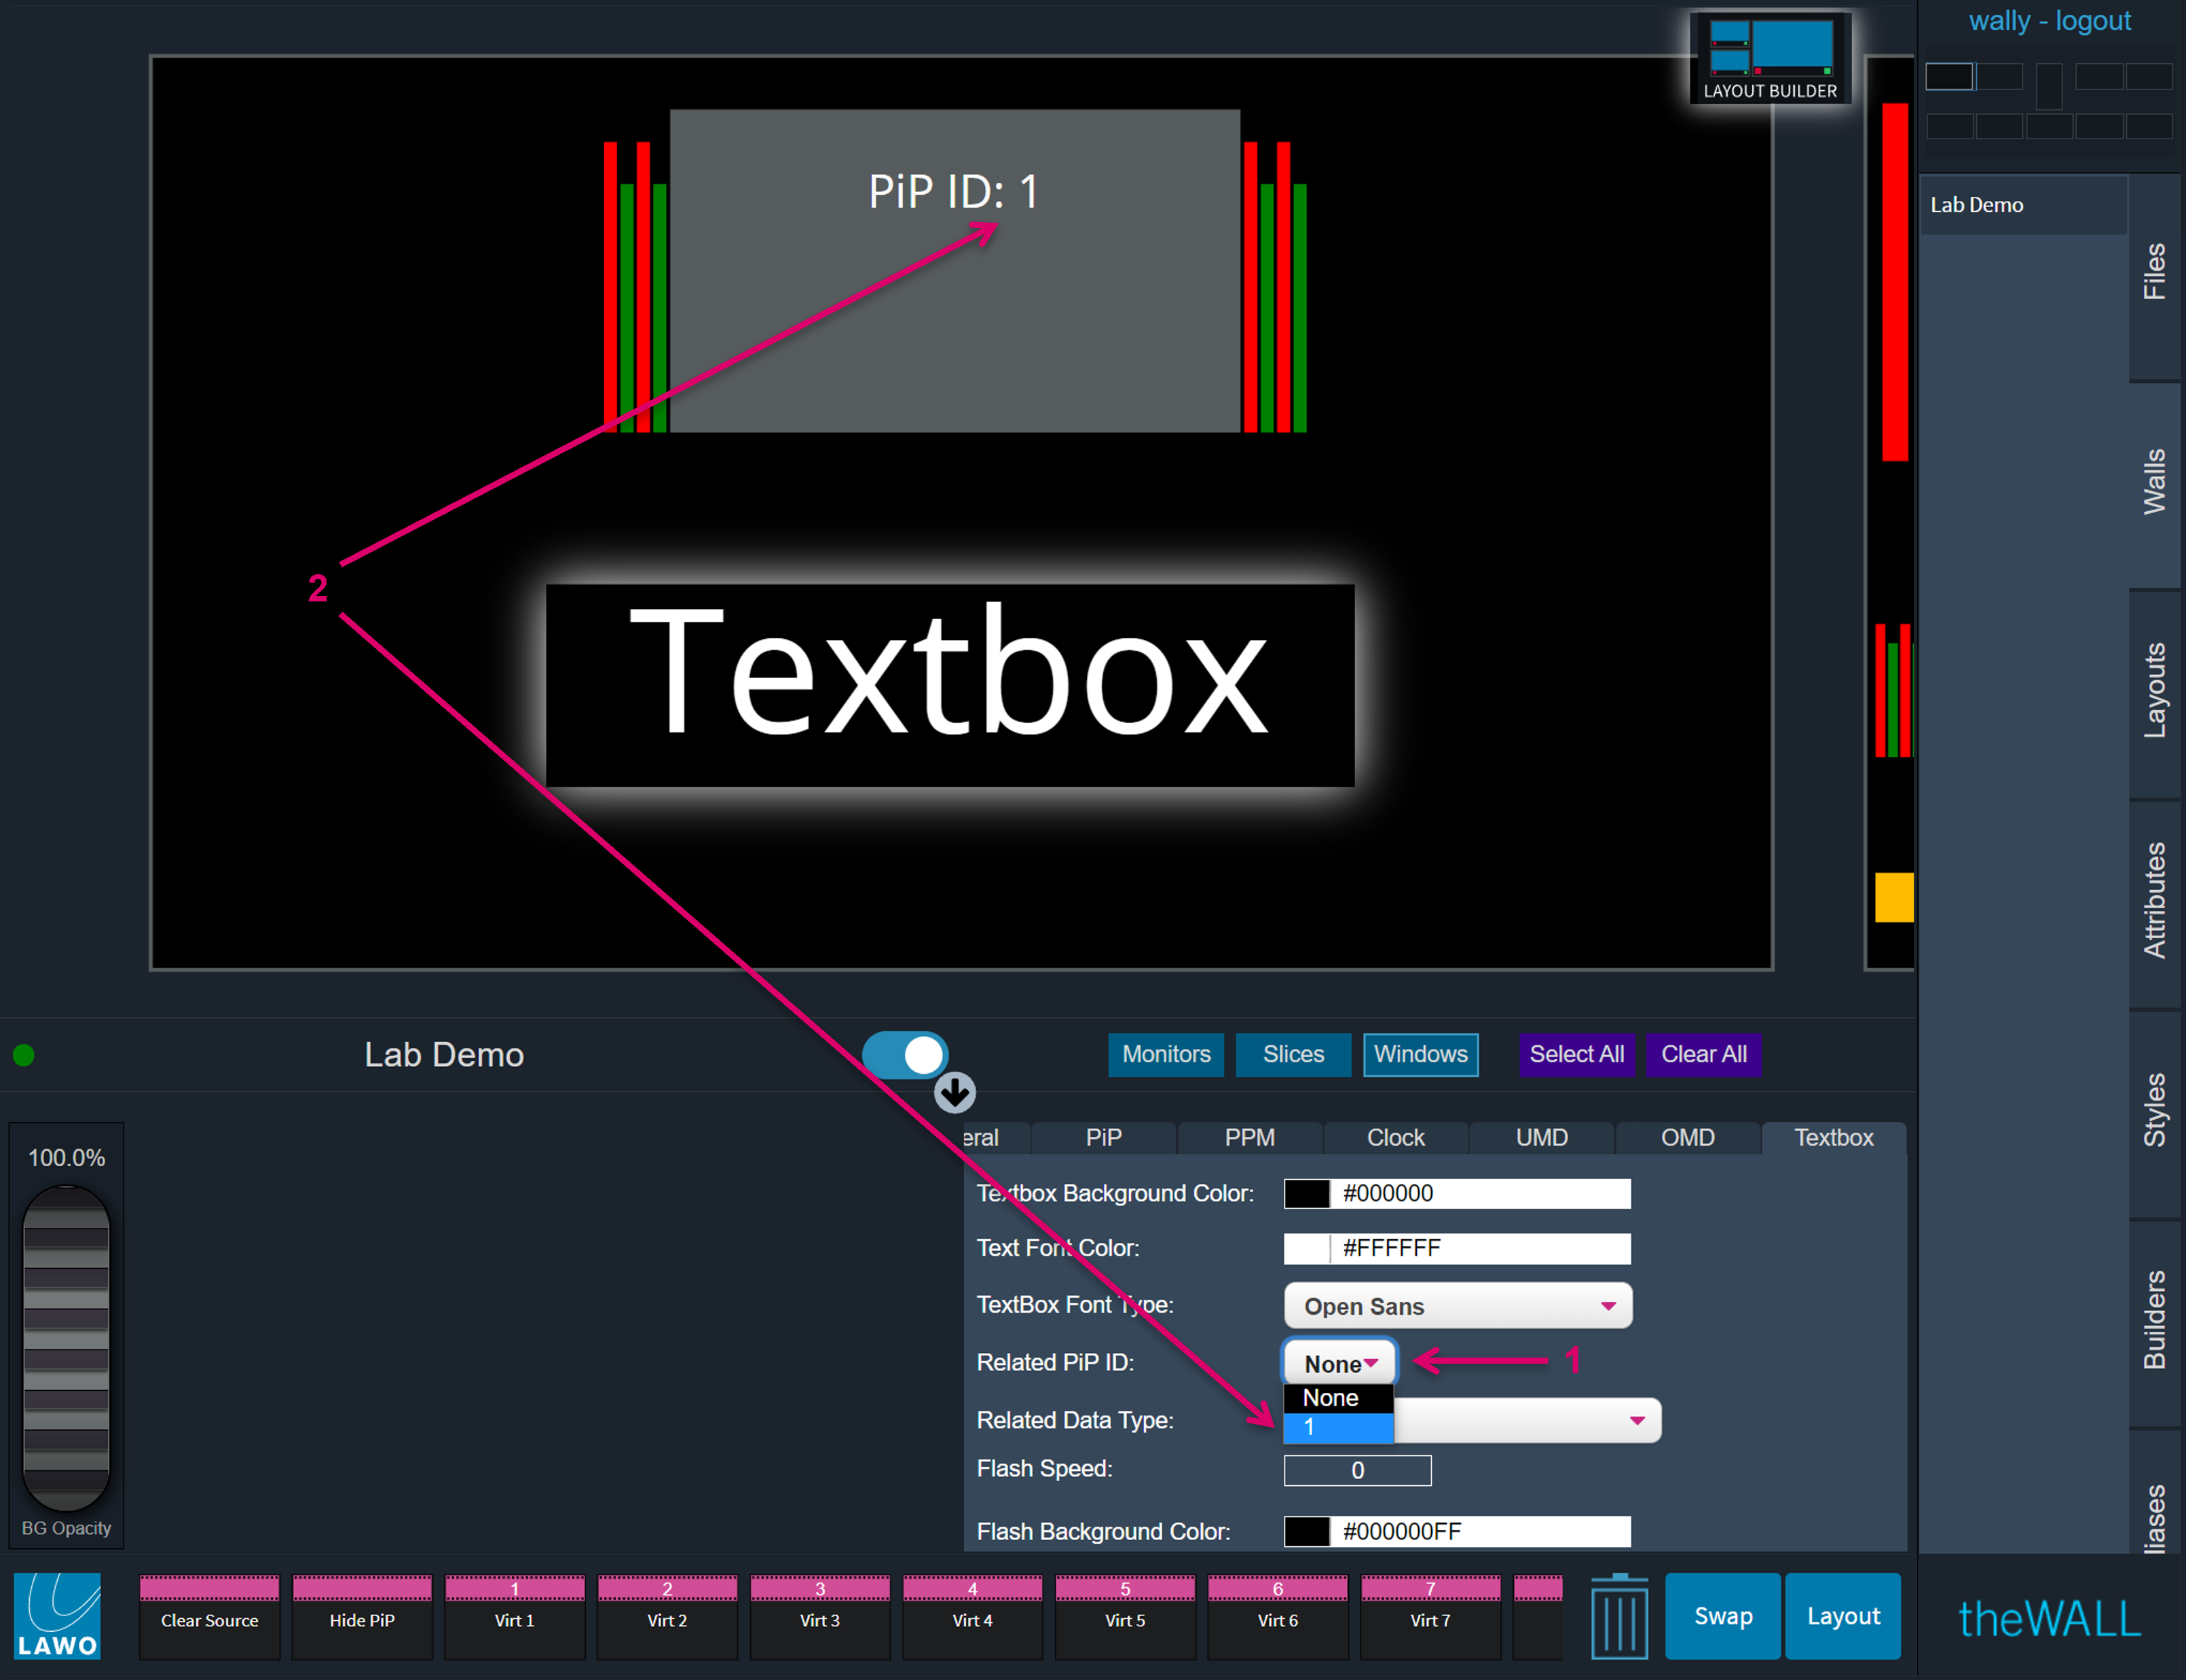
Click in the value box next to Related PIP ID to assign a PIP relation to the selected Textbox (1). Only PIP IDs available within the respective layout are selectable (2). If the Textbox is supposed to be a standalone rule display, choose None.
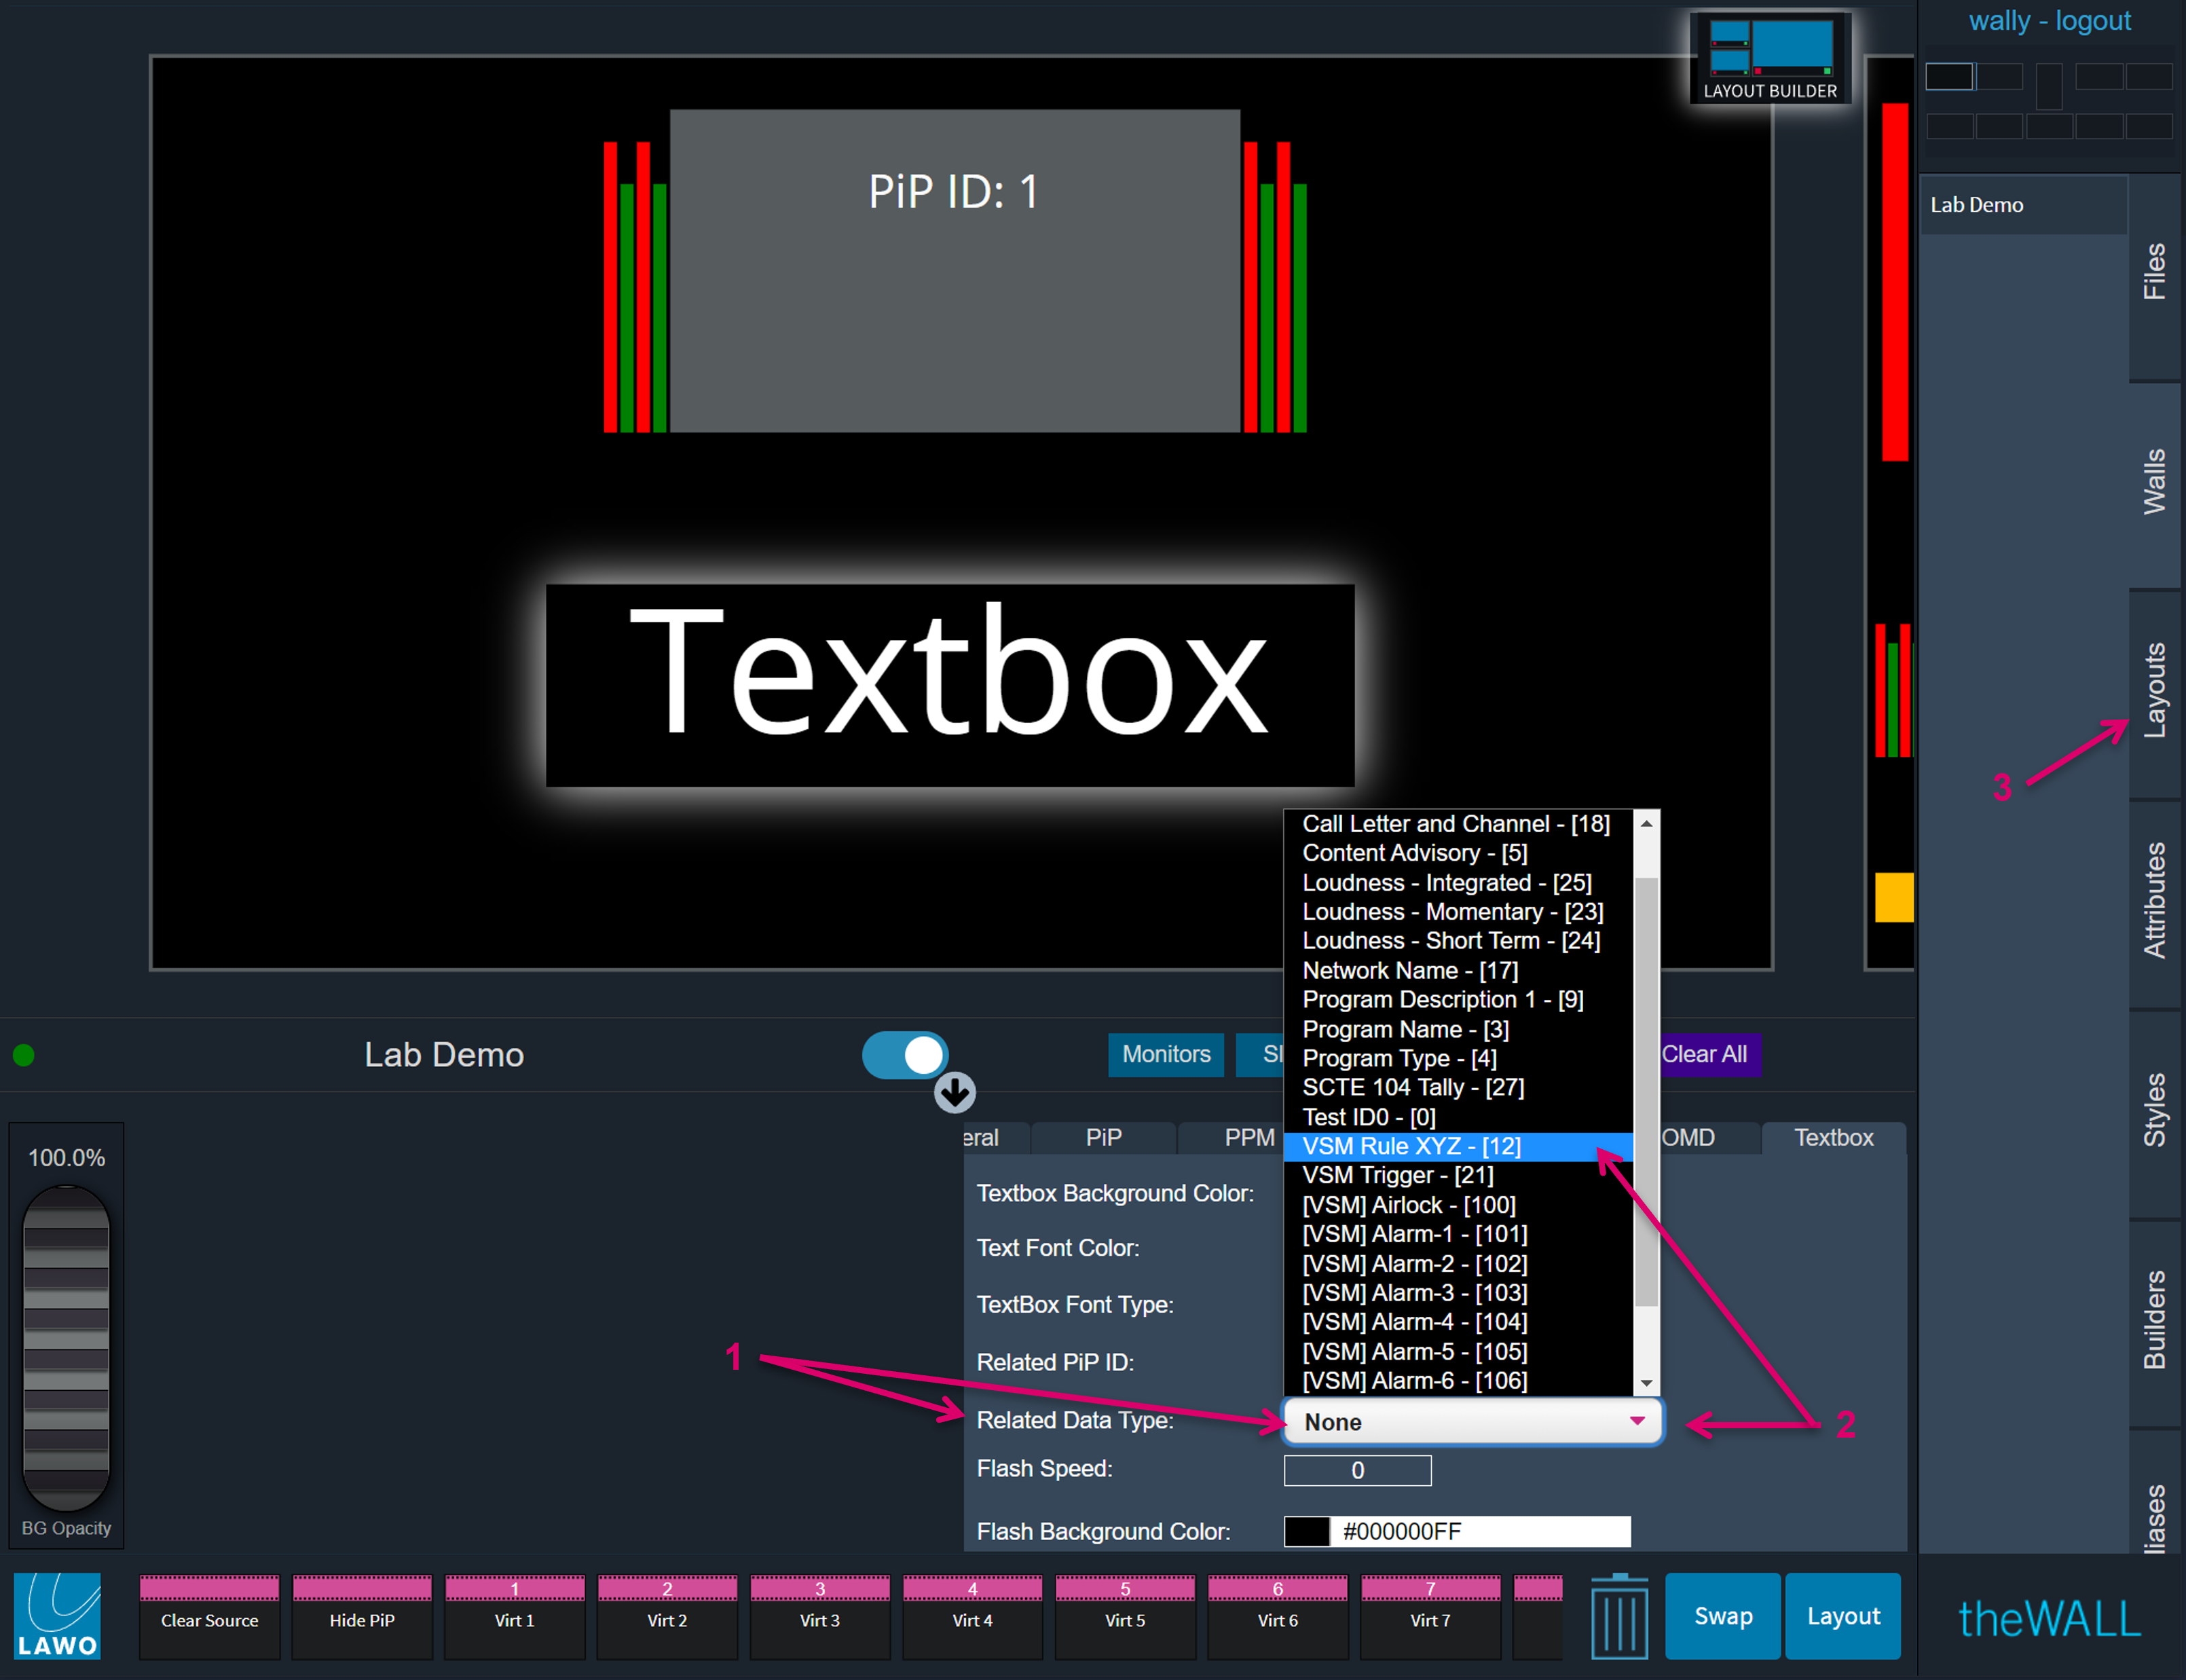
Click in the value box next to Related Data Type to map an external Rule to the selected Textbox (1). Only Data Types with a predefined Label are selectable. The number in brackets shows the underlying ID (2). If the Textbox is supposed to be used without any external rule trigger, choose None.
Finish the configuration with saving the modified layout via the Layouts tab (3).
Some Data Type IDs may already carry a Label since they were previously defined to be used by an external system, e.g., by SMaRT, that can also address Textbox parameters via direct API interface. Make sure in the configuration process to not address the same Textbox IDs from multiple systems as this would inevitably lead to a conflict and fight about parameter values.