Lawo VSC - Receiving Audio from the Network
To use audio from the network, you must configure an audio device in Lawo VSC. Then connect an incoming stream to the audio device's receiver(s) and assign the device to your local audio application.
The streaming connection(s) can be made either manually (by editing the receiver's SDP data) or dynamically (using Select Stream in Lawo VSC or the Stream Routing page in HOME).
Channels Received & I/O Routing
Once a stream is connected, its audio channels are received on a 1:1 basis. If number of channels carried by the stream is different to the configuration of the receiver, then the incoming channels are received on a best-effort basis. For example:
- If a stereo stream is connected to an 8-channel receiver, then the two source channels are assigned to channels 1 and 2 of the receiver (and channels 3 to 8 of the receiver are unused).
- If a 64-channel stream is connected to an 8-channel receiver, then the first eight source channels are assigned to channels 1 to 8 of the receiver (and the remaining source channels from the incoming stream are unused).
There is no user-defined I/O routing in Lawo VSC and so the received channels are connected to the local audio application on a 1:1 basis. If you wish to shuffle the audio channels, then this must be done in the external application.
Please note: Sample rate conversion (SRC) is applied automatically to the audio (as required). For example, if a 48kHz stream is connected to a 96kHz application, then audio from the stream is decoded and then up sampled.
Checking the Audio Inputs
The Lawo VSC GUI can be used to check the audio received on a channel-by-channel basis. This is done as follows.

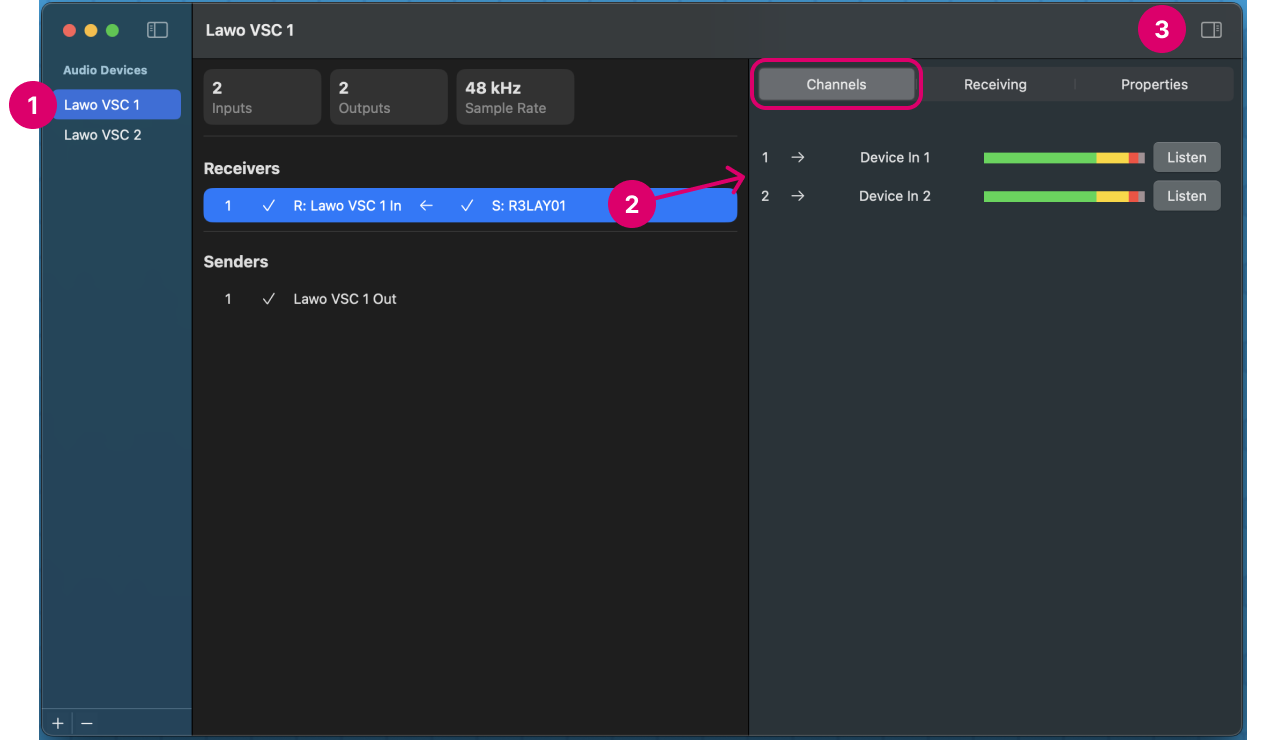
- Select the audio device in Lawo VSC (to reveal its Receivers and Senders).
- The receiver status should be ticked (to confirm that the setup is ok).
- The name of the connected source appears to the right of the receiver (e.g. S: R3LAY01). If there is no connected source, then check the streaming connection.
- The connected source status should also be ticked. If a warning indicator appears, then the connected source cannot be found. Check the network connections from the Lawo VSC computer and the sending device.
- Select a receiver (e.g. R: Lawo VSC 1 In).
- Click on the show side panel icon (to view the right-hand side panel) and select the Channels page.
- If audio is present, then you will see the level on the meters.
- Click on Listen to monitor a channel on the local playback device (defined in the ' Settings → General' dialog).
If the audio device has multiple receivers, then the number of the receiver can be used to identify the channels. For example, if a 64 input device has 8 x 8-channel receivers and you wish to check inputs 9-16, you will need to select receiver 2.
Listen Function
First, you must configure a local playback device using the Play local audio through and Channels options in the 'Settings → General' dialog. You can choose any Sound device that is configured in your macOS system.
Then click on one of the Listen buttons (available for each channel). The audio is played out through the selected channels of the playback device.
Advanced Functions
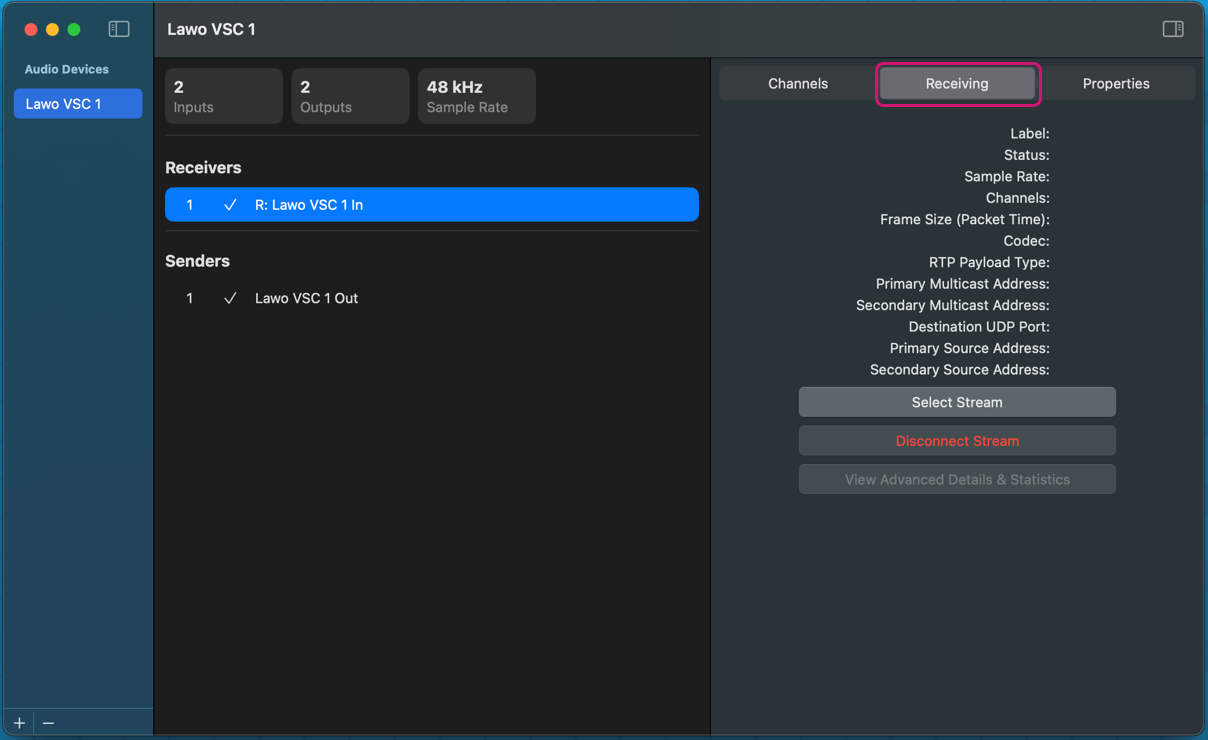
The Receiving page shows information about the connected source such as its sample rate, number of channels, etc. If there is no stream connected, then the fields are empty.

The three buttons, at the bottom of the page, can be used to setup a new streaming connection, disconnect an existing stream or view more information about the connected stream (for diagnostic purposes).
Select Stream
This option can be used to setup a new streaming connection. Streams can be selected by name if they are announced to the network. Or, you can enter a URL or SDP.
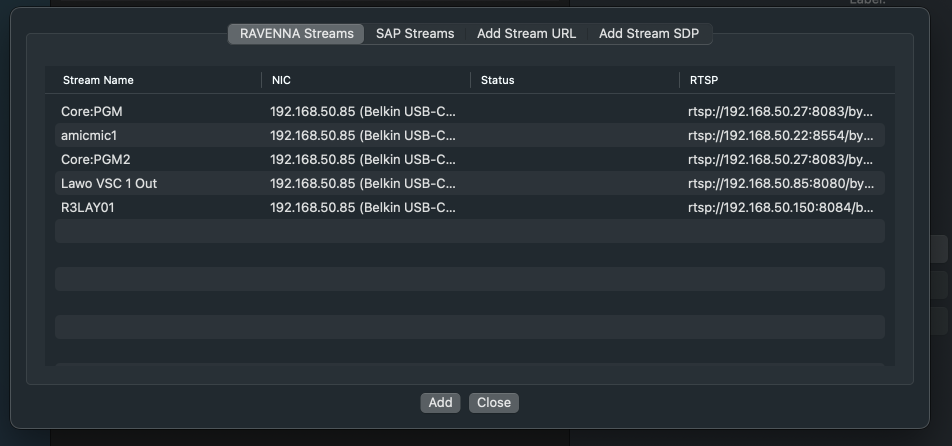
Start by clicking on Select Stream. A dialog opens with four pages/tabs.

To choose a stream by name:
- Select either RAVENNA Streams or SAP Streams.
- RAVENNA Streams lists all streams announced to the network via MDNS.
- SAP Streams lists all streams announced to the network via SAP.
- In each case, the list includes incoming streams from other devices plus local streams published from the Lawo VSC audio device.
- Select a stream and then click on Add. The stream is connected to the receiver.
- Click on Close (to close the dialog).
If a stream is not announced to the network, then there are two alternative methods: Add Stream URL or Add Stream SDP.
Add Stream URL can be used to add a stream with a specific URL. For example, if your network uses rtsp addresses.
- Select the Add Stream URL tab.
- Use the NIC drop-down menu to select the Network Interface Card which is receiving the stream.
- Then enter the URL for the stream. The maximum length for the URL is 200 characters.
- Click on Add. The stream is connected to the receiver.
- Click on Close (to close the dialog).
Add Stream SDP can be used to add a stream by entering its session description (SDP). The SDP can be loaded from a file or entered manually into the 'Text' area.
- Select the Add Stream URL tab.
- Use the NIC drop-down menu to select the Network Interface Card which is receiving the stream.
- If you have a copy of the SDP (as a file), then:
- Click on the Load.. button (beside the 'File' field).
- Use the macOS Finder window to locate the SDP file.
- Select the SDP file and click on Open. The SDP is displayed in the 'Text' area.
- Alternatively, you can enter the SDP into the 'Text' area.
- Either type in the SDP (as text).
- Or, copy the SDP from the sending device and paste this into the 'Text' area.
- The Save.. button can be used to save the contents of the SDP 'Text' (for backup purposes or transfer to another device).
- Click on Add. The stream is connected to the receiver.
- Click on Close (to close the dialog).
Disconnect Stream
Click on this option to disconnect the existing stream.
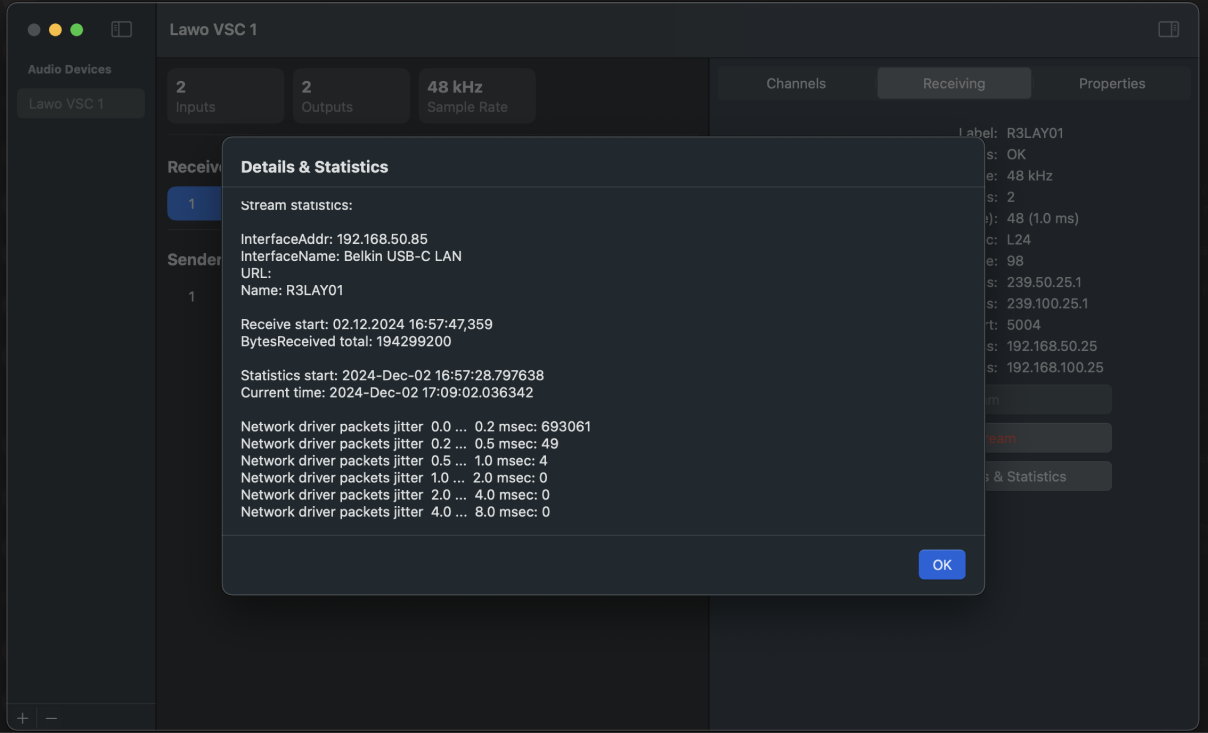
View Advanced Details & Statistics
Click on this option to open a dialog which shows more information and statistics about the connected stream. This can be useful for diagnostic purposes.
The information includes statistics about the network packets such as the amount of jitter.

Receiver Properties
In the current release, the Properties page is empty and has no function.