HOME - Connecting and Disconnecting Streams
This topic explains how to connect and disconnect the selected senders and receivers (in HOME's 'Stream Routing' page) in more detail.
You can use these functions to make (or break) the signal streaming connections between HOME's media network devices. Connections can be made between individual or groups of flows, and for multiple sources and destinations.
- Apply a Filter
- Connecting (and Disconnecting) Streams
- Connecting Groups and Flows
- Stream Connection Rules
- Connection Examples
- Using Multi Select
- Clear Selections
Apply a Filter
Before using the 'Stream Routing' page to make (or break) connections, it is a good idea to restrict the view using one or more filters. For example, to view only the senders or receivers for a particular device or device type.
In the example below, the Sources list is filtered to show only the A__stage64 senders.
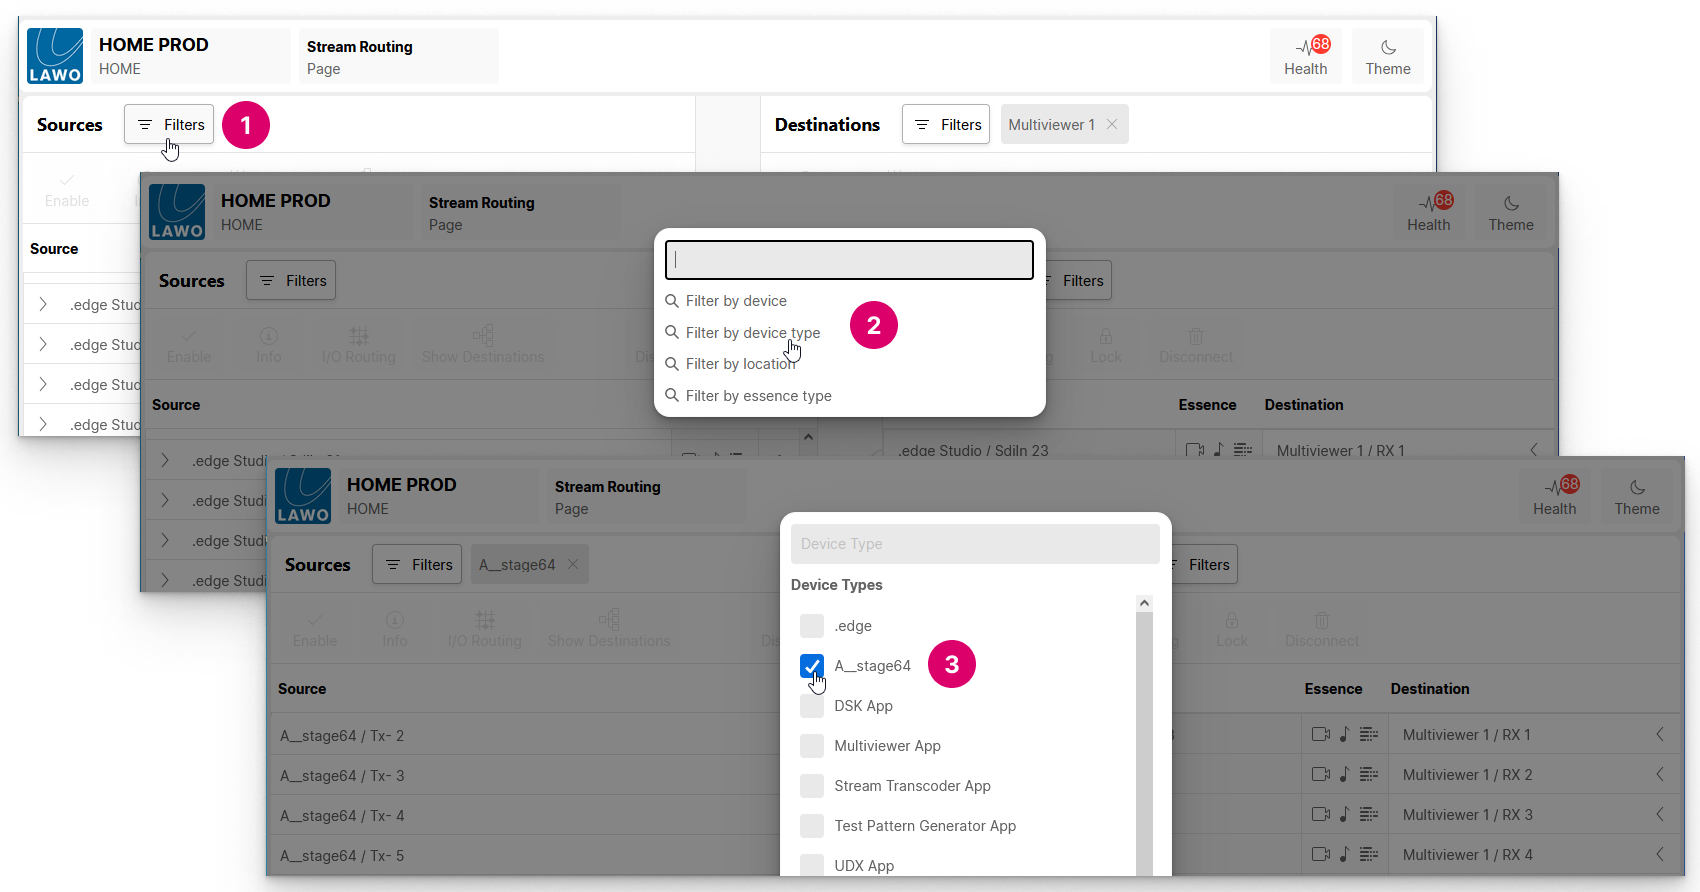
The resultant view makes it easy to connect streams from this device to other receivers on the network.
For more information about this feature, please see HOME - Using Filters.
Connecting (and Disconnecting) Streams
The Connect and Disconnect buttons are used to connect (or disconnect) the selected sender and receiver.
Connect a Sender to a Receiver
To prepare a connection, select a source and a destination - the selections are highlighted (in blue) and a dotted (preview) line appears.

To make the connection, click on Connect - the dotted (preview) line changes to a solid line and the "Connected Source" field updates.
Please note: If the selected source and destination cannot be connected, then the Connect button is not available and there is no dotted (preview) line. This will happen if you select say a video sender and an audio receiver (as you cannot connect streams of a different essence type).
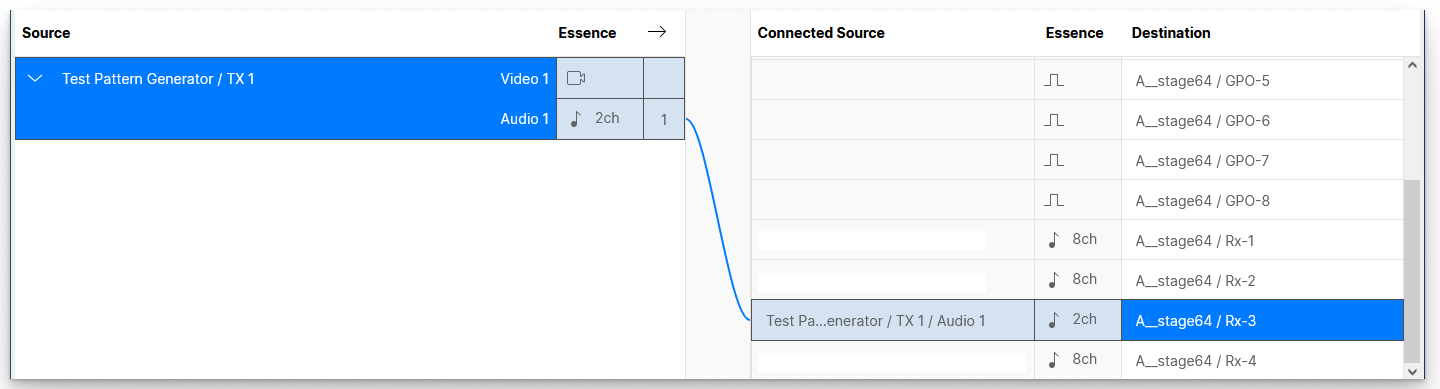
If a connection is permitted but the source stream cannot be properly received, then an icon appears in the "Connected Source" field. Hover over the icon to reveal more information.
![]()
In the example above, "Not all channels will be received" as the source is a 64-channel sender and the destination is an 8-channel receiver. If the missing channels are not important, then you can ignore the "info" icon (as first 8 channels will be received). Otherwise, you will need to edit the configuration of either the sender or receiver.
Using Disconnect
To break a connection, select either a source or destination and click on Disconnect.
- If you disconnect a source, then all of its connections are removed and the "source used" field clears.
- If you disconnect a destination, then only the one connection is removed and the "Connected Source" field clears.
Connecting Groups and Flows
If a source or destination handles more than one flow, then the flows are grouped so that they can be connected (or disconnected) in one operation.
To make a connection, select the source and destination groups, and click on Connect (in the usual manner).
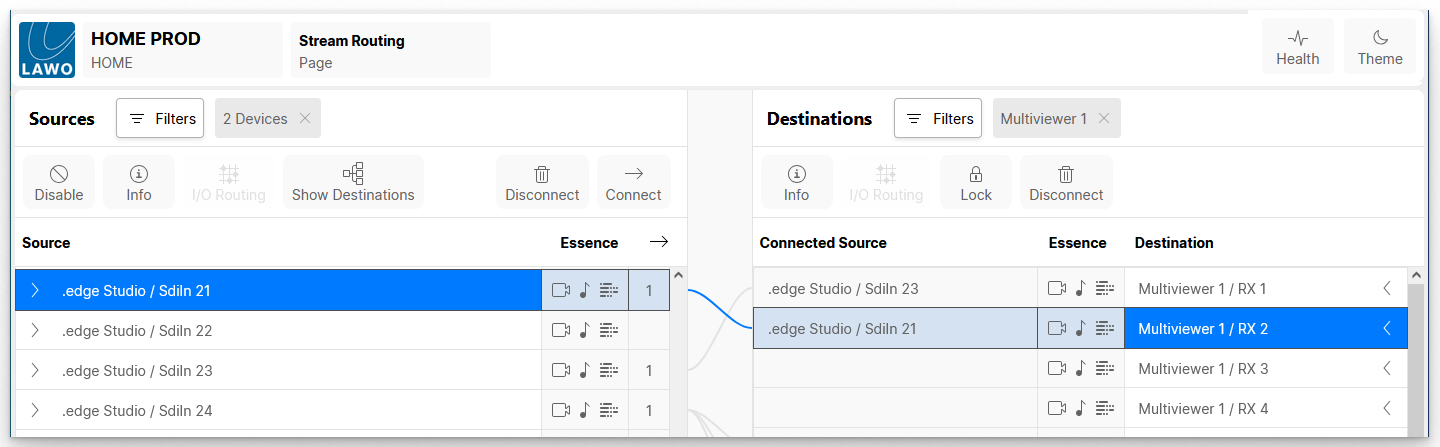
To view the individual connections, click on the arrows (beside the labels).
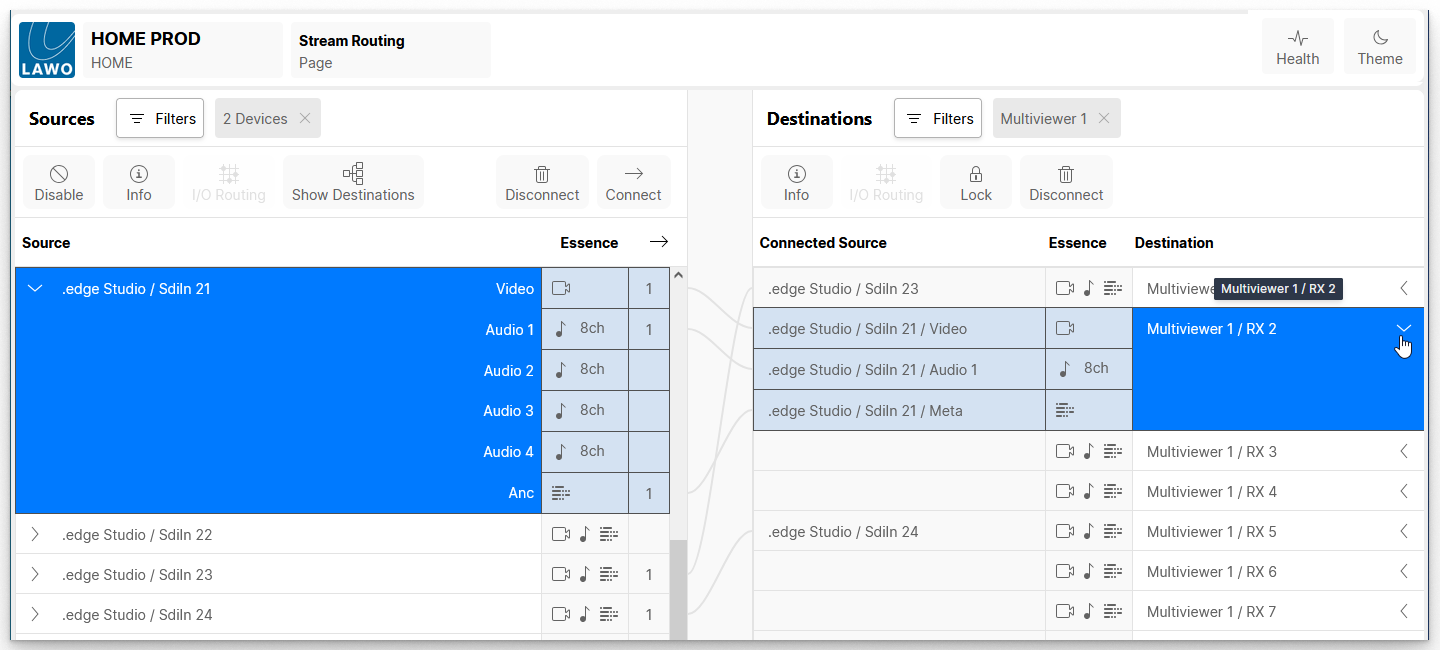
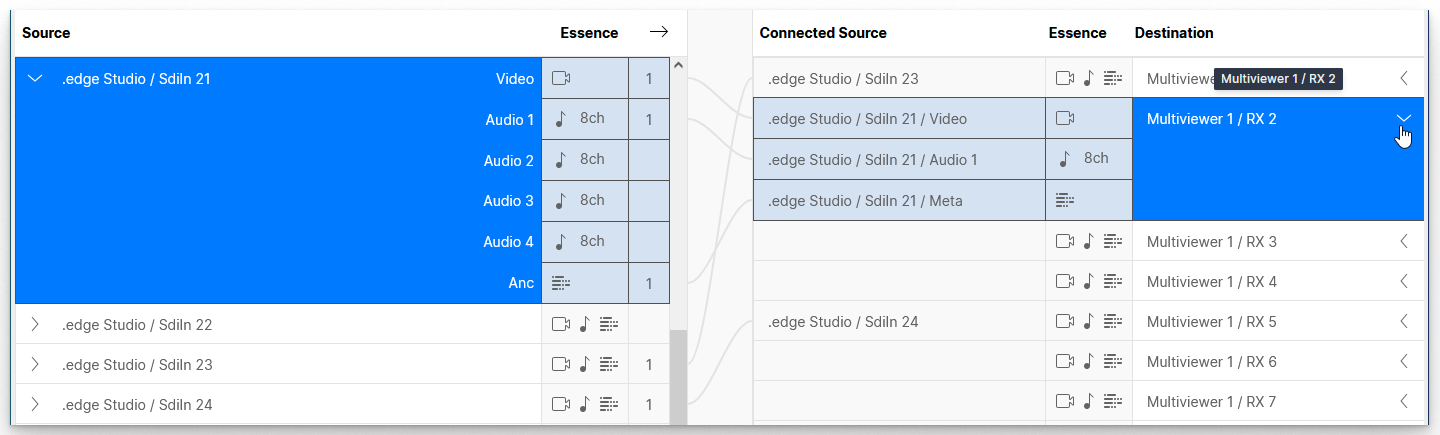
In the example above, all related flows are connected: Video to Video, Audio 1 to Audio and Metadata to Metadata.
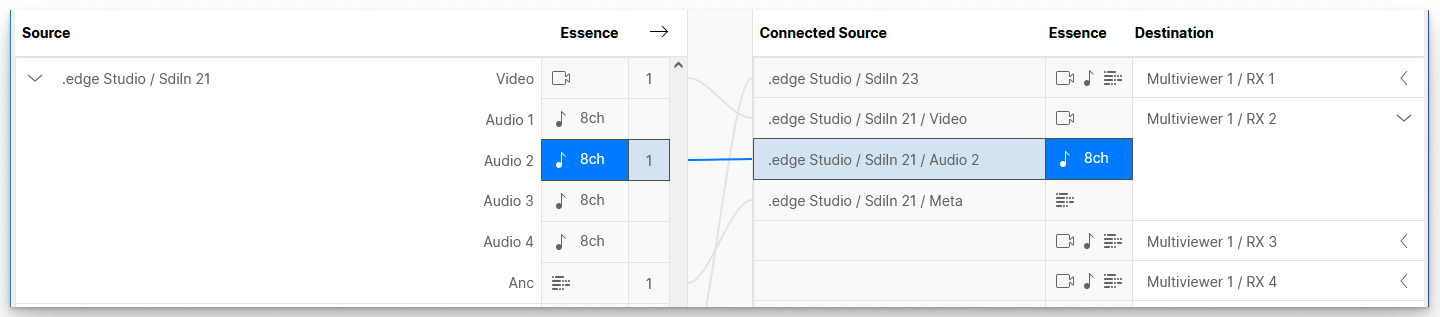
Once a group is revealed, you can edit the individual connections. For example, to replace the audio received by the Multiviewer:
Stream Connection Rules
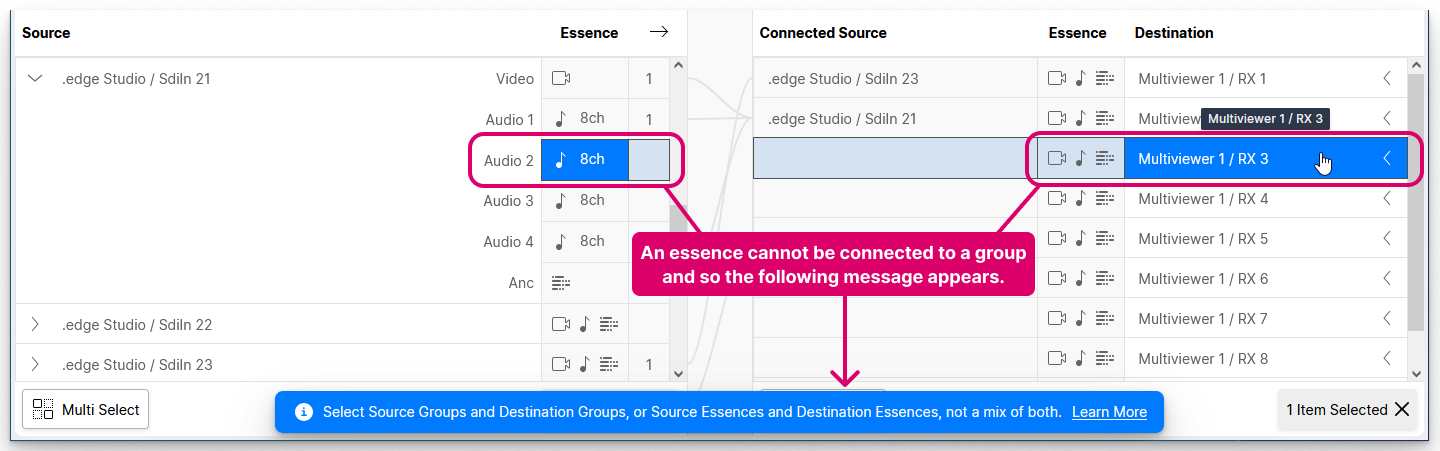
When working with groups, it is important to select either groups OR individual flows on both sides, otherwise the connection(s) cannot be made.
If the selections are not permitted, then a blue "info" message appears at the bottom of the screen.
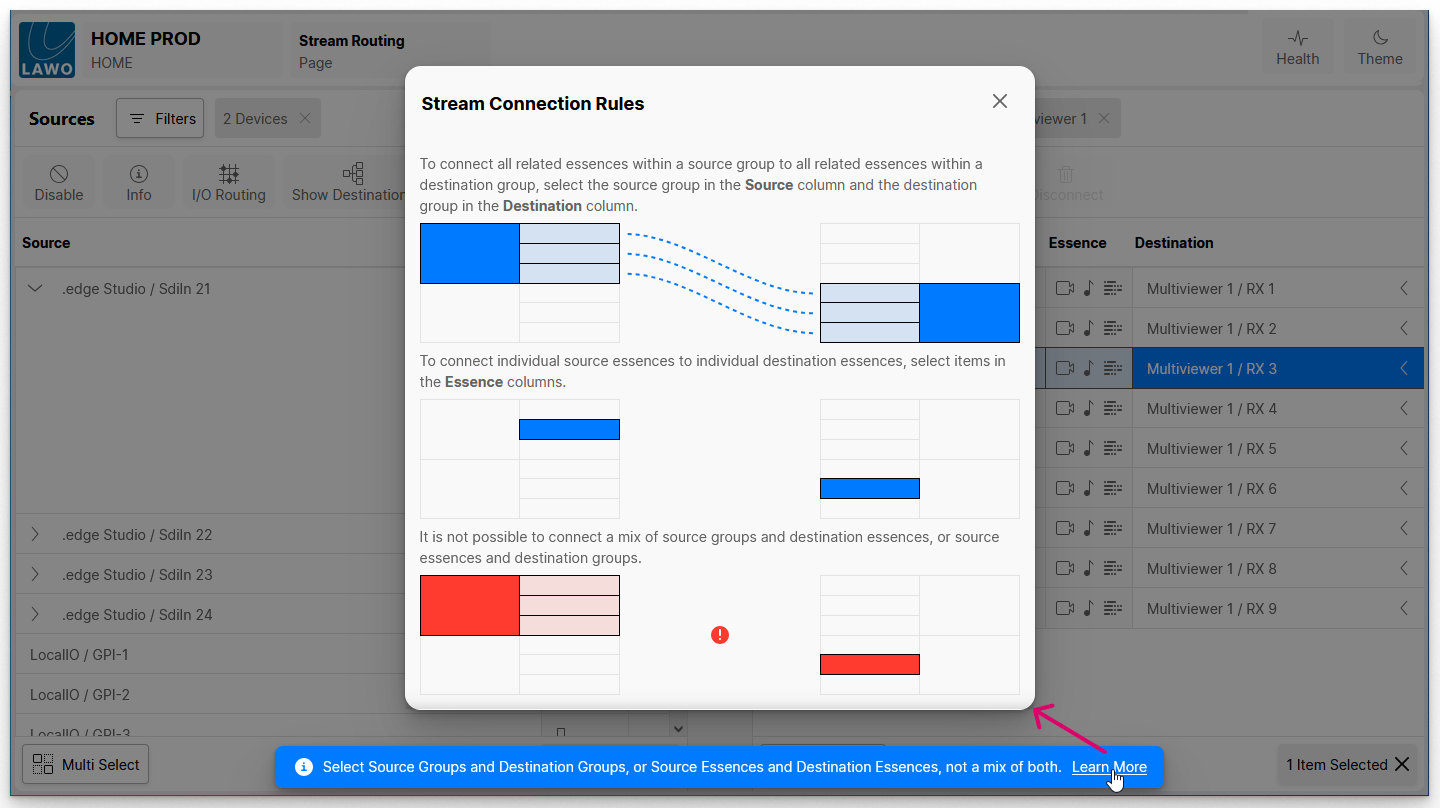
You can learn more about the "Stream Connection Rules" by clicking on Learn More (from the blue message bar).
To proceed, you will need to close the 'Stream Connection Rules' dialog and then modify the selection(s): choose either a group or individual flow on both sides.
Please note: It is possible to select a single source flow (e.g. Audio) and destination group (e.g. Video, Audio and Metadata) OR a source group and single destination receiver. In this instance, the related flows will be connected (e.g. Audio to Audio).
Connection Examples
The examples below explain how the system handles connections between groups and individual flows in more detail.
Group to Group
Whenever a source and destination group are selected, the system connects all related flows: e.g. Video to Video, Audio to Audio and Metadata to Metadata.
If there is more than one possible match, then the sender(s) and receiver(s) are connected consecutively. For example:
- If an SDI In is connected to an SDI Out, then all of the flows are connected: Video to Video, Audio 1 to Audio 1, Audio 2 to Audio 2, and so on.
- If an SDI In is connected to a Multiviewer, then there is only one audio receiver and so Audio 1 is connected while Audio 2, 3 and 4 are unused.
The screenshots below show how these examples look once the connections are made.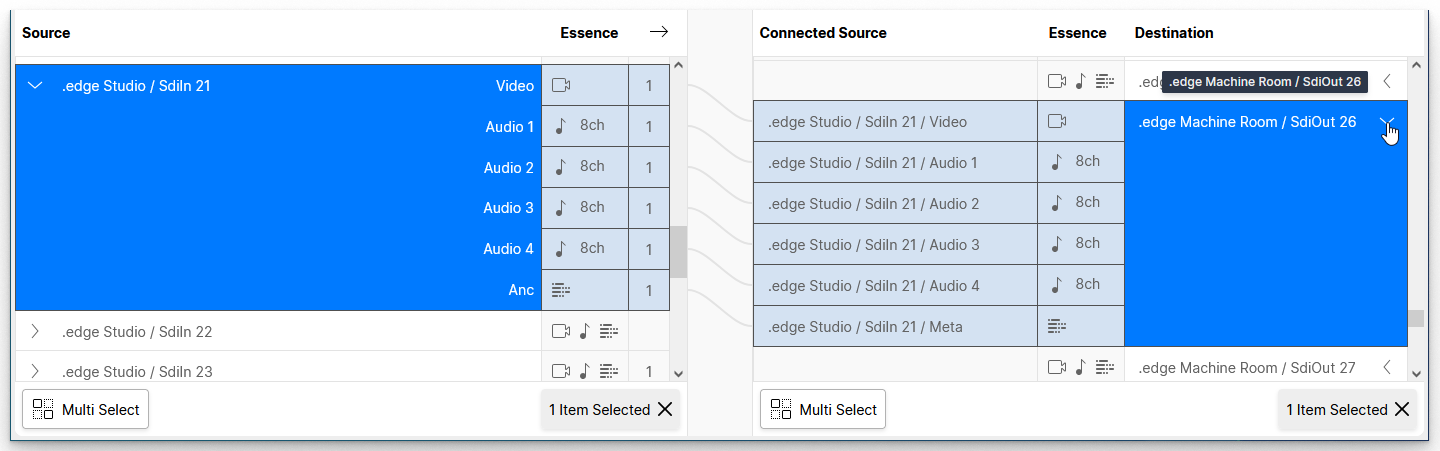
Essence to Group OR Group to Essence
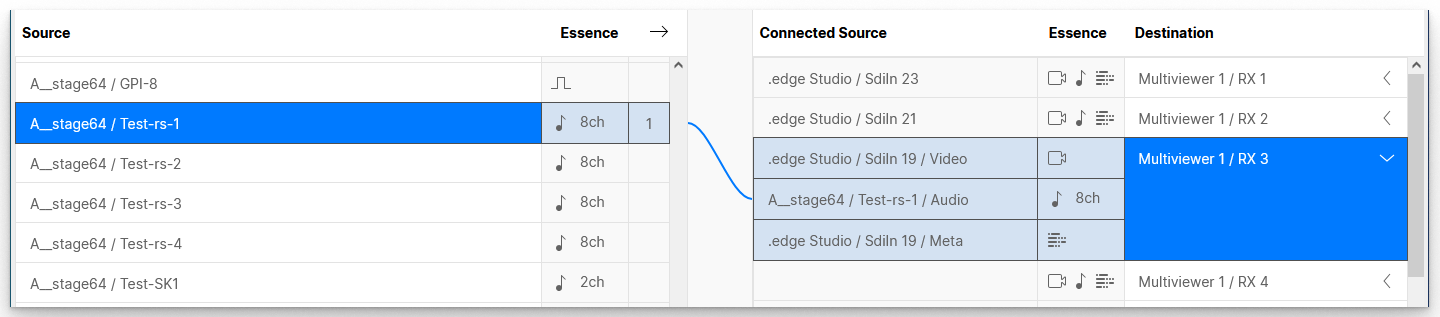
If an individual sender is connected to a destination group OR a source group is connected to an individual receiver, then only the related flows are connected (e.g. Audio to Audio).
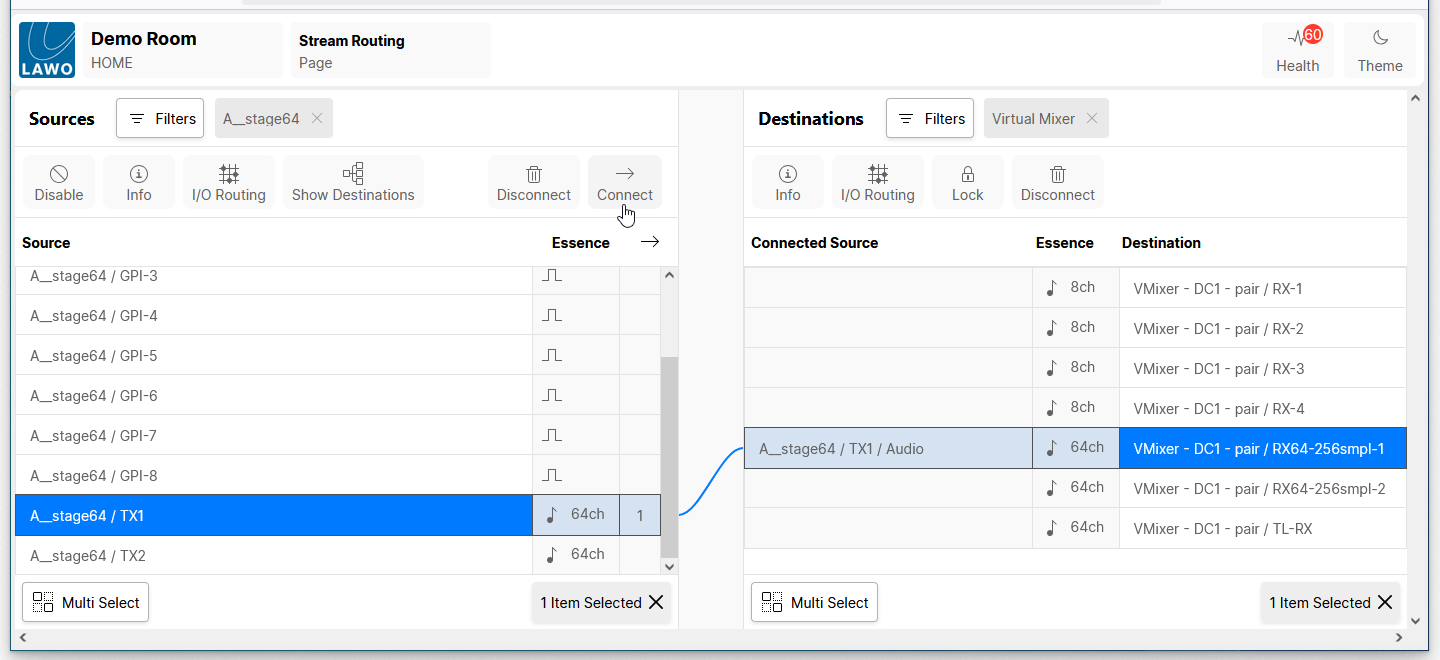
In the example below, this is used to replace the audio received by a Multiviewer with audio from an A__stage64.
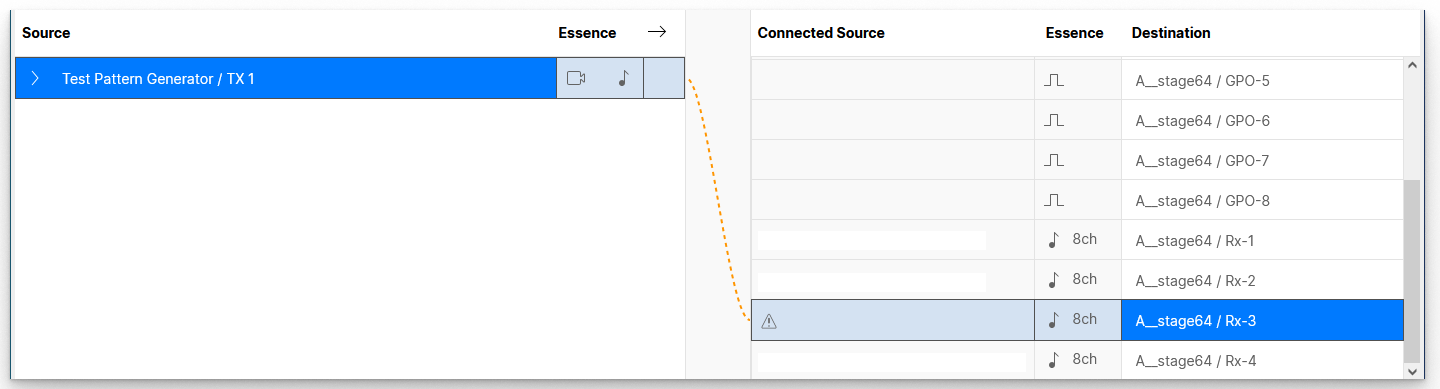
Please note: When preparing a connection from a source group, you may see a dotted orange (preview) line. This indicates that only a part of the source group can be connected. For example, if the source group contains Video, Audio and Metadata but the destination contains Audio only. In this instance, the connection can still be made, but only for the related flow(s).
In the example below, a connection is prepared from a Test Pattern Generator (source group) to an A__stage64 (audio-only receiver). The dotted orange (preview) line indicates that not all essences in the source group can be connected.
If you reveal the source group, then you can check which flow(s) can be connected (e.g. audio only).
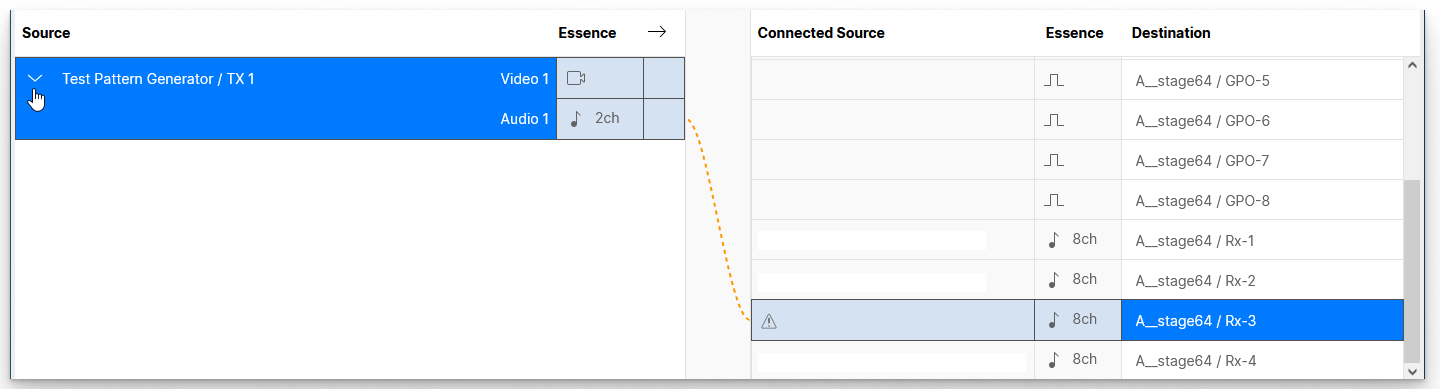
To make the connection, click on Connect. The dotted orange (preview) line changes to a solid (blue) line once the connection is made.
Using Multi Select
It is possible to make (or break) several connections in one operation by selecting multiple sources and destinations.
When working with groups of flows, the selections must conform to the stream connection rules. i.e. You must select either groups OR essences on both the source and destination sides.
To select a range:
- Click on the first source (or destination).
- Press and hold SHIFT (on your keyboard) and click on the last source (or destination).
- The selections highlight in blue.
- If you press and hold SHIFT again, you can increase or decrease the selected range.
To select non-consecutive sources or destinations:
- Either press and hold CTRL (on your keyboard) or turn on the Multi Select option (at the bottom of the page).
- Click on the individual sources or destinations.
- The selections highlight in blue.
- If a range is selected, you can use this method to remove or add entries to the range.
When you click Connect (or Disconnect), the assignments are made in one operation. For example, to connect four senders to four receivers.
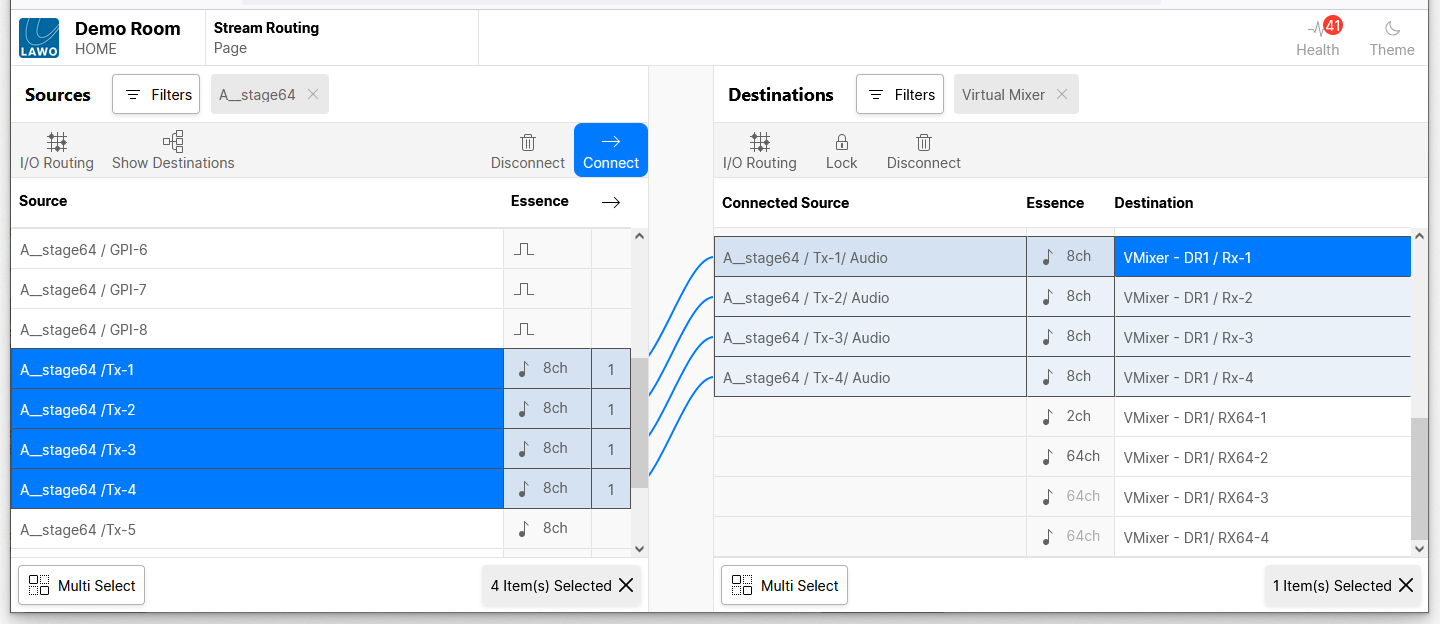
If there is a mismatch between the number of selected sources and destinations, then the sources are connected consecutively on a best-effort basis. For example:
- If there are eight sources and only four destinations, the first four sources are connected consecutively to the first four destinations.
- If there are two sources and eight destinations, the sources are connected to each pair of destinations.
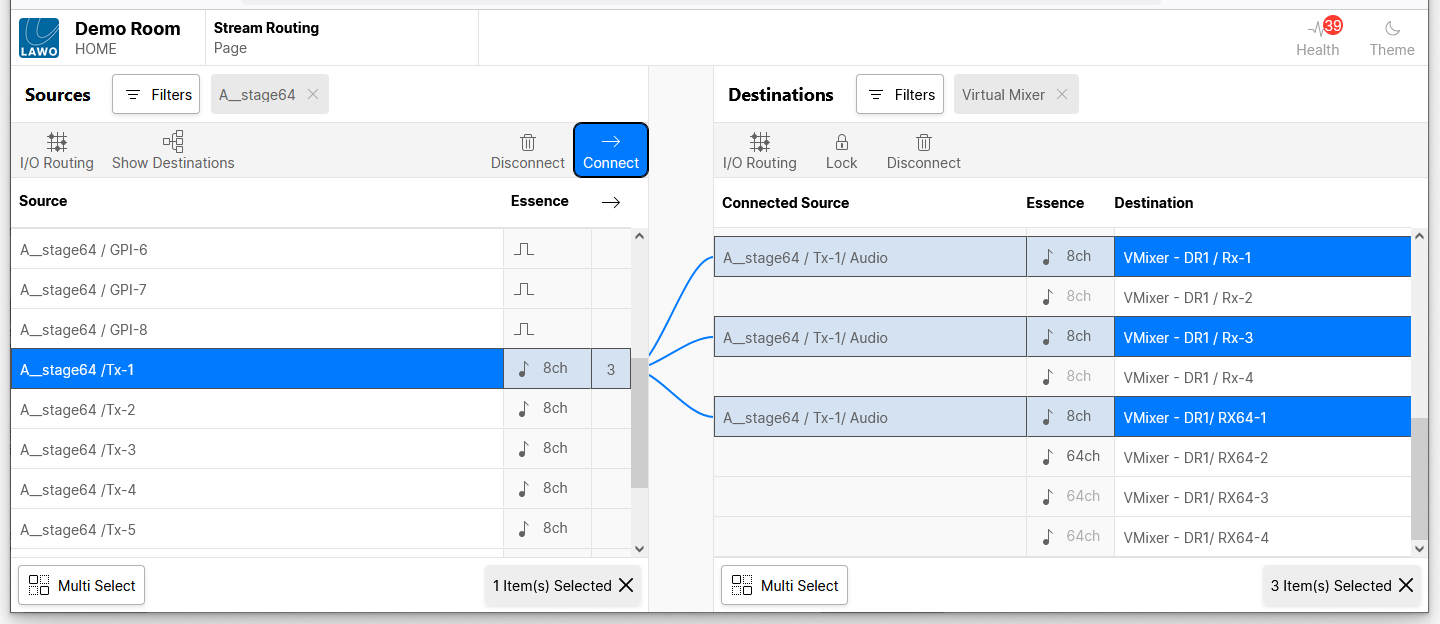
- If there is a single source and multiple destinations, then the source is connected to all of the destinations (as shown below).
Clear Selections
The quickest way to clear the current selections is to use the n Item(s) Selected buttons (at the bottom of the page).
There is one button for each list: Sources and Destinations. In each case:
- The button shows how many sources (or destinations) are selected.
- You can clear all of the current selections by clicking on the X.