mc²56 - Signal Routing
This topic describes how to setup and edit the console's signal routing.
Make (or Break) Connections
The Connect and Disconnect buttons (in the Signal List) are used to make and break the signal connections.
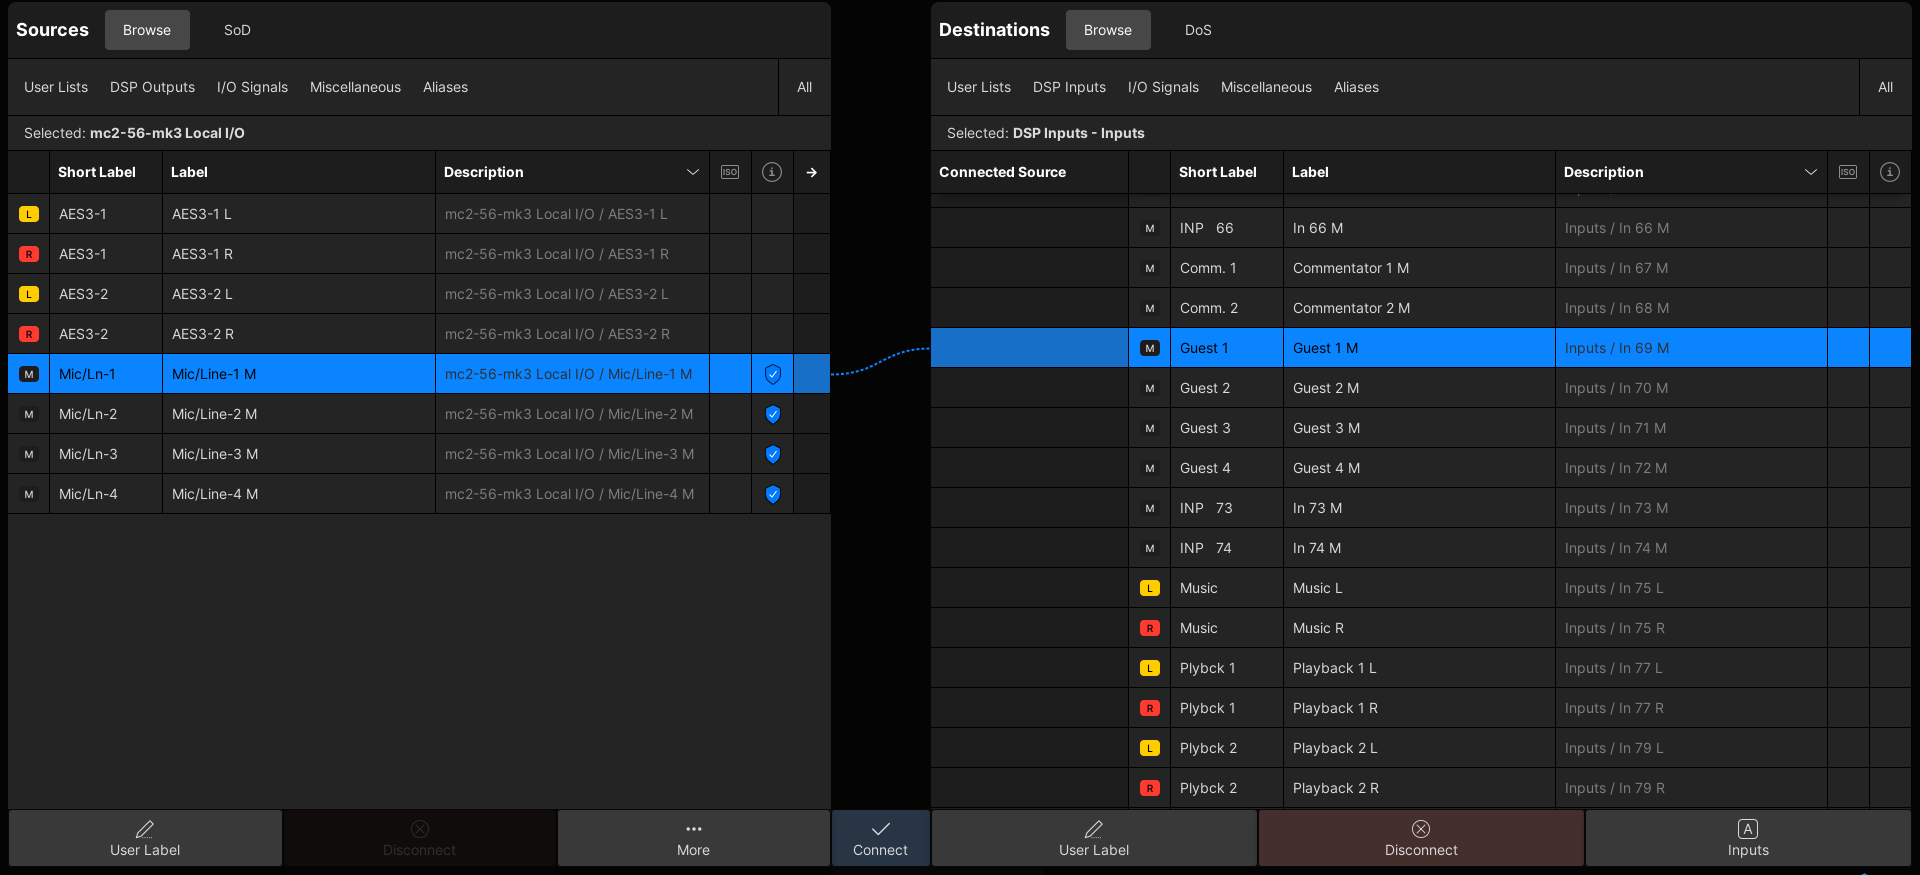
To make a connection, select a source (on the left) and a destination (on the right); then click on Connect.
- A dotted (preview) line appears when a connection is prepared.
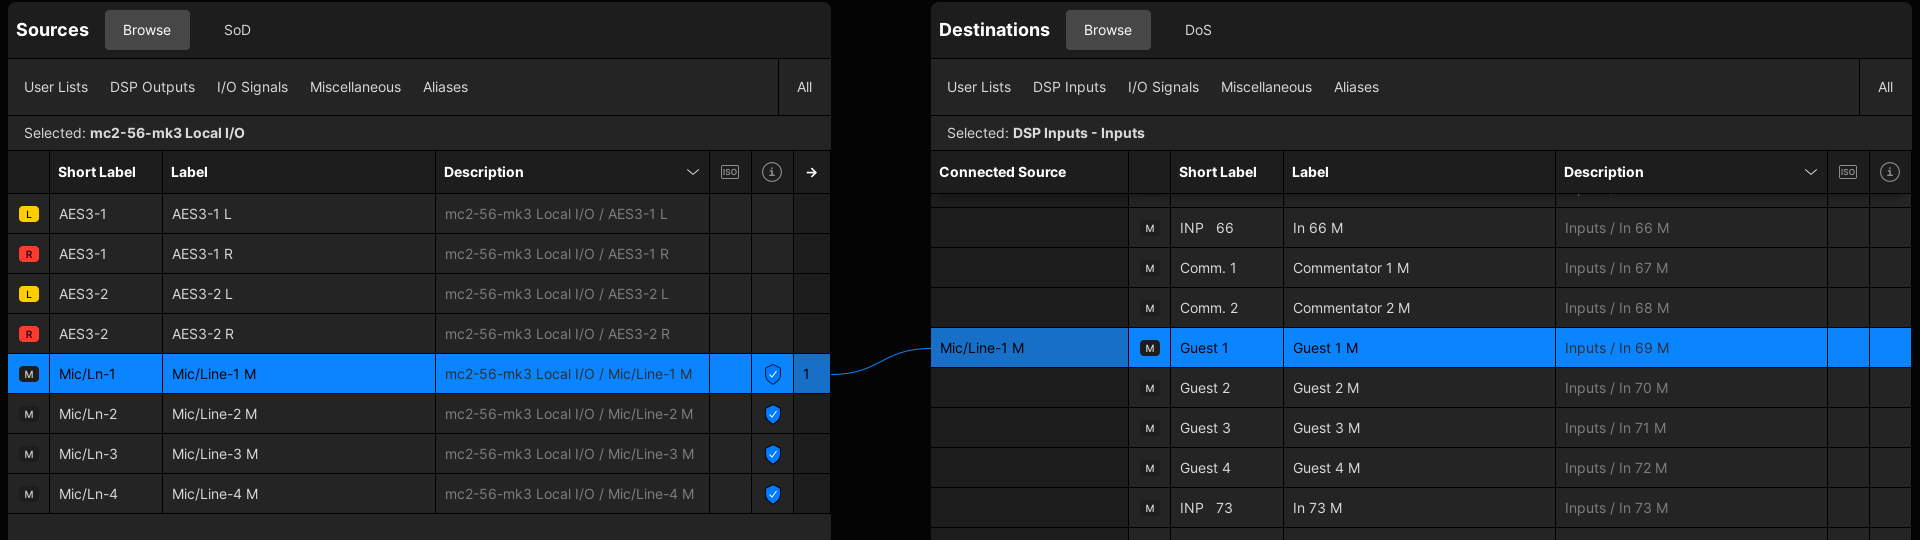
- This changes to a solid line once the source(s) and destination(s) are connected.
- Once a valid source is connected, the Connected Source field updates.
- You can select multiple sources and/or destinations by clicking and dragging, or using SHIFT or CTRL on the console keyboard. This allows you to connect or disconnect multiple signals in one operation.
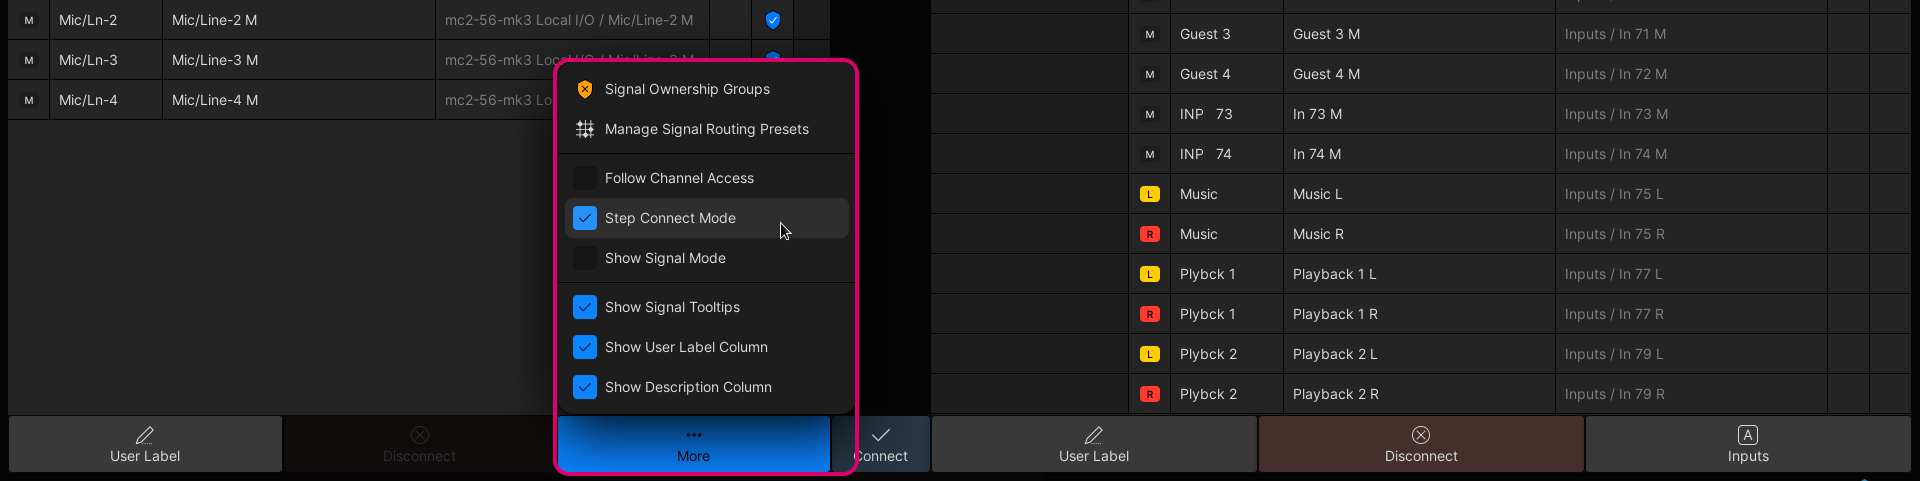
- Optionally, you can enable Step Connect Mode (from the More... options). This can be used to connect (or disconnect) consecutive sources and destinations by repeatedly pressing Connect (or Disconnect).
The rest of this section works through some examples.
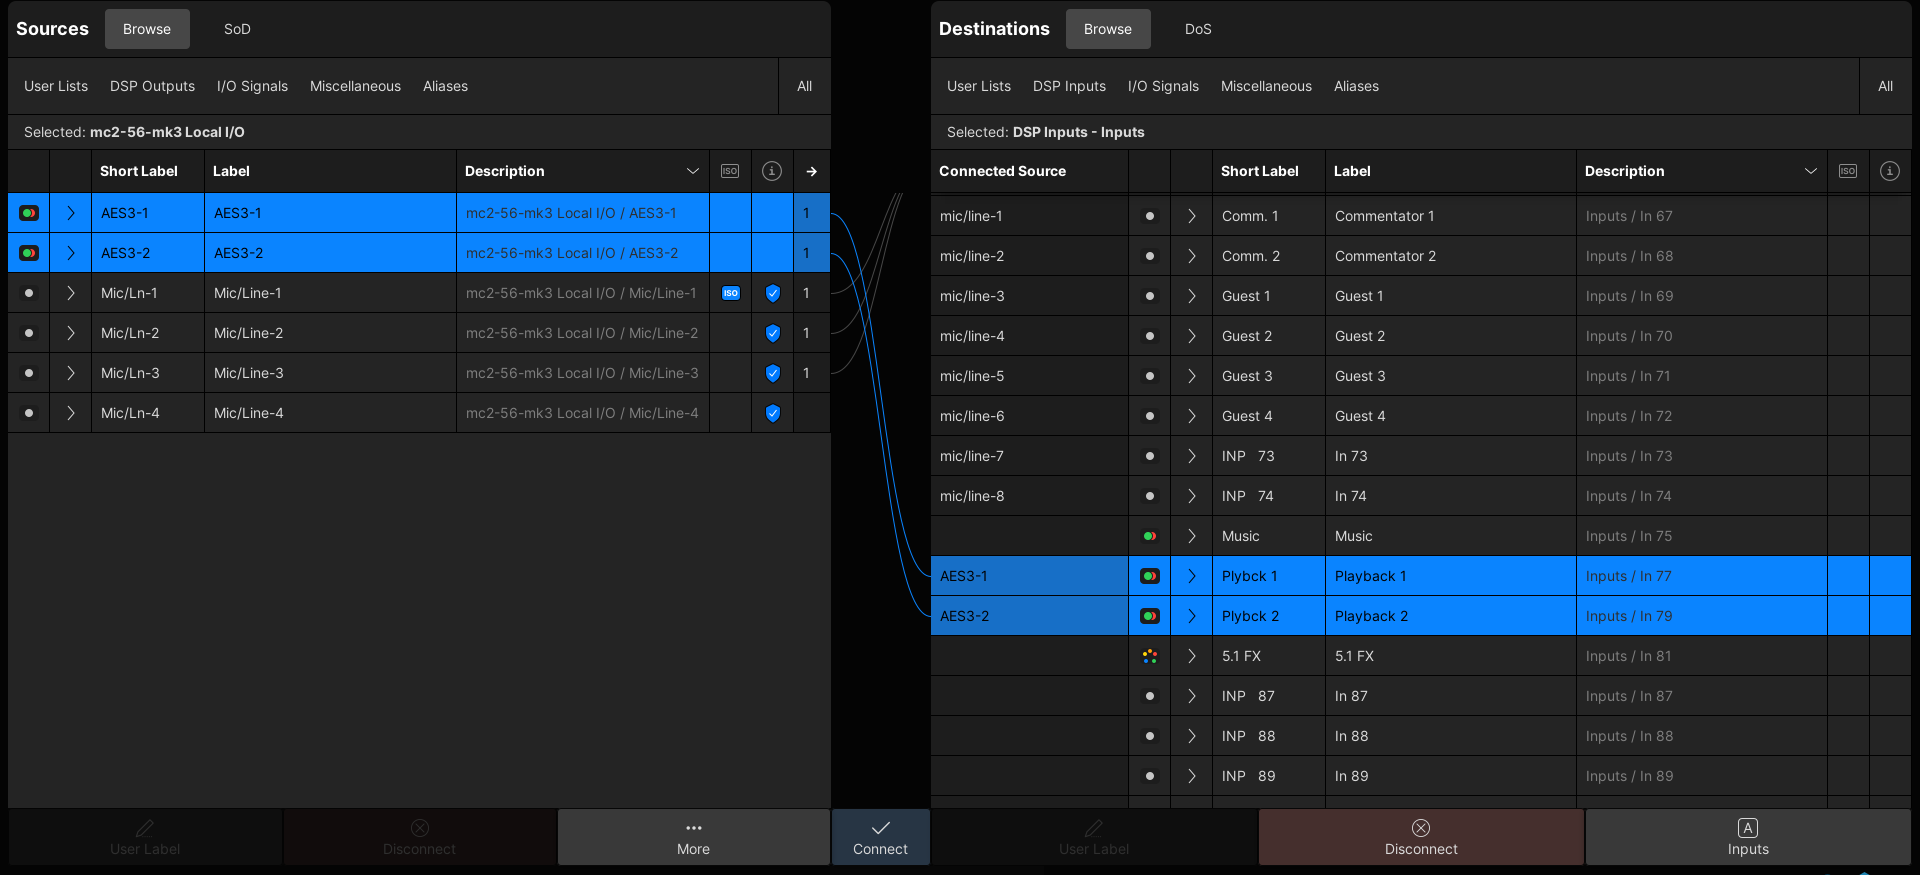
Connect a Source to a Destination
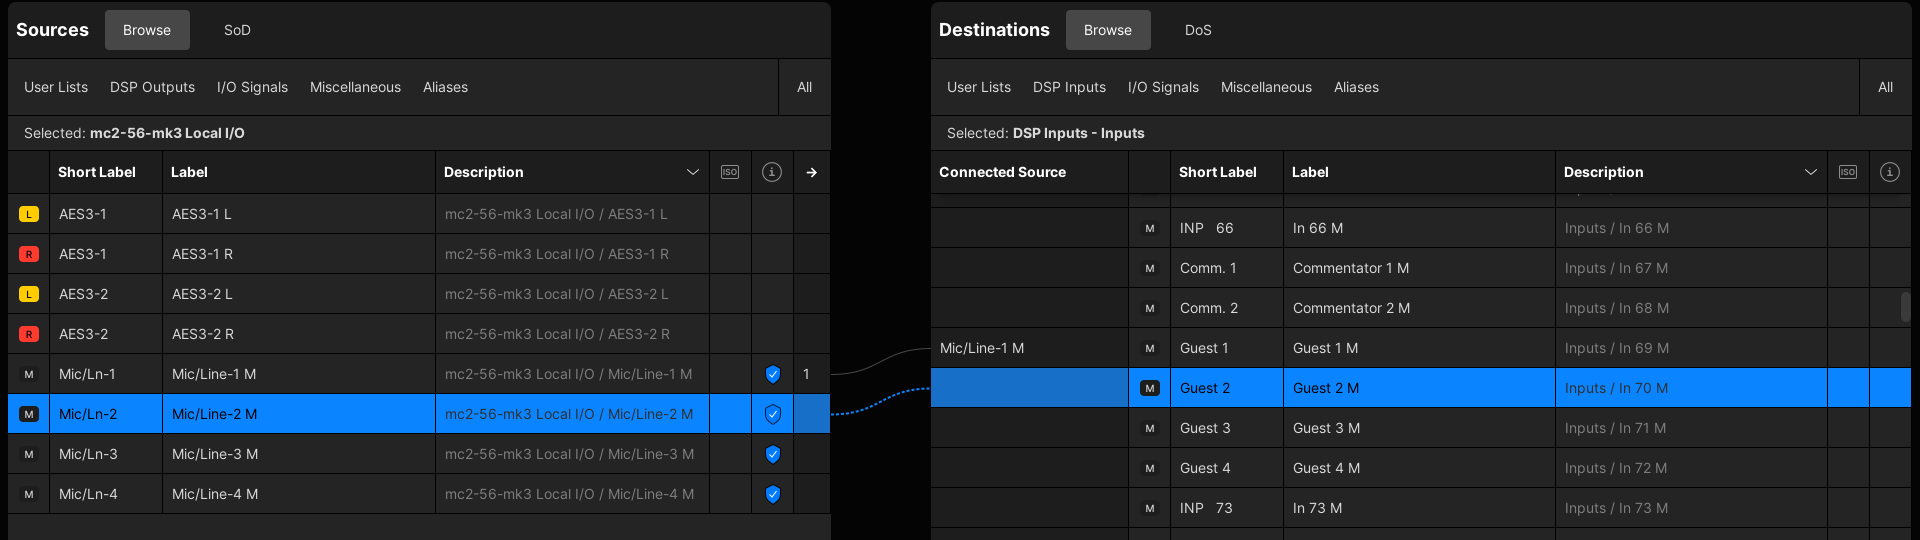
To prepare a connection, select a source and a destination - the selections are highlighted (in blue) and a dotted (preview) line appears.
To make the connection, click on Connect - the dotted (preview) line changes to a solid line and the "Connected Source" field updates.
If Step Connect Mode is enabled, then the system automatically selects the next source and destination (in each list) after pressing Connect. You can use this mode to quickly connect consecutive sources to consecutive destinations (as described here).
Disconnect
To break a connection, select a destination and click on Disconnect.
The connection is removed - the solid line changes back to dotted (preview) line and the Connected Source field clears.
If you hover over a Connected Source field, then a tooltip appears showing information about the connected source (and for input channels, which input is active). You can see an example of this here.
Multi Select
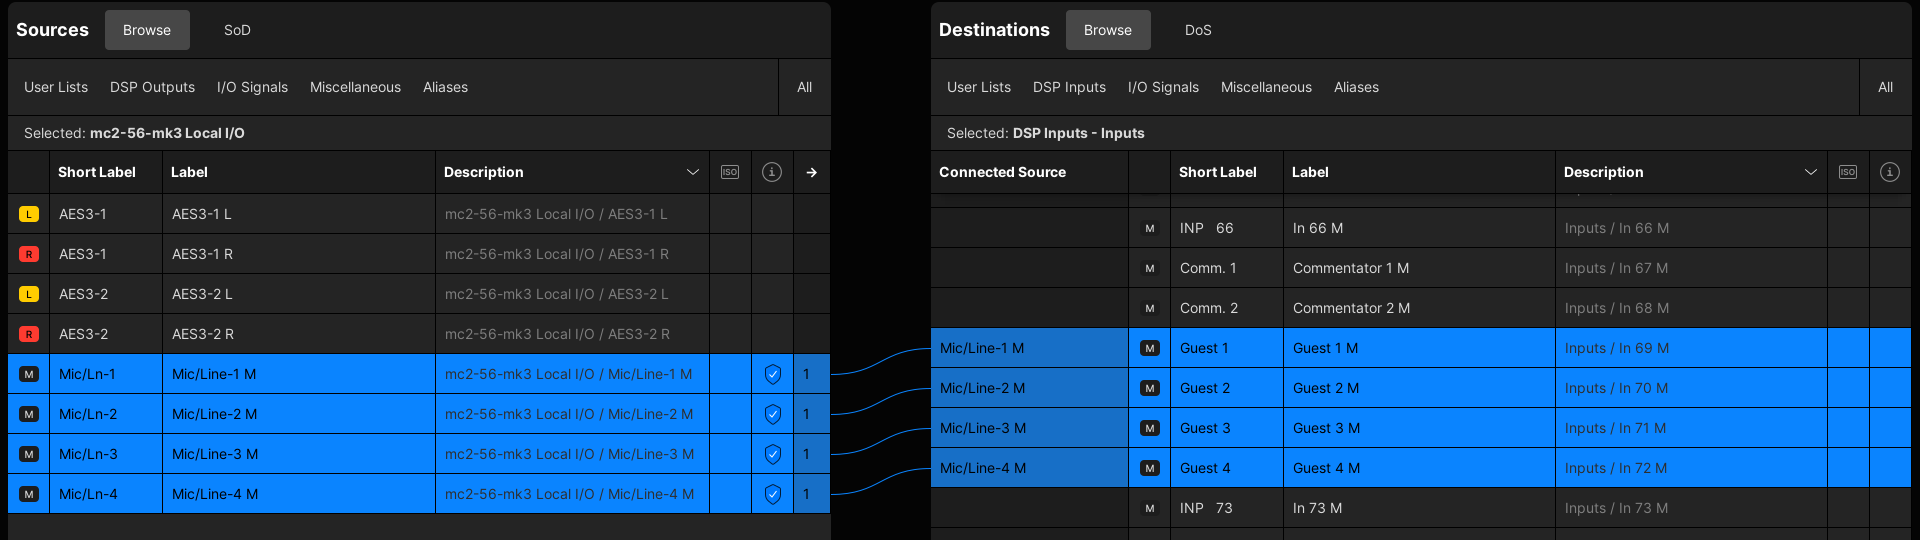
It is possible to make (or break) several connections in one operation by selecting multiple sources and/or destinations.
This is done by clicking and dragging (to select a range), or using the SHIFT or CTRL modifiers (on the console keyboard).
Important: To use the click and drag method, you must start from a source (or destination) that is not selected. i.e. select another source first before you begin the click and drag.
- Follow the same steps as before, but click and drag to select a range of sources and/or destinations.
- Press and hold SHIFT to increase (or decrease) the range.
- Or, press and hold CTRL to select (or deselect) individual signals.
- The dotted (preview) line shows what is prepared.
- When you press Connect, the routes are made in one operation.
- You can use the same method to Disconnect several destinations.
In the example below, four sources are connected to four destinations.
If there is a mismatch between the number of selected sources and destinations, then the sources are connected consecutively on a best-effort basis. For example:
- If there are eight sources and only four destinations, the first four sources are connected consecutively to the first four destinations.
- If there are two sources and eight destinations, the sources are connected to each pair of destinations.
- If there is a single source and multiple destinations, then the source is connected to all of the destinations.
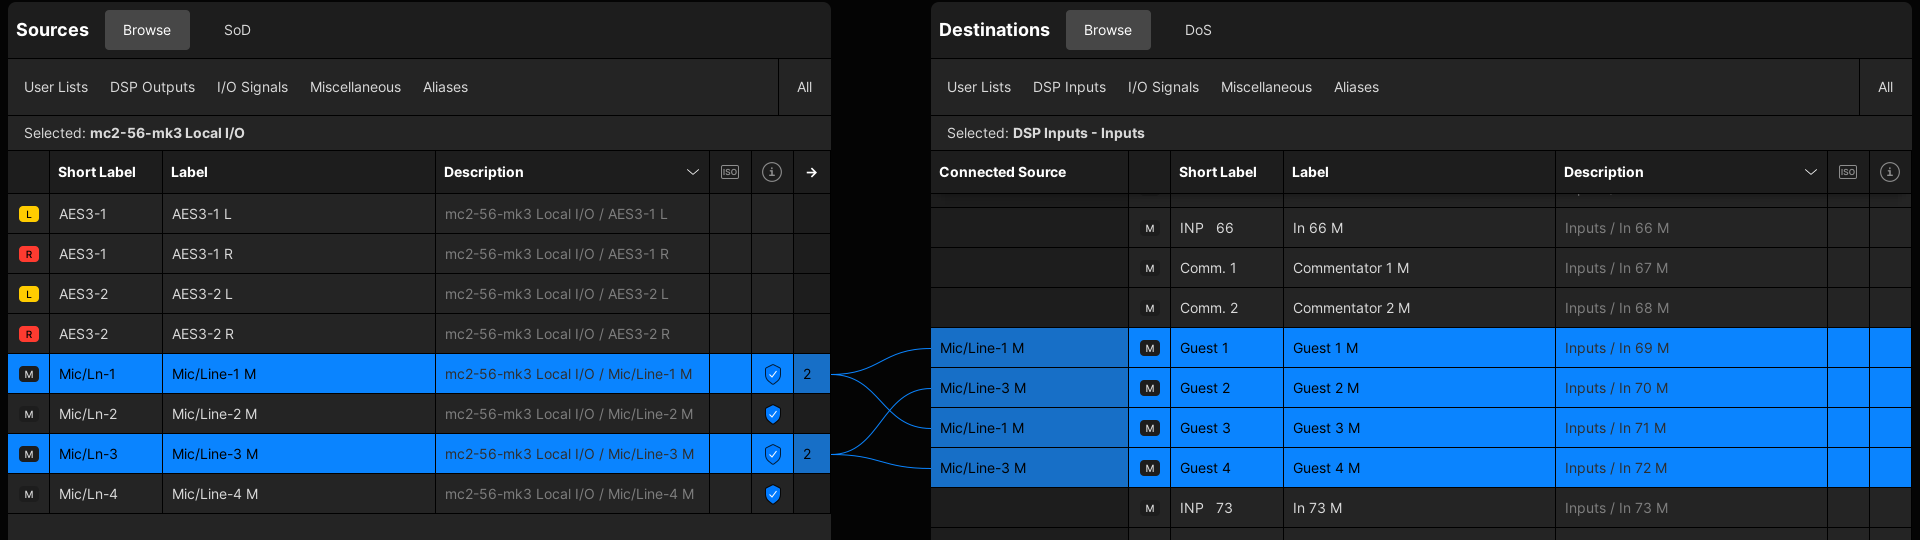
In the example below, two non-consecutive sources are connected (as a pair) to each pair of destinations
Step Connect
Step Connect can be used to quickly connect (or disconnect) consecutive sources to consecutive destinations by repeatedly pressing Connect (or Disconnect).
Start by enabling Step Connect Mode from the More... options.
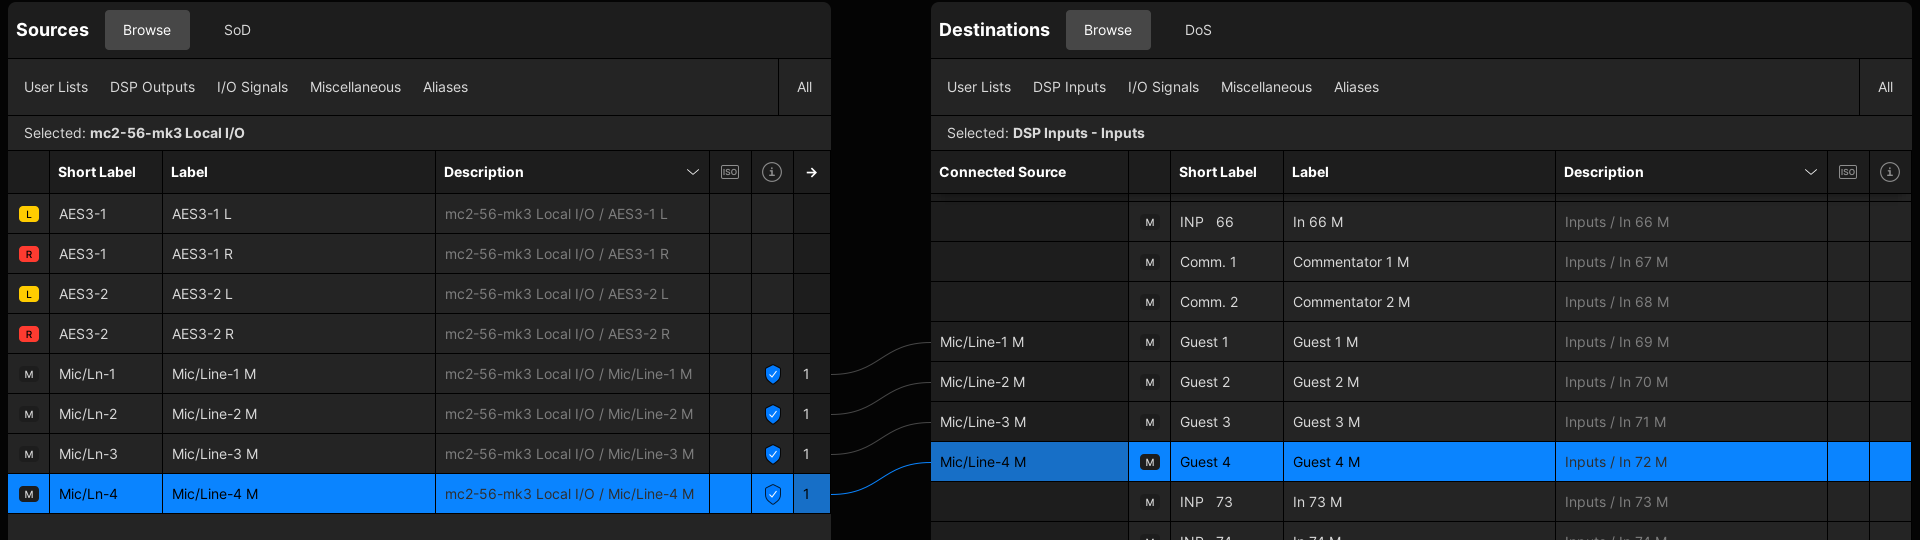
Then connect the first source and destination (e.g. Mic 1 to the Guest 1 channel).
When Step Connect Mode is enabled, the system automatically selects the next source and destination (in each list) after pressing Connect.
This means that you can press Connect (again) to make the next route (e.g. Mic 2 to Guest 2).
Keep pressing Connect until all of the required connections are made.
The same method can be used to disconnect consecutive destinations by repeatedly pressing Disconnect.
Interrogate Signal Routing
The Signal List provides two ways to interrogate existing connections: show Destinations of Source (DoS) and show Sources of Destination (SoD).
Destinations of Source (DoS)
This function can be used to check the destinations of a source (or multiple sources).
- Select the source(s) you wish to interrogate.
- Next to Destinations (on the right), choose DoS.
The Destinations list updates to show only the connected destinations of the selected source. In our example, the selected mic is connected to two destinations.
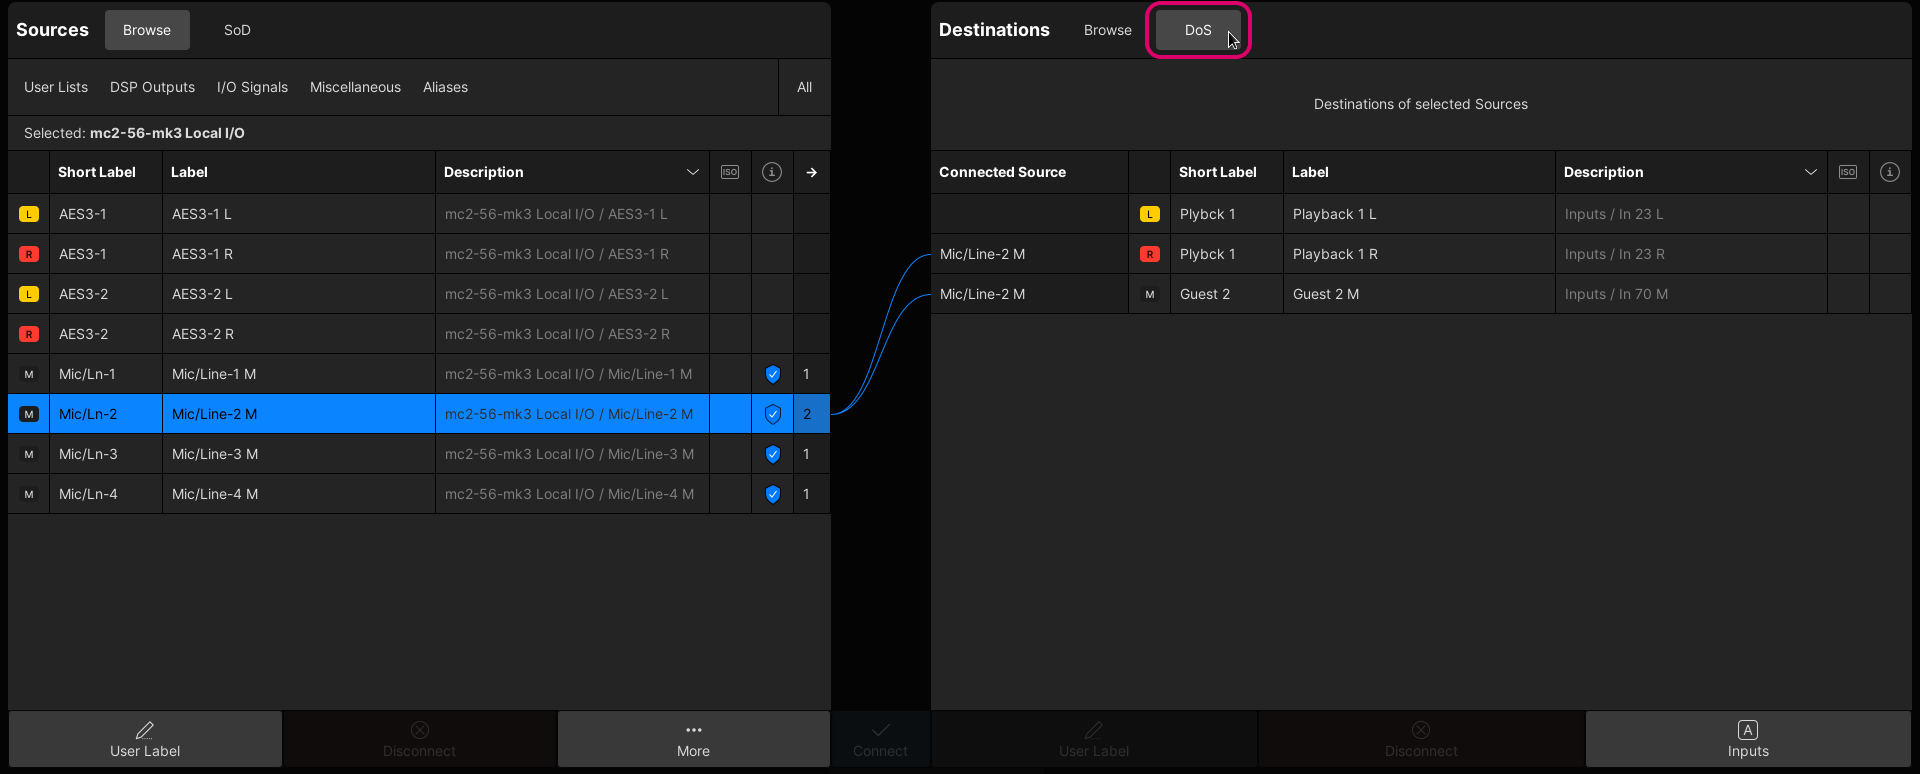
You can now scroll up/down the Sources list to check each source individually. Or, select multiple sources to check all of their connections.
While DoS is active, you can make or break connections in the usual manner. For example, to Disconnect the mic source from the Playback 1 R input channel!
If the Sources list is unfiltered (to show All sources) and you press CTRL + A (to select all sources), then the DoS list shows only the destinations that have a connection.
This is a quick way to view all of the active connections in the matrix
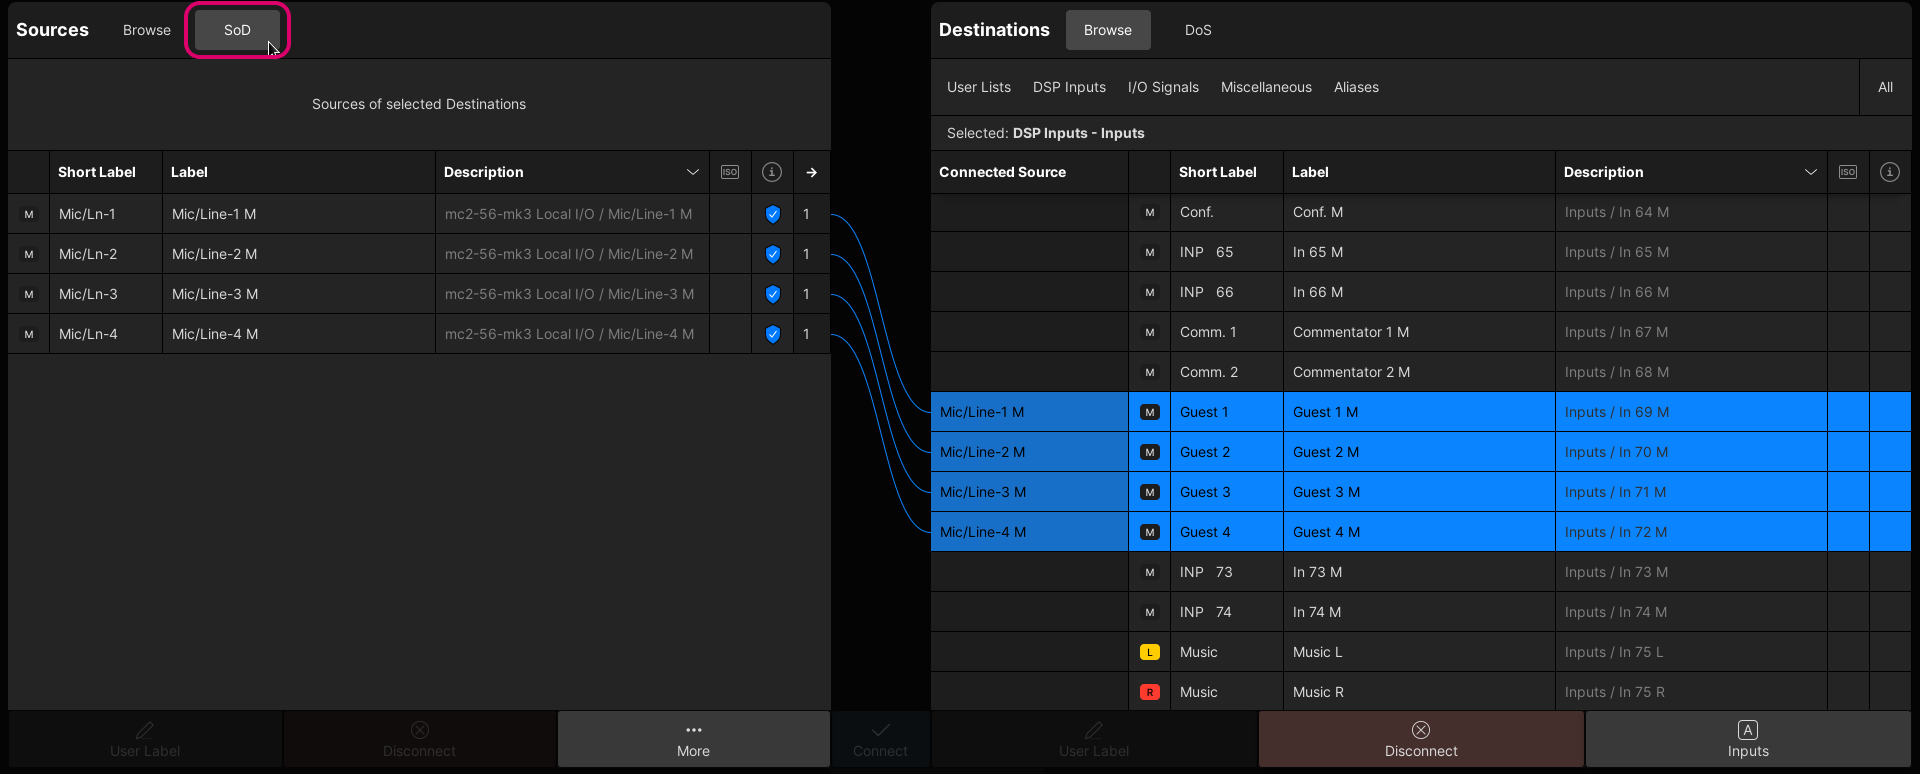
Sources of Destination (SoD)
This function works in a similar manner but this time shows the sources of the selected destination(s).
In the example below, SoD is used to show the sources of four input channels.
Signal Mode
The Signal List display can be viewed in either standard or signal mode.
In the standard view, all signals are listed as mono resources. This is great if you are connecting a mixture of signal formats: mono, stereo and surround.
If you are handling lots of stereo or surround signals, then you may prefer to work in Signal Mode (as this condenses the view by grouping the linked signals).
Start by switching to the view, by turning on Show Signal Mode from the More... options. Immediately, all signals are grouped according to their format: mono, stereo or surround. Notice that the lists are now more condensed, and include an arrow column (to reveal the grouped components).
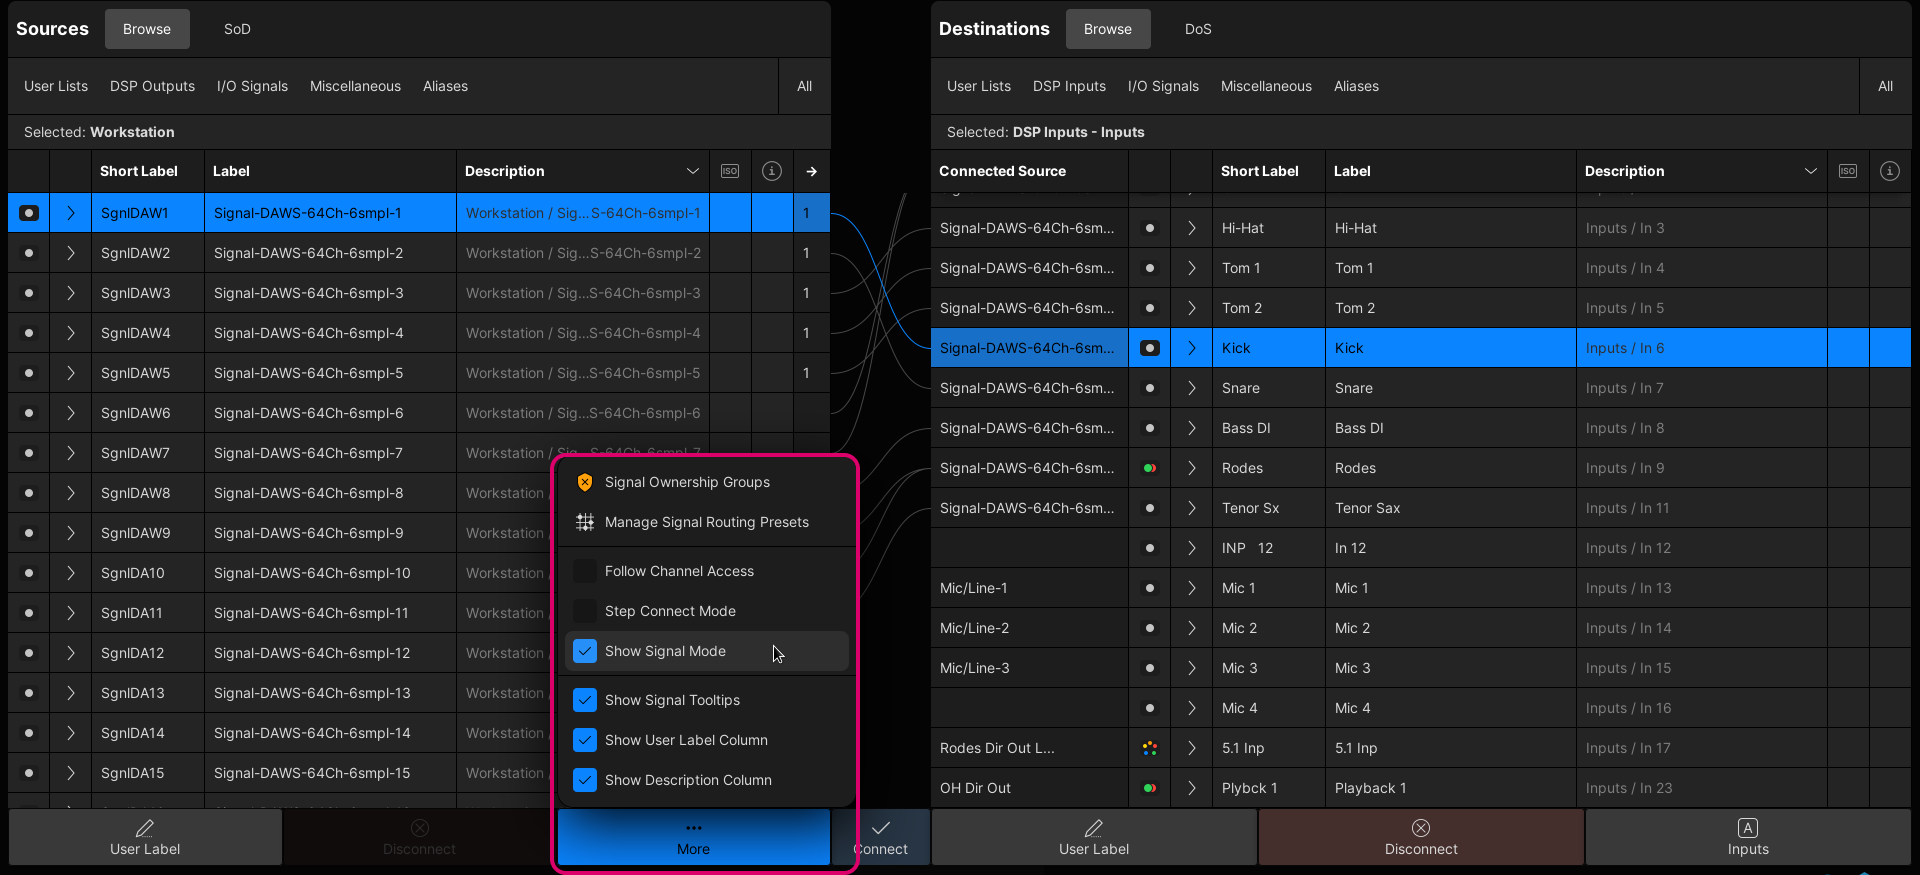
The functionality is identical to the standard view, with the same right-click context menu options and Connect/Disconnect functions.
Signal Mode is great for connecting signals of the same format. e.g. stereo to stereo, 5.1 to 5.1, and so on.
However, if the signal formats do not match, then this requires some extra handling. For example, if you select a mono source group and a stereo destination group, then a Connect is not permitted.
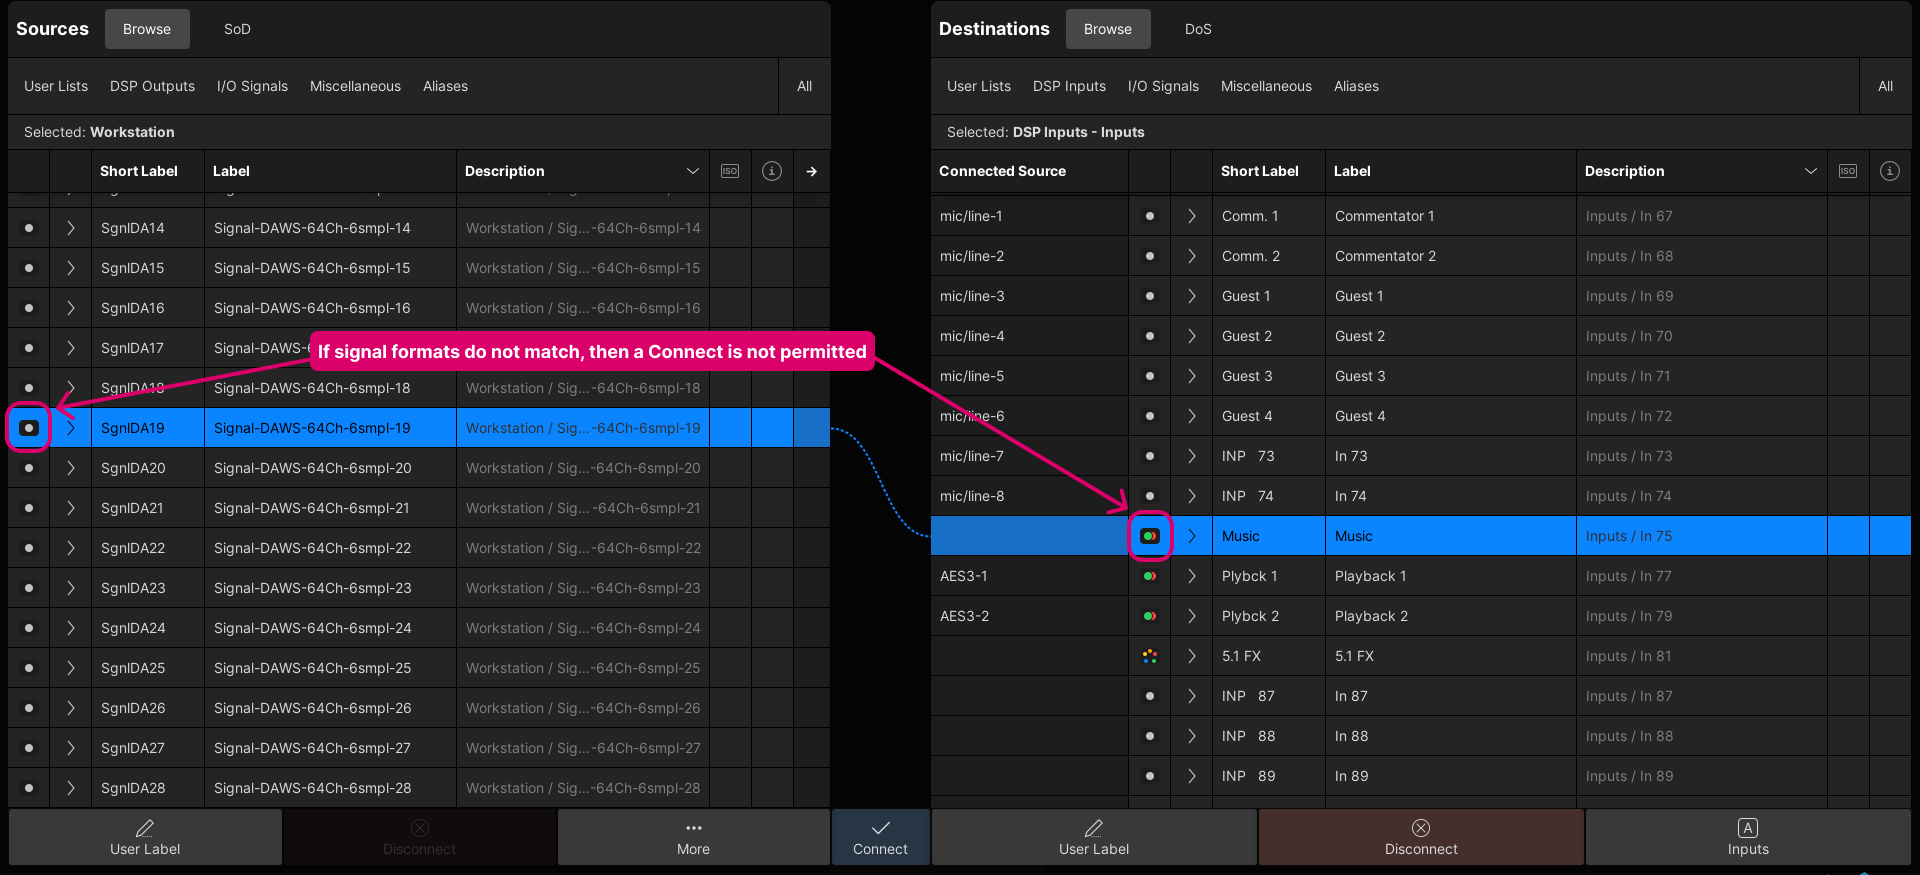
In this instance, click on the group arrows (on both sides) to reveal the individual (mono) signals.
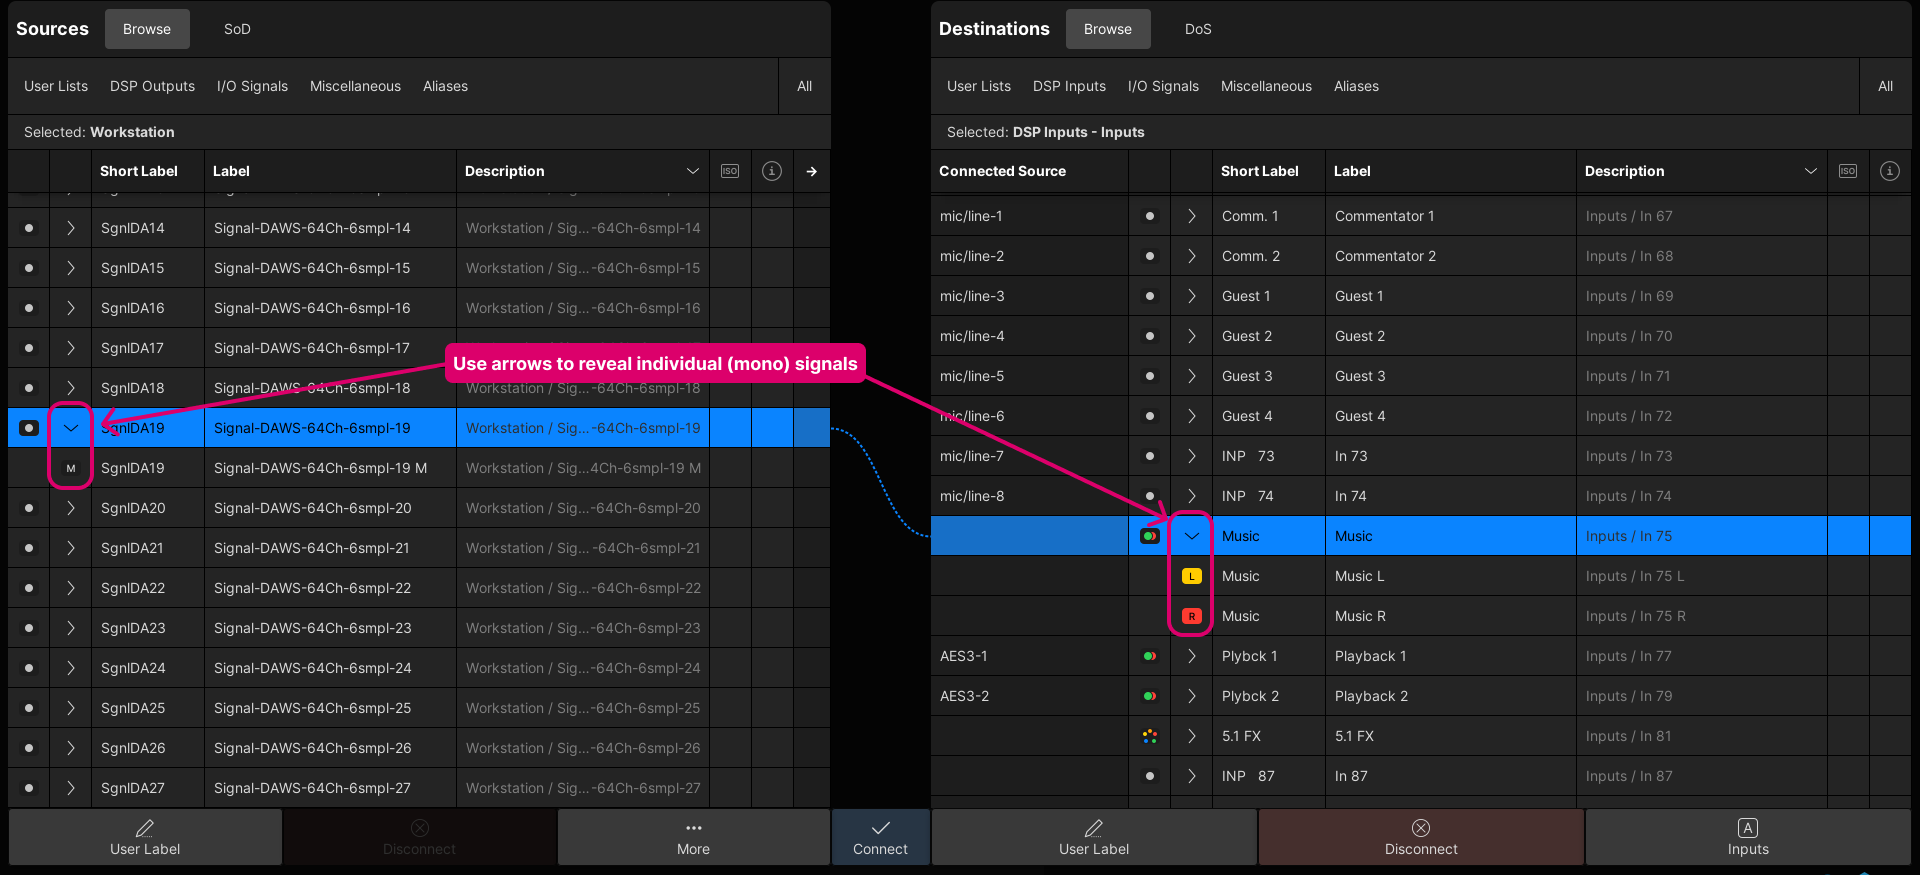
Then, select the individual signals you wish to connect (e.g. the mono source and left channel of the stereo destination). The Connect is now permitted.
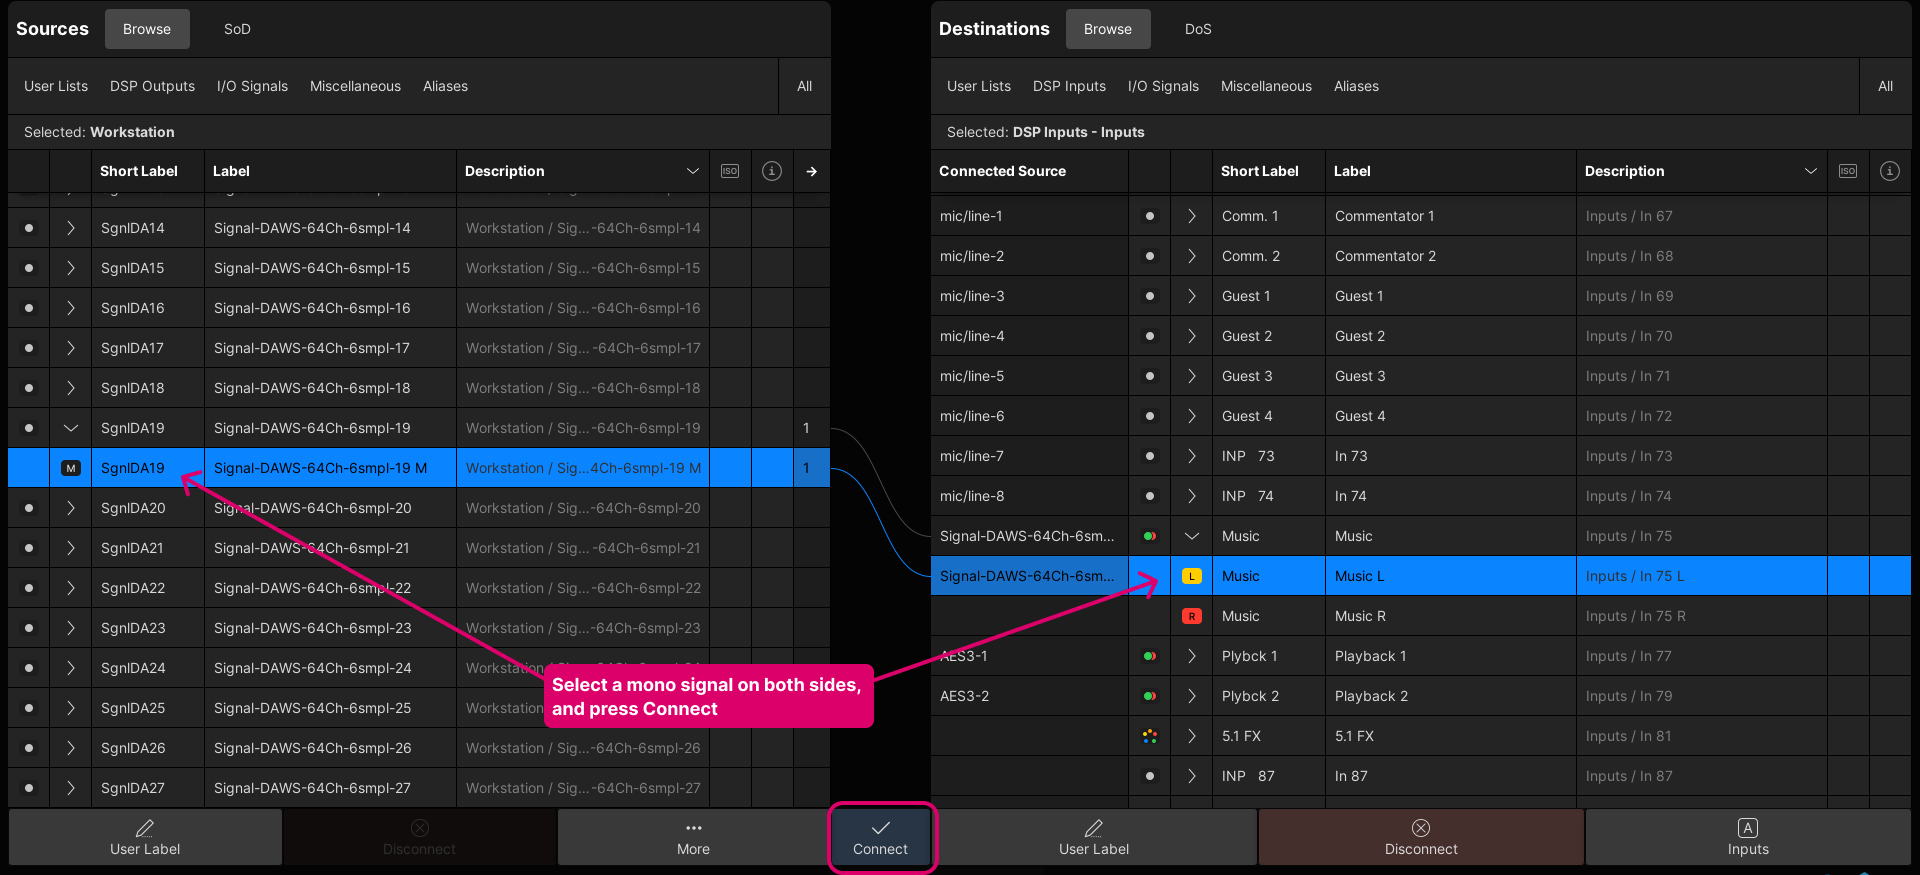
You can now repeat the steps above to connect the other legs of the destination. In our example, reveal and select another mono source (on the left) and then select the Music R destination.
Signal Routing Presets
Signal Routing Presets can be used to save and load a selection of matrix crosspoints. They replace partial snapshots that were supported in older releases of the mc2.
Each preset can store any number of crosspoint connections. All presets are saved and loaded with the production.
The example below describes a typical application, where each preset connects a different stereo source to four stereo outputs.
- There are three presets, one for each source: Stereo 1, Stereo 2 and Stereo 3.
- Each preset stores four sets of connections: Stereo 1 to Recorder 1, 2, 3 & 4; Stereo 2 to Recorder 1, 2. 3 & 4; Stereo 3 to Recorder 1, 2, 3 & 4.
Create a New Preset
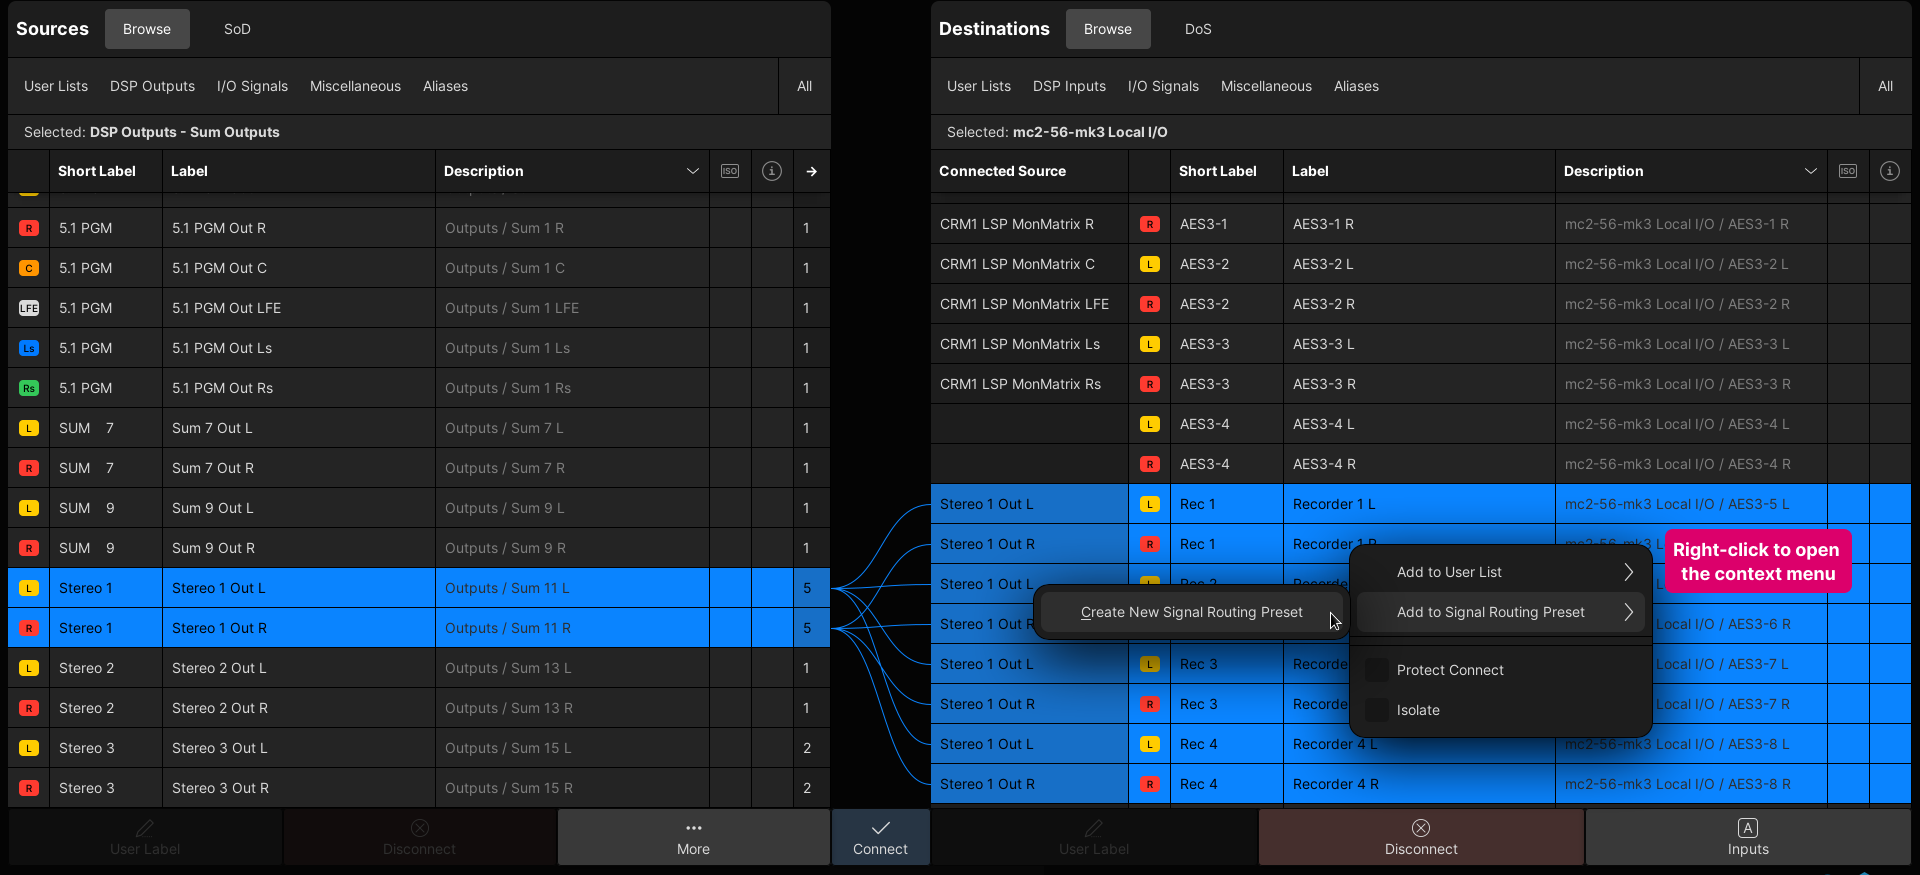
There are two ways to create a new preset: from the right-click context menu (for the selected destinations), or from the Signal Routing Preset management window. The first method is usually quickest.
- Start by making the connections you wish to save, and select the destination(s).
- Right-click and choose Add to Signal Routing Preset from the context menu, followed by Create New Signal Routing Preset.
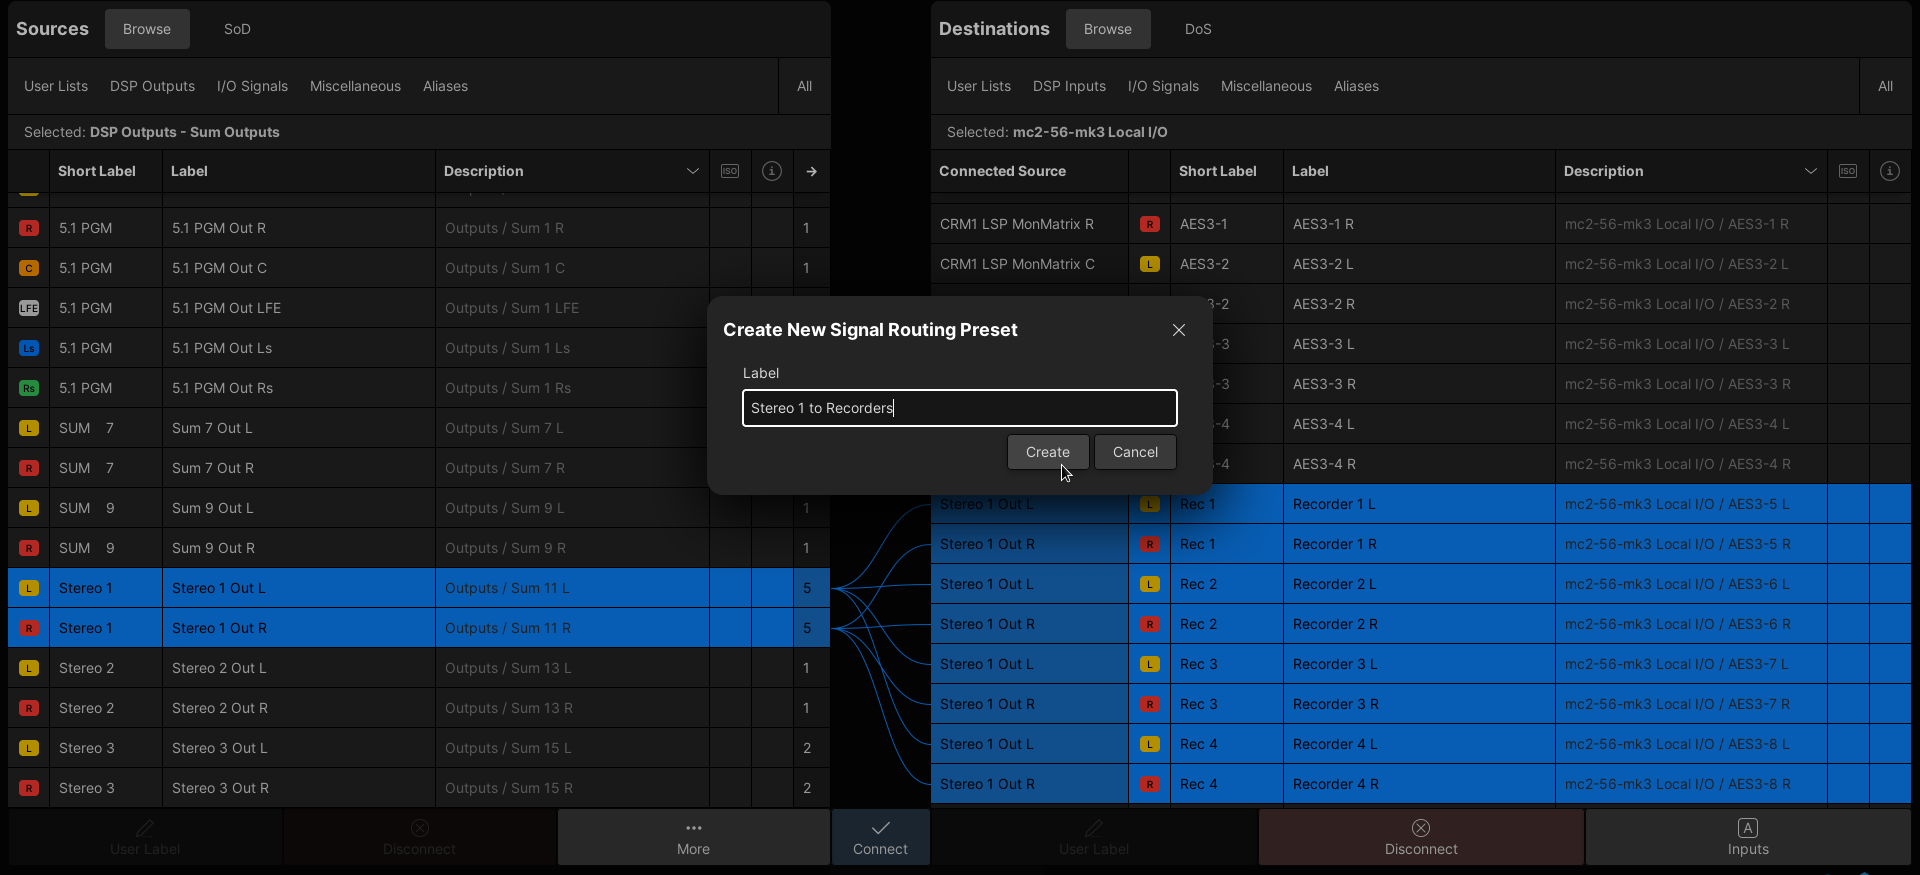
- You are asked to enter a Label.
- To confirm (and create the preset), either press Enter (on the console keyboard) or select Create.
If you now choose Manage Signal Routing Presets (from the More... options), you will see the preset in the management window.
Repeat the steps above to create more presets. The example above shows the connections to from the first stereo source.
Add Connections to a Preset
You can add more connections to a preset at any time. Repeat the steps above but this time choose Add to Signal Routing Preset, followed by the preset name (e.g. Stereo 1 to Recorders).
The selected connections are added once you choose the preset name.
Remove Connections from a Preset
To remove connections from a preset, repeat the steps above but this time choose Remove from Signal Routing Preset followed by the preset name.
The selected connections are removed once you choose the preset name.
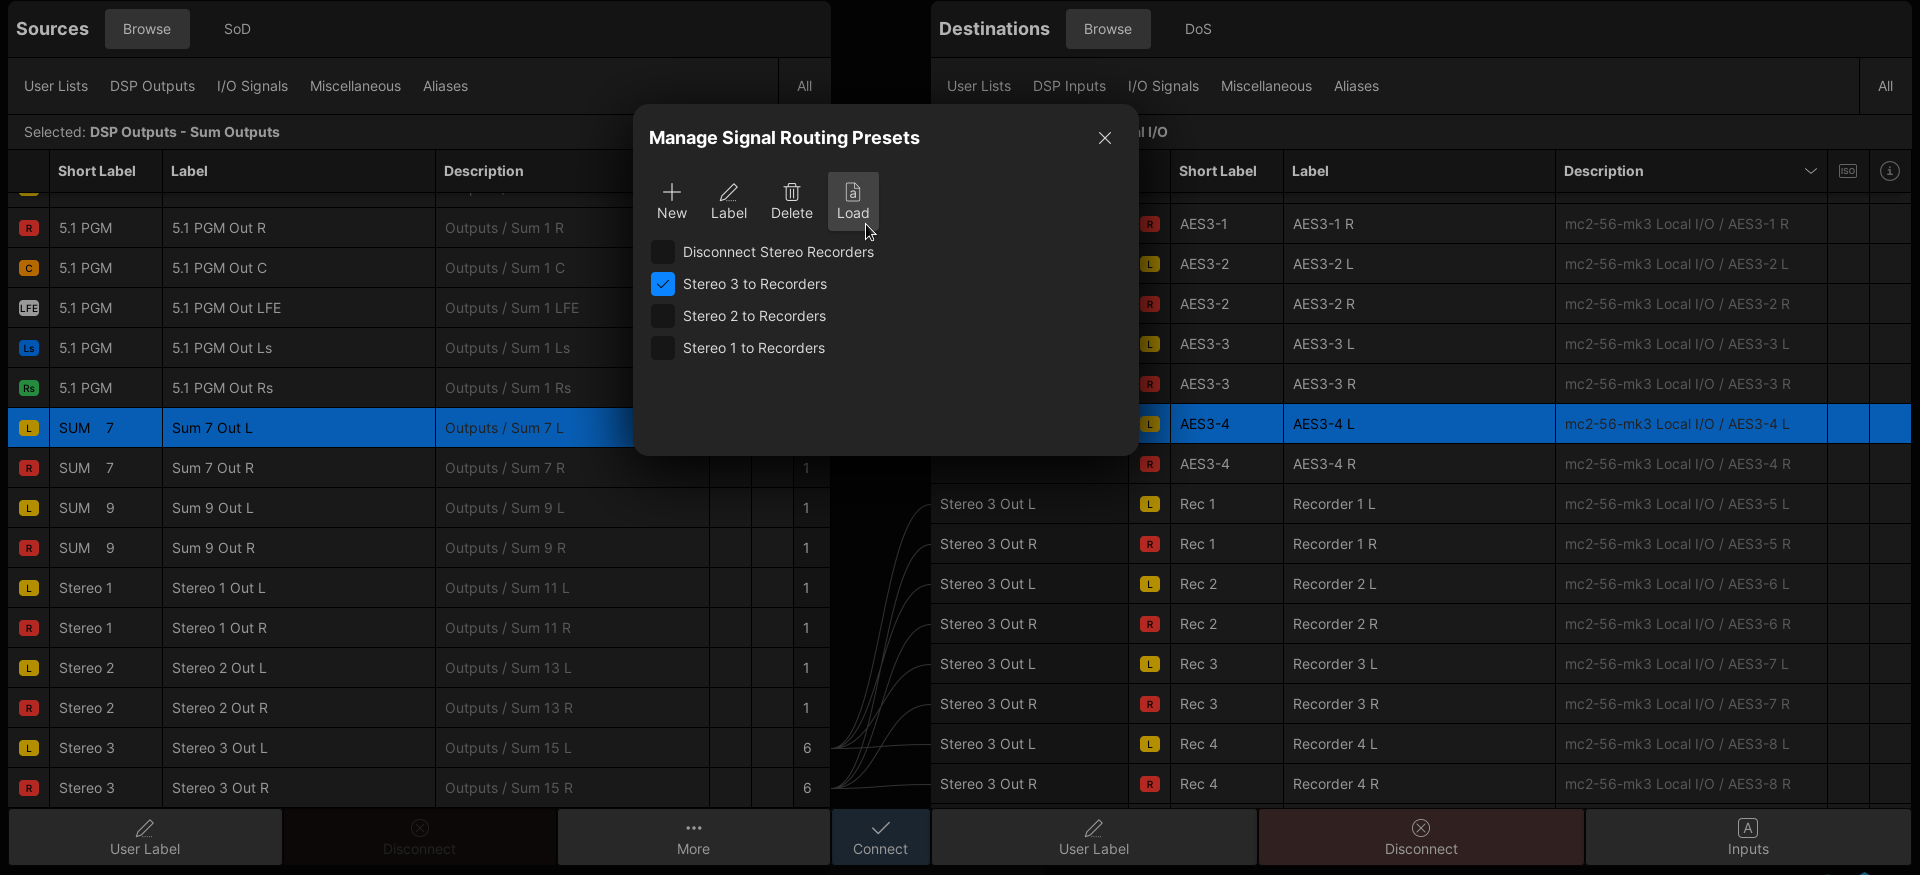
Load a Preset
The presets are loaded from the Signal Routing Presets management window.
- Select Manage Signal Routing Presets (from the More... options) to open the window.
- Select the preset you wish to load (e.g. Stereo 3 to Recorders).
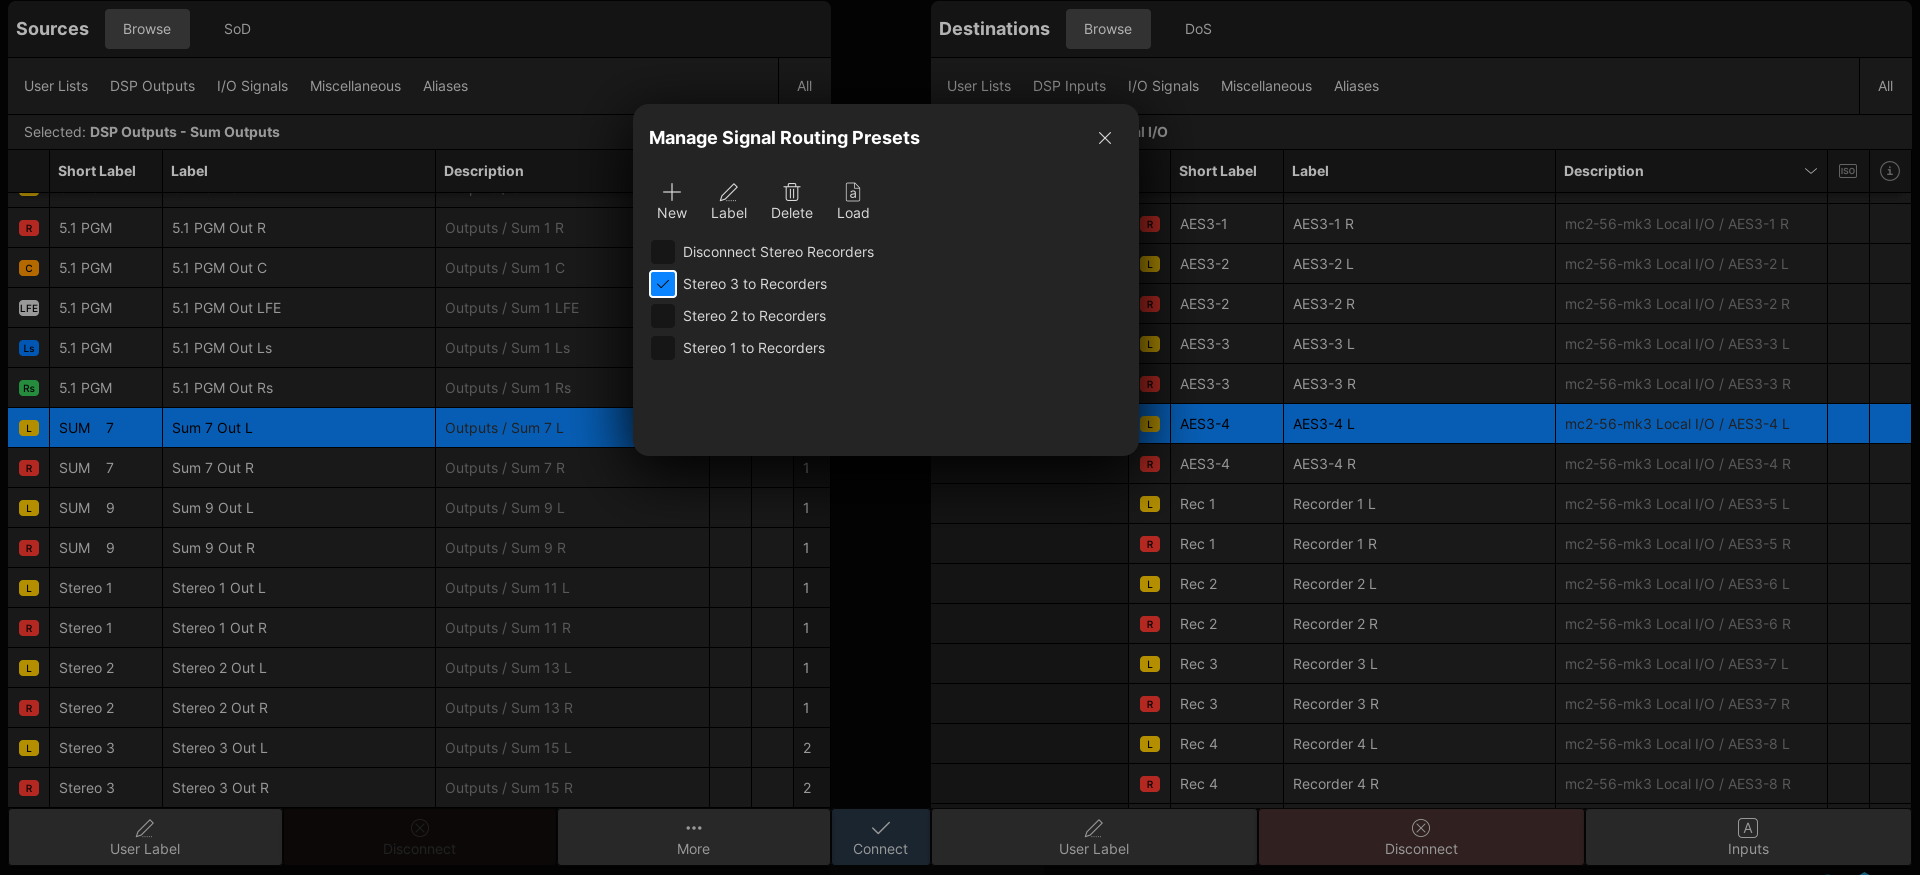
- Then select Load.
- If the destinations are in view, then you will see the Connected Source fields update.
Manage Signal Routing Presets
The management window is opened by choosing Manage Signal Routing Presets (from the More... options).
From here, you can perform the following operations:
- New - creates a new (empty) preset. You are asked to enter a Label.
- Label - edits the label of the selected preset.
- Delete - deletes the selected preset.
- Load - loads the selected preset.