Dynamic Attachment Scripts - DAS
FAQ Dynamic Attachment Scripts
What are Dynamic Attachment Scripts?
Dynamic Attachment Scripts allow the configurator to create sophisticated panels with dynamic and context dependent visualization and functionality.
Do I have to use DAS?
No, a lot of workflow can be visualized using the standard panel buttons.
Is DAS a programming language?
No, not really. Despite having similarities to programming languages, DAS is not a programming language and does not contain classical elements of programming languages like loops or types. DAS is more like explaining how to get to the next train station: “Take the first left, then the fifth right… oh, and if you see a Taxi – take it”.
Is it difficult to learn?
As computers go, DAS will do exactly what you tell it to do. So at the beginning the biggest problem is not learning the actual DAS syntax, but to learn how formulate the actual problem.
It is generally the best to build up the scripts step-by-step in a controlled environment.
Not everything that you can do with “Dynamic Attachment Scripts” must make sense. Think about every step and perform critical testing. Not doing so might lead to unwanted, even bizarre results.
Always spend a few moments testing for the situations that you are not expecting, like no target selected or wrong and unexpected sources.
- Check for cases where the signal paths have different lengths depending on if or if not e.g. processing has been inserted.
Always remember that users can break anything.
If the script becomes longer than a few lines (e.g. 5), this is mostly a sign of a bad script.
Scripts do use CPU time - CPU time is valuable.
Have a few Aspirins ready – just in case…
Using Dynamic Attachment Scripts
Editing
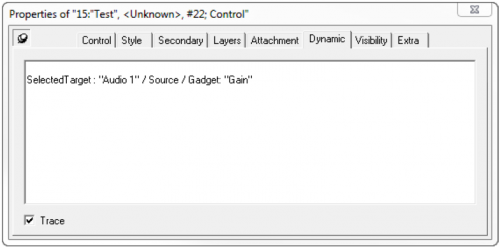
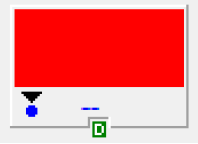
The DAS is edited using the DAS editing field which is accessible through the property box when a panel button or a panel page item is selected. Once a script has been entered the button will display a green D.
Tracing
Checking the “trace” check box in the lower left corner will send information about the script processing to the CommTrace application. This will give comprehensive feedback of how exactly the script resolves the dynamic attachment. When DAS trace is enabled on a button the button will show a red D.
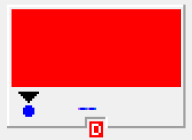
Remember to disable trace once the script has been tested. Having two or more scripts tracing to CommTrace makes reading the output difficult and also has the potential of slowing down the system unnecessary.
When are Dynamic Attachment Scripts processed?
It is important to remember that the system only processes scripts when the button or page item which contains the script is actually potential visible on an active hardware panel or vsmPanel.
If the above condition is met, then the DAS will be processed whenever:
The script is edited.
A user presses a button on the panel which navigates or changes the selection.
A signal assignment changes.
An object, which has been referred to by the script, changes its state.
Additionally, the system may re-process the DAS at any time when it “feels” the need to do so, based to its internal database of dependencies.
Do not attempt to write scripts that assume any sequence or timing.
How are Dynamic Attachment Scripts processed?
Assuming that the script does not contain any syntactical errors, the scripts are processed line by line, until the goal has been reached: To find a new [dynamic] attachment.
A script may contain multiple different ways to find a new attachment – once one has been found the processing ends and this new attachment is used (Or analogue to giving somebody two ways to get to the next station – he won’t try the second it the first got him there).
What if no new “Attachment” can be found?
If the script reaches the end of the script without finding a new attachment, the system uses the default attachment. The default attachment is whatever attachment has been specified by the configuration when the button or the page item was created. So for example, a source button might have been created by dragging the MUTE signal onto the button. This signal becomes the button’s default attachment. Therefore the button will fall back to become the MUTE source button if the script cannot find an alternative signal to display.
What does this {null} mean?
While testing scripts, using CommTrace, the expression {null} will be visible quite often. This generally indicates that the preceding keyword did not result in any usable e.g. signal. As a result of this, processing of the current script line will be ended and continues on the next line.
Example Script:
SelectedTarget / Source
If the user has not selected any target on the panel yet or has pressed the escape button, the trace might look like this:

Once the user selects a target, the trace might look like this:
![]()
The yellow keywords are the processed keywords; results are displayed in cyan and not processed keywords are displayed in grey.
In the first trace, the greyed keywords indicate that these were not processed further as there is no point trying to find the source of {null} aka “nothing selected”.
Can DAS change the function of a button?
No, the originally assigned function of the button cannot be modified by the script.
This said, a script can change the visibility of a button, thereby allowing, e.g., in dependency of a context, a button to be hidden or shown. This can be used to create the illusion of a button changing its function.
Additional Aspects
Pseudo Devices
A lot of DAS are built around pseudo devices e.g. to display and modify audio channels associated with video signals. Two important aspects must be kept in mind regarding pseudo devices:
Only the bound pseudo device is accessible via DAS. Also, the pseudo device columns are accessed by name: Changing the name of a pseudo device column will effectively destroy the relationship between the scripts and the columns and the scripts will have to be edited accordingly.
Meta Links
Meta Links or Metas (former known as Meta Gadgets) allow Gadgets, GPIs, Storage Groups, Signals and more to be logically linked to a Signal. These can be accessed by the script. As with the pseudo devices, access is by name and the same considerations regarding renaming apply (see above).
Combining DAS with “jump to ‘this’ page” buttons
While possible, using dynamic attachments on control buttons with the “jump to ‘this’ page” option is very challenging to say the least. Bear in mind, that the script is only processed when the button’s page is visible and will retain the last attachment until visible again. Also there is a miniscule but possible chance that the user might navigate past the buttons visible phase before the DAS has a chance to be processed.
Using DAS with Secondary Commands
It is possible to modify the button’s secondary commands with a DAS. See chapter "Interacting with Secondary Commands" for more information.
Language Elements
Reserved Keywords and Symbols
The following is a list of reserved keywords and symbols that are ether implemented or simply reserved for future use (keywords currently implemented are shown in bold):
' | - | -- |
|---|---|---|
! | $ | |
% | & | && |
( | ) | * |
, | . | |
: | ; | ? |
@ | ||
^ | ||
| | || | |
~ | + | ++ |
<= | ||
| = | == | |
>= | >> | |
alias | as | |
bool | ||
break | Button | |
byte | ||
catch | char | |
common | ||
const | ||
delete | do | |
error | ||
Find | ||
float | for | |
forward |
| |
in | ||
int | ||
label | Layer | |
new | ||
object | ||
Parent | Parked | |
Pooled | ||
| read | |
return | rsn | Select |
string | ||
Tag | ||
throw | to |
|
try | ||
until | Use | |
void | Where | |
while | ||
Keywords marked struck through are obsolete and should not be used. These will become dysfunctional in the future.
Upper- and Lowercase
All keywords, variable names and named references are non-case-sensitive, therefore writing “Meta”, “META” or “meta” will all mean the same. Some joined keywords like
“SelectedTarget” are written with capitals to increase the readability and it is recommended to use the same writing style.
The Slash character
The slash ( / ) is used to join a sequence of keywords within an expression.
The Backslash character
The backslash ( \ ) is used to join two or more lines into one. For this, the \ has to be the very last character at the end of the line which is to be joined to the next:
Active	= $panel.sr1 / meta: "X1" is true \
		or $panel.sr1 / meta: "X2" is true
Names containing spaces
Sometimes, e.g., when accessing Meta Links or Pseudo Device Columns, the name contains spaces. In this case this name must be surrounded with quotation marks “…”. For example, to access a Meta Link called Frame Sync, the name must be written as “Frame Sync”. For the sake of readability it is recommended to place all names in quotation marks all of the time, this makes it easier for the casual reader to identify names from keywords.
Naming of Variables
Variable names should begin with an underline ( _ ) or a valid alphabetic character. The following characters may be both alphabetic and numeric as well as an underline ( _ ). The name may not contain any spaces or any of the reserved symbols.
Valid variable names:

Invalid variable names:

Although all words not contained in the reserved keyword list, may be used as variable names it is strongly recommended to use the underline character " _ " to prefix variables. E.g. to write _myVariable. This also increases the readability and reduces the risk of clashing with newly introduced keywords at a later date.
Use of Variables
Variables are used in DAS to ether increase readability by spitting elsewise long lines into more manageable parts or to store information for later use. Variables are persistent on a per button or page item base.
There is currently no way to share information across buttons.
Example, script without variables:

Same example, but script with variable:

Language Reference
Syntax used in this document:
| [ optional ] | Information in Square Brackets is optional |
| < parameter > | Pointy Brackets indicate required information |
| { object type } | Curly Brackets indicate the object type that the keywords following may be applied to. |
Special Keywords
If, Elseif, Else and Endif
The keywords If, Elseif, Else and Endif provide the base for conditional operations. Please note that most DAS do not require any conditional operations due to the way the processing will be ended when an attachment has been found. Simply try the least likely first.
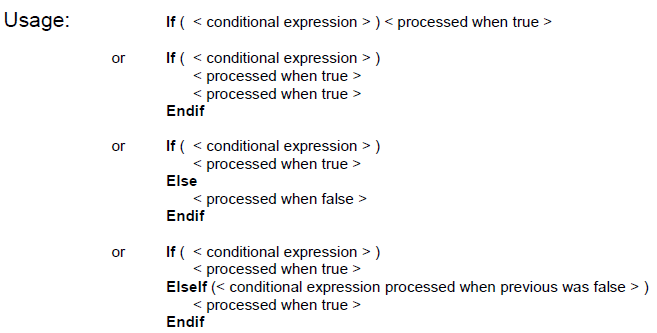
If the conditional expression is true, the corresponding expression will be executed. The expression is considered true when it results is a valid signal or other object. The expression is considered false if its result is {null}. The If statement can be nested and as many ElseIf as needed can be added to an If statement. When using the one-line version (see below) no EndIf needs to be added, in all other cases an EndIf must conclude the If statement.
Examples:

Trace
(obsolete Keyword)
Usage: Trace [comment]
The trace keyword will activate the trace to CommTrace and is generally placed on the first line. The trace keyword should be removed from the script when the evaluation and testing of the script has been completed.
The trace keyword is no longer required, as the trace check box in the property box offers a far better option. The trace keyword should be removed from all scripts!
Trigger
Usage: Trigger
This keyword sets a signal which indicates that once the script completes, the system should trigger the execution of secondary commands which have had the secondary condition set to “DAS Trigger”.
In case of abusive or careless use of this keyword, massive amounts of operations could be triggered. As a countermeasure, the system will only trigger the secondary commands when the trigger keyword is called the first time or when the previous script processing did not call the trigger command.
xConnect
Usage: xConnect
This keyword sets a signal which indicates that once the scripts completes, the system should attempt a connect operation on the resulting node.
As a protection against endless self-triggered reparsing of the script due to the resulting connection, the connection will not execute if the connection is already made. Also, if the xConnect command does trigger connections too frequent the script might be suspended.
Expressions – Starting Points
Every expression needs a starting point, e.g. a signal or object to begin with. One of the most commonly used starting points is SelectedTarget which will return the target currently selected on the panel. Beginning with the starting point, the scripts instructs the system how to “walk” the signal path, meta links or pseudo devices to find the desired attachment.
Attached
Usage: Attached [ /… ]
This selects the button’s original default attachment.
Collection
Usage: Collection: “<name>” [ :…]
Selects a collection specified by name. Results in {null} if no collection with the specified name could be found. Collections can contain signals or other components and are application specific (Documentation is provided only when required).
ConnectedSource
Usage: ConnectedSource [ /…]
This selects the source that is connected to the target currently selected on the panel. It is {null} if no source is connected or no target is selected. An alternative way to express this would be to write SelectedTarget / Source.
Current
Usage: Current [ /… ]
This selects the dynamic attachment that has been evaluated by the script during the previous parse.
LinkedTarget
Usage: LinkedTarget [ / … ]
This selects the signal that was transferred to this panel via the “panel link” button using the “Transfer selected Target to other panel” option.
SelectedComponent
Usage: SelectedComponent [ /… ]
Selects the component, but not signal, that a user might have selected on the panel. This might be a gadget parameter or a Node (cross-point). It is {null} if nothing has been selected or the selected component is not a gadget parameter or node.
SelectedGadget
Usage: SelectedGadget [ /… ]
This selects the gadget parameter that a user has selected on the panel. Returns {null} if nothing has been selected or the selected component is not a gadget parameter.
SelectedNode
Usage: SelectedNode [ /… ]
This selects the node (cross-point) that a user might have selected on the panel. Returns {null} if nothing has been selected or the selected component is not a node.
SelectedSource
Usage: SelectedSource [ / …]
Selects the signal currently selected as source, but not connected, on the panel.
It is very important to realize that this is the source that the user has selected and not the source currently connected to the target which is currently selected on the panel. When the user selects a new source by pressing a button, this becomes the return value of SelectedSource until the source becomes the source of the selected target. On a panel without a TAKE or an ENABLE button this might only be the case for a few milliseconds, after which SelectedSource will return {null} again.
SelectedTarget
Usage: SelectedTarget [ / … ]
Selects the target currently selected on the panel. This is the most common starting point for dynamic attachment script.
SelectedTargets
Usage: SelectedTargets [ / … ]
This selects a collection of all targets currently selected by the user (Most likely using the multi-target or the multi-target from source buttons).
SubPanel
Usage: SubPanel(<Sub Panel Number>) [ / … ]
Changes the context from which panel context information is retrieved. Can be used to e.g., to retrieve the SelectedTarget from a different subpanel. The number corresponds with the number displayed in the editor. Additionally, the number 0 refers to the outside panel.
Expressions – Modifiers
After establishing a starting point it is possible to “walk-around” in the dependencies of the components e.g. find the source of a signal or get an associated gadget parameter. Most of these modifiers are specific to the type of component that is currently selected. If a modifier cannot be applied to a component type, the result will be {null} and parsing is continued in the next line.
And
Usage: <conditional expression> And <conditional expression> [And…]
This results in a {true} if the left and right hand expressions are true. Mostly used with if statement.
Bound
Usage: {object} / bound [ /… ]
This will instruct the script to accept and use the right hand result even if it is {null}. The default behaviour would be to a) continue operation and b) use the default attachment if at the end if script execution the result is {null}. Yet, in some cases, e.g. when retrieving a pseudo device, the fact that there is none is a valid and usable information.
CardinalSource
Usage: {Signal} / CardinalSource [ /… ]
This selects the next source up the signal path, which is marked as cardinal by the cardinal attribute or has no further source. The cardinal attribute is used to mark signals that have a special significance to the workflow making it easier to locate them with DAS.
Connected
Usage: {node} / connected [ /… ]
This will result in {null} if the specified node’s source and target are not connected. If the source and target are connected then the result is the specified node.
Connected to blind
Usage: {signal} / connected to blind
This will result in {null} if the source is not the signals default blind. If the signal is connected to the signals default blind, the result will be that signal.
When testing if a signal's source is blind, consider using "... / connected to blind" and not "... /source is blind".
Why?
is blind only checks if a signal is configured as a blind source, whereas connected to blind checks if the target is connected to it's blind source, which can be the signals layer blind or the signals default blind, the latter might not be a signal marked as blind.
Contains
Usage: {Collection} / Contains [ … ]
Results in right hand object if this object is contained in the left hand collection. If it is not in the collection the result is {null}.
EffectiveSource
Usage: {Signal} / EffectiveSource [ /… ]
This selects the effective source of the currently selected signal. This is the signal which would generally be displayed on e.g. UMDs.
false
Usage: false
This results in a {false}. Mostly used with conditions and to control the visibility or enable state of an item.
FarSource
Usage:
{Signal} / FarSource [ /… ]
{Signal} / fSource [ /… ] (obsolete Expression)
This selects the source at the far source end of the signal path. This will walk up the signal path until it finds the signal which has no further source itself.
Follow
Usage:
{parameter} / follow = {parameter}
{parameter} / follow = null
This instructs the left parameters to follow any change to the parameter on the right. Specifying the keyword null instead of a parameter will revoke the dependency. The follow dependency is established in the parameter; therefore the dependency will remain even if the button that established the dependency is no longer visible. Also it means that only one panel should attempt to create or modify a follow dependency of a given left hand parameter.
Gadget
Usage: {Gadget or Parameter} / gadget: "../path/to/other/parameter"
Allows to navigate the gadget tree starting from a given gadget or gadget parameter.
A starting point for the navigation could be for example a statically attached parameter or a meta gadget:
Attached / gadget: "param2"
SelectedTarget / meta: "myGadget" / gadget: "../otherGadget/param"
The path consists of a series of gadget or parameter identifiers separated by forward slashes.
To see identifiers in the Gadget Explorer, right click a tree item and select "Show Identifiers".
Right-click and "Copy Path to Clipboard" also produces a compatible path (which has to be made relative to the chosen starting point).
It is not possible to traverse from one root level device into another root level device.
The special elements "." and ".." can be used to describe the current and the parent gadget, respectively.
If the input is a parameter, the navigation will start on the gadget that contains this parameter.
If a gadget has both, a child gadget and parameter with the same name, the parameter will be chosen for the last element of a path, and the child gadget will be chosen for all other elements. To select the gadget append "/." to the path.
For example, given this gadget tree:
root
+- device1
+- thing 1
+- param 1 = 10
+- param 2 = 20 +- thing 1
+- thing 2
+- config 1 = "input"
+- config 2 = "output"
+- thing 3
+- color
+- hue = 270color
+- saturation = 100 +- color
+- color = FF00FF
+- device2
+- something else
+- param 1 = 10
+- param 2 = 20
Assuming that 'device 1/thing 1/param 1' is used as a static attachment, then the following lines would all produce valid results:
Attached / gadget: "param2" [returns "param 2"]
Attached / gadget: "./param2" [same result, as "." denotes current gadget, which is "thing 1"]
Attached / gadget: "../thing 3/color" [returns the "color" parameter]
Attached / gadget: "../thing 3/color/hue" [returns "hue" as "color" selects the gadget]
Attached / gadget: "../thing 3/color/." [returns the "color" gadget]
But the following will not work as it attempts to traverse from device to device, crossing the root boundary:
Attached / gadget: "..\..\device 2\something else\param 2"
Gadget commands can also be chained:
Attached / gadget: "../thing 2" / gadget: "config1"
For debugging purposes, CommTrace will highlight the path that was evaluated, using the same logic as the other DAS tracing.
For example, given the regular DAS script:
SelectedTarget / source / meta: "x"
If there is no source connected, "SelectedTarget / source" will be highlighted and "meta: "x"" will be greyed out, because it was not evaluated. The result of "source" will be "{null}".
Similarly, given this DAS line:
Attached / gadget: "../device2/foo/settings/param"
The part "../device2/foo" will be highlighted and the part "settings/param" will be greyed out, because it was not evaluated.
The result will be "{null}", since "foo" was not found.
Has
Usage: {object} has <condition>
Results in left hand object if the condition is met. If not the result is {null}.
Valid conditions:
{signal} has Inserts - true if signal has active inserts / processing.
is
Usage: {object} is <condition>
Results in left hand object if the condition is met. If not the result is {null}.
Valid conditions:
{signal} is Used | - true if signal is used [by a target] |
{signal} is Locked | - true if signal is locked |
{signal} is Blind | - true if signal is a blind source |
{signal} is Cardinal | - true if signal is a cardinal signal |
| {signal} is cardinal:<"identifier"> | - true if signal has the specified cardinal identifier |
{gpi} is true | - true if gpi is active |
{gpi} is false | - true if gpi is inactive |
{node} is connected | - true if node’s target and source are connected |
{parameter} is online | - true if parameter is online |
{parameter} is offline | - true if parameter is offline |
Meta
Usage:
{Signal} / Meta [ /… ]
{Signal} / Gadget [ /… ] (obsolete Expression)
Not
Usage: not <…>
This will invert the Boolean result of the right hand operation.
Null
Usage: null
Results in {null}. Mostly used within conditions when a variable has to be set to {null}.
Or
Usage: <conditional expression> Or <conditional expression> [Or…]
This results in a {true} if the left or right hand expression are true. Mostly used with if statements.
PhysicalSource
Usage:
{Signal} / PhysicalSource [ /… ]
{Signal} / pSource [ /… ] (obsolete Expression)
This selects the physical source of the currently selected signal. Within the system, a lot of signals can be virtual signals which abstract the use of the actual physical signals, using the PhysicalSource keyword will side-step any virtual signals and select the effective physical source.
Pool
Usage:
{Signal} / Pool : “<name of pool>” [ / <access> ]
{Signal} / Pool ( {layer qualifying signal } ) : “<name of pool>” [ / <access> ]
Retrieve a pool entry from a signal, where “name of pool” corresponds to the name of the pool as specified in the configuration’s pooling settings. If the signal is a source on multiple layers it might be necessary to qualify which layer is meant, this is done by specifying a signal which is on the layer required – in the most cases this ends up to be the starting point used in the current line. Once a pool has been retrieved, use source to access the signal’s internal pool source signal, target to access the signal’s internal pool target signal or inserted to access the signal inserted into signal’s pool entry.
RawSource
Usage: {Signal} / Source [ /… ]
This selects the primary source of the currently selected signal, including any internal, tie-lines or processing signals.
Search
Usage: {Signal} / Search [scope] <condition>:<search string> [/…]
Where: scope: primary | physical
condition: label[(<number>)] | meta | cardinal | family
This will search a signal path, starting and including the signal specified back to its source. By default, all primary sources will be iterated through (the keyword primary can be omitted), this includes all none tie-lines signals including virtual signals and internal signals. Specifying physical will iterate over physical signals including tie-lines. Each signal will be checked for a match depending on the specified condition. The condition meta will check if a signal has a meta with a matching alias and when a match has been found, the meta attachment is selected and the search iteration ends. The condition cardinal will search and select the signal which has a matching cardinal identifier. The condition label will search and select the signal which has a matching label. If no label number is specified, the primary label is used. The condition family will search and select the signal which has a matching family (both family name and short are checked).
The Cardinal Identifiers can be applied to multiple signals during signal creation and later also from the signal list using the context menu Advanced / Edit Cardinal Identifiers.
Source
Usage:
{Signal} / Source [ /… ]
{Node} / Source [ /… ]
This selects the source of the currently selected signal or node. In the case of a signal this will be the source most commonly understood by the user as the source which means any tie-lines, internal signals and processing is skipped.
Target
Usage: {Signal} / Target [ /… ]
This selects the least recently connected target of the currently selected signal.
true
Usage: true
This results in a {true}. Mostly used with conditions and to control the visibility or enable state of an item.
xSwap
Usage: {Signal} / xSwap [ /… ]
The xSwap keyword swaps the target / source usage when accessing pseudo device rules.
The default access to pseudo rules starts on the target side. This is because the most common starting point in DAS is the selectedTarget keyword, where pseudo-rule access typically is the target's target pseudo-rule. Consequently, all other accesses to signals which are initially retrieved via starting point keywords like selectedTarget, attached, current or variables will also default towards using the target side rule.
Conveniently, using keywords like source will implicitly do the xSwap for you, knowing that the next access to the sources pseudo rule will be most likely on the signal's source side.
selectedTarget : "Audio 1"
-> accesses "audio 1" of the target rule of selectedTarget
selectedTarget / source : "Audio 1"
-> accesses "audio 1" of the source rule of the source of selectedTarget
selectedTarget / source / xswap : "Audio 1"
-> accesses "audio 1" of the target rule of the source of selectedTarget
$panel.SR1 : "Audio 1"
-> accesses "audio 1" of the target rule of the signal in $panel.SR1
$panel.SR1 / xswap: "Audio 1"
-> accesses "audio 1" of the source rule of the signal in $panel.SR1
But if a signal is a source only signal, why does it not automatically use the source rule?
If we did that, access to the signal’s pseudo rule would become non-deterministic. The script author could no longer reliably know whether xSwap is needed, because current (or any other starting keyword) might refer, depending on the situation, to a target, a source, or a through-signal. Keeping the default on the target side, and requiring an explicit xSwap when needed, ensures consistent and predictable behavior.
xTarget
Usage: {Signal} / xTarget [ /… ]
This selects the 1:1 target of the currently selected signal. When using 1:1 emulation both a 1:1 target and 1:n targets can be connected to a source at the same time. This keyword will retrieve the target that is used for the 1:1 connection.
<<
Usage: {target signal} « {source signal}
This results in a node that corresponds with the specified target and source signal. This can be effectively be used to construct nodes from independent object sources e.g. from the original button attachment and a source of the selected target. This is very powerful together with secondary commands.
==
Usage: {object} == {object}
{parameter} == “string”
This results {true} if the left and right objects are equal or if the parameter’s value equals the specified string.
!=
Usage: {object} != {object}
{parameter} != “string”
This results {true} if the left and right objects are not equal or if the parameter’s value does not equals the specified string.
Expressions – Assignments
Some commands are assigned similar to variables:
Activate = {parameter}
At the end of the script the system will attempt to activate the specified parameter on the panel. This parameter will receive user changes e.g. via a rotary encoder.
Active = {object}
The button’s active state and color will follow the state of the {object}, where {null} or {false} will be inactive and {true} or any valid object, signal or parameter will be active.
The active state is not persistent and has to be re set every time the script is processed or the active state will revert to the default behavior.
Enable = {object}
The button’s or panel item’s enable state will follow the state of the {object}, where {null} or {false} will be disabled and {true} or any valid object, signal or parameter will be enabled.
The enable state is persistent and will only change if the script actively changes it.
Source = {object}
If the button is a control button this will modify the control buttons node’s source.
To simulate the scripts normal end when goal found behavior, the target can only be modified by the first none {null} object.
Target = {object}
If the button is a control button this will modify the control buttons node’s target.
To simulate the scripts normal end when goal found behavior, the target can only be modified by the first none {null} object.
Visibility = {object}
The button’s or panel item’s visibility will follow the state of the {object}, where {null} or {false} will be invisible and {true} or any valid object, signal or parameter will be visible.
The visibility state is persistent and will only change if the script actively changes it.
Interacting with Secondary Commands
It is possible to combine secondary commands with DAS on panel buttons. In order to do so the secondary command must be prepared in two steps:
Creating the secondary command entry
First, add a Secondary Command entry using an appropriate object, which is going to act as the template for the dynamic assignment. This should be an object e.g. a gadget parameter that matches the type and usage of the dynamic attachment that should later be controlled.
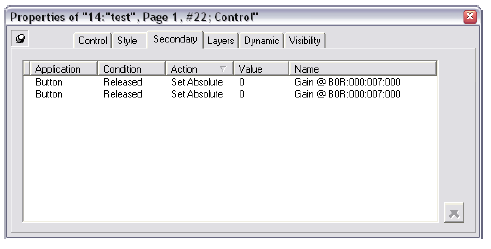
The template entry will never be actually used when the secondary commands are executed. If the DAS provides a dynamic attachment which is {null} or inconclusive e.g. is a different object type, the entry is skipped.
Assigning the DAS alias
Using the drop-down menu, select “Assign DAS Alias” and enter an alias into the field.

The alias provided is the binding link between the DAS and this secondary command. The alias is case insensitive, but correct spelling must be assured.
Assigning the attachment from the script
Now it is possible to write a DAS which will provide a dynamic attachment for this entry. A DAS statement corresponding with the above secondary command might look as follows:
“Gain Left” = SelectedTarget / Source / Meta: “Gain”
Please note the quotation marks around “Gain Left”. This is necessary due to the space contained within this alias. Any alias what contains spaces or other non-alphabetic characters must be enclosed within quotation marks for simple words they may be omitted.
Further example:

The matching Secondary Commands:
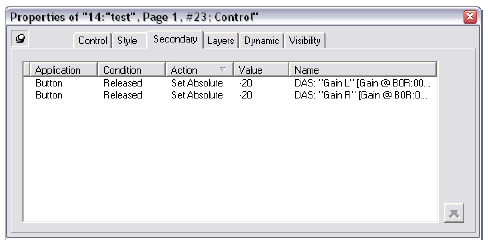
As advised before, it is recommended to add an underline character ( _ ) at the beginning of all variables to avoid conflicts with predefined keywords. Also the above use of spaces, thou possible, was only done for demonstration purpose.
DAS triggered secondary commands
It is possible to have dynamic attachment script trigger a secondary command. In order to do this the secondary command’s condition must be set to “DAS Trigger”.
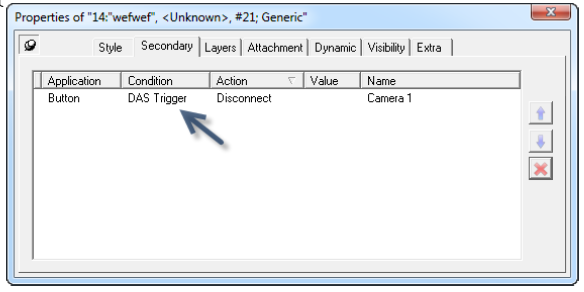
In the example above the secondary command will disconnect the signal “Camera 1” when triggered from the DAS. Script triggered commands can also be dynamically assigned secondary commands as described in the previous chapter.
The secondary commands with the condition “DAS Triggered” are executed after the script parses the Trigger keyword. In the case of abusive or careless use of this keyword, massive amounts of operations could be triggered. As a countermeasure, the system will only trigger the secondary commands when the trigger keyword is called the first time or when the previous script parse did not call the trigger command.