Interface - Sony Video Mixer
Guide to setup a Sony Mixer setup
Editing the System Registry incorrectly can cause serious issues that may require you to reinstall the operating system. We cannot guarantee that problems resulting from the incorrect use of the Registry Editor can be solved. Use the Registry Editor at your own risk.
Devices
List of required devices:
PWS-110 - Professional Workflow Station
MKS-x2700 - System Interface Unit
MVS-6000 - Switcher
MKS-7011 - Touch screen Menu Panel
Please note that the description is referring to the hardware listed above, but it may well fit with other combinations, especially different switcher hardware.
Device Installation
Install the devices in the server rack and connect them as described to a dedicated switch. Connect a PC to this switch and find out the IP address of the Maintenance Menu. Login into the Maintenance Menu using the following credentials:
- Maintenance Menu
- Login: user
- Password: password
(Please use credentials as provided for your local setup)
Now configure the network IP so that we can connect to the Setup using VSM. LAN1 is used to connect the Sony devices & LAN2 is used to connect to the rest of the network. Navigate to the Network settings and configure Lan2 port with an IP that is usable within your network, e.g. "10.1.234.67"
Once this is configured you can connect the device to your network using the LAN2 port.
The other menu entries can be accessed with:
- Login: Admin
- Password: [empty]
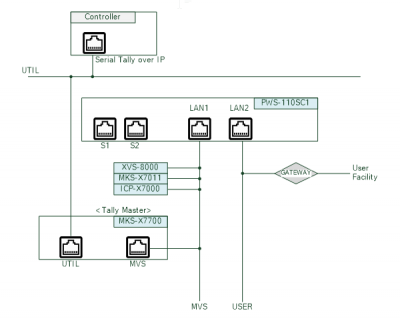
Connecting the Smarthub
- SERIAL TALLY 1, 2
- RS-422A (D-sub 9-pin, Female)
- <CONTROLLER>to Tally Interface Unit
| Pin No. | Signal Name | Function |
|---|---|---|
| 1 | FG | Frame ground |
| 2 | RX_ | Received data (_) |
| 3 | TX+ | Transmitted data (+) |
| 4 | GND | Common ground |
| 5 | _ | No Connection |
| 6 | GND | Common ground |
| 7 | RX+ | Received data (+) |
| 8 | TX_ | Transmitted data (_) |
| 9 | FG | Frame ground |
Connect a cable to the editor port and to an SmartHub RS422a port that follows the above scheme. Use the settings below to configure the SmartHub port.
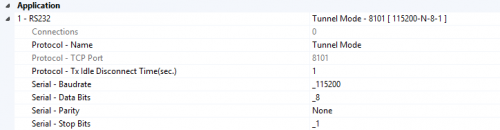
Settings:
- Protocol name: Tunnel Mode
- Baud rate: _115200
- Data bits: 8
- Parity: none
- Stop bits: _1
Creating the vsmStudio Communication Port
- press “new”
- select - mixer - sony - mvs xxxx - Tally via editor port (see if you can match your model but otherwise select one of the mvs entries, doesn't matter which)
- press “next”
- press “New Port, then set the fields:
- Description: name
- Type of Port: TCP Outbound
- Remote IP address: SmartHub IP connected to the Sony setup
- Port : Port number shown on the SmartHub connection ex. above is 8101
- press “Ok”
- Cancel the port setup dialog.
- Open the registry editor. Find the comm. port entry in the following path:
Computer\HKEY_LOCAL_MACHINE\SOFTWARE\WOW6432Node\VirtualStudioManager\vsmStudio\Ports - Select the port entry used for the setup. Right-click and select rename, add “Tunnel” to the name and save the change.
- Create the communications port again using the steps above, and use the tunnel Port.
- Press “ok” to complete the process. Now the connection to the SmartHub is completed and can be used by VSM.
The following video show an example setup process to an MVS 8000:
Setting up the Sony MVS
Now to finalize the setup on the Sony MVS using the Touchpanel menu.
Go to the following menus and change the settings:
Menu number Setting
| Menu number | Change |
|---|---|
| 7312 | master panel Tally |
| 7326.9 | change something here, can't quite remember what. |
| 7361 | set start address for SWR1 to source 1 destination 1 size 320*348 |
| 7362 | set group 1 |
| 7364 | only two lines “out 1 enable R1” and “out2 enable G1” all others delete |
| 7367 | serial 1 tally type R1 G1 256 bit |
After all these changes reboot the system to ensure that all the settings take effect.
Check that the Communication between vsmStudio and the Sony Mixer is correctly working by starting CommTrace.
Check for the » and «. These are the messages going back and forth.