Firmware - Exchanging Firmware
Introduction
This document explains how to manually exchange the firmware of a vsm hardware device without having physical access to it, assuming that the uploader of the device is still working. This process can especially be used to downgrade the firmware to a previous version.
This process needs to be fully completed once it is started. Do not start this process shortly before a lunch break or before the end of your work day, since leaving the device with wrong firmware can harm or destroy the hardware. Even if the process is quite straight forward, plan enough time (at least 30 min. - 1h) for the whole firmware exchange
Make sure network connectivity and electrical power are available to your vsmServer and to the hardware device throughout the update process. Do not use vsmDiscover while the update is running and make sure no one else in your network can possibly manipulate your hardware device through vsmDiscover during the update process! Applying changes via vsmDiscover, or removing network or electrical power connection may lead to device errors, that will necessitate a complex reset process, that can only be done by Lawo's vsm hardware production department.
Do not install firmware versions below 2.40 on LBP panels with device class identifiers starting from 42 (silver housing)!
Prerequisite knowledge
To exchange the firmware of your device, you will need its device class identifier (DCI).
Information about DCIs are available through support@lawo.com
You can only install a firmware onto a device, that matches the device's chipset. E.g. the older LBP panels work with an ATMega chipset (black housing), the current products have an ARM7 chipset (silver housing). Depending on the chipset, the devices have different DCI's. Information on the the chipset of your device can be gathered from:
vsmDiscover: In the Device Configuration view under Device, you'll find a Hardware Revision field.
Also in vsmDiscover, you can see, which Software Version is currently installed on the device.
In the internal network, find folder V:\vsmGear\Internal only\. Find the zip archive with the latest build number and open it. Here you'll find the PDF document vsmGear - Change Log and Version History.pdf
If you're still not sure, ask our Lawo vsmGear production department.
Downgrading a vsm hardware device is critical, since vsmGear will refuse to install a firmware, that is older than the currently installed version. Therefore, you will need to install the firmware for any other device from the same product family first, before you can actually install the downgrade. Examples for product families are LBP panels and protocol converters (like a SmartHub 111 or a GPI-O interface). So if you want to downgrade e.g. a LBP 17, you need to upload the software of any other LBP panel - e.g. LBP 32 - to you physical LBP 17 hardware, before installing the older actual LBP 17 software.
The software of SmartHub 2 devices or LTC interfaces cannot be exchanged with this procedure.
The exchange process
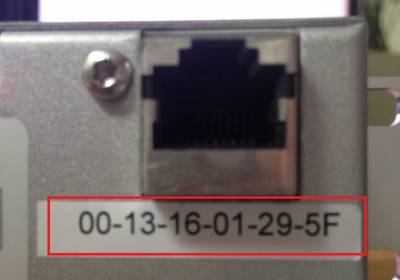
Find out the MAC-address of your device. You'll find it at the back of the housing of your device, close to the ehthernet port:

Find out the device class identifier of your device and - if you want to downgrade - also select a device class identifier of another device of the same family.
Connect your device to electricity and network.
Open vsmDiscover, press F5 or click on Discover → Start Detection.
Find your device in the device list. If there is more than one device of the same type in your network, use the MAC-address to identify yours.
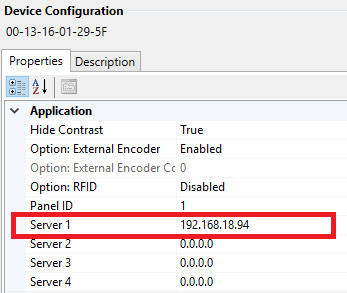
Click on it to view the Device Configuration details on the right. Find the field Server 1 and set it to the IP-address of your vsmServer.Fill in 0.0.0.0 for the other servers.

Finally, click Apply and check if the field Current Primary now also shows the IP-address of your vsmServer.
If everything is correct, CLOSE vsmDiscover.
- Open a text editor like the Windows notepad or Notepad++. Type in:
[Firmware]
<Device MAC or GUID> = <Device Class Identifier>
For example:
[Firmware]
00-13-16-01-29-5F = 4201
Again, you can find your DCI here: V:\vsmGear\Device Class Identifiers.pdf (Tip: For LBP panels with the latest chipset (silver housing) the DCI starts with 42). If you are performing a downgrade, enter the DCI of the foreign device of the same family (see 2.).
Save the File as Firmware.Patch.ini to e.g. the desktop of your vsmStudio server first (make sure, that the editor does not turn it into Firmware.Patch.ini.txt or something like that).
Go to the internal folder V:\vsmGear\Internal_only and find the zip archive with the build number you want your device to up- or downgrade to. (If you are performing a downgrade and you now want to install the foreign firmware, the version does not matter here).
But remember: Do not install firmware versions below 2.40 on LBP panels with device class identifiers starting with 42 (silver housing)!
Open the archive folder (you do not need to unzip it) and open the inner folder Firmware.Find the pFL file, that contains the DCI, that you also just entered into the Firmware.Patch.ini file. For our example this would be Firmware.4201.pFL. Copy and paste this file on your Desktop as well. You should end up with two files now:
Now it is time to double check, if everything is correct. Also it is advisable (even if not absolutely necessary) to close vsmStudio now.
Go to the installation folder of your vsmStudio copy and find the Firmware folder. Drop the two files Firmware.Patch.ini and Firmware.XXXX.pfL into this folder.
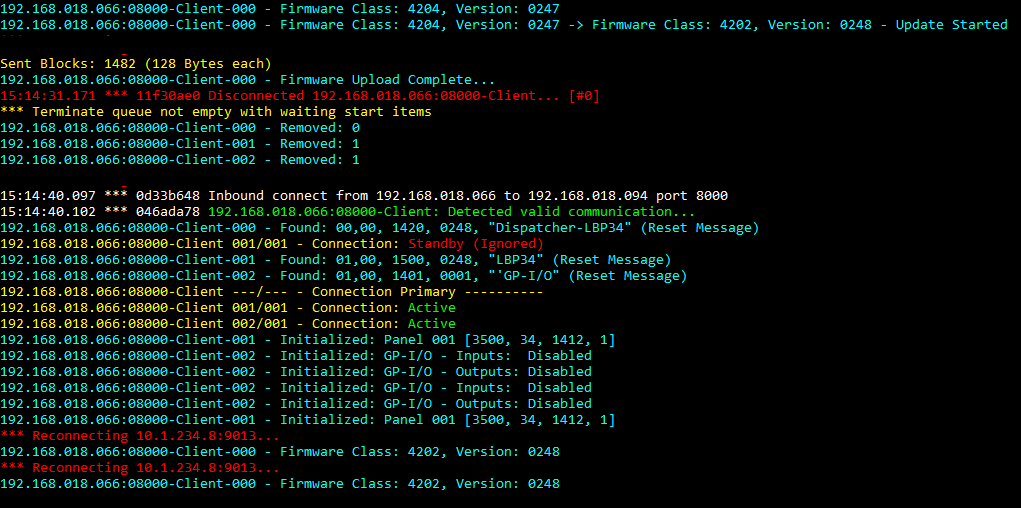
Warning: If vsmStudio is running here, it will execute the update immediately without further warnings or prompts.Start vsmStudio now (if not already open). The firmware exchange will be executed. You can follow this process in CommTrace and on the device itself (status LEDs, displays):
vsmStudio will remove line with the MAC-address and the DCI from the Firmware.Patch.ini file, after processing the update/downgrade.If you are performing a downgrade, now repeat the process from step 5. onwards with the actual DCI of your device and the respective pFL file from the software build, that you would like to use.
You can delete the two files from vsmStudio's Firmware folder, once the firmware exchange is completed.
The process of updating VSM panels and hardware does require incremental CPU, network and memory consumption of the vsmStudio application. Depending on the number of panels, the automatic update procedure can affect the overall system performance. Before starting to use a vsmStudio Server in a live production system please make sure to delete all firmware files within the firmware folders!
Firmware updates in a running system should be planned carefully and executed during dedicated service windows only. Alternatively panels may also be updated by connecting to any offline Server running vsmStudio with the respective firmware files in its local Firmware folder.


