Power Core - Create a New Project
This topic describes how to create a new configuration from scratch.
Please note: this method creates a very simple configuration that defines the device type and main license package only. You will need to configure all other elements manually: sources, sums, logical functions, etc.
For this reason, it is recommended to download and open one of the standard configurations as a starting point (to reduce the amount of configuration effort).
The 'New Project Wizard' can be used to produce a quick configuration for testing purposes or to start from a clean (empty) project.
Instructions
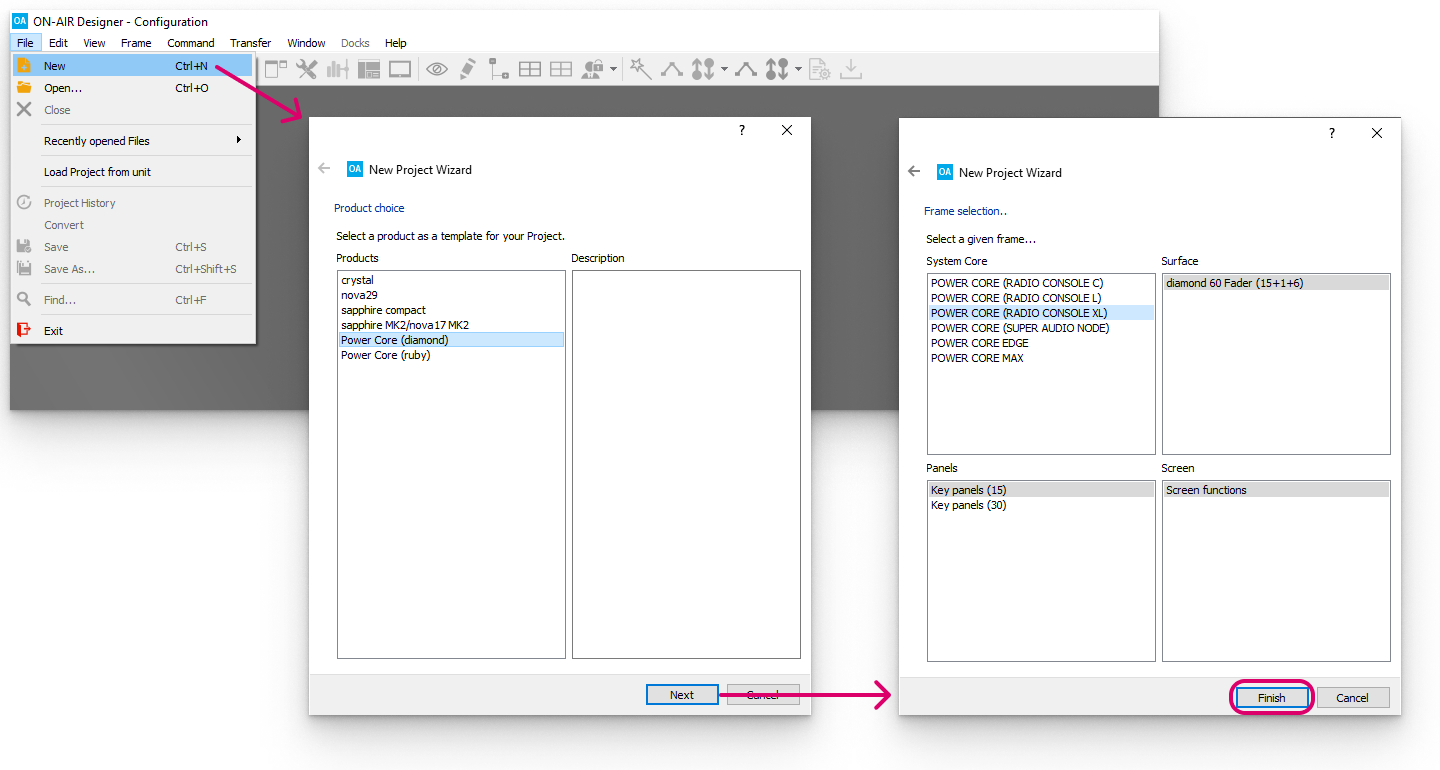
1. Open the 'New Project Wizard' using one of the following methods.
- Select File → New from the main menus.
- Click on the
 Toolbar icon.
 - Press CTRL + N on your computer keyboard.
2. Select your product type from the available options.
For diamond OR stand-alone Power Core systems, you should choose Power Core (diamond). If Power Core is connected to a ruby surface, choose Power Core (ruby).
3. Click on Next - the 'Frame selection' window opens.
4. Use the four 'Frame' areas to define the system as follows.
- System Core - defines the main license package. This must match the active license installed to the DONGLE port (as described earlier) or the license you intend to purchase.
- Surface - defines the maximum control surface size, where the numbers in brackets indicate the number of Fader Modules + Central Modules (full mode) + Central Modules (monitor mode). Please select the maximum configuration required.
- Panels - defines the maximum number of key panels connected to the system. Please select the maximum configuration required.
Screen - is always set to Screen functions to support VisTool functions.
The specification can be changed later (by selecting Frame → Change Frame). So, for example, if you purchase a larger main license package, you can change the System Core frame to unlock the additional resources.
5. Once you have specified the 'Frame', click on Finish.
The software creates the new project - this will take a few seconds. During this time the status is shown in the "progress" bar (below Console in the 'Project' window). Once the configuration windows open, the project is ready to use.
In the example below, we can see the 'Project' window (on the left), plus the 'System Core' (in the main working area).

6. Use File → Save to save the project.
You can now edit the parameters in the usual manner.