mxGUI - Offline Setup
In offline mode, mxGUI runs an emulation of the mc2 control system on the host computer. You can use this mode to prepare settings offline and then transfer them to the system at a later time.
When running offline, all user data is stored locally on the mxGUI computer (on the "Local Control System"). A very basic configuration is included with the mxGUI installer (and this is why, initially, the offline Signal List has no external signals). Before you can build an offline setup that includes signal routing, you will need to open a online connection to the system (to synchronize the Signal List). It is also a good idea to transfer a production from the mc2 system (to use as a starting point for the setup).
The recommended workflow is as follows.
- Open an online connection to the mc2 system (to update the Signal List and transfer a production). This ensures that you have the correct external signals to work with and a useful production to load as a starting point.
- Settings can then be edited and saved (offline) in the usual manner. For example, use the Production List to load (and save) a production, the Main Display to load (and save) a preset, etc.
- Once the new files are prepared, they must be transferred back to the mc2 system either via the network (by going online) or via a removable USB device (using a file export/import).
- The final step is to load the production or preset on the console.
The rest of this topic describes the main points in more detail.
What can be Configured Offline?
Anything that can be saved on a real system can be saved offline (onto the mxGUI local control system).
- Productions, Snapshots, Cuelists and Mixes - as saved from the Productions, Snapshots, Cuelists and Mixes displays.
- Presets – module or channel presets as saved from the Main Display.
- Custom Function Assignments – the mapping of user buttons and other custom function assignments as defined in the mc²56 - Custom Functions display.
Compatibility
- Productions can be loaded on any mc2 system. If there is a difference in the hardware configuration, then settings are loaded on a best-effort basis (as described below).
- Presets can be loaded to any mc2 system regardless of the configuration.
Custom Function Assignments can be transferred to any mc2 system. If the receiving system does not support the same User Panel, the custom function assignment can be edited from the Custom Functions display.
Settings prepared offline are loaded on a best effort basis. So, for example, if the mc2 system has fewer DSP channels than the number configured, settings are loaded to the available channels. Similarly, if the signals in the Signal List are different, then only the ones with a matching ID can be configured.
Where are the Files Stored?
The File Transfer display provides access to the user data stored on the local control system. The parent folders are as follows.
- Active Production – contains the snapshots and mixes stored in the active production.
- Productions – contains all zipped productions (as a complete file).
- Presets – contains all module and channel presets.
- Configuration – contains the custom function template files.
- User Thumbnails - contains images for the user label thumbnails.
Preparing the mxGUI Computer
To prepare signal routing offline, it is important that the Signal List for the mxGUI emulation matches that of the mc2 system. If not, any settings which are specific to external signals will not load. The simplest solution is to open an online connection to the mc2 system. The HOME configuration will then automatically update the Signal List stored locally on the mxGUI computer. You only need to perform this operation once (providing there are no changes to the HOME configuration).
While online, it is a good idea to transfer a production from the mc2 system (to use as a starting point for the setup). This can be done from the File Transfer display as follows.
- Open the File Transfer display.
- On the left, select the Local Control System → Productions folder as the destination.
- On the right, select the remote control system (via its name and IP) and open the Productions folder.
- Right-click on the production you wish to import and choose Transfer - the production is copied from right to left.
![]()
File Transfer from online system (mc256) to mxGUI
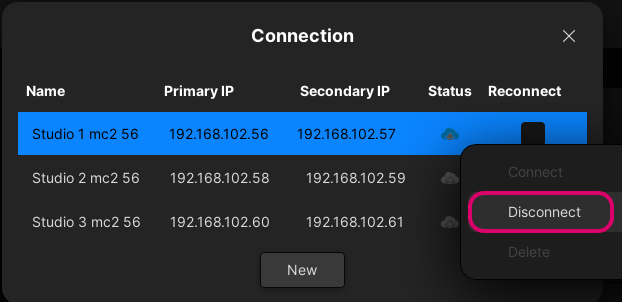
Now open the Settings → Connection window and disconnect mxGUI from the mc2 system (to run offline).
Open the Production List and load the production (using either the Load button or right-click context menu).
![]()
Production List (on Local Control System)
You are now ready to begin the offline setup.
Editing and Saving Settings
The instructions below describe how to deal with different types of user data.
Productions
It is recommended to modify an existing production if possible.
Use the File Transfer display to transfer a production from the online system (as described above). Then disconnect mxGUI and load the production from the Production List.
Once this is done, you can edit the parameters in the usual manner. For example:
- To edit signal routing and labels, open the Signal List display.
- To edit bus assignments, open the Bus Assign or Buses Reverse display.
- To adjust the channel levels, open the Strip Assign display.
- To edit the fader strip assignments, open the Strip Assign display and Access/Assign window.
- To save different variants of a setup, save some snapshots and/or snapshot folders.
Once you have finished editing, remember to save all of the changes by saving or updating a production.
Presets
Module and channel presets are saved and loaded from the Main Display. They are stored on the local (or remote) control system as individual files in the Presets folder.
Custom Functions
Custom Functions are programmed from the Custom Functions display. They are stored on the local (or remote) control system as individual files in the Custom Template Instances folder.
Snapshots and Mixes
Snapshots and mixes are managed in the usual manner. They are saved and loaded automatically as part of a production. They can also be transferred as individual files by loading the relevant production and making a transfer to/from the Active Production folder.
Backing up the User Data
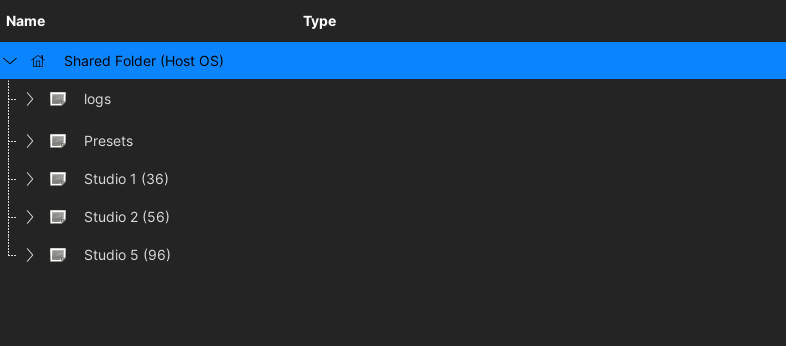
If you are going to prepare settings for a range of different systems, then it is a good idea to make a backup copy of the user data. This can be done using the shared folder that appears in both mxGUI and your host operating system.
- Use either the File Transfer display or host OS to create a separate folder, inside the Shared Folder, for each mc2 system.
- Then within each studio's folder, create a sub folder for productions, custom functions, etc. This allows you to keep all the relevant files together for each studio.
- Now use the File Transfer display to make a backup copy of all relevant user data.
In the example below, the Shared Folder contains a sub folder for each console plus a generic folder for all presets.
Shared Folder (in mxGUI) |
Shared Folder (in Windows Explorer) |

Transferring Data to the System
Having prepared a file offline, the final step is to transfer this back to the mc² system. This can be done either by going online (and using the File Transfer display) OR by using a USB memory stick (to export and import the data).
File Transfer
If you have a network connection to the system, then the first method is recommended. The instructions below describe how to transfer a production. Other types of file can be transferred in the same way; take care to select the correct destination folder in step 3.
- Open an online connection to the mc2 system.
- Open the File Transfer display.
- On the right, select the mc2 system's Productions folder as the destination.
- On the left, right-click on the production you wish to import and choose Transfer - the production is copied to the system.
- Now go to the console and load the production from the Production List in the usual manner - your setup is recalled!
USB Export/Import
If a network connection to the system is not possible, then you can use a USB memory stick to transport the file as follows.
- Start by using the File Transfer display to copy the file from the Local Control System to the Shared Folder (Host OS).
- Open the mxgui_user_share folder (in the host operating system), and copy the file to the USB device.
- Now connect the device to one of the console's USB ports and import the file (using the File display on the console).
- Load the production from the Production List in the usual manner - your setup is recalled!