mc²96 - User Labels
The channels assigned to the fader strips can be easily identified using the labels in the fader strip displays. Here you will see either a text label or thumbnail image.
- There are three different views for the text labels that are switched globally across the console.
- The LiveViewTM (Signal Thumbnail) images can be enabled either globally or individually per channel.
This topic describes how to control the label switching, and how to edit the text labels / assign the thumbnail images.
Label Switching
The centre section LABEL buttons change what is shown in the "label" fields on the fader strips and GUI. From here, you can choose which text labels are in view, and whether LiveView images are enabled.
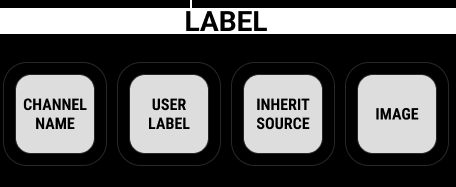
Text Labels
For the text labels, there are three possible options:
- CHANNEL NAME = the system name of the channel (e.g. INP 1). This is system-defined and cannot be edited.
- USER LABEL = the user label given to the channel (e.g. Guest).
- INHERIT SOURCE = the user label given to the source connected to the channel (e.g. Mic 1).
By default, the selected label is shown in large text with the channel level (in small text) below.
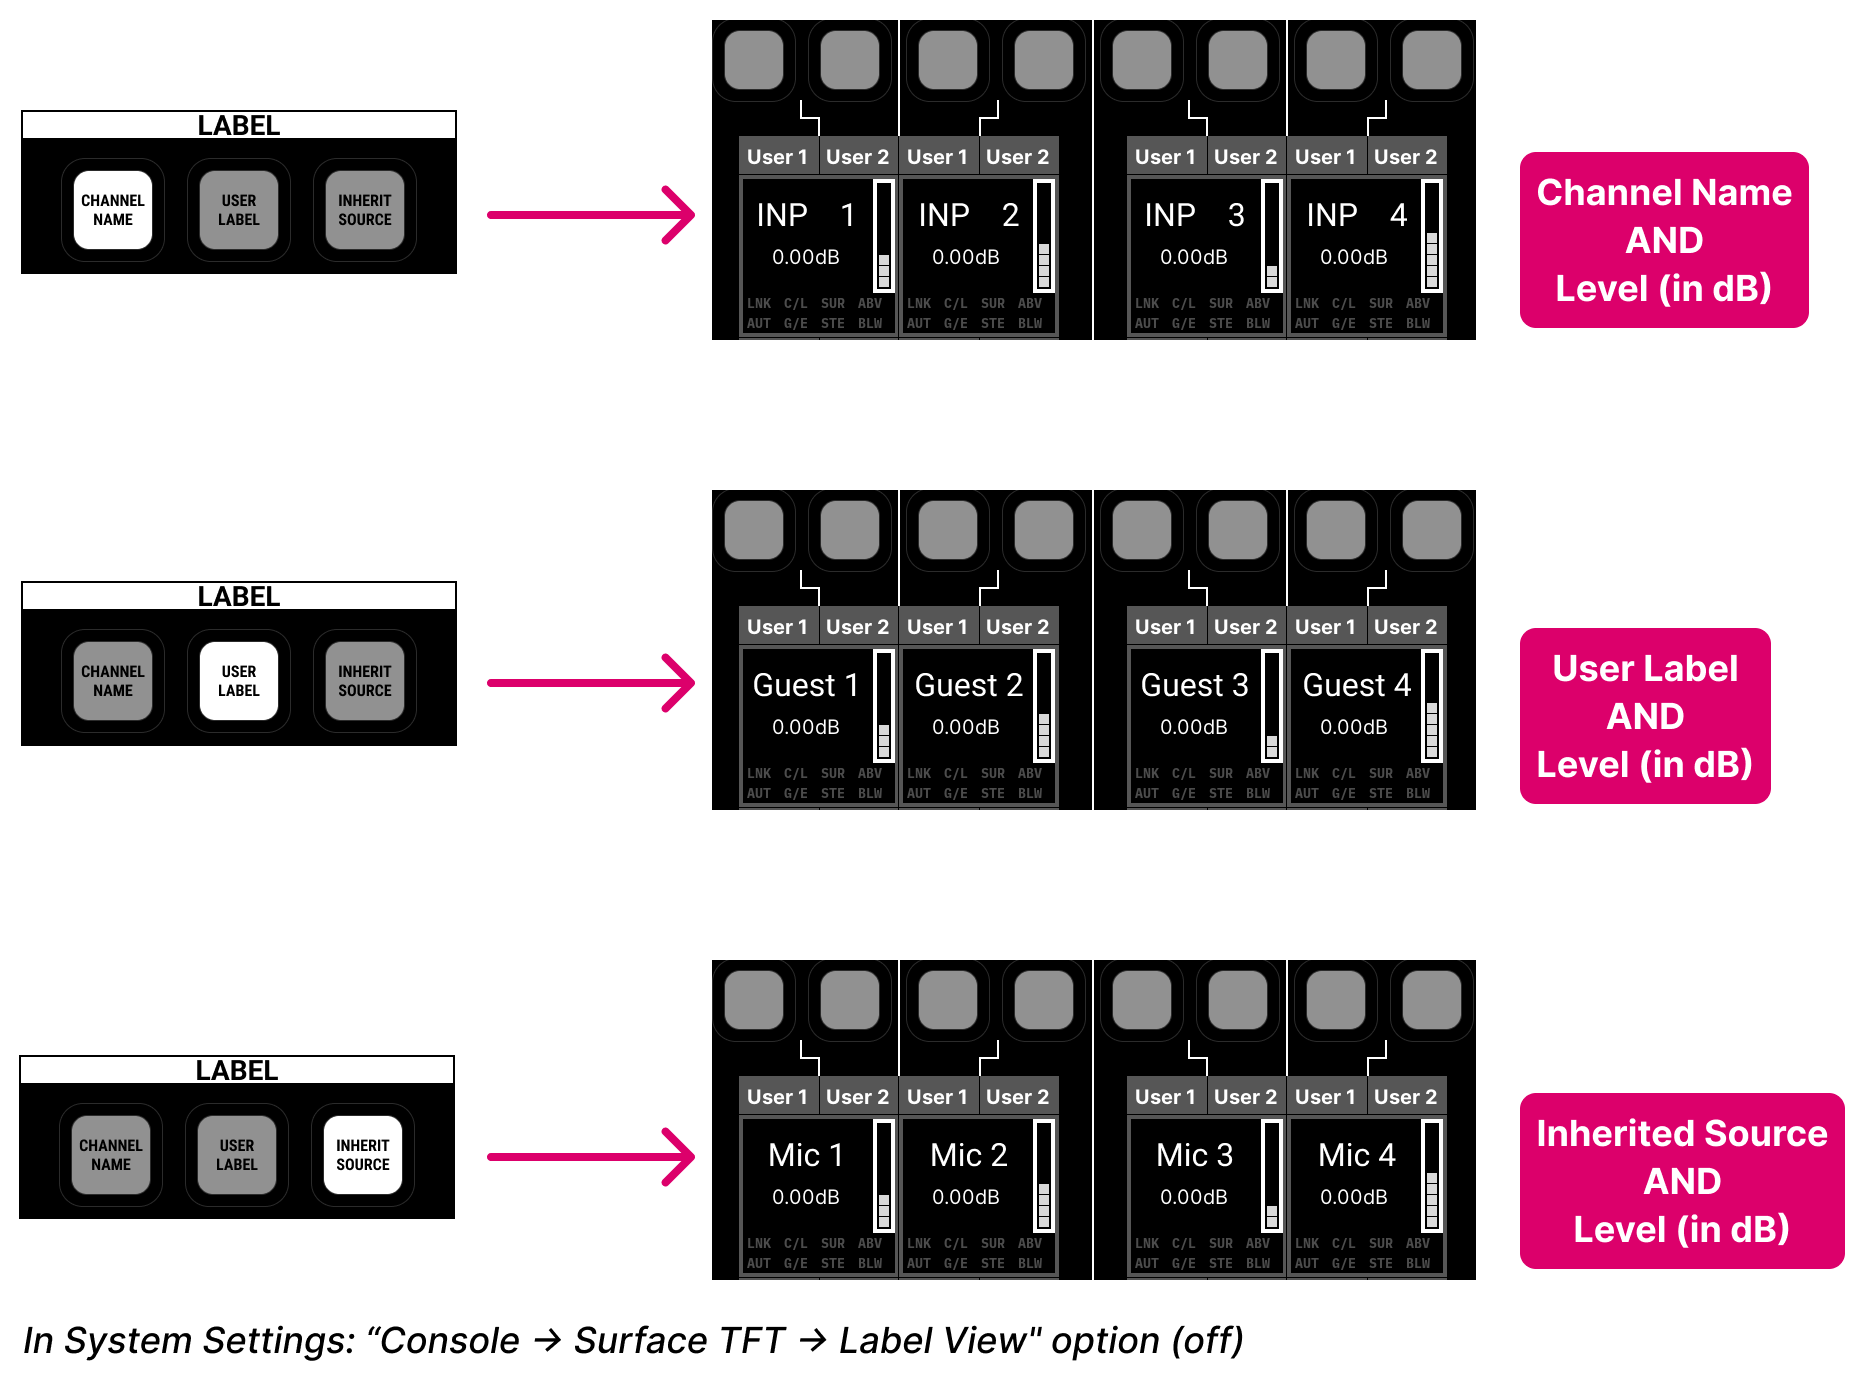
Please note: If INHERIT SOURCE is selected but there is no source assigned to the channel, then the USER LABEL is displayed. The same rule applies to channels that do not have an input source such as an Aux, Group, Sum, VCA, Surround VCA or GPC.
Using Label View
Optionally, the channel level can be replaced by a sub label. For example, to view the Channel Name AND User Label.
To work in this mode:
- Turn on the "Console → Surface TFT → Label View" option (in the System Settings display).
- Use the centre section's LABEL buttons to choose the main label (as described above).
- The main and sub labels update accordingly.
The image below shows what happens to our example once Label View is enabled.

LiveView Images
If the IMAGE button is enabled, then the 'Signal Thumbnails' are displayed instead of the text labels.
In each case, the displayed image follows the USER LABEL or INHERIT SOURCE selections (in the same manner as for the text labels):
- IMAGE + USER LABEL = the signal thumbnail assigned to the channel.
- IMAGE + INHERIT SOURCE = the signal thumbnail assigned to the source connected to the channel.
The signal thumbnail assignments are made from the Signal List display. How to do this is described here. If an image is not available, then the equivalent text label is displayed.
By default, the image enlarges to fill the display whenever you touch the channel fader. The example below shows how this looks on a mc296 console.

Please note: There are two ways to enable the LiveView images: either globally (from the centre section LABEL buttons) or individually per channel (using a fader user button).
To program the latter, you will need to assign the Live View Image channel function to a fader user button. A second channel function called Live View Fullscreen can be used to switch the channel's image to full screen permanently, and not just when the fader is touched. For more information, see Live View Images (Local Control).
Best Practice
To make the most of the global LABEL options, here are some recommendations:
- Switch the labels to CHANNEL NAME while preparing the console.
This makes it easy to see which fader strips are assigned to inputs, groups, VCAs, etc. - Select USER LABEL to see the generic label for each input channel - e.g. Presenter, Guest, etc.
This can be useful if you want to define the layout of the surface but do not have the signal connection list. - Select INHERIT SOURCE once you start connecting sources to input channels (to check the signal routing).
For example, if the channel user labels are Guest 1, Guest 2 and Guest 3, and the source user labels are Mic 1, Mic 2 and Mic 3, then when you begin to connect sources to channels, the fader strip label displays should update.
If you see say Mic 1, Mic 2 and then Guest 3, this means that the first two channels are correctly connected but the third channel has no connected source.
User Label Editing
The user labels for all DSP channels can be edited in one of two ways: from the Access Channel user label field (in the title bar) or from the 'label editor' (in the Signal List display).
The second method is usually best if you have lots of channels (or signals) to label. The first method can be quicker to edit the label for an individual channel.
Please note:
- The user labels for control channels can only be edited from the Access Channel fields (in the title bar).
- The user labels for signals can only be edited from the Signal List display.
Entering Text
In both cases, please edit the text as follows:
- Left-click on the text field - either once to overwrite, or twice to modify an existing name (a cursor will appear).
- Type in the new text. You can use the left or right cursor keys to move the position of the cursor within the field.
- Press ENTER to confirm. Or, to exit without making any changes, press ESC.
Once some text is selected, you can:
- Right-click to access Cut, Copy, Paste, Delete, Select All and Insert Emoji.
- Or, use the CTRL+C and CTRL+V keyboard shortcuts to copy and paste the selected text between fields.
Access Channel Label field
The "channel in access" field at to the top of the Central GUI is great way to edit the user label of the selected channel.
This is the only method available for control channels such as VCA masters, Surround VCA masters and GPCs.
- Select the channel you wish to work on, by pressing a fader SEL button or using the Access/Assign panel.
- Switch the centre section LABEL buttons to USER LABEL.
- Type the text into the Access Channel label field and press Enter.
![]()
Signal List Label Editor
To use the signal list 'label editor', open the Signal List display (in the usual manner). Then select a source or destination and click on the User Label button.
The 'label editor' opens in its own pop-up window that can be repositioned (via a click and drag).
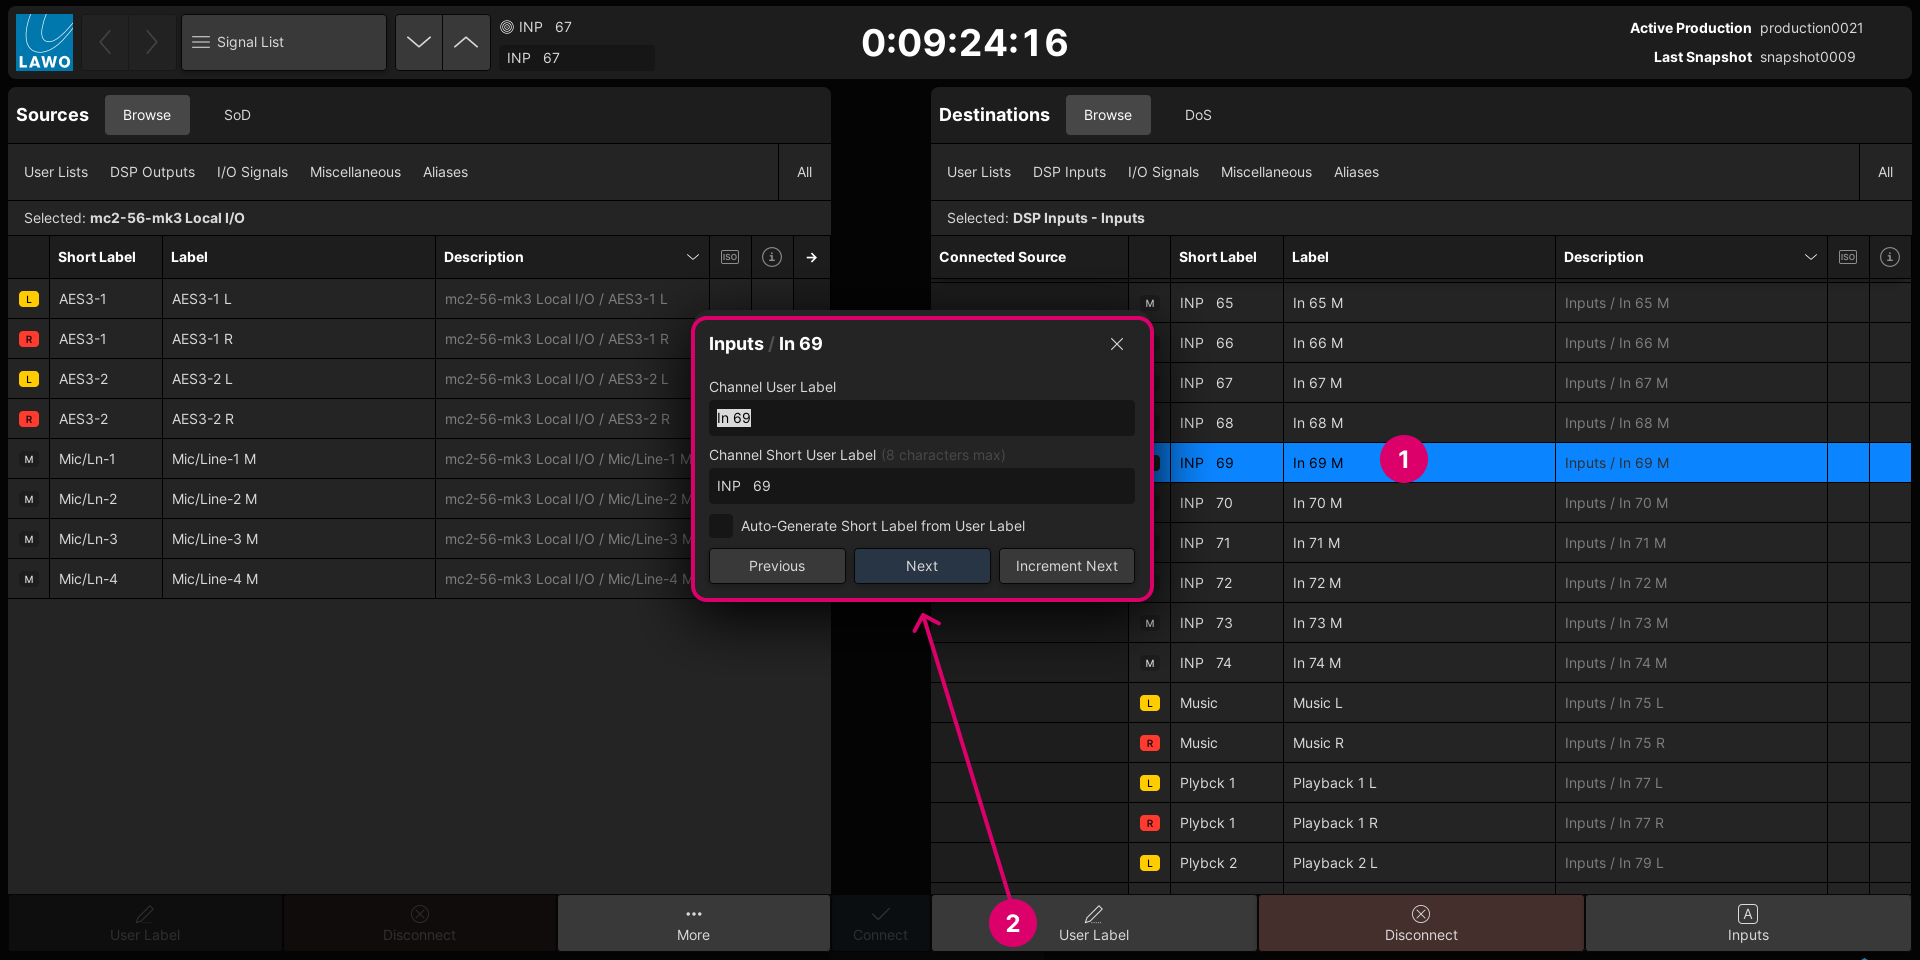
For each channel (or signal), there are two label fields: the full User Label (shown in the GUI displays) and the Short User Label (shown on the surface displays). The two versions are necessary as the Short User Label is limited to 8 characters (to ensure the labels are legible on the surface displays).
Once the label editor is open, it provides the following buttons and options:
- Next (or Return) - confirms both label fields and steps down to the next signal.
- Increment Next (or CTRL+Return) - confirms both label fields and steps down to the next signal. The contents of the previous label fields are carried forwards. If a label ends with a number, then the number increments by one.
- Previous (or SHIFT+Return) - steps back to the previous signal.
- Auto-Generate Short Label from User Label - when enabled, the Short User Label is generated from the User Label field. If the User Label is more than 8 characters, then the Short User Label is truncated (by removing the vowels, then plurals, and so on).
- TAB (or SHIFT+TAB) - can be used to move between the User Label and Short User Label fields.
- X (or ESC) - closes the label editor. You can use this to quit the editor (and cancel any changes made).
The instructions below work through some typical examples.
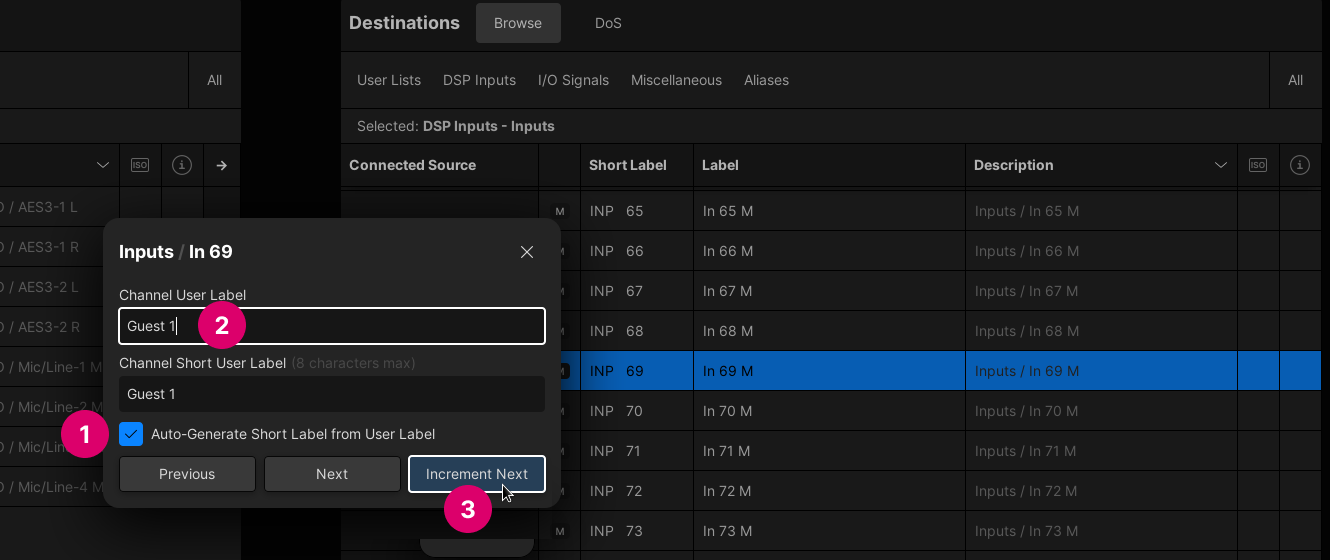
- Start by enabling the Auto-Generate Short Label from User Label option.
- Type a new label into the Channel User Label field (e.g. Guest 1).
When Auto-Generate is enabled, the text is copied into the Short Channel User Label field. In this instance, the full label is less than 8 characters and so the two fields are identical. - To confirm, select either Next or Increment Next.
In our example, there are four guest channels to label, so Increment Next is the best option. The labels for Guest 1 are confirmed and the editor steps down to the next signal. The contents of the previous label fields are carried forwards and increment by one. - Keep pressing Increment Next until all four channels are labelled as Guest 1, Guest 2, Guest 3 and Guest 4.
- To step down to the next signal, without overwriting the existing labels, press Next.

- To move back up the list of signals, press Previous.
- Repeat steps 2 and 3 to edit the next set of labels (e.g. for Commentator 1).
In this instance, the User Label is more than 8 characters and so the Short User Label is truncated.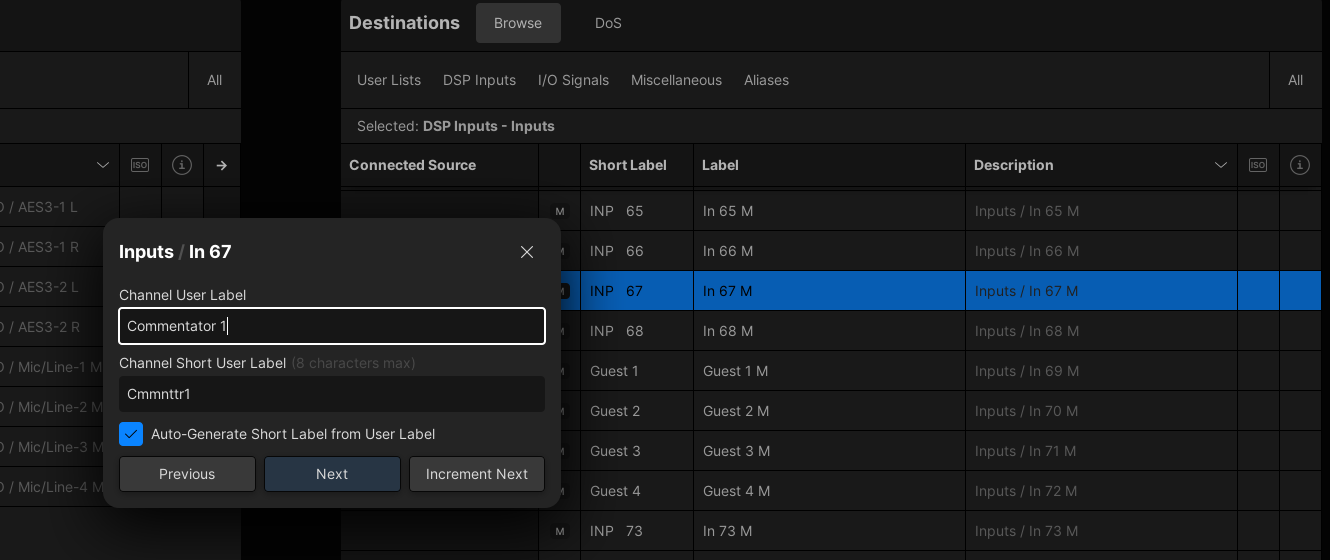
- If you do not like the result, turn off the Auto-Generate option and enter your own text into the Short User Label field (e.g. Comm. 1).
You can use TAB (or SHIFT+TAB) to move between the User Label and Short User Label fields.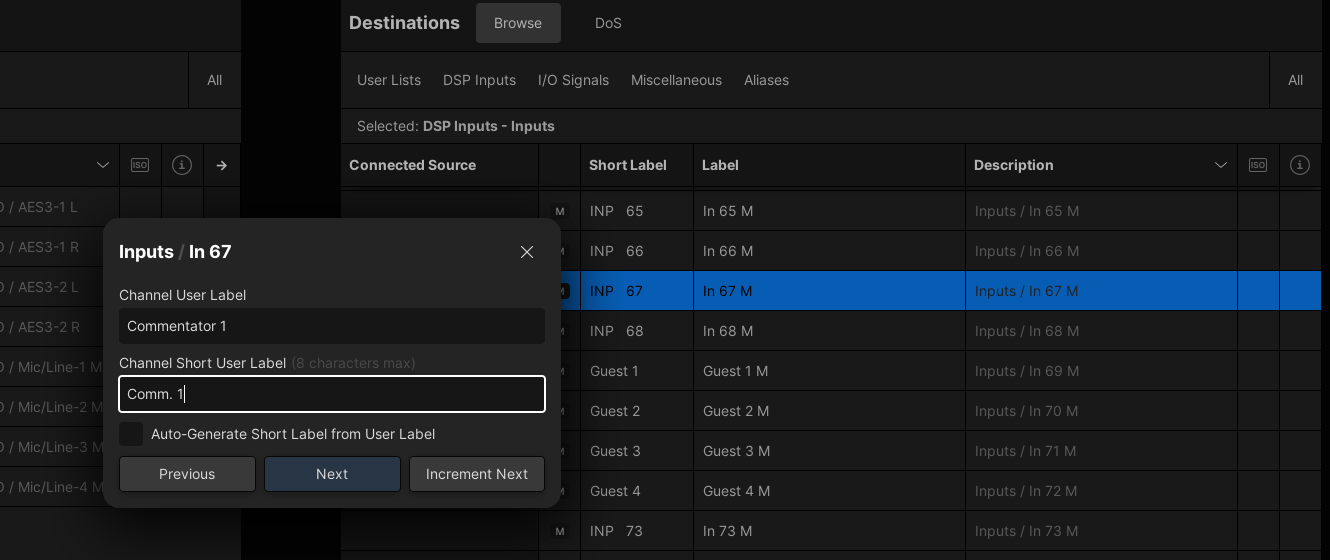
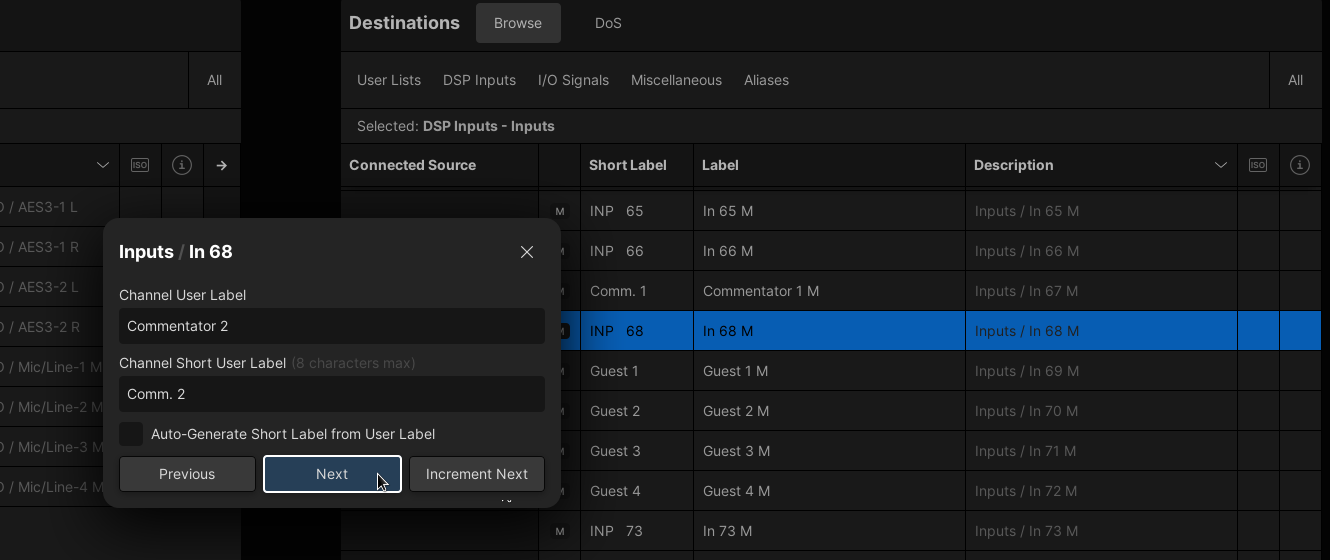
- Select Increment Next to confirm the labels for Commentator 1 and carry forwards/increment the labels for Commentator 2.
- Then select Next to confirm the Commentator 2 labels without overwriting the next signal (Guest 1).
- At any time, you can close the label editor by selecting X (or ESC).
For our example, the final result looks like this.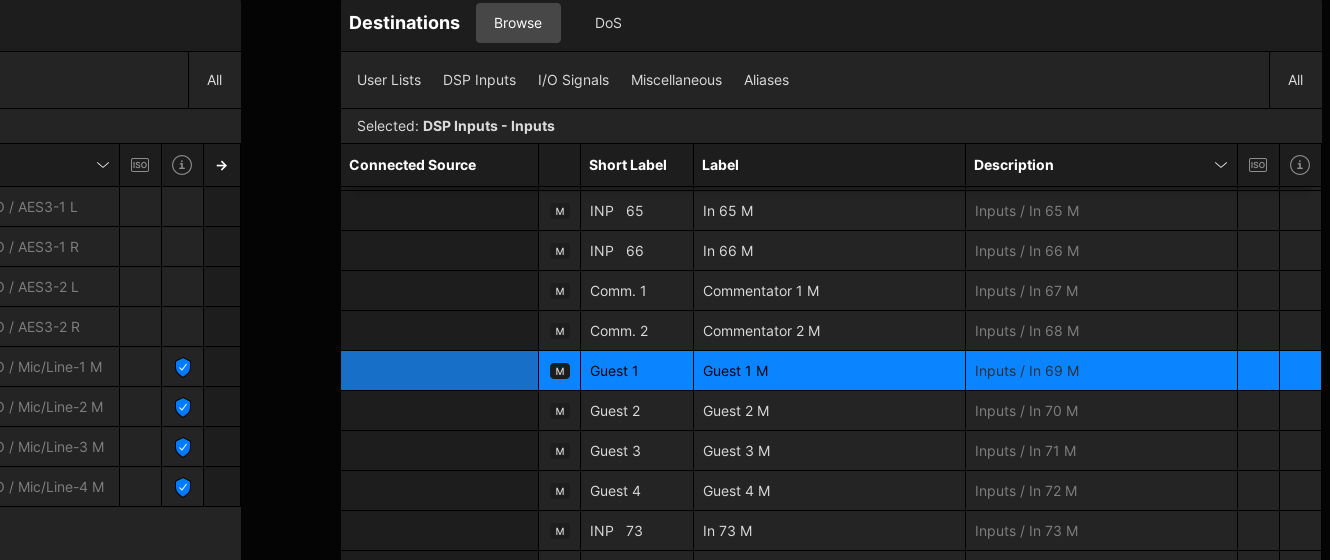
Signal Thumbnail Assignments (for LiveView Images)
When LiveView images are enabled, the 'Signal Thumbnail' assigned to a channel or source is displayed in place of the text labels.
The 'Signal Thumbnail' assignments are handled from the Signal List display. In each case, the thumbnail image can be either a still image, stored locally on the mc2 control system, or a moving image from a networked stream provider.
The system comes with 18 still images. To this, you can add your own custom images and/or configure a networked device as a moving image provider. How to do this is described later. For now, it is useful to know the following:
- Up to 128 still images are supported by the Image Stills stream provider. This includes the 18 still images (included with the system).
- In the current release, the supported video thumbnail providers (for moving images) are Lawo's V__pro8, V__link4 and V__remote4. Up to 10 providers can be configured, where each device can deliver eight streams.
To make a new assignment:
- Open the Signal List display (in the usual manner).
- Locate the source or destination you wish to assign. For example, under 'Destinations' (on the right), select a DSP input channel.
- Right-click on the source or destination and choose Assign Thumbnail from the context menu. This opens the 'Signal Thumbnails' window.
- Choose a stream provider (e.g. Image Stills).
- Select an image (or stream number).
- The assignment is made and you can close the 'Signal Thumbnails' window.
Or, use the up/down arrows (top right) to select a different source or destination, and make another assignment.
Please note:
- If channels are linked for stereo or surround, then select the first (left) channel to make the assignment.
- The 'Signal Thumbnail' assignments are saved along with the signal connections in both snapshots and productions.
To test the thumbnail image:
- Assign the channel to a fader strip and turn on IMAGE (from the centre section LABEL buttons). This enables the LiveView images globally across the console.
- The assigned 'Signal Thumbnail' image should appear in the fader strip label display.
If not, check the USER LABEL and INHERIT SOURCE options (as the image assigned to the inherited source signal can be different).
If you are using a custom image or networked stream provider, then choose one of the system images (in the Image Stills folder) to check the operation. If this is working, then the issue lies with the custom image and/or provider. More information is provided below. - By default, the image enlarges to fill the display when you touch the channel fader. Optionally, you can program a fader user button to toggle the fullscreen view. How to do this is described later.
To remove a thumbnail image assignment:
- Right-click on the source or destination.
- Select Remove Thumbnail from the context menu.
- If the channel (or source) is still assigned to the surface, then the image should be replaced by the equivalent text label.
Uploading Custom Images
The system is delivered with an Image Stills stream provider that supports up to 128 still images.
Custom images can be added to this provider by copying the prepared files to the following folder (on the mc2 control system): /data/config/mcx/user_thumbnails
Each custom image must be a .jpeg file that meets the conditions specified below.
To make the copy, you can use mxGUI's File Transfer display. Once the upload is complete, refresh the Image Stills provider (if the 'Signal Thumbnails' window is open). The new images should appear in the preview area.
Please note: If a custom image has the same index number as one of the system-provided images, then the custom image takes precedence (until the custom image is removed from the "user_thumbnails" folder).
Custom Image File Conditions
The conditions for the custom image files are saved in a "README.txt" file that is stored on the mc2 system in the "user_thumbnails" folder. The full file path is:
/data/config/mcx/user_thumbnails
The system will consider all images that meet the following requirements:
- The file must be a valid JPEG image.
- The file must be named according to the pattern XXX_AnythingGoesHere.jpg, where:
- XXX must be a three digit number in from 000 up to and including 127,
- AnythingGoesHere may be chosen freely to aid recognizability, and
- the file extension .jpg must be all lower case.
- The file must be less than 32kB in size.
- The image must be at most 640 pixels wide.
- The image must be at most 480 pixels high.
Please note: The images placed in the "user_thumbnails" directory take precedence over the system provided images. This means that if a "user_thumbnails" image has the same index as one of the system provided images, then the system image will be inaccessible until the "user_thumbnails" image is removed.
Configuring a Moving Image Stream Provider
Lawo's V__pro8, V__link4 or V__remote4 can operate as a moving image stream provider. Up to 10 devices can be configured, where each device can deliver eight streams.
Currently, the configuration must be performed by the Lawo engineering team, so please contact Lawo Support for assistance or more information.
Once the provider(s) are configured, they are listed below the Image Stills provide in the 'Signal Thumbnails' assignment window (described earlier). From here, you can check the status of the streams and providers as follows:
Beside each entry in the Stream Providers list you will see either a green or red circle:
- The Stream Provider circle indicates the connection status: green = ok; red = connection error.
- The Name circle indicates the stream status: green = valid stream; red = stream is invalid.
If the Stream Provider is red, then you should check your network connections and the IP settings on the remote device.
If the Stream Provider is green but one or more stream Names are red, then check the number of streams being output by the providing device.
Local Control of LiveView Images
There are two custom functions that can be used to control LiveView images locally from the fader strips: Live View Image and Live View Fullscreen.
In each case, the functions are triggered from a fader user button and programmed from the Custom Functions display as follows:
- Start by adding an instance of the Fader User Buttons, Channel Functions.
- Assign the Live View Image parameter to a fader user button.
- Assign the Live View Fullscreen parameter to a different fader user button.
- Confirm the custom function (in the usual manner).
To test the functionality:
- Assign a channel with a 'Signal Thumbnail' assignment to a fader strip.
- Press the Live View Image fader user button. The label display should update to show the thumbnail image. If the image does not appear, check the USER LABEL and INHERIT SOURCE options.
You can now use this button to toggle between the thumbnail image and text labels. - With the image in view, press the Live View Fullscreen fader user button. The image should fill the fader strip label display.
You can now use this button to toggle between full screen and half screen (when the image is enabled).
Once programmed, you can use the same fader user buttons on any channel (or inherited source) with a valid thumbnail assignment.