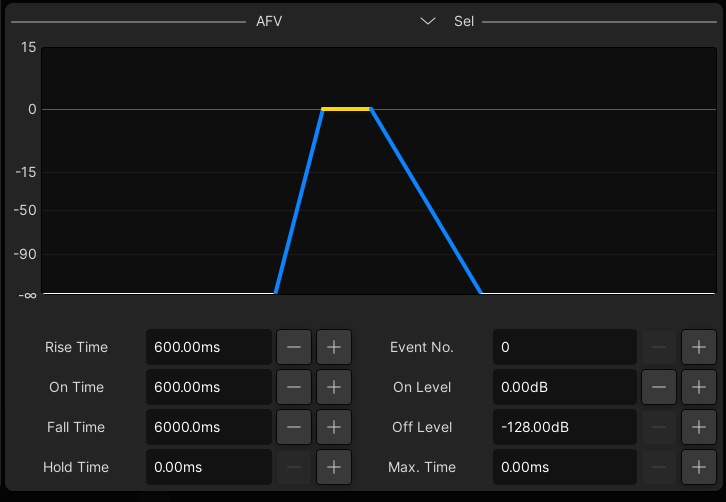
The Audio Follow Video (AFV) feature provides the ability to open and close a channel or main fader from an external event. For example, during coverage of a live motor racing event, you can program the audio channels associated with each camera to automatically open and close as the picture cuts between different shots.
Events can be received via TCP/IP Ethernet (using Lawo's Remote MNOPL protocol) or GPIO.
Up to 128 events can be programmed, with each event corresponding to a different camera tally. An event can control an individual channel or a group of channels. Parameters for the Hold Time, Rise Time, Max Event Time, On Time and Fall Time control the envelope of the fade allowing smooth fades from one camera to another.


To configure the AFV parameters:
1. Press AFV on the AUX SENDS/AUDIO FOLLOW VIDEO panel.
The rotary controls switch to the eight AFV functions as indicated on the alphanumeric displays.
2. Turn the Event Number control to assign the external event.
Active events are numbered from 1 to 128. Select 0 for no event. The event number appears beside the rotary control, at the top of the Channel Display and on the Main Display (in the graphical area).
Main Display

3. Enable AFV by selecting the ON button beside the On Level control.
4. To action the event locally from the console, press the ON button beside the Event Number control.
The fader opens (and closes) according to the AFV parameters.


5. Use the remaining rotary controls to adjust the AFV behaviour:

  • On Level – the level which the fader opens to when the event if switched on.
  • Off Level - the level which the fader closes to when the event is switched off.
  • Hold Time – use this control to delay the opening of the fader after the event on trigger.
  • Rise Time – the time taken for the fader to move from off to on level after the hold time has expired.
  • Max Event Time – the maximum amount of time the fader stays open (if no event off).
  • On Time – the amount of time the fader stays at the on level, after the event is switched off.
  • Fall Time - the time taken for the fader to move from on to off level.

    6. Once you have connected and configured the external controller, sit back and watch your fader(s) open and close from the AFV event controller.
    The Main Display shows the progress of the AFV event: the line for rise time is red as the fader rises; the line for on time is red while the event is on; the line for fall time is red as the fader falls.


You can override a fader at any time, for example, to adjust the level of an open camera mic.
In addition, if you touch the fader while the camera is cut (AFV switched off), the fader remains open. This allows you to perform a manual fade out.
You can link as many channel or main faders to external events as you wish, providing flexible AFV control for individual and groups of faders.


If channels are grouped to a VCA master which is controlled by Audio Follow Video, then the slave faders will be automated by the AFV master event. If you do not wish this to occur, deselect the AFV enable (ON button beside the On Level control) on the slave channels.

7. To set Audio Follow Video either on or off for all channels, use the All AFV on/off option in the System Settings display.|