mc²56 - Snapshot Crossfades
When playing out snapshots from a cuelist, you can choose to crossfade from one snapshot to another.
For each cuepoint, you will need to assign a snapshot AND a fade set. The fade set specifies the channels and modules which will crossfade. You can link the same fade set to multiple snapshots, or fade sets can be snapshot-specific. Thus, you can define exactly which parameters will crossfade at each change of cue.
You can also define the crossfade time (in milliseconds) and whether switched functions (e.g. mutes) will change state at the start or the end of the crossfade.
A default fade set, fade time and switch mode can be applied to all new cuepoints, and the crossfade curve type can be set to either linear or weighted. These options are defined in the System Settings display (under Global -> Status).
To apply crossfades, you MUST play out fade snapshots from a cuelist. Crossfade are NOT applied when you load snapshots from either the Cuelist or Snapshots List displays. |
Creating a Fade Set
The first step is to create a fade set (in order to specify the channels and modules which will crossfade).
1. Open the Fade Sets display on the Central GUI.
2. Select a Folder.
By default, fade sets are stored in the current snapshot folder (e.g. Mozart). This is a good idea if the fade sets and snapshots are closely related. However, if they are more generic, then you could use a separate snapshot folder. A fade set can be linked to any snapshot (stored in any snapshot folder) as long as they are saved in the same production.
3. Make sure the view is set to Current (and not Preview).
In Current view, the ticks show which modules and channels are selected.
4. Use the on-screen matrix to select the DSP module(s) and channel(s) you wish to fade.
You can use the drop-down menu (below Contents) to change the channel type.
The buttons to the left of each module and above each channel can be used to select all channels and/or all modules.
5. From the Operations area, select Save - a new fade set is created and given a default name.
You can click in the Name field to enter a new name, and switch to Preview to interrogate or edit the contents of the selected fade set.
6. Repeat steps 4 and 5 to create the different fade sets required for the cuelist.
In our example, we have created two fade sets.
Fade Sets (example)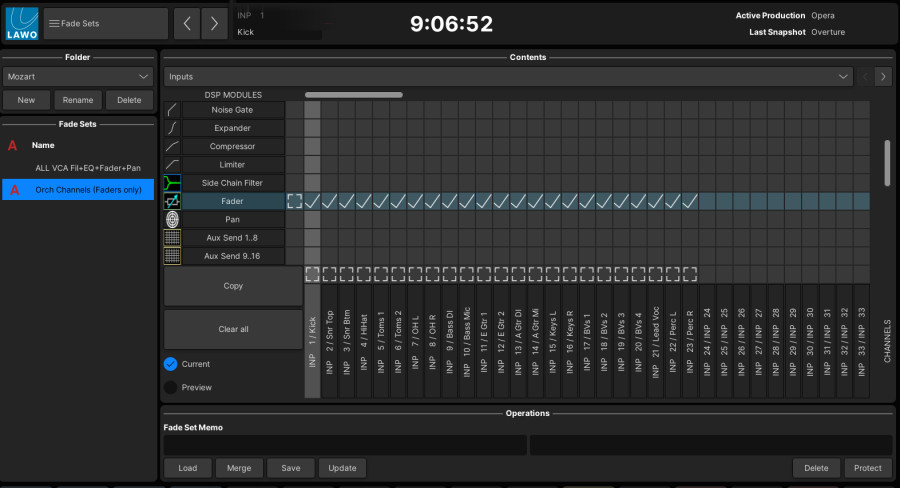
Assigning Fade Sets to Cuepoints
To apply crossfades to a change of cue, you must assign a Snapshot AND a Fade Set to each cuepoint in the Current Cuelist.
To save time, you can specify a default fade set, fade time and start mode that is applied to all new cuepoints. This is ideal if you wish to link the same fade set to multiple snapshots and/or apply the same crossfade parameters. The defaults are defined in the System Settings display (under Global -> Status), and are automatically applied whenever you use New Cue or Make Snap and Cue. You can then edit the parameters, or assign a different fade set, as follows.
1. Open the Cuelist display and select a cuepoint.
2. Click on Select snapshot (from the Selected Cuepoint area) to open the "Load Snapshot" window.
3. Use the Snapshot and Fade Set areas to choose a snapshot and fade set.
In the example below, the snapshot and fade set are stored in the same snapshot folder, but you can choose snapshots and fade sets from any folder as long as they are stored in the same production.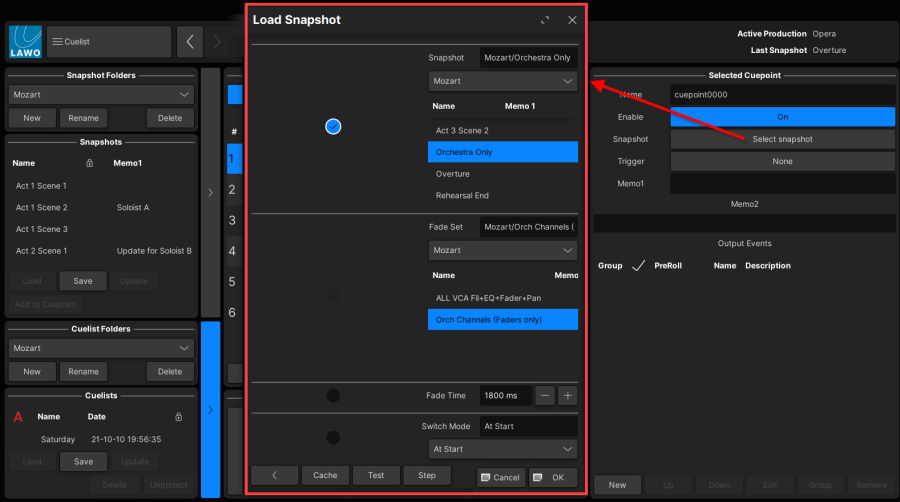
4. Now use the Fade Time and Switch Mode areas to define the crossfade parameters:
- Fade Time - defines the crossfade time applied to variable parameters (in ms).
- Switch Mode - determines whether switched functions change start at the start or end of the crossfade.
The parameters are applied to the cuepoint that you are fading to. For example, if cuepoint 0001 loads snapshot 0001 with a fade time of 1 second, and cuepoint 0002 loads snapshot 0002 with a fade time of 2 seconds, then if you step forwards from cuepoint 0001 to 0002, a fade time of 2 seconds is applied. If you step back from cuepoint 0002 to cuepoint 0001, a fade time of 1 second is applied.
At the bottom of the window are a number of useful functions:
- < - click to step back to the last operation; in this instance, to go back a page.
- Cache - click to add the snapshot to the Cache.
- Test - click to load the selected snapshot (to "test" its contents).
- Step - click to step forwards to the next cuepoint AND automatically increment the step field (marked by the blue tick). In our example, this will assign consecutive snapshots to consecutive cuepoints using the same crossfade parameters. See Using the Step Function.
5. Confirm all changes with OK or, to exit without making a change, select Cancel.
In our example, the snapshot assigned to cuepoint0000 will load the snapshot named Overture and apply the fade set named Orchestra channels - faders only. We have then used Step to assign snapshots and fade sets to the other cuepoints in the list.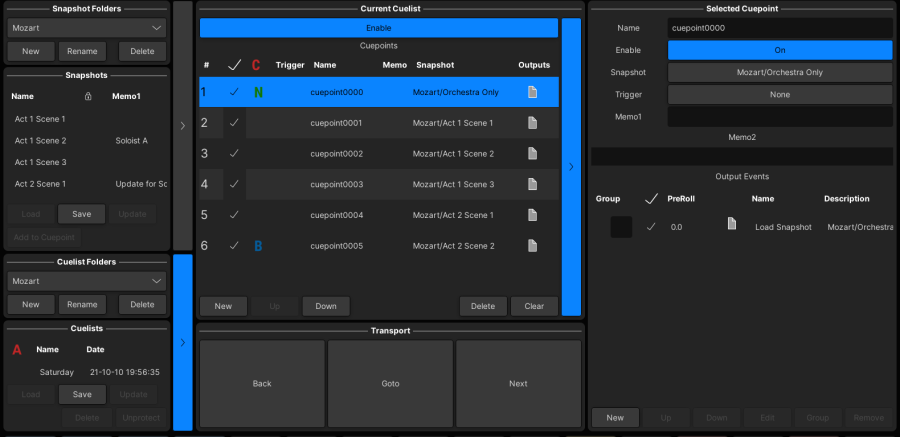
Remember to save your assignments by saving or updating a cuelist, and then updating (or saving) the production. |
The cuelist can now be played out in the usual manner, so press Next to crossfade into the first cuepoint (cuepoint0000). In our example, this will apply a fade time of 1800ms and change switched functions at the start of the fade.
If nothing happens when you recall your cuepoint, check the following:
- Is cuelist automation enabled (Enable button on)?
- Are the channels and modules defined by the fade set isolated from the snapshot recall (using snapshot isolate)?
- Have you entered a crossfade time greater than 0ms?!
- Make sure that you are not crossfading between snapshots with the same parameter values!
Creating a Fade Set (from the surface)
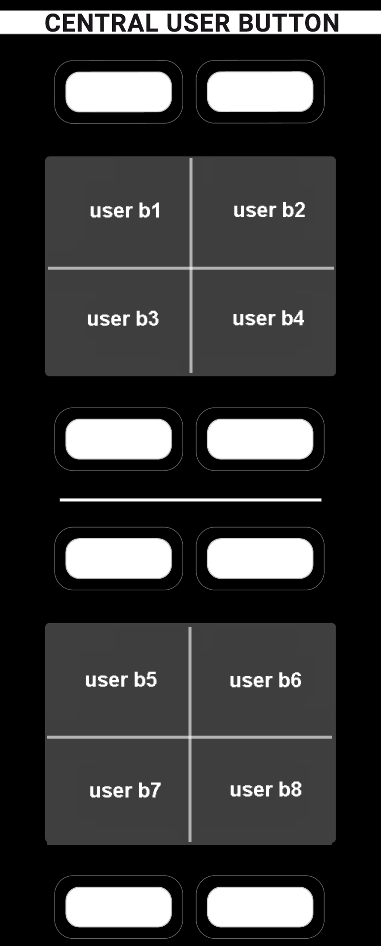
A fade set can also be created from the control surface. To use this method, it is recommended to program a FADE SEL Central User Button via the Central User Button, Snap/Sequence options in the Custom Functions display. Alternatively, you can use the Select Fade button (under Cue List) on the Central GUI side panel.
CENTRAL USER BUTTONS | Central GUI Side Panel |
1. Press the FADE SEL Central User Button, or Select Fade on the Access/Assign 3 side panel - it flashes (green) when active.
2. Select the DSP module(s) you wish to fade by enabling the SEL buttons on the Central Control Section. See Selecting Channel Parameters.
3. Then press the fader SEL buttons to apply your chosen selections across multiple channels.
4. Open the Fade Sets display in Current view to check which modules and channels are selected.
5. When you have finished making selections, remember to turn off FADE SEL.
Working with Fade Sets
The Fade Sets display is used to manage and edit the fade sets stored in the active production.
1. Open the Fade Sets display on the Central GUI.
The display is divided into four areas:
- Folder - manages the snapshot folders stored in the current production.
- Fade Sets - lists the fade sets stored in the selected folder.
- Contents - shows either the Current elements selected to crossfade, or the contents of the selected fade set (in Preview).
- Operations - buttons for managing fade sets: Load, Merge, Save, Update, Delete and Protect.
Folders
Fade sets are stored in the current snapshot folder. The method used to change folder, create a New folder, Rename and Delete a folder is identical to the Snapshot List operations described earlier.
Note that a fade set can be linked to any snapshot (stored in any snapshot folder) as long as they are saved in the same production.
The Contents Matrix
The Contents matrix can be used to select which modules and channels will crossfade. It can be switched between two views: Current always shows the current selections; Preview shows the contents of the selected fade set.
Contents Matrix (Current view)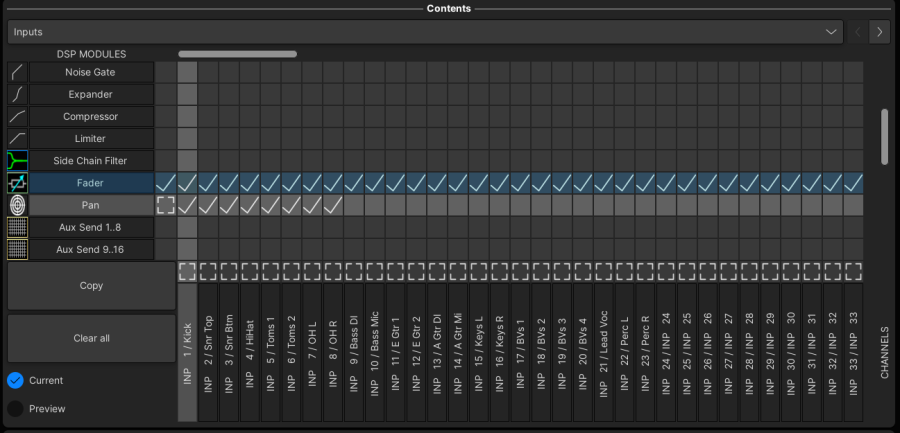
At the top of the matrix you can use the drop-down menu to choose different channel types - for example, Inputs for input channels.
When using the matrix:
- Click on an individual crosspoint to select a single DSP module on a single channel.
- Click on the ALL crosspoint fields (beside each row of DSP modules) to select a single DSP module across all channels.
- Click on the ALL crosspoint fields (above each channel) to select all DSP modules on a single channel.
Note that the ALL fields indicate:
- blank = nothing is selected.
- white box outline = something is selected.
- white tick = everything is selected.
Use the scroll bars at the top and on the right of the matrix to access all CHANNELS and all DSP MODULES.
Copy (and Paste) can be used to copy and paste the selections from one channel (or DSP module) to another. Follow the on-screen instructions to use these functions.
Clear all can be used to clear all selections.
Fade Set Operations
Fade Sets are managed in a similar manner to snapshots. Note that the two sides of the display can be resized to view more fields for the Fade Sets.
Fade Sets list (resized)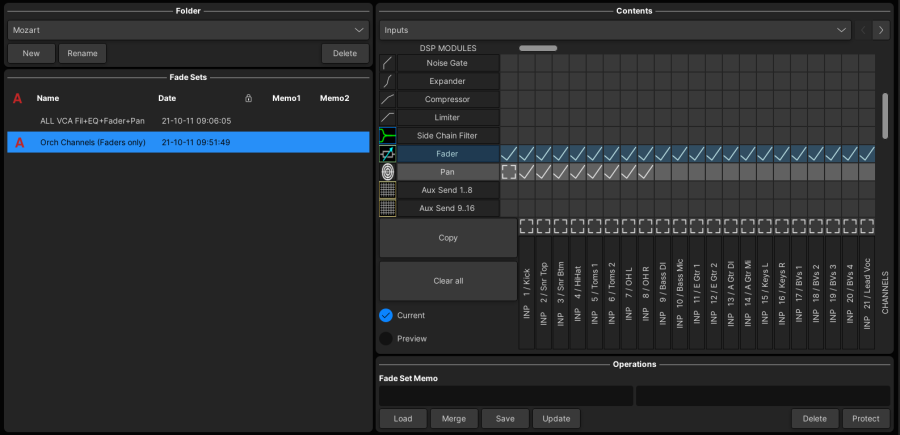
Fade Sets
- Name - click in the Name field to rename a fade set.
- Memo - click and type into the Memo1 or Memo2 fields to enter memo text.
Operations
- Load - loads the selected fade set.
- Merge - merges the selected fade set with the current selections. Use this option to combine fade sets.
- Save - saves the current selections into a new fade set.
- Update - updates the selected fade set with current selections.
- Delete - deletes the selected fade set.
Protect - protects (or unprotects) the selected fade set. Once protected, a fade set cannot be updated or deleted.
Importing and Exporting Fade Sets
Fade Sets cannot be accessed individually from the File display, but they can be imported and exported by copying the snapshot folder:
1. Copy the snapshot folder containing your fade sets to a USB interface or network drive using the File Export function from the File display.
2. Connect your USB interface or network drive to the destination console.
3. And import the snapshot folder into the current production using File Import from the File display.
If you now open the Fade Sets area (in either the Snapshot List or Cuelist displays) and select the imported folder, you will see your fade sets.
