mc²56 - DSP Configuration
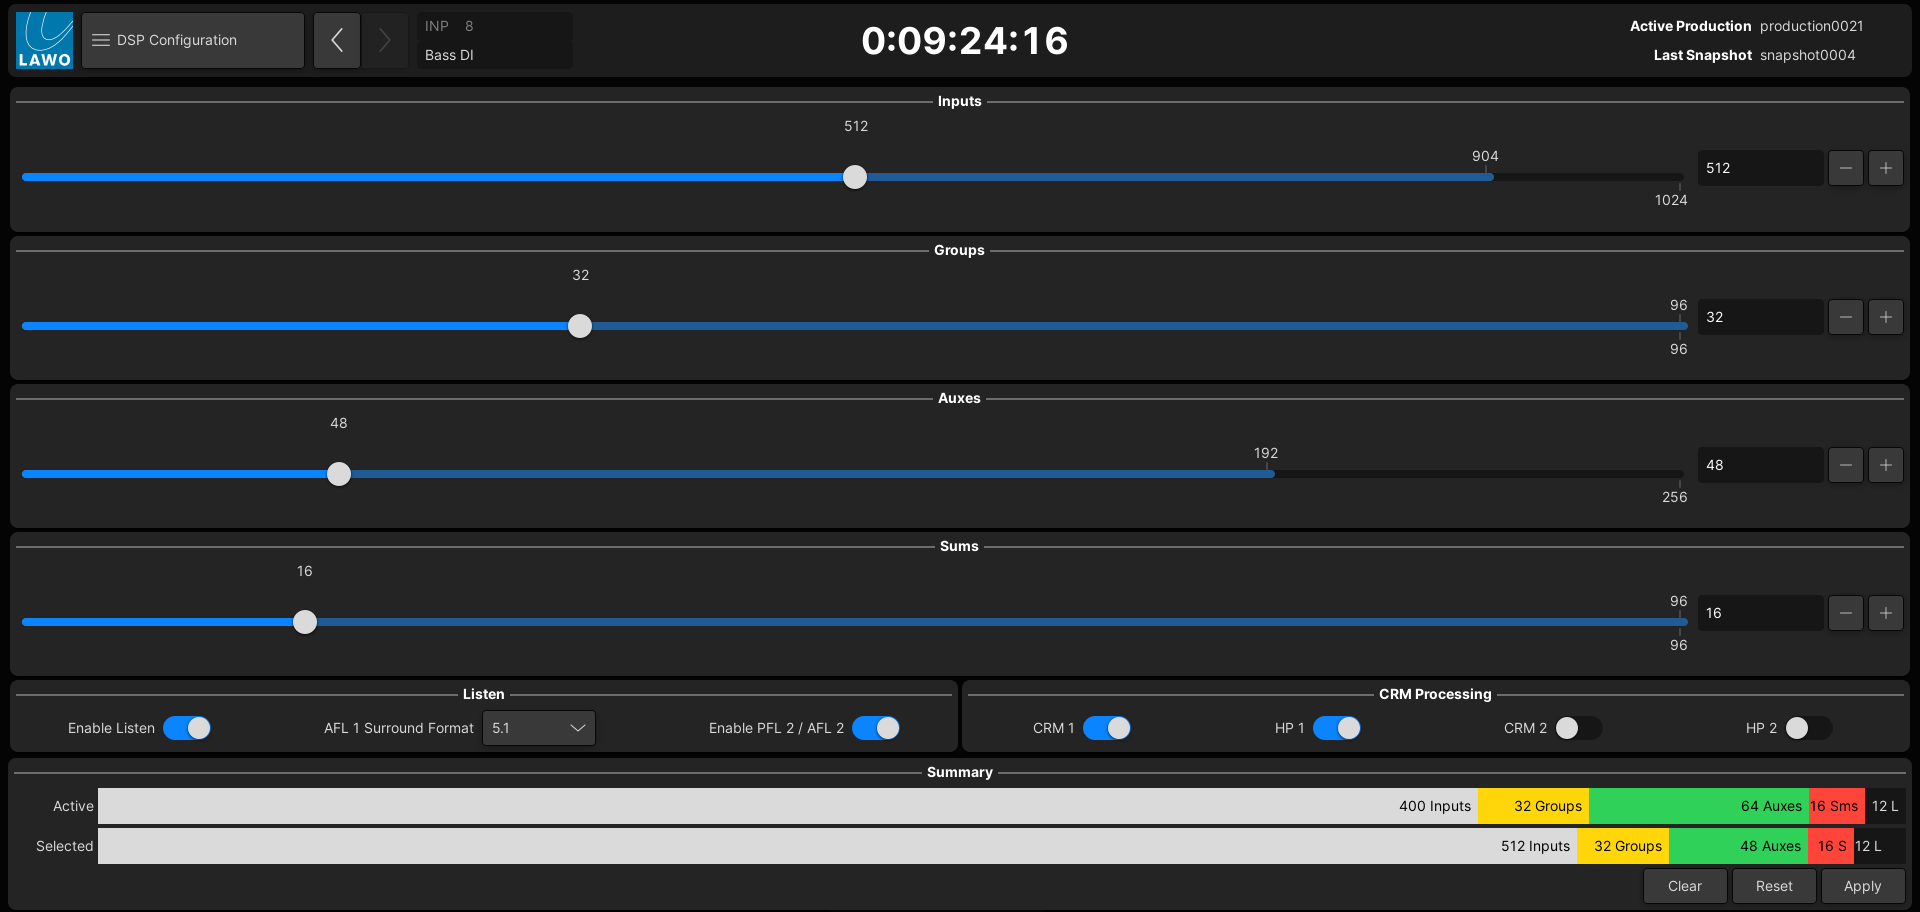
The DSP Configuration defines the number of input channels, auxiliary sends, groups and main outputs (sums). The configuration can be changed at any time, and is saved and loaded with the production. This makes it easy to change the mix structure and enables the console to handle productions of different types.
Important: Loading a different DSP configuration causes a brief interruption to audio. Therefore, it is not recommended to change the DSP configuration while live on air!
Editing the DSP Configuration
1. Open the DSP Configuration display on the Central GUI, using one of the following methods.
- Press the SYSTEM DSP button on the SCREEN CONTROL panel.
- Select System → DSP Configuration from the GUI page menu.
- Press CTRL + 5 on the console keyboard.

2. The sliders can be used to prepare a new configuration, while the "Summary" area at the bottom of the display shows what is currently "Active".
In each case, touch and drag a slider, or press the + and - buttons, to change the resources. The numbers on the right show what is selected and what is possible (with a maximum capacity license).
Please note:
- The number of Inputs, Groups, Auxes and Sums are shown as mono resources. This means that you will need two resources for each stereo input channel, six resources for a 5.1 group, ten resources for a 5.1.4 sum, and so on.
- The resources increase in a stepped manner and are interdependent. Thus, if you increase the number of Inputs to the maximum, this affects how many Auxes, Groups and Sums are available.
- It is possible to select more channels than is supported by your hardware. This is deliberate so that productions can be interchanged between systems. In this instance, the system works on a best-effort basis. e.g. If you select more than 256 resources on a system with a 256-channel license, any resources above the license limits will be virtual and have no audio!
The Clear button (at the bottom of the display) can be used to clear all of the channel counts to 0.
3. The options in the "Listen" and "CRM Processing" areas can be used to save DSP resources if a function is not required.
There are three "Listen" options that affect the AFL and PFL buses:
- Enable Listen - enables (or disables) all of the listen buses: AFL1, AFL2, PFL1 and PFL2.
- AFL1 Surround Format - determines the format of the AFL1 bus. If None is selected, then AFL1 is stereo.
- Enable PFL2/AFL2 - enables (or disables) the AFL2 and PFL2 buses (that can be used on isolated bays).
The "CRM Processing" options affect the Control Room Monitoring, and are used to enable (or disable) the DSP processing on CRM1, HP1, CRM2 and HP2.
4. The Apply and Reset buttons become active once a change has been made.
- Use the "Summary" area to compare the "Active" and "Selected" configurations. The channel counts are color-coded in the usual manner: Inputs (white); Groups (yellow), Auxes (green), Sums (red), Listen buses (black).
- Select Apply to make the "Selected" configuration active OR Reset to reset the current view to the "Active" configuration.
- If you select Apply, then a confirmation pop-up appears. Choose Yes to continue. While the configuration loads, there is a brief interruption to the audio.
5. If a resource is increased or enabled, then the new channels are available immediately.
For example, open the Signal List display and, under "Destinations", choose DSP Inputs → Inputs. The list shows all available input channels. In our example, up to Input 400.
Saving and Loading the DSP Configuration
The "Active" DSP configuration is saved in the production, but not in snapshots. This is because, whenever you load a new DSP Configuration, there is a brief interruption to the audio.