mc²56 - Automix Groups
An automix group provides automatic level adjustment for a collection of mono, stereo and surround channels. The feature is ideal for balancing active and inactive microphones such as in a panel discussion, or balancing commentators against international sound.
Up to 32 independent automix groups can be created. Any number of input or group channels can be added to each group, and channels can be of any format - mono, stereo or surround.
Within each group, a Lawo algorithm monitors the signal power of each channel, and then automatically adjusts the mix levels accordingly. For example, if there are four guests plus a presenter, then the algorithm automatically mutes the guest channels while the presenter is speaking. This frees the operator to concentrate on other aspects of the audio production.
Automix Conditions
- You cannot add Auxes, Sums or VCAs to an automix group.
- A channel can only be assigned to a single automix group.
- When stereo or surround channels are added to an automix group, the algorithm calculates the average power of the summed component channels.
- The automix level adjustment affects the main channel level - i.e. the level to the mix buses (Groups and/or Sums). Therefore, it has no affect on Aux send level.
- Automix parameters are stored in snapshots and productions (as part of the channel DSP).
- Automix parameters are not stored by the timecode automation system.
Creating an Automix Group
The quickest way to assign a channel to an automix group is from the Channel display.
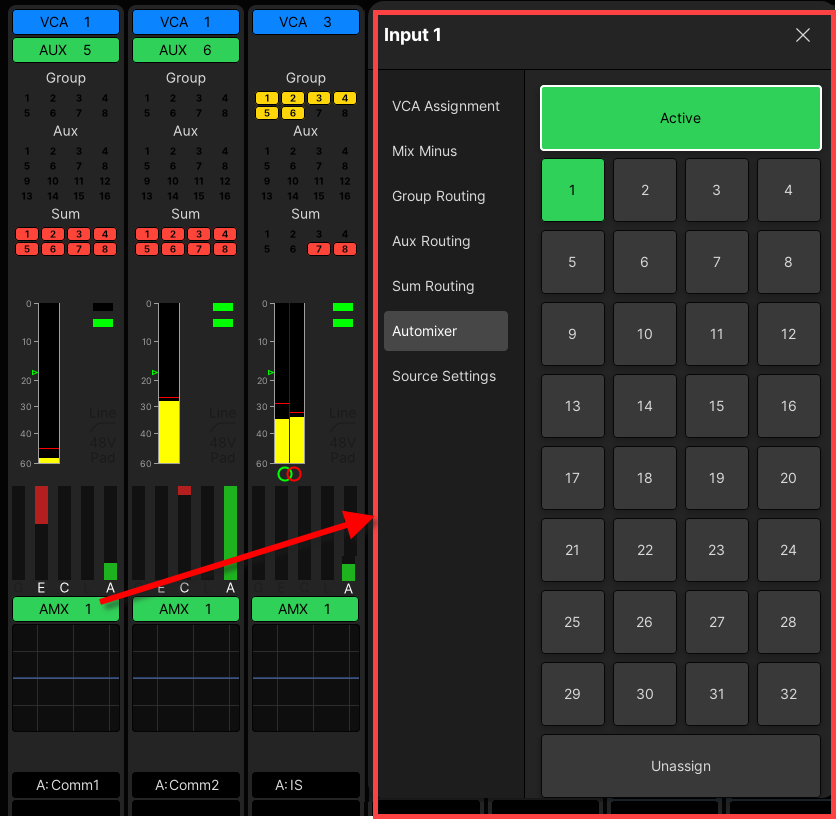
1. Touch the current automix group (or anywhere within the bus assign area) to open the "input x" pop-up. 
2. Choose Automix and then select a group number from 1 to 32 (the selection turns green).
3. Repeat for each channel you wish to add to the group.
To add a range of channels, create a couple and then select the automix group. To add a surround channel, you must select the Surround VCA master.
If you add a channel which is assigned to another automix group, then the existing assignment is removed.
In our example, three channels have been assigned to automix group 1 (AMX 1): two mono commentator channels (Comm1 and Comm2) and stereo International Sound (IS).
Once more than one channel is added to an automix group, gain reduction becomes active.
4. If you need to remove a channel, select Unassign.
5. To close the pop-up, either touch the X in the top right corner, or touch twice in quick succession somewhere else on the display.
Automix Metering
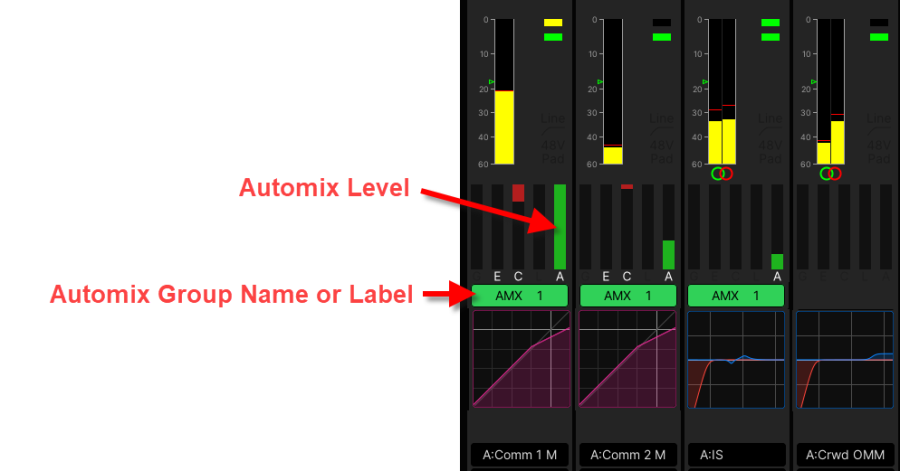
The name of each automix group and gain reduction metering are shown on the Channel Display. This allows you to see which channels are assigned to an automix group, and the resulting level balance.
Channel Display 
The automix algorithm monitors the signal power of each channel within the group, and then automatically adjusts the mix levels accordingly.
The gain reduction is shown using the A meters. This uses a negative scale ranging from 0dB (green, fully lit) to -20dB . Thus, if a meter is lit (green), then the channel level is open; if a meter is unlit, then its gain is reduced.
In our example, the levels of the Comm2 and IS channels are reduced whilst the first commentator (Comm1) speaks.
Automix Parameters
The default parameters can be edited from the Automix display.
1. Open the Automix display on the Central GUI.
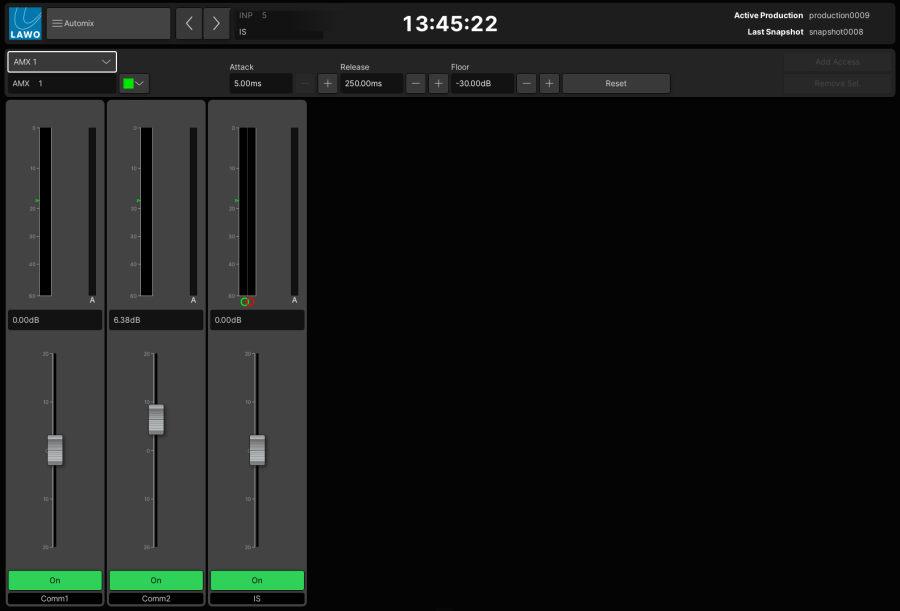
2. Select a group from the drop-down menu at the top left (e.g. AMX 1). 
Automix Channel Parameters
For each channel within an automix group, you can adjust its weighting factor and On button.
1. Click and drag the on-screen faders to adjust the weighting factor of each channel.
The weighting factor scales from +20 to -20 dB, with the default mid point = 0dB.
In our example, we have chosen to add more weight to the second commentator (Comm2) so that the International Sound (IS) is quieter when this commentator speaks.
2. The On button can be used to temporarily remove a channel from the automix group.
The On button is green when the channel is enabled.
Tip: The weighting factor can be assigned to a fader strip Free Control so that it can be adjusted on-the-fly.
- Right-click on an on-screen fader to copy the weighting factor to the PARAMETER clipboard.
- Then assign this to any Free Control in the usual manner. See mc²56 - Free Control Assignment.
Automix Group Parameters
For each automix group, you can use the Attack, Release and Floor parameters to control how the automixer behaves.
1. Use the Attack and Release times to change how quickly the automixer responds to changes in signal level.
2. Use the Floor level to set the maximum amount of gain reduction.
For example, if the Floor level is set to -128dB, then channels will mute when no signal is present. To add a little ambient sound from inactive microphone channels, increase the Floor level accordingly.
3. The Reset button can be used to reset the Attack, Release and Floor parameters to their default values.
Automix Group Label & Color
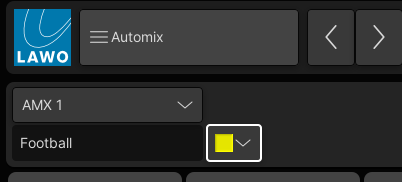
By default, the automix groups are named AMX 1 to AMX 32 and assigned the color green. Each one can be given a user label and a different color as follows.
1. Enter a new name into the automix group label field - e.g. Football.
2. Assign a color from the drop-down menu - e.g. yellow. 
The automix label area on the Channel Display updates accordingly.
Automix Group Members
For convenience, the members of an automix group can be edited from the Automix display as follows.
1. Select the channel you wish to add by placing it in access - e.g. press its fader SEL button.
For surround channels, you must select the Surround VCA master.
2. Then select the Add Access button (top right) - the channel is added to the automix group.
The Add Access button is only available if a valid channel is in access. This can be any mono or stereo input or group channel, or a Surround VCA master.
You cannot add surround component channels, Auxes, Sums or VCA masters to an Automix group. If an invalid channel is in access, then the Add Access button is greyed out.
If you add a channel which is assigned to another automix group, then the existing assignment is removed.
3. To remove a channel, click to select it - the channel outline highlights in white.
You can select multiple channels if you wish.
4. Then select the Remove Sel. button (top right) - the selected channels are removed from the automix group.