mc²36 - Command Triggers
Command Triggers can be used to execute a command or series of commands from a trigger. Triggers and commands can include channel parameters, load events or remote events such as GPIOs and MIDI messages. For example, to open or close a channel level from a GPI input. Or, issue a MIDI Note On message from a specific channel level threshold.
Multiple triggers can be stored in each production. Note that only one set of triggers are ever stored (there is no folder structure).
The Command Triggers Display
1. Open the Command Triggers display on the Central GUI.
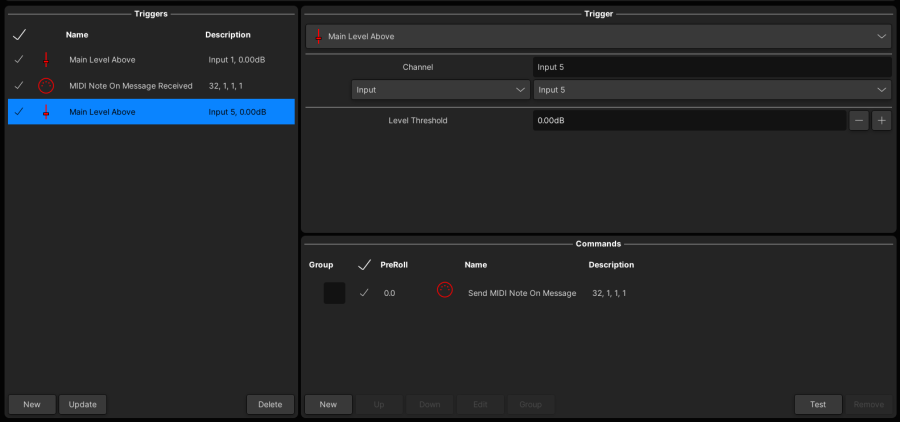
On the left you will see all the Triggers which have been defined. In our example, we have three triggers.
On the right you will see the details of the selected Trigger and its Commands. In our example, a MIDI Note On Messsage will be executed when the Main Level of INP 1 rises above 0dB.
Programming a Trigger
To prepare a simple trigger:
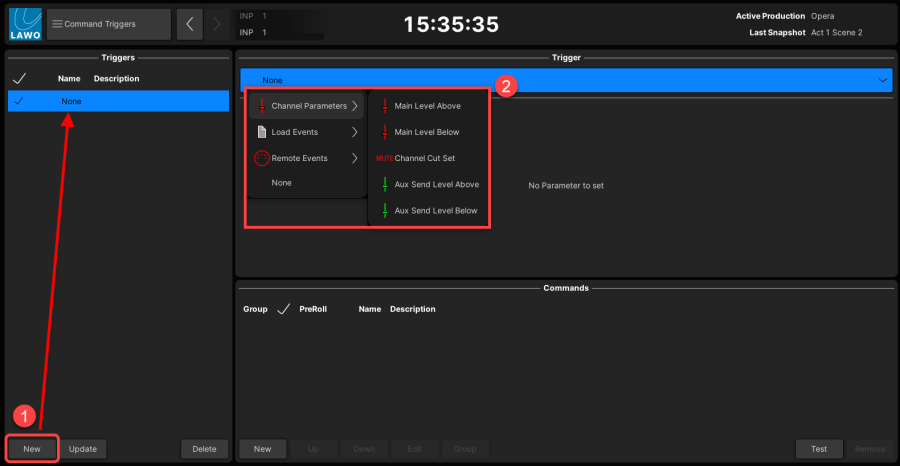
1. Click on New to create a new "empty" trigger - an entry is added to the Triggers list (on the left of the display).
2. Click on the drop-down Trigger menu to assign the input trigger.
The system supports a wide variety of input triggers, and so you will see the following categories:
- Channel Parameters - specific channel events (e.g. main fader level above/below, channel cut set, aux send level above/below).
- Load Events - such as a snapshot load.
- Remote Events - such as a GPI, incoming timecode position passed or MIDI message.
3. Select a category (e.g. Channel Parameters), an input trigger (e.g. Main Level Above) and then define its parameters.
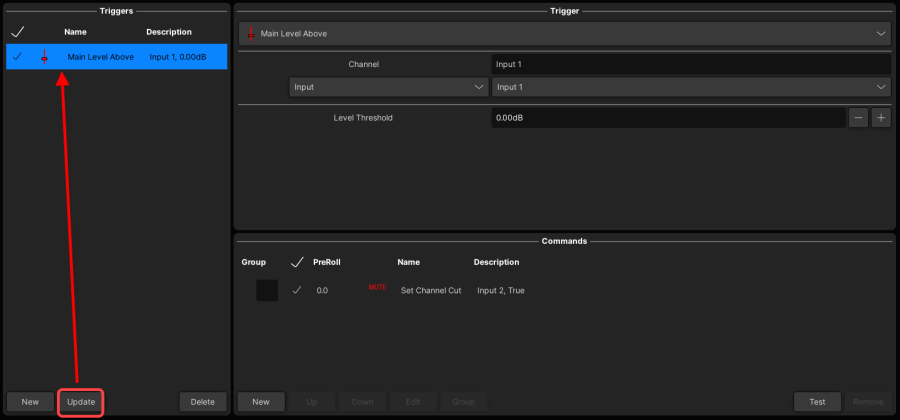
In the example below, the trigger will become active when the Main Level of INP 1 rises above 0dB.
Next define the Commands which will be executed when the trigger becomes active.
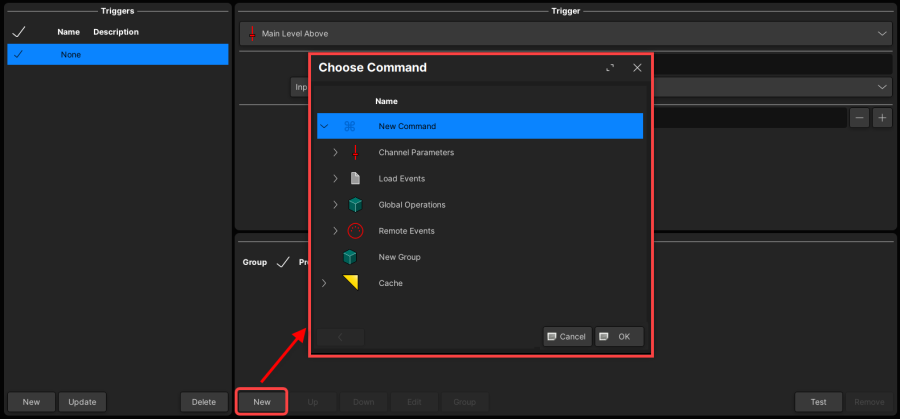
4. Click on New to open the "Choose Command" window.
5. To assign a single command, select New Command.
Alternatively, you can use New Group to create a group of commands, or Cache to select commands previously stored to the cache. These functions operate in an identical manner to the Cuelist group and cache functions explained earlier.
When you select New Command, you will see the following categories:
- Channel Parameters - specific channel events (e.g. main fader level above/below, channel cut set, aux send level above/below).
- Load Events - such as a channel preset, snapshot, iso set or oversnap.
- Global Operations - such as clearing all iso sets.
- Remote Events - such as a GPO or MIDI message.
6. Select a category (e.g. Channel Parameters), a command (e.g. Set Channel Cut) and then define its parameters.
In the example below, the Channel Cut for INP 2 will become active.
7. Repeat steps 5 and 6 if you wish to execute more commands.
8. Once you have prepared the input Trigger AND all of the Commands, click on Update.
This writes all of the assignments into the selected Trigger (on the left of the display), and you will see its Name and Description update accordingly.
Note that you MUST perform this step to save the assignments.
9. You can now repeat steps 1 to 8 to create more triggers.
Managing Commands
If you have assigned several commands to a trigger, then they can be managed as follows.
1. To remove a command, select it (from the Commands list), and click on Remove.
Note that you can select multiple commands and remove them in one operation by using the select tick boxes. However, there is no level of confirmation, and so you should use this feature with caution!
Multiple Commands Selected
2. To test the function of a command, select it and click on Test - the command will be executed.
3. To change the function of a command, select it and click on Edit - the Choose Command window appears, allowing you to assign a different command.
4. To change the order of commands, select the entry you wish to move. Then click on either the Up or Down button to move the selected command up or down the list.
Note that, depending on the type of command, the order can be important. For example, if a specific channel parameter is placed after a load snapshot, then this may be reset by the values stored in the snapshot!
5. To delay the start of a command, enter a value into the PreRoll field (in seconds).
6. To create a group of commands, select multiple events using the select tickboxes (as shown above), and click on Group. This function works in an identical manner to the Cuelist Output Event grouping described earlier. See Using Groups.
Managing Triggers
All the Triggers which have been created are listed on the left of the display.
Note that Triggers cannot be renamed, as the Name field show the system name (e.g. Main Level Above, MIDI Note On Message Received, etc.).
Use the buttons at the bottom of this area to:
- New - adds a new "empty" trigger.
- Update - overwrites the selected trigger with the contents of the Trigger and Commands areas.
- Delete - deletes the selected trigger.